


Do you find yourself frustrated trying to keep the back of your embroidery reasonably neat?
There are times when the back of embroidery doesn’t matter so much, but there are other times when it really does matter – especially on pieces where the back of the embroidery will show.
Today, let’s talk about the back of embroidery: when it matters and what you can do to keep things relatively tidy on the underside of your stitching.
In the kids’ classes I’m hosting at my studio, we’ve been working our way through some embroidery on flour sack towels. If you’ve been hanging out with me lately, you’ve seen the designs we’re working on (you can see them here), and I’ve shared some resources with you for good flour sack towels (I like these, here).
As we tackle these projects, we’re helping the kids be more aware of what’s going on behind their embroidery, showing them how to keep the back as tidy as possible, but without making it tedious.
Especially with projects like embroidered towels where the back is not covered, a certain amount of neatness goes a long way to making a very nice finish.
Now, I’m not a huge stickler for keeping the back of embroidery extremely neat. Sometimes, it doesn’t matter so much. If, for example, you’re working on a heavy fabric where nothing from the back shows through and the back of the piece is going to be covered permanently, it’s not really a point you have to fret over.
That said, I prefer the back to be somewhat neat, and I generally apply the points we’re going to talk about today to most of my embroidery projects, regardless of whether or not the back will show through or be covered. Once you develop good habits regarding the back of your work, after all, it’s just as easy to keep it neat as it is to make a mess of it!
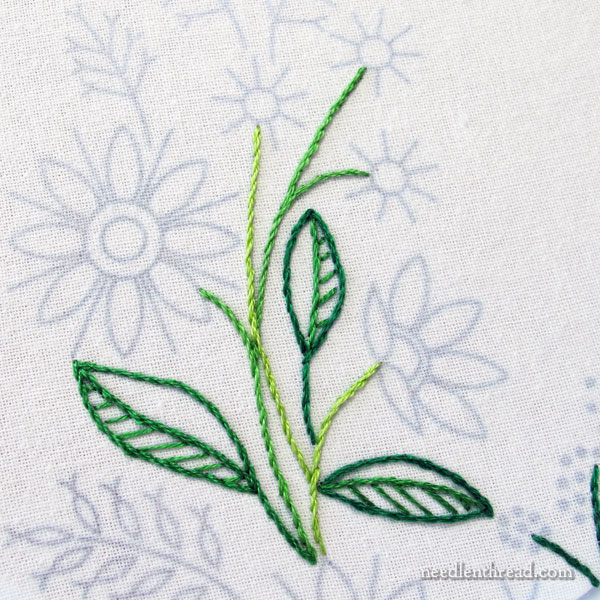
For demo purposes, consider the stems and leaves in the photo above.
Now, take a look at the back:
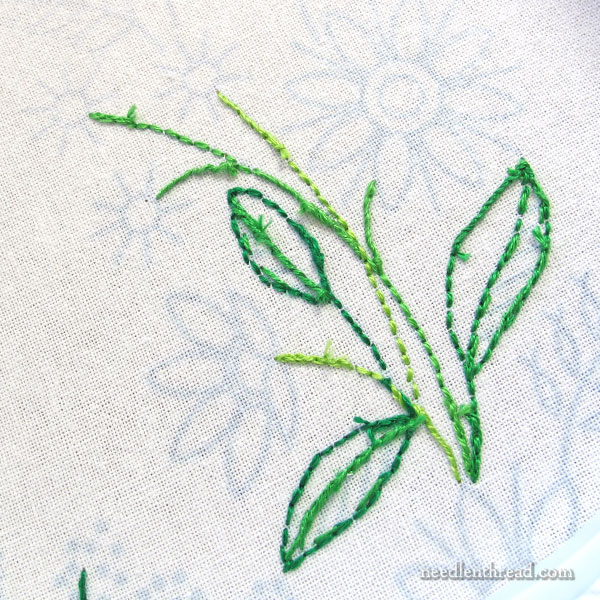
No, it isn’t reversible.
Embroidery like this isn’t meant to be reversible. But the back is relatively neat. There are no threads crossing wide spaces from one area to the next, there are no clumpy knots of threads, and the tweakers – the ends of thread that stick out beyond the stitched area – are short and trimmed close.
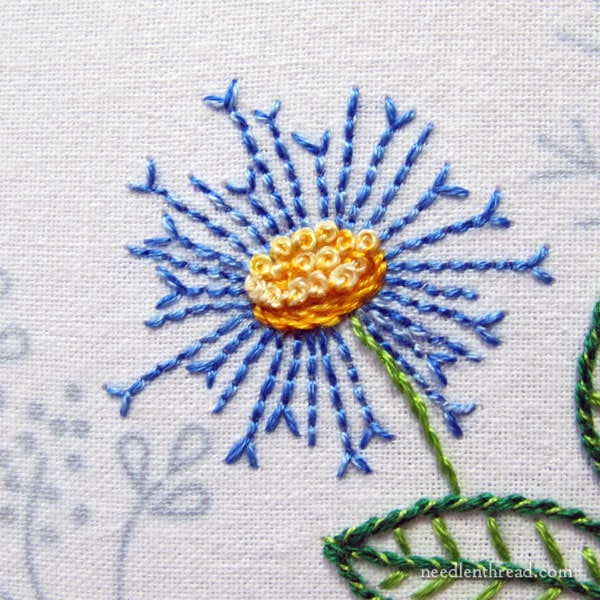
Here’s the front of a floral element worked in backstitch, stem stitch, and French knots.
Again, it’s not reversible – but there are no threads criss-crossing the piece from one side to the next, the general character of the floral element is obvious (the radiating lines, the filled center), and there are no large clumps of unruly thread or lengthy tweakers poking beyond the embroidered area.
So, for those who have trouble with the back of their work and would like to neaten it up a bit, here are three tips to help you do just that!
Tip #1: Where Are You Going?
Before you begin to stitch on a piece that has definite stitching paths, think about where you’re going before you start stitching.
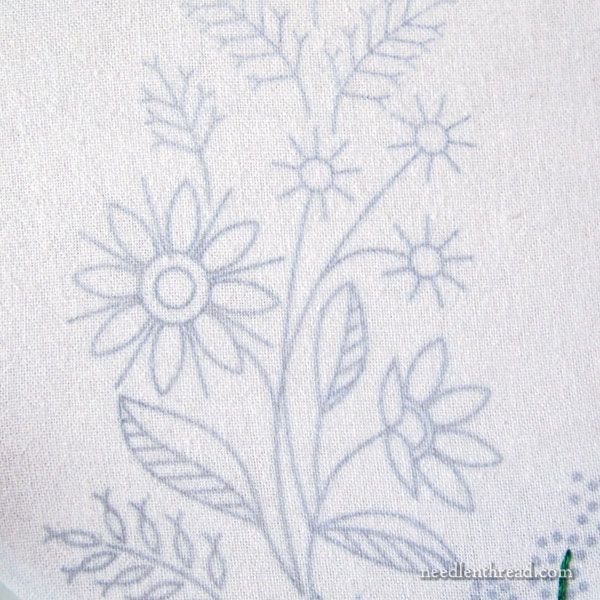
Here, for example, we have an area with lots of stems and a few leaves.
Once you know what colors and stitches you’re using (in this case, different greens and stem stitch), look at the design carefully and decide a reasonable stitching path that will allow you to get the most out of the thread you’re going to start stitching with.
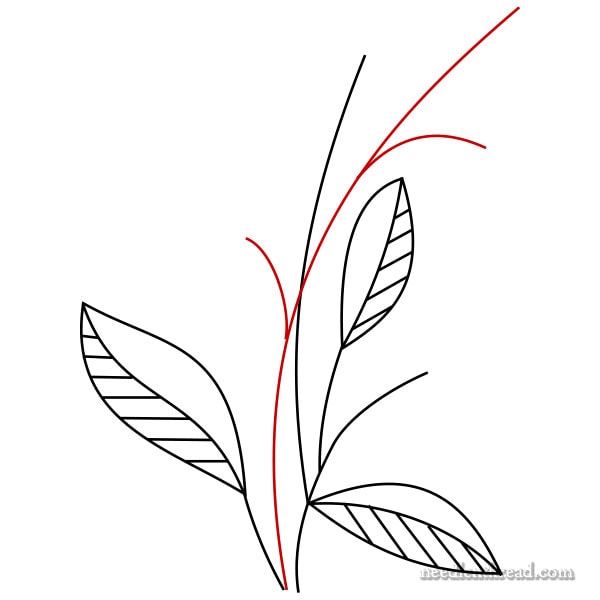
In your mind, map your path, including where you’re going to start, where you’re going to stop (estimating about how far your length of thread will take you), and any side journeys you can take care of along the way.
In the diagram above, the red line represents the stem I think I can reasonably tackle with one cut of thread, that I plan to be all the same color. It includes both the main stem and some side offshoots.
I want to stitch that element in the way that makes the most sense, wasting the least amount of thread on the back, and keeping things neat and tidy at the same time.
Notice that I’m not throwing in separate stems that I might stitch in the same color, that are separated from this element in the design.
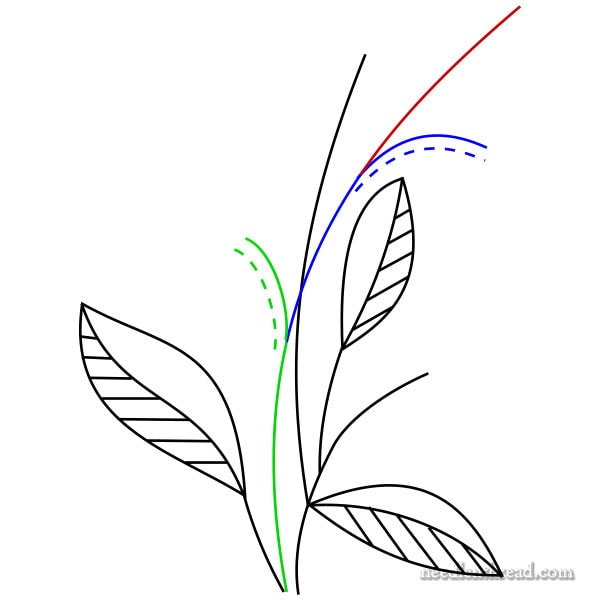
So, in my mind, the stitching path above makes pretty good sense. I’ll follow the green line, backtrack a tiny bit to the main stem (where you see the dotted line), then follow the blue line, backtrack a little back down to the main stem again, and then finish with the red line.
That seems to make sense to me, so I’m ready to start stitching it.
Each time you tackle an element, then, think before you start stitching! Work out a path that makes sense as you stitch it, that allows you to use your piece of floss to its best advantage, with the least amount of waste on the back, and no big jumps to other unconnected areas.
Tip #2: Pay Attention to Beginnings and Ends
When you’re working on a piece like this, it’s often the beginning and the end of the thread that end up causing the biggest mess on the back.
Even when you’re keeping things super tidy, the starts and stops are the most noticeable areas on the back. It’s ok if they’re noticeable. Again, this isn’t meant to be reversible embroidery!
But there are a couple tricks that can help you keep the starts and stops a little neater.
For the beginning of your threads, the most obvious trick is to avoid a knot on the back of the embroidery.
Now, I’m not averse to knots on the back of embroidery, when it makes sense to use them and it doesn’t matter whether or not you use them.
In cases like the exposed backs of embroidered hand towels, handkerchiefs, household linens and the likes, though, a knot is problematic because it generally has to have a tail with some length on it. If you trim the tail of a knot too close, chances are, the knot will come undone. So you have to leave a tail, and the tail becomes a noticeable tweaker on the back. It tends to stick out well beyond the stitched line, it can get fuzzy and caught up in other things, and so forth.
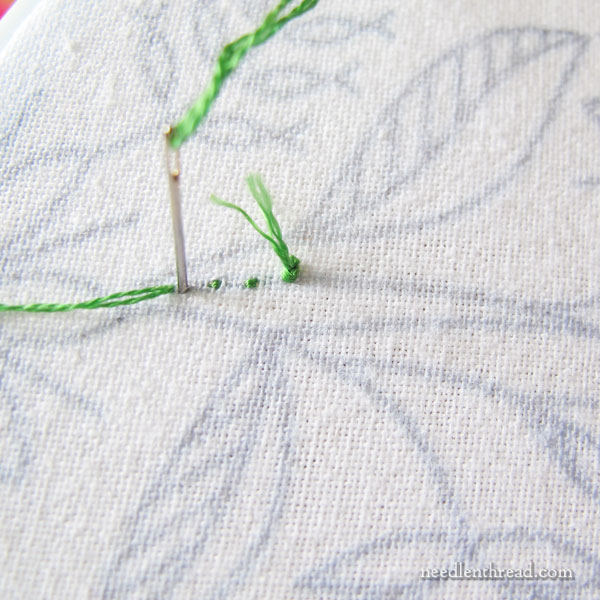
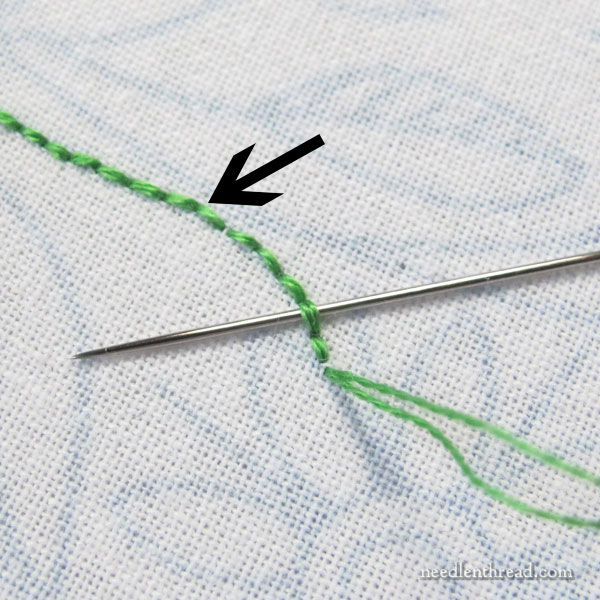
So, consider beginning your threads without a knot on the back. One way to do this is to use a waste knot on the front of the work, followed by a few tiny backstitches towards the beginning of your line, as you can see in the photo above.
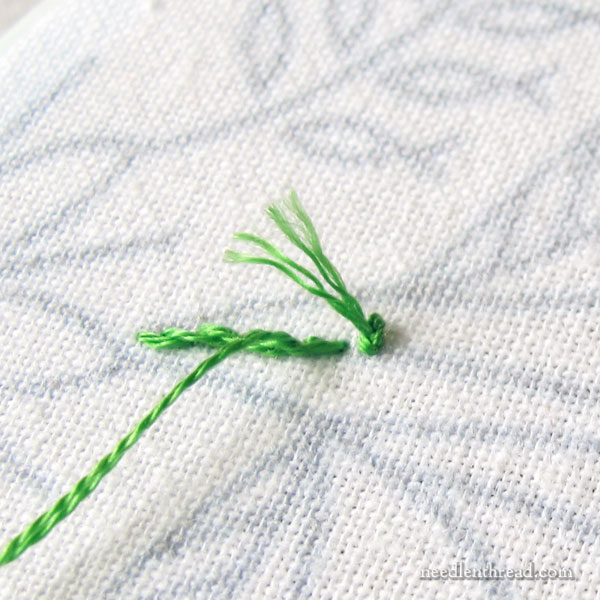
Start stitching forward towards the knot, completely ignoring those tiny stitches and working right over them.
When you get to the knot, snip it off and keep stitching.
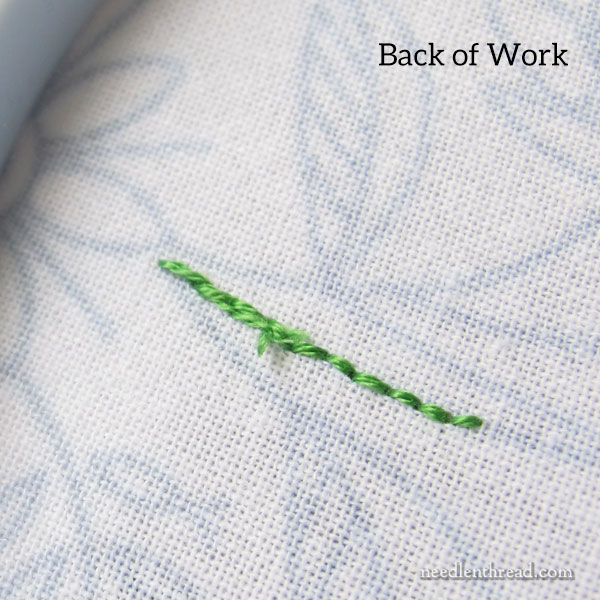
This is what the back of that kind of start looks like. The beginning of the thread is perfectly secure, and even though you can tell there’s something going on there, it isn’t a mess. There are no large tweakers to deal with.
You can find a more detailed tutorial for starting with anchor stitches and a waste knot in this manner here, if you want to read further.
There are other tricks for starting threads invisibly in embroidery – I’ll show you one of them next week – but they require that you’re using only two strands to stitch with. But with this type of embroidery, I use two or three strands, and a waste knot used this way will work no matter how many strands I’m stitching with.
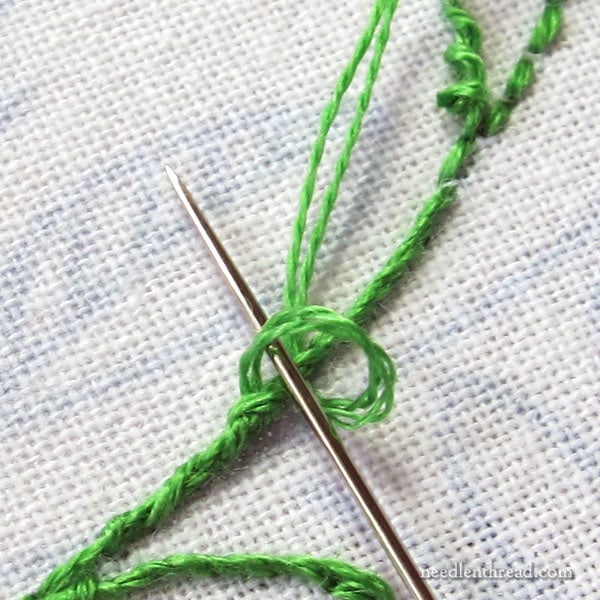
When ending threads, whip the remaining working thread around the stitches on the back of the work, in the same manner that you would whip, say, a backstitch. (You can find a tutorial for whipped backstitch here.)
Whip around four or five stitches – you want the thread to be really secure, since it is likely that any household linen like this will go through the regular laundry.
On your final time whipping the back of the stitches, leave the loop open and pass through it to form a small hitch knot that will secure the end of the whipped thread up next to the line of stitches. Then, snip your thread – not right on top of the little hitch, but about, say, 1/8″ away.
With the end of the thread secured with a little hitch, it won’t come unwhipped, so you won’t end up with longer tweakers as time goes by.
Tip #3: Traveling on the Back
The final point for a neat back is learning the art of traveling well!
Sometimes, it’s necessary to move from one finished point of stitching to a new starting place that’s connected to the same main path.
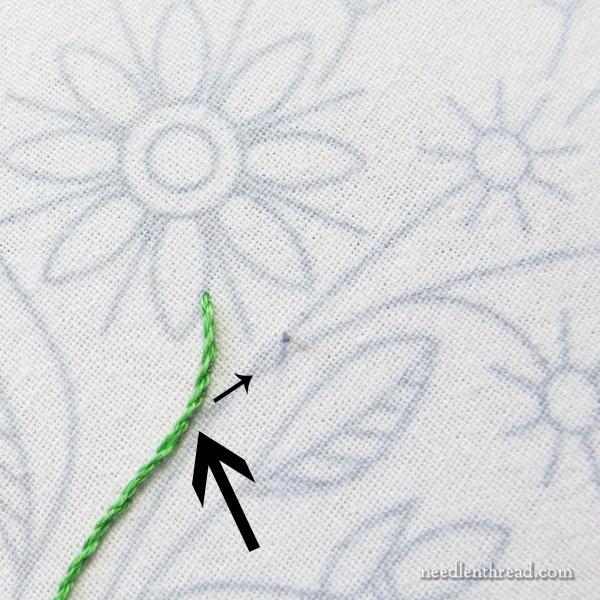
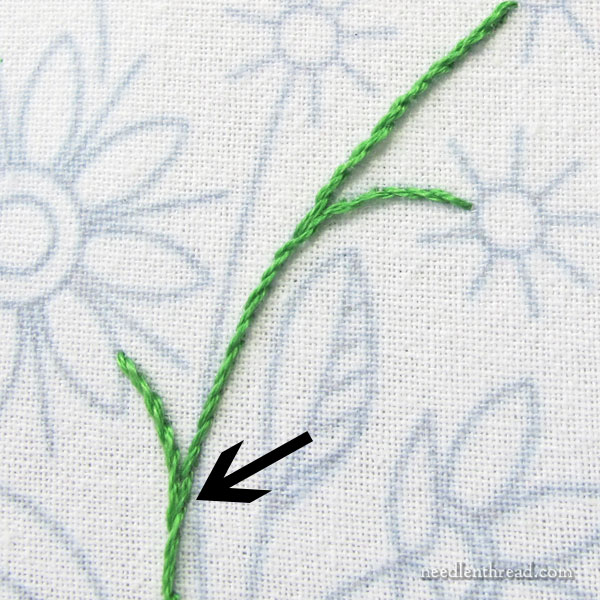
On the sample element here, I’ve finished the first part of the journey diagrammed in green earlier in the article.
I need to return to the main path, indicated by the black arrow. But I don’t just want to jump right down there and leave an inch-long piece of exposed thread on the back of the fabric.
To avoid this, I’ll turn the work over and whip stitch around the backs of the stitches until I return to the main path, indicated by the arrow.
I don’t have to whip around every stitch – every other stitch will work just fine.
Once I get to the main path, I start where I left off and continue up to the top of the second section. Then I turn the work over and whip stitch back to the main path, and finish with the third section on the line.
It Sounds Hard, But…
When you’re explaining these types of tips to younger or beginning stitchers, it sounds complicated, so it’s best to take each concept one at a time and teach it as the opportunity arises. All lumped together in this article, it might seem like a lot to take in, and it might seem to make the whole notion of embroidery a bit too complicated.
But once you get the hang of thinking in terms of stitching paths, starting and ending threads this way, and traveling your threads through the stitches on the back of the work, it becomes habit. It’s not all that time consuming, and the payoff in a neat back is worth it!
All that being said, if these tips cause you anxiety for any reason – if they take away the pleasure of stitching – well, do what works for you!
Remember, embroidery is supposed to be a fun, creative, and relaxing pastime!
Enjoy it!
For the most part, I have no trouble keeping the back of the work fairly neat. But I’m having a problem with a piece right now that has widely spaced, individual French knots. Do you have any suggestions for those?
Oh, I wanted to mention that when I use knots to start a line of stitching, I use a tooth pick to put a tiny dot of Fray Check on the knot itself. I can then cut the tail off at the knot. I’ve never had a problem with it coming loose, even after laundering dishtowels.
Hi, Cindy – These two articles on isolated French knots might help:
https://needlenthread.wpengine.com/2012/06/isolated-french-knots-part-1.html
https://needlenthread.wpengine.com/2012/06/isolated-french-knots-part-2.html
ótimas dicas! Eu só aprendi a “viajar pelas costas” com o tempo e praticando. Gosto muito de aprender com você e sou muito grata.
Dear Mary
These are great tips on starting and ending threads and keeping the back of embroidery projects tidy especially when the back is going to be exposed. I really like the idea of a stitching path at the beginning of a project, this makes so much sense and I do try and follow this technique, as you say it saves stitching time and thread and keeps the back tidy which for me makes me feel better when I’m stitching. Thanks for sharing with us the tips and techniques of starting and ending threads and how to keep the backs of embroidery projects tidy and for the photos tutorials and links. I hope you have a great weekend.
Regards Anita Simmance
Thanks, Mary! I hope you will address how to put in tidy French knots when they are in an open area, for instance working about 1/2″ apart on either side towards the end of a stem, or just randomly in a space, without any stitching to hide the jumps.
Hi, Marty – I answered the very question in an earlier comment here, if you’d like to check out the other comments! 🙂
Thanks! Sorry I missed it before.
Thank you for this excellent article Mary! I even learned something new: a hitch knot at the end of weaving through. Never seen that before :). But makes perfect sense and will from hence forth be incorporated!
When I first learned to do embroidery just before I was 5 years old, my great aunt had me tie a knot to start stitching and then knot the end around around the stitched thread at the end of the thread. My mom (who had been taught by this aunt) did the same thing. It was not until I was in my 20s or 30s that I found out that knotting the ends was not the “state of the art”.
I developed a system in which I leave (and hold) a tail on the back of the piece when I start stitching. As I do the stitches I move the tail right and left (or up and down) on the back so when the stitches go through the fabric to the back and then back to the front, the tail is woven into the back of the stitches. I then will weave the end tail also through the back stitches. I will “cheat” if I am starting a new thread immediately next to a section that has been stitched and start it off by weaving it through the back of the finished section. I am guessing that this idea works for at least 90% of my stitches – leaving those which are individual stitches or very short areas of stitches to need to be knotted.
Love your tips, Mary. On the back itched flowers radiating from the center one could also use a double running stitch. Like blackwork uses. It is even easier to trace back over your work.
It’s almost as though you saw that mess I made yesterday on the back of my Phillipa Turnbull piece… Trying to fill in an oak apple and made such a mess on the back! With wool! Sigh. I think it’ll be okay, but still, we’re all perfectionists or we wouldn’t be into embroidery.
Thank you 🙂
Whipping back over the stitches in the back until you get to your next starting point is genius! I was looking at my long lines of thread hanging out in the back of my practice piece yesterday and thought “there must be a way to do this better” and here you are, revealing it to me in this old blog post.
Don’t you just love blogs?? So much work to write and maintain them, but so much valuable info in sites like this. Thank you.