


So I’m embroidering this tree that I’ve stitched before.
There are times when I stitch things twice (or a veritably uncountable number of times, depending on what it is – I can’t tell you how many Little Things from Lavender Honey I have floating around among my embroidery supplies!).
I might stitch things twice for a number of reasons: I want another interpretation of it, or I want to try a different color layout, or I want to work out a glitch I didn’t overcome the first time, or I want to tweak the design, or I want better documentation of it, or I want to try it with different materials to give people different options… you get the drift.
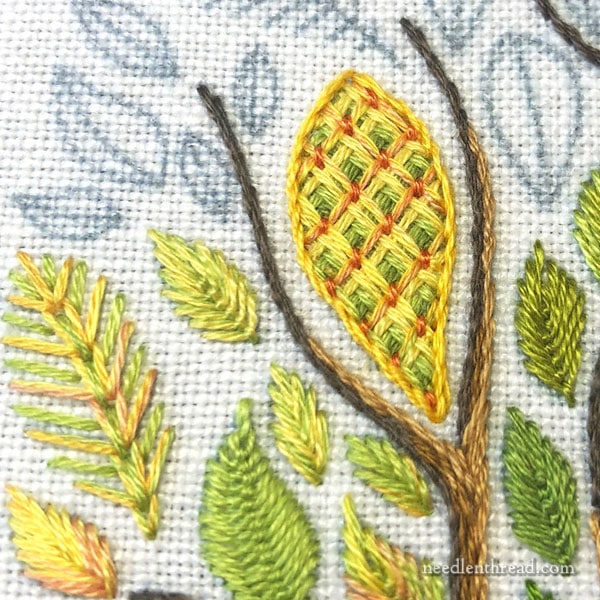
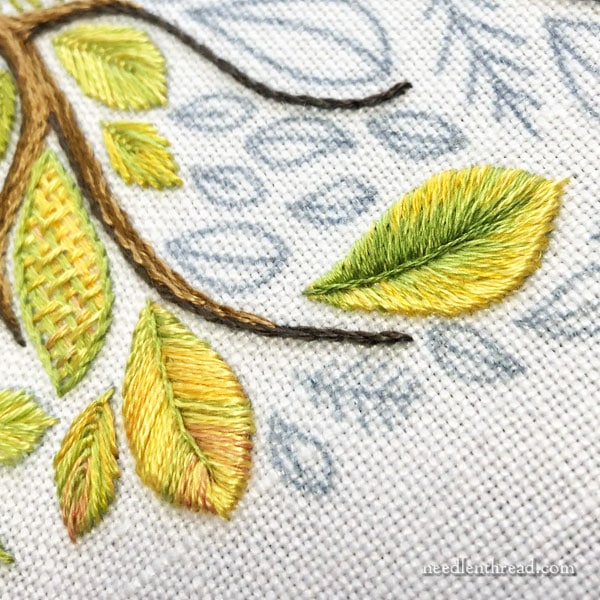
So I’m working on this Extremely stylized leafy tree that I stitched last year. I’m testing some tweaks in the design. I like the design much better this go-around.
The large leaf up there in the photo is worked with what’s called battlement couching. I do love that technique! You can find a tutorial for it here.
I’m trying out new color combinations on this version of the tree so that, when I finally do something with the design, I’ll be able to show two (or more) approaches on color layout.
I’m also using different materials. Essentially, they are the same type of materials, but I’m working with a different brand of thread.
One of my challenges in this second stitched version is the transition of colors as I work through the design.
There are a couple approaches to take when moving from color to color on an embroidery project. It all depends on the effect you want.
If I were intentionally stitching something very bold, contemporary, and a little, say, “stark,” I might not want gradual transitions in color. I could switch from green to yellow immediately, from one leaf to the next.
And that type of transition would probably fit pretty well with this designs, since it is definitely more contemporary than traditional.
Yet, I like the idea of softening the transition from color to color in this tree, despite the bolder, modern design.
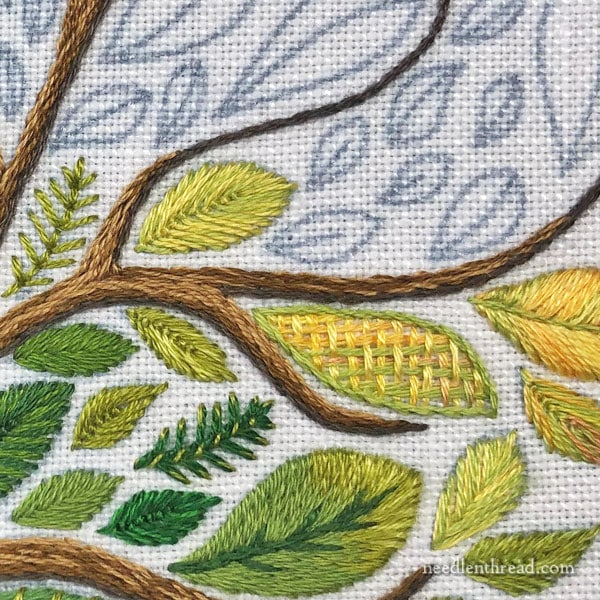
To make the transitions, then, I’ve been spilling colors into each other by moving in stages from dark greens to brighter yellow-greens, and then combining yellow-greens with light yellow, and then fewer yellow-greens with lighter yellows and darker yellows, with the tiniest touch of pinky corals in there, too, so that I can pick up those colors as I move into the corals, oranges, reds.
It’s a fun process! But at the same time, it takes a little thinking, a lot of documenting, and the occasional un-stitching.
The biggest drag is the documentation. Sometimes, I can document ok with a camera, by snapping a photo of the thread color and the element I’m stitching. Then, when I get away from my stitching, I can go through the pictures and note everything. In such cases, I move more quickly through the stitching process.
On this particular project, however, a camera won’t do it. It’s too easy to confuse the elements. So I’ve been noting every nuance, color decision, stitch choice, alteration, combination – you name it – with pen and paper. It really slows down the stitching process!
But still, it’s a lot of fun!
I hope to have this project finished by week’s end. I’m also working on some mighty computer stuff this week. (Speaking of drags. Stitching is Much More Fun!)
I spent a bit of time this weekend preparing some sets of these holly & evergreen towels with pre-transferred designs, ready to stitch, for those who are still wanting them. This morning, there are a limited number in the shop and they will ship around mid-week for those who purchase them today.
Hope your week is off to a splendid start!
Will you please show us full view photos of both trees when you finish with this version? I’d love to have a comparison/contrast opportunity. Thank you!
Absolutely, Joyce!
This would also be a lovely pattern to purchase!
Hi Mary,
I’m teaching a class of children how to embroider. How did you transfer designs on multiple towels? I’m starting with a sampler and want to print it on the fabric first. I finally found Frixion felt tip Markers, not their gel pens, to let the children mark on felt and iron it to disappear but I think it would take too long to have them mark their own fabric for this project. Thanks!
Hi, Robin – If you’re going to use a marker, I suggest investing in Sublime Stitching’s fine-tipped iron-on transfer pens (the blue works best, in my opinion). They’re really good, you can get a couple (2-3) transfers from each drawing, and the line is fairly fine, compared to most pen transfer lines. They’re also permanent, so you just have to make sure they’re covered, but that’s easy enough with kids.
Mary,
Did you transfer the designs onto towels for your classes, one at a time? I was hoping you had an idea for transferring in bulk. I have heard you can run the fabric through a Jet ink printer. I will try that and let you know how it works. Does anyone know a place to print your own designs on fabric. Spoonflower is pretty expensive. Thanks.
Hi, Robin – you can’t run towels through the inkjet! I transfer mine one at a time. Even if you had towels screen printed professionally, they’d be doing them one at a time, unless they’re the towel manufacturer as well.
Mary,
What stitch did you use for the tree/branches? Is it raised stem? If so, how do you taper it?
Thank you for your site and the Facebook group. You are such a great resource for me.
Susan
I do like your green to gold changes, Mary. Makes me think of spring leaf buds bursting. Some interesting stitches to show off the blends, too. Are you going beyond these shades into bronze and ginger, I wonder? I guess we shall just have to wait and see.
Hi Mary! Yes, I would love to see each of the completed trees! Will you be offering this design for others to stitch? I think it would lend itself to seasonal color combinations very nicely!
Thank you!
I love seeing the different stitches used to create the leaves and the shading with greens and yellows is very pretty. It seems like a very pretty sampler study of leaf appropriate stitching.
I love this idea, and your take on these leaves! You need a good friend to visit with while stitching, who doesn’t mind being your secretary, taking notes for you as you stitch so you can keep working with needle and thread.
That’s a splendid idea!! It probably won’t happen, but it’s a great idea! 🙂
I’m loving this project. Simple and beautiful. Did I miss the finished picture of the first version? Can you point me in the right direction to find it please? I hope you’ll be publishing this for sale!
Hi, Mary Ann – I haven’t published the finished piece yet (either version), but I’ll be publishing it soon! 🙂
Oh, I love it. The gradual colors work beautifully, I think. This is a pattern I would buy, should it ever become available…
Mary, this is really beautiful. The thread mixing is just incredible. It looks like so much fun!
And it looks like one of those projects to repeat in many variations. I had a very small tree sketch once that was stitched 4 times, once for each season and framed them separately so the recipient could put up one season at a time or put them up together. I was thrilled with it. Of course it is in some relative’s house now. Or I certainly hope if it ended up in a tag sale, others are enjoying them as well.
This would be a great project to do the same.
Will you share what linen you are using?
As well as your new threads- but it sounded as if you wanted to keep the threads under wraps for now 🙂
I’m really looking forward to the end of the week to see it finished!
Cheers,
Kim d
Beautiful Mary. So much texture and definition. Can’t wait to see the finished post.
I love this look and really want to make this pattern into a pillow. Do you have in mind publishing this pattern and the stitches used on this second version. I just love the look and what to try some of the new stitches that I see. Thank you!
Wow beautiful work. i would purchase this if you publish it.
Dear Mary
I love the green, yellow and gold colour threads you are using for this project it is so vibrant and colourful and I love the colour transition of dark and light greens and yellows beautiful. The battlement couching large leaf is lovely. I can’t wait to see the finished project I bet it will shine with glorious colours. Thanks for sharing with us your new version of the leafy tree and for the photos and links.
Regards Anita Simmance
I wouldn’t want the leaf to the left of the battlement stitch leaf to remain as it looks too artificial and naive to me. I know it isn’t meant to be realistic but it looks out of place. Maybe it’s the colours – 2 shades of the same colour might work.