


It’s time to add a new embroidery project into the mix! Yay! I’m excited about it! I have a vision in my head for it, and I can’t wait to work it out with needle and thread.
In fact, I’m suffering from the Start Up Thrills.
The problem with the Start Up Thrills – which is the official name of this malady – is that this new project is all I can think about at the moment. When I’m drifting off to sleep at night, it’s on my mind: what treatment for that leaf, should I add this thread, is there an alternative for that part of the design…
And when I wake up in the morning, my one concern is how quickly I can accomplish the Needful Daily Things in order to get back to the project.
You’ve suffered from the same malady before, haven’t you? I knew you would understand!
This project is something a little different. (And it’s about time…)
I’m temporarily calling it Jacobean Whitework, but I might develop that name into something a little more poetic… or not. If it’s a flop, it’ll be “or not.”
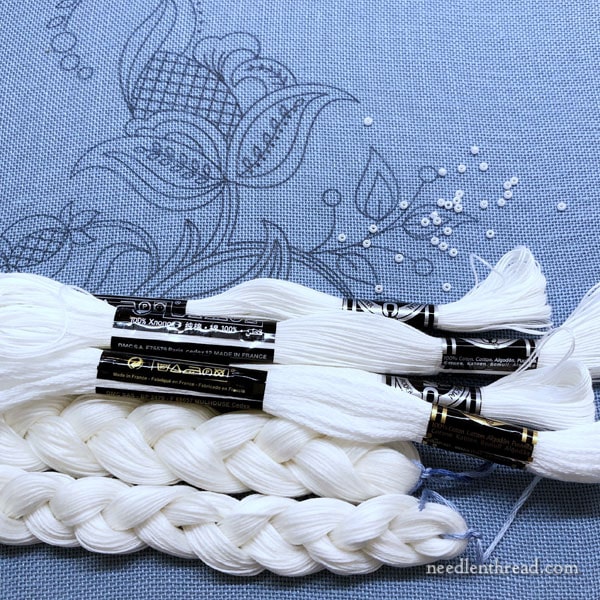
In any case, something different! I’m using blue linen and (at the moment) white threads. I expect to add another couple threads into the mix as an experiment, but we will see how that develops.
This particular linen is delightfully called “Atmosphere,” part of the Legacy Linen line from Access Commodities.
It’s a 30 count linen, which could be problematic for surface embroidery. Why? A lower count linen like this doesn’t always supply a close enough fabric weave to accommodate stitches like satin stitch and long and short stitch and still achieve smooth edges. It can also make line stitching a little choppy.
To allay all those difficulties, I’ve backed the blue linen with finer white linen to give the surface stitches the support they will need for achieving smooth edges and lines. The backing fabric gives the stitches something to grip into, when the weave of the ground fabric isn’t where you want it to be.
You can read more about backing ground fabrics for surface embroidery here, with details on why to do it, when to do it, and what to do it with.
My backing fabric is white. To further enhance the blue, I could have used blue – a blue cotton, for example, that matches the ground fabric. But I might play with some pulled thread or drawn thread stitches (not sure about that yet), that leave a little bit of the backing fabric exposed, in which case, I want it white for the contrast.
When I set up a project on linen, it’s actually a while before I get to the point of framing it up. Before I can frame it up, I do the following with the linen and any backing fabric I’m using:
Pre-Wash & Pre-Shrink
I’ve thoroughly washed and pre-shrunk the fabric, by soaking the cut (in this case, it’s about 11″ x 12″) in alternating hot and cold water (three alternations) in a clean bowl or pot.
When it’s soaking in the hot water (and I mean hot-hot, like almost boiling hot), I leave it to soak until the water is pretty much tepid to the touch. It’s during the hot water soak that the water will turn a little milky at first, indicating that the sizing is releasing from the fabric. I want all the sizing out.
The linen softens considerably in the hot water. But then, the fun part – running it under ice cold water! At this point, the linen stiffens up again.
Then back in hot, then cold, then hot, then cold. It’s the back and forth with the hot and cold that’s going to take all the shrink out of the linen.
For small pieces like this that may never be laundered, it doesn’t necessarily matter that the whole piece of fabric is thoroughly pre-shrunk, but for me, I prefer to know it is (just in case I have to soak it again at the end), and I also prefer knowing it’s free of sizing.
Sizing, incidentally, (and starch) can cause fabric to discolor, especially if you iron it for any extended period of time.
I never wring or twist the fabric while putting it through the hot and cold baths. When I’m finished, I lay it flat between a couple towels and press on the towels to remove excess water.
Somewhat Dry, then Iron
With linen, it’s easiest to remove wrinkles if it is ironed damp. So I let my fabric piece dry a little bit, but only until it’s still noticeably damp. Then I iron it with a hot iron.
If you can’t get to the ironing right away, you can roll the damp linen up in a towel and stick it in the freezer until you have time to iron it.
The trick when ironing damp linen with a hot iron is to keep the iron moving. You don’t have to press the fabric hard or anything – it’s the heat (and steam) that’s going to get the wrinkles out, not the pressure you put on the iron. Just keep that iron moving! I iron east-west and north-south on the fabric (between the cut edges), but not diagonally, which can stretch it on the bias.
With colored linen, you’ll see the color lighten as the fabric dries. Pay special attention to the edges of the fabric, which will dry more slowly. If the edges undulate (meaning they’re somewhat wavy), then they are not dry. The waves are caused by the difference between the drier interior fabric and the wetter edges.
After the initial ironing to get any wrinkles out, I leave my linen to air dry, and then right before I’m ready to do the rest of the set-up, I run the iron over it again, especially the edges. By this time, the result is a perfectly smooth, perfectly flat piece of linen. Beautiful stuff!
Neaten the Edges
Before I transfer the design or frame up that perfect piece of linen, I run the edges through my sewing machine on a zig-zag stitch to neaten the edges.
I do this with the backing fabric as well.
Neatening the edges prevents the threads of the fabric from shedding while you’re stitching on the project. Who needs extra fabric threads tangling up on the back of the embroidery, after all?
You can read an article on neatening the edges of fabric here, including why and how (and by hand).
Next up is transferring the project design onto the fabric. You can read all about different methods of transferring embroidery project designs onto fabric here. Read the comments for lots of other suggestions, too. My favorite methods of transferring designs are tracing, prick and pounce, tissue tacking, and iron-on – and which one I use depends on the project, whether or not the lines will be covered, and so forth.
For this piece, I ironed the design on, as all the lines will be covered.
For most folks wishing for an affordable option for making their own iron-on transfers, I recommend Sublime Stitching’s fine-tipped iron-on transfer pen. Keep in mind, the transfer does not wash out. Test the pen first, to make sure it will give you fine enough lines for what you need.
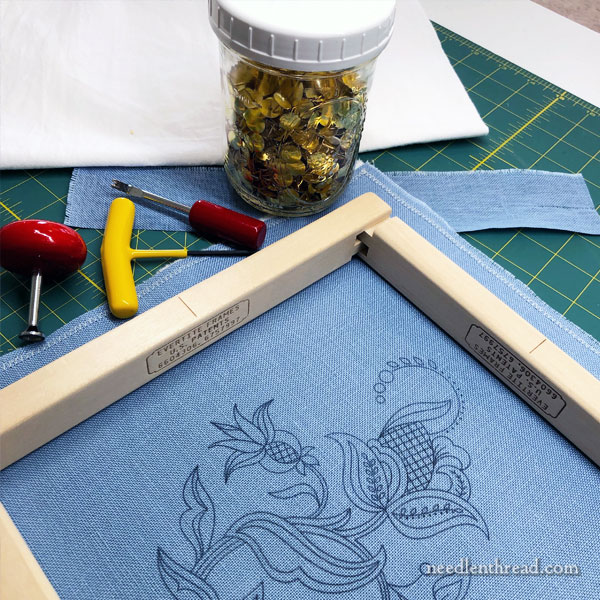
Then I frame the fabric up.
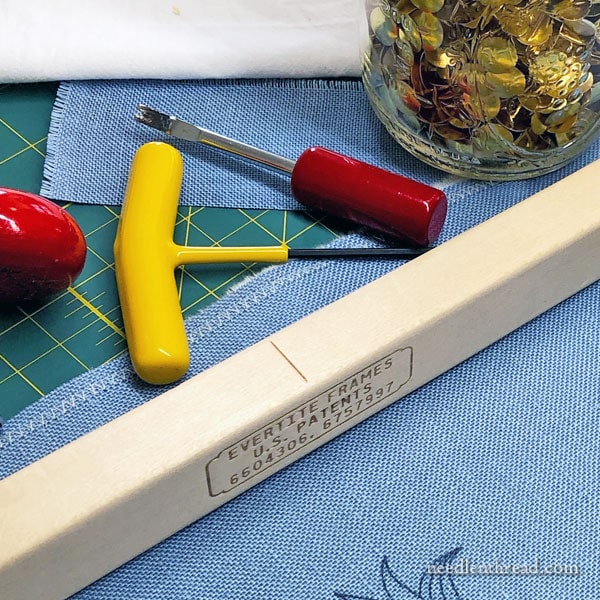
My favorite “quick” frames for this type of embroidery project are Evertite stretcher bar frames. You can read about Evertite stretcher bar frames and how to use them here.
I use regular thumbtacks and the pusher tool that comes with this tool kit to tack the fabric to the frame.

By this time – once the project is framed up and ready to stitch – I’ve usually also gathered all my supplies for stitching.
So far, I’ve gathered some five or so different weights and types of white cotton embroidery threads, including floche, regular stranded cotton, and coton a broder in several sizes. For texture, I may mix in some other whites down the road. I’m also going to pull some blues, just in case I want to use them to enhance the fabric. We’ll see.
You can read about cotton floche and coton a broder here, if you’re not familiar with those threads.
I’ve also pulled different sizes and types of white beads for this project.
And, so that I can stitch on it whenever I have the chance, I’ve put a selection of needles in a small needlebook, grabbed a small tool tin (with scissors, seam ripper, tweezers, laying tool), and put the whole kit and caboodle in a basket on my work table.
I’m ready to go when the opportunity arises!
The opportunity arose briefly this weekend to start putting some stitches in. Not really much progress, but this will develop!
So that’s my new project for now.
I’ll take you through the development of the project as I travel along!
If you have any questions, comments, suggestions, please feel free to join in the conversation below!
Coming Up
Keep an eye out at the end of this week! Finally – finally – I’m releasing the Floral Corners instructional stitching guide & designs from last summer! I’ll also have some pre-transferred towel sets to go with it, if you’re wary of transferring your own designs or if you just like to jump straight into stitching without the bother of transferring!
Happy Monday!
Dear Mary,
I love the blue linen with the varied white threads. So pretty! I will look forward to watching it progress.
Dear Mary
I’m excited for you it’s looks a lovely design and I like the blue linen you are using and the thread selection I like floche and coton a broder they are lovely threads to stitch with. I like the prewash and shrink idea ever since you wrote about it a while ago, I use it all the time when setting up a new embroidery project and like the feel of the linen after washing. Thanks for sharing your new embroidery project with us and for the links on how to set up a project very useful. I look forward to your progress on the project. Happy Monday to you.
Regards Anita Simmance
Thank you, Anita! 🙂 I hope you’re doing well and enjoying spring by now!!
Morning Mary! This looks like a lot of fun! I do have two questions: 1. What are the dimensions? (hard to tell exactly from the photo,,, guessing 8 x 10?) and 2. How will you do pulled stitches with the backing fabric? Doesn’t that get in the way?
Looking good so far!
Hi, Tina – I mentioned the dimension of the fabric piece in the article – about 11″ x 12″. The design is smaller, of course. Pulled stitches: I’d use a tapestry needle and scoop the stitch, using the “sewing method,” without picking up any of the backing fabric. Hope that helps!
Gosh that looks so beautiful!
Thanks, Paula! I’m really looking forward to making some headway on it, to see if I can pull off what’s in my head. 🙂
Mary,
Thank you for the level of detail you provide in your explanation of preparing your linen.
This is a beautiful project that we will love to follow.
Beth
Thanks, Beth!
Hi Mary,
Love the idea, all if it! Have a question. Do you know what you plan to do with it when finished? I ask, because I don’t usually know how to finish and use items such as this. I realize that it’s probably too early on for you to know that yet☺️
Well, normally you have to have some idea of the finish before you start a project, I think. For example, if I wanted to make a white work cushion cover on blue linen (I think it would make a pretty pillow!), I’d have to know that in advance if I want the pillow front to be the solid blue linen. My ground fabric would have to be the right size to make into a pillow cushion. But often pieces like this are framed, and I’m just thinking of it as a sample piece right now, that I’d most likely eventually frame and display.
Just reading your article has made me feel as excited for you as you are. I am mostly an appliquer and quilter now but still understand the eagerness of a new idea…the going to bed and waking up breathing the new idea. Thank you.
Funny thing about that…………my “needful things of the day”, never seem so needful, when I am stitching or quilting…..lol.
Cheers!
Isn’t that The Truth!?!?! LOL!
I love the idea of sticking to white threads although I could see using a white with a little silver metallic running through it in places. Itty bitty pearls. Yummy.
I wish you would release pattern so we could do project with you.
Thanks
Denise
Hi, Denise – Over the years, I’ve found it better to release everything after I work through a project and work all the kinks out. Otherwise, I get swamped with emails full of questions (and, surprisingly, complaints) if I change my mind or if life intervenes and I can’t finish quickly enough, and so forth. What I try to offer as I work through a project like this are general tips that will help people tackle similar projects or problems that come up in their stitching, or inspire people to try something similar on a project they might be working on already. Then, down the road, when folks have access to the project patterns and whatnot, they can also refer to the previous blog posts as they work the project themselves.
I suffer from that same malady, I thought it was just my obsession with the new project but “Start Up Thrills” sounds so much better! AND I love you naming the daily household chores and obligations that we believe have to be done before we can enjoy our stitching!
Excellent! – Mary, I love the book reviews, I love stitch clinics, I love any kind of stash discussion – – I LOVE the stitching projects and best of all, we can follow and learn from the very beginning until the project is complete. This is going to be fun!
I can’t wait to see the progress on this one!
Me, neither! :-/ As life goes, I got the thing set up and started stitching on it, and haven’t had one second to get back to it since then! Today, maybe! LOL!
I dream of a time that you and I could be together to realize a project like the one on the blue linen fabric that you are doing.
Do you come to Montréal, province of Québec, Canada ? Or a place very close to that I could go to meet you ?
I will keep reading you and hoping that my dream will come true one day.
Thank you for the great information you give us needleworkers.
Hi, Francoise – Oh, I love Montreal and I’d love to go back up to visit one of these days (it’s been eight or ten years now since I’ve been there), but I don’t have any travel plans for the near future, I’m afraid. Perhaps in a couple years? We will see what the future brings! I’m glad you enjoy the website!
I’m really excited to watch this one! Whitework on blue linen looks like a great idea! Looking forward to seeing the progression!
Gosh, that brilliant white on the soft, slate-ish blue is SO pretty. One question… when you’re working with floss that white, how often do you make yourself wash your hands while you’re working?
I always wash my hands before a stitching session. I have hand wipes available with my stuff if I feel the need to use them. But generally, I don’t stitch long enough at one time (without having to get up for something or another), and I don’t generally do anything with my hands other than stitch, for my hands to start feeling like they need another wash. I certainly don’t feel the need to wash my hands every 30 minutes! I think that’s overkill for regular home stitching. Plus, I can always wash this at the end if I want to.
Oooooo, pretty!!
My favorite color. I’ll be watching anxiously as this project develops. Thanks for the detailed information on shrinking and prewashing.
Love your new project…and all your “getting ready” tips. But am most excited that Floral Corners will be coming on Friday !!! Woohoo….
i’m very interested in the iron on transfer pen!
i couldn’t quite understand how to use it, from the website
do i use the pen to trace around my print out, then somehow heat up my fabric and then iron the transfer onto the fabric?
That’s exactly what you do. 🙂
Such a beautiful colour linen, thank you for all your step by step instructions for setting up. I love the idea of a variety of white thread’s on the blue it will look like Wedgewood. I will look forward to seeing the design grow. Is this a design we can download?
Hi, Yvonne – the design won’t be available until after I work through the project. It’ll be a little while!
This looks like a great project. My favorite combination of colors in the work is blue and white. It’s so classic. I’m looking forward to seeing this develop, and to see what stitches you choose. It helps us all learn.
Hello Mary,
This design piece looks stunning…I am hoping that you will make this available as a kit with the stitch detail or a download with stitch detail. I am so glad that you will have the floral corners from last summer available soon – I am looking forward to it. I am also awaiting your tree design to be available. After doing some of these I will feel more confident about color and stitch selections for surface embroidery designs.
Thank you very much as always for making quality design and instructions available to us.
By the way, I was hoping that you would have some embroidery classes available for adults over the summer. I would make a commitment to attend. Currently I am in school so my schedule is restricted. Please consider this request and let me know.
Thank you.
Sincerely,
Neela
Thanks, Neela! I’m not quite sure yet what this summer will bring! I’ll be slowly churning out all your requests above….it just takes a little time to get everything done. 🙂
I’m going to love watching this project progress. I haven’t done stitching for months, other home projects have gotten in the way. I’m itching to get stitching again and this might be the jump start I need.
Hello Mary,
This is going to be a beautiful embroidery . I have the Coton Floche in white, never tried to work with it. But this new project may be just the little push I need to try and use my thread on a small project. I went to read your article on these different threads. Thank you for that information, it will be helpful.
Have a great day tomorrow and I hope you can have some time to work on your project.
Best regards,
Louise
Oh, I love floche, Louise! I hope you do try it soon and that you end up loving it just as much as I do! 🙂
Oh this looks like FUN! I love the design and the idea of doing it on blue with a variety of white threads. Have you considered the possibility of adding white Medici or Appleton’s?
Hi, Roberta – I probably won’t add wool to this one, though I think it would be a good idea if you really wanted to mix in more interesting thread textures. I actually thought, initially, about doing the project in white silks. But first, I’ll just work through it with cotton and see where it goes. I might end up switching mid-project! One never knows!
Dear Mary,
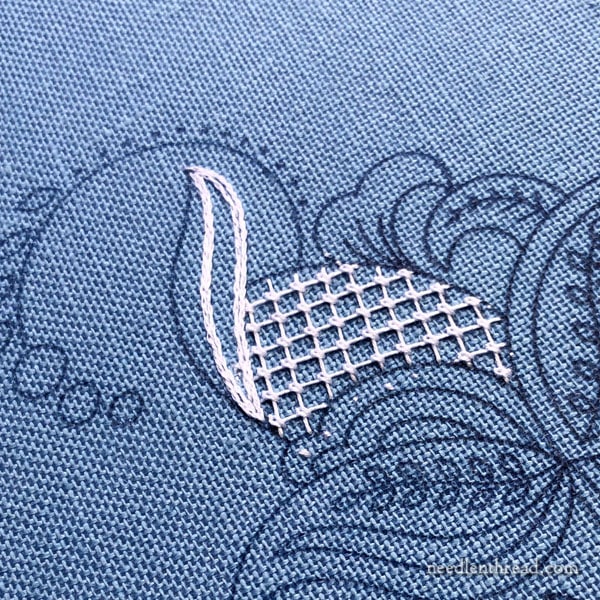
I love your work!❤️ I was wondering how you do the lattice stitch you have done in this piece so far. Do you have a tutorial on it?
Thank you. Looking forward to seeing your progress.
Kim❤️
Hi, Kim – You might check under the Stitch Fun series of tutorials, which you can find here: https://needlenthread.wpengine.com/2012/05/stitch-play-index.html There are a bunch of lattice stitch tutorials in there. All I did here was lay down parallel threads in one direction, then a layer perpendicular to those and couch the intersections, so it’s a very basic lattice.
Dear Mary,
Please can you provide that pattern so I can print one out? I love anything Jacobean?
Please, and thank you!. I already have my blue fabric and white thread, but need that beautiful pattern.
Lyn Procopio
Hi, Lyn – I’m going to work through the project first before I release it, so it won’t actually be available until a little later. I answered this question a little earlier, when Denise asked something similar. Here’s my previous answer: Over the years, I’ve found it better to release everything after I work through a project and work all the kinks out. Otherwise, I get swamped with emails full of questions (and, surprisingly, complaints) if I change my mind or if life intervenes and I can’t finish quickly enough, and so forth. What I try to offer as I work through a project like this are general tips that will help people tackle similar projects or problems that come up in their stitching, or inspire people to try something similar on a project they might be working on already. Then, down the road, when folks have access to the project patterns and whatnot, they can also refer to the previous blog posts as they work the project themselves.
Wouldn’t the blue be a better backing to show off the pulled thread sections …assuming they were stitched with the white thread?
I’m thinking more in terms of pulling blue threads apart to reveal white, with the blue acting as the “border” around the white – to give a lacy effect (similar to effect produced by gingham embroidery). We’ll see. I may not even use pulled & drawn thread stitches – there are only two spots on the design where I would, although the larger central lattice area would have been good for that… Still a work in progress! We will see what develops!
Happy Spring! I, too, get New Project Thrills, once I get a great idea in my head. I’m looking forward to seeing this Whitework progress. I wish I could stay as excited about these projects once I have the design work finished. Once I know what to expect after the stitching is done, and get all of the materials accumulated, I get less enamored by the projects and just finish them, sometimes just to get them off the table, always looking for the next best thing. In order to finish, I have to work on one project at a time. I don’t know how you do it balancing so many things at one time, but you constantly keep me excited to see what comes next.
Mary,
I enjoy reading your emails.
I am a novice embroiderer. I am interested in what pen you use to trace your patterns.
Could you please advice name/brand of pen.
Many thanks.
Margaret
Hi, Margaret – I generally recommend people who want to transfer their projects at home using an iron-on transfer to use Sublime Stitching’s fine tipped iron on transfer pen. It’s the most economical option with the best results for a finer line.
Oh my gosh, it’s “startitis”. I get positively obsessed about searching out the perfect materials. Starting a new project just brings me such joy!
This looks like a great demo about using the same color but different textures/weights of thread, creating different looks.
As you go along could you tell us which thread you are using and for us ‘newbys’ what stitch you are using,…….. if it is a different one? Thanks so much, love that you are using white predominantly.
I can’t wait to see this project progress. I will be glued to posts waiting to see the next development.
Heather
As I mentioned on Facebook, I love this style of designs. They have always called to me. I am very anxious to see how you stitch this as well as how the different weights and types of white threads come into play. And most of all…I am super excited that the flower corners are coming out later this week. I definatly would like to order a set as soon as they are ready to ship out!
Hi Mary:
What a lovely blue linen you will be working with, can’t wait to see it finished!
Thank you for your in depth write up on preparing linen and how you plan to mount it for stitching….iIhave shied away from using linen as I was unsure how to prep ..now thanks to you I know.
Thank you again Mary for sharing your tips and tricks!
Yvonne
Hi Mary
I have been an avid follower of your work for many years. Thanks for all you have given me. I was struggling with diamond stitch until I remembered your videos. I have now got the hang of it. Thanks a ton. Keep positive about your health and God bless.
Lorna
Wow, can not wait to see this project evolving. It will be really beautiful.
Hi Mary!!!
Thank you so very much for such a wonderful and detailed explanation how to start an embroidery project. You are stitching a wonderful design on that blue fabric – one of my favorite colors!!!
How about with hand dyed fabrics? How do you remove all those nasty wrinkles? Any suggestions and thoughts?
Thank you very, very much and happy stitching!!!
Vilma.
Hi, Vilma – Well, I don’t work with a lot of hand dyed fabrics, but maybe try fixing the dye with a water and vinegar solution first, and then soak in lukewarm water to relax the fibers, and then I’d try ironing it damp.
The white linen you placed behind the blue, I take it it is not fused to the back of the blue linen, right? Doesn’t it billow or come loose at any point? How do you keep it exactly the same as the blue – is it stitched together somewhere? Sorry for the misconception that I am displaying, but I tried placing one fabric behind another and I must be doing something terribly wrong. I was not able to always catch my stitches through both fabrics. Thank you. This is going to be a beautiful piece!
Hi, Mary – It will be stitched onto the blue eventually, as I embroidery the piece. No, it won’t billow and whatnot – both fabrics are stretched together onto stretcher bar frames and pinned on. Once the design is stitched, the white fabric will be just fine, situated nice and close behind the blue. You are probably “scooping” the embroidery stitches (they call this the “sewing” method, where you don’t take your needle all the way to the back, but rather just scoop up a tiny bit of the fabric from the front). I use the stab method when I embroider, taking the needle and thread all the way to the back of the fabric before returning to the front. This method works better when your work is stretched drum taut in a hoop or on a frame. It also keeps your fabric from distorting and it allows your stitches to sit up nicely on the top of the fabric, rather than kind of “sucking into” the fabric. I also use a floor stand to hold my frame. This way, I have both hands free and can use one on the back of the frame and one on the top of the frame, so that both hands are employed in stitching and neither has to hold the hoop or frame.
Good Afternoon Mary:
In reading this article something came to mind and I would like your advice when time permits. I am new to embroidery and learning the stitches from you on YouTube and the embroidery books that I have bought recently. So recently I bought a pair of those white pillowcases here on the internet thinking I can do this, yet this lining of your current project made me think, should I do this to the backs of these pillow cases for I am concerned about the threads becoming lose or undone as this is a gift for my mailroom lady where I live. She is a very nice lady and I just want to thank her for all her hard work here and thought embroidered pillow cases would be nice. I can do the stitches for they are simple and so far work for me….yet not sure about should I line the backs of them first and with what if I need to.
Any advice you can give me will be very much appreciated as I have so much yet to learn.
And Thank you for a wonderful site for you are showing what a truly nice thing to learn.
Sherry McLaughlin
Hi, Sherry – The “lining” on the current project is a backing fabric that I’m actually stitching through. It adds support to a fabric that normally wouldn’t be used for detailed surface embroidery. It’s not hiding the back of the stitches or anything like that. On household linens like pillow cases, table cloths, towels and the like, it’s normal for the back to be visible. They aren’t usually lined with another fabric. The difficulty on purchased pillow cases is that they have a cuff, so you end up having to stitch through both layers of the cuff to embroider the edge, and this can be kind of tough on the fingers, going through both layers of what is usually a fairly heavy cotton. Still, I’ve done it – it’s not impossible. I prefer embroidering pillow cases, though, that don’t have a cuff. Don’t worry about the back – keep it as neat as possible, but it’s normal for the back to be visible if someone looks inside the pillowcase!
G’day Mary,
Am loving this already.
Often wonder about your Mum with special thoughts.
Cheers, Kath.
Thanks, Kath! She’s doing better – hanging in there. Not out and about much, but things are going a lot better, anyway!
Thank you and take good care of Mary x
I love it!
Mary, I love the blue linen with white threads. You do such lovely pieces. I’m alway in awe of you will create next. Beautiful stitching! Can you tell where you purchased the blue linen?
Hi, Jeannette – Well, as it turns out, I think this particular linen has been discontinued. I’m going to look for a different blue linen that will make a good substitute, and then I’ll let people know. I’ve had this in my cabinet for quite a while!
Fascinating. Thank you.
I have been scavenging at Fabscrap and ended up with various pieces of 100% SILK…one or two are several yards. How do you suggest washing these before I start to embroider on them? (or if I take them to an indigo dye class)
Thank you, I greatly admire your writing, your commitment to detail, and consistency!
Marie
Hi, Marie – Aaaaah! Well, silk is a different story. I don’t normally wash silk before I use it for hand embroidery. But for dyeing, that is another question – I’d probably check with the instructor at the indigo dye class (which sounds like heaps of fun!) to get some input on that. I think it should be washed before you dye it, but I don’t know what method or whether you should use anything detergent or anything when preparing it for dyeing. :-/
Hello from Brisbane, Australia, dear Mary,
You have probably answered this in an archived post, but as you design your own work, how do you get your lovely clear outlines on linens etc? Thanks for your extremely wonderful, helpful, inspiring, generous blog, facebook etc. It’s my first stop every day!
There are many, many ways to transfer designs onto fabric, and I use a variety of different ways, depending on the project. What I advise most people to do is to figure out which way works best for them, for the type of project their doing. Lately, for quick projects with lines that will be completely covered with embroidery for those who are looking for a fast transfer solution that’s affordable, I’ve been recommending Sublime Stitching’s fine tipped iron-on transfer pen.
Striking with the blue background and white embroidery! Very eye-catching and pleasing!
Is this an iron-on transfer? It looks took crisp to be otherwise. I’ve seen paper that you can use in your computer. Print then iron. Wondering if work.
Printable iron-on paper that you would use in your printer (like the kind Avery makes) will leave a film on your fabric, I’m afraid. For those looking for an affordable iron-on solution at home, I suggest Sublime Stitching’s fine-tipped iron-on transfer pen.
Hi, Mary! What a lovely project.
Just to clarify, when you say to iron the damp linen, you are meaning to run the iron over it like a shirt, as opposed to pressing a piece, where you press down with pressure, then pick up and move the iron to the next area and press again?
Thanks so much,
Diana
Yes, I mean just iron it as you would anything else, only iron horizontally and vertically with the grain and not on the bias.
I so appreciate how complete and precise you are in your instructions and the links to former posts on the various subjects/instructions that are mentioned. I have not done any embroidery in several years (illnesses and family concerns) but I have been following you for some time. Very soon, I will be ready to start a new project. Thank you, Mary for all the wonderful instruction and generous sharing you do.
This project with the white design on the blue linen especially appeals to me.
Thank you, Mary
Pat
Hello Mary, I ran into the same issue on the project that I am working on. It is a modified version of the EGA English Summer. Four branches extend away from the heart design’s point. I stitched myself into an ugly merge. I decided to redraft the heart and start over. The second time I started to stitch the branches I first stitched a horizontal bisection line across the stitching branch point area. I then filled in the area with stem stitch below the bisection line with stem stitch and then rotated the design and filled in the area that had been above the bisection line. Photos would make this procedure much clearer. I am not sure how to post photos. I am now continuing on my tangled heart of branches.
ce projet est très sympa.. j’aime beaucoup broder en blanc
je suis sans doute très en retard dans la réponse, mais je suis intéressée pour le suivre. belle journée à bous