


You know that booklet I reviewed on Monday, by Elisabetta Sforza? In a Wheat Field?
Well, it’s become rather diverting. I think you need to get it, if you haven’t already gotten it. We could have fun together!
I wasn’t really going to let myself be diverted by it.
But then I did.
You see, I got it into my head that I would at least scuffle through my DMC thread colors to see what I had on hand for the projects in the book. And then, while I was chillin’ a bit in the evening, I figured I’d go ahead and trace some of the designs onto vellum – you know, just for the fun of it.
Then I got it into my head that I’d like to play with the designs on a linen glass towel. And one thing led to another, and here I am. And I’m Perfectly Happy to be here!
As I began to delve into the projects, considering colors and stitches and what-have-you, I admit that I changed things up a little bit.
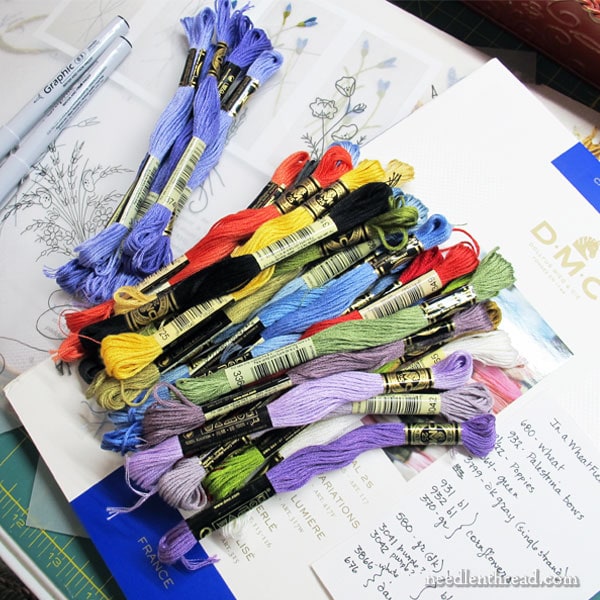
The first thing I did was go through In a Wheat Field and, on a little index card, note all the DMC thread colors used for the various elements. There are only a dozen colors called for across all the projects, so I fished them out of my thread drawers.
As I looked at the threads, I realized the color palette was a little more muted than I expected. It’s a very elegant muted palette, but – maybe because it’s spring, maybe because I’m longing for sunshiny days – the colors just didn’t sing for me.
I was really wanting the cornflower blues to be that vibrant blue that our cornflowers are out here in the Midwest in summer. Sometimes they lean more towards periwinkle; sometimes they’re a brilliant blue-blue; sometimes, they’re just typical blue. But they’re always vibrant. You can see them from afar, among the grasses. They stand out, in all their blueness. I love them.
Our poppies are red-orange, brilliant, fiery flowers. To me, they personify summer. And poppies and cornflowers together are magical.
So I decided to mix up the color palette a little bit, mixing in a few of my own color choices.
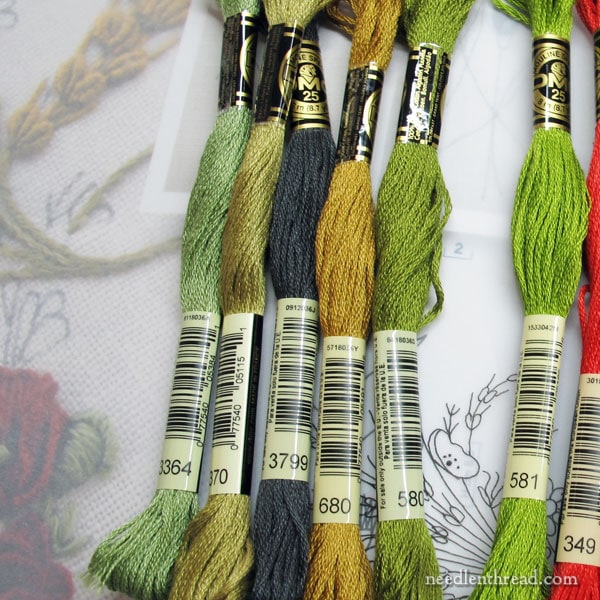
I kept some of the original colors, which you can see grouped on the left here. They will balance, I hope, my more garish color choices.
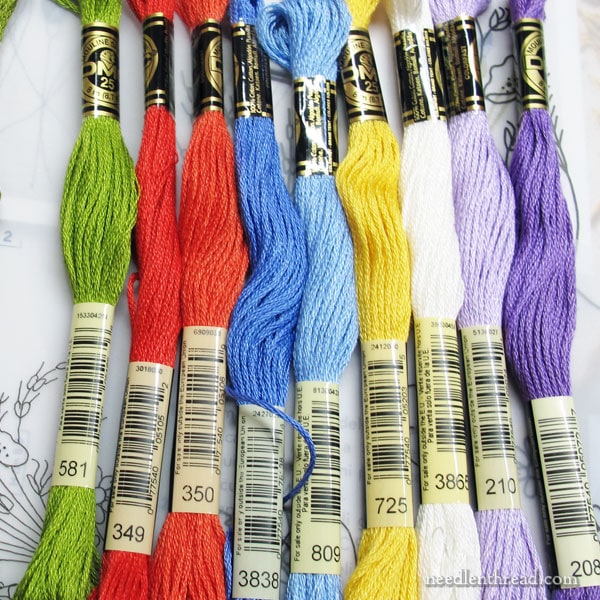
I swapped out some of the more muted florals for these brighter choices. The purple on the end, I’m still considering. The flowers are bluebells, which are periwinkle, but the periwinkle didn’t seem to mix so well with the cornflower blue and the poppy red & coral. Once I stitch with the colors together, I might develop some other ideas.
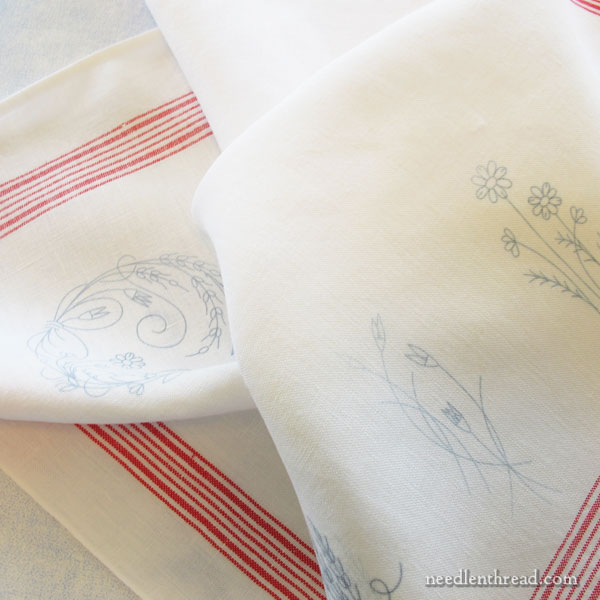
Since I have some of these linen glass towels on hand, and since they are very nice to stitch on, and since the red in the stripes works with the poppies, I figured I’d use one of these to stitch the small motifs in the book.
I’ve written about these linen glass towels before, when I used them for monogramming, here. If you’re looking for beautiful European linen striped towels to stitch on, you’ll find these available at Needle in a Haystack, here. They come in blue, green, and red stripes.
I lined up all five practice motifs on one side of the towel. I also took the small round design found just at the end of the book and transferred it into one corner, for the fun of it.
It won’t create a very coherent layout on the towel, I’m afraid, but that’s ok! I’m just testing!
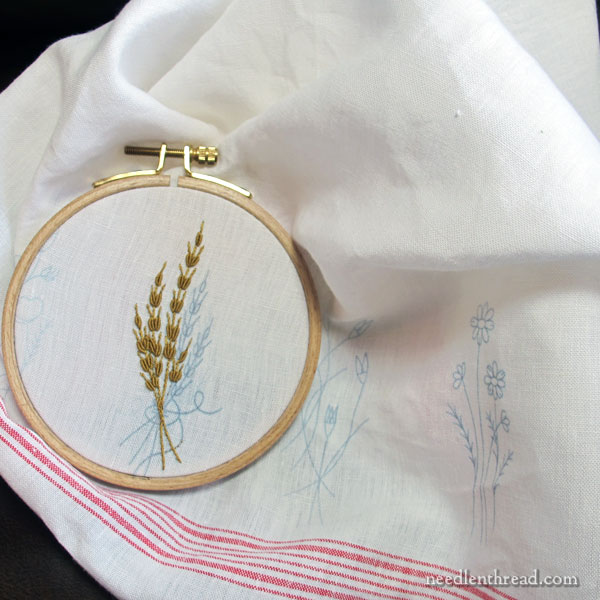
I enlarged the wheat motif slightly, since it’s in the center of the row of individual motifs and I wanted it to stand out a bit.
Oh my, it took me forever to get into my Bullion Groove. I haven’t stitched bullions in a while. They’re one of those stitches that requires me to get into a certain stitching rhythm, if I want them to come out with any consistency or neatness.
And of course, as soon as I was trucking along into Comfortable Bullion Land, I got interrupted. So the next time I picked it up, I had to re-groove myself all over again!
Isn’t that just the way of it?
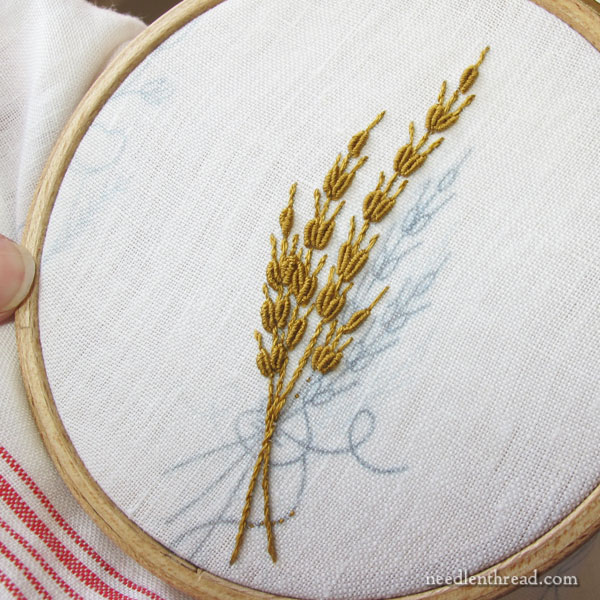
Behold, Much Bullion Wonkiness!
A Bullion Substitute
For those who are intimidated by bullion knots, try watching my video tutorial for bullion knots. It may help you conquer the stitch.
However, if they still discourage you, you can always substitute a daisy stitch held with a long anchor stitch for the wheat kernels. And if you want them solid rather than open (like a daisy stitch normally is), you can stitch a straight stitch down the middle of the daisy stitch. You’ll end up with a perfectly acceptable kernel of wheat, with the long anchor stitch as the beard.
A Bullion Tale
Incidentally, I was Face Timing a friend of mine a while ago who was having trouble with bullions.
I said, “Let me see how you’re doing it.”
With her needle threaded and ready, she launched in. Just as she was trying to pull the thread through the wraps, the whole thing seized up, resulting in a mess that she had to snip out.
So I went through some questions:
Are you using a milliner needle? Yes. (Read about needles and how to choose them and use them here.)
How tightly are you wrapping the needle? Are you choking it to death? No.
Have you tried wrapping the needle in the opposite direction? Yes, with the same results.
When you bring the needle back up in the fabric near the beginning of the stitch, are you getting caught in the original part of the stitch? No.
So we troubleshot back and forth.
Finally I said, “Show me again.”
At this point, she didn’t have a thread ready, so we kept casually chatting while she cut a new thread and prepared it for stitching.
And then… The Moment of Enlightenment! I saw the problem. But I let her continue without saying anything.
She got her needle and thread situated in the fabric, but I already knew this knot was doomed. Exactly the same thing happened – as she pulled her thread through, following all the correct form for a bullion, the whole thing seized up.
At that point, I suggested, “Now let’s try it again, but this time, don’t lick your thread when you thread your needle.”
The result with a dry thread? A perfect bullion.
Perhaps you’re a thread licker, and you don’t have this problem with bullions. But I’ve noticed it with other thread lickers, too. So, if you have trouble with bullions and you’re a thread licker, snip off the damp end of the thread after you thread your needle. The damp thread increases the friction as the thread pulls through the wraps and can cause everything to seize up.
I’m not going to say, “Shame on you for being a thread licker.” But I normally encourage thread lickers to find a different way to thread your needle.
There are some definite cons on the side of thread licking – it can cause the deterioration of the inside of the eye of your needle, for one thing. It can cause your thread to leave color residue on your fabric. And it can cause bullion knots to seize up. (If you think about it, you can probably come up with other disadvantages, too!)
More Later…
I’m going to continue with this particular stitching diversion for a couple days during my stitching time.
This will give me some time to think about the Jacobean Whitework project I started a couple weeks ago. I’m not 100% happy with some aspects of it – I’ll share those with you in the future – and I’m thinking I should try it on a different fabric, anyway. We’ll talk about it soon.
I hope your week is going well!
I agree with your decision to brighten up the colorway. Being from wheat country (Oklahoma), the flowers don’t have wimpy colors. When we harvest the wheat, the grass is still green (before the sun becomes merciless and the rainclouds disappear) and flowers are blooming in all their glory. The coral you picked reminds me of the Indian Paintbrush, the State Wildflower.
Yes! Exactly! Not-So-Surprisingly, same with Kansas, only you all are probably blooming things up before we are. Oh – and Indian Paintbrush, with blue bonnets or other blue wildflowers! So pretty!
Dear Mary,
I am a “thread licker” (hangs head in shame…)…could I get the same effect with a tiny bit of Thread Heaven or beeswax without the possible downsides? Have you tried these solutions? I generally only use TH or beeswax once I have already threaded the needle, and generally only for hand-sewing…haven’t used them with embroidery thread though I might try!
Thanks!
Hi, Dectora – If you lick your thread, that’s ok! I am not trying to shame anyone! Just snip off the end after threading the needle. Have you thought about a needle threader, if the problem is threading the needle? Or maybe trying to “needle the thread” – that is, pinch the tip of the thread in between the pads of your finger and thumb, so it’s hardly even showing, and then saw the eye of the needle down over the thread? That usually works. Beeswax and thread conditioners affect the color and performance of threads. I don’t use them, except for beeswax when doing goldwork, when the beeswax is necessary for strengthening the threads that hold the metal threads onto the fabric. I have this little bothersome voice in the back of my head (and perhaps I am just too critical?) that says “If a thread needs a conditioner in order to work well with embroidery, then it’s not really an embroidery thread.” I wrote about the subject here: https://needlenthread.wpengine.com/2018/03/on-thread-conditioning-beeswax-for-embroidery.html I always figure that, if you find yourself super frustrated with a thread and you have to condition it to make it a non-frustrating stitching experience, then the problem is not with you. It’s with the thread. Of course, now that I’ve just gone on about that, and I’ve just re-read your comment, you’re really just asking about using the stuff at the tip of the thread to help you thread it. Well, sure! You can! But I’d still snip it off, because the application of stuff on the end of the thread can run interference with your stitches. I think it would be easier to invest in a needle threader, though…
In addition to Mary’s hints, try turning the needle around. I have a few needles that if I can’t get threaded after a couple tries even with licking and trimming, the thread just goes right in when I thread from the other side of the needle. There are no snags or rough spots in the needle eye, IIRC it’s something about the stamping process when they create the needle eye.
Love the colors you selected for your piece.
Re: the thread licking problem. I typically use a thread conditioner. Would it cause the same issue with the bullions?
Yes, I think it might, to an extent, but not to the same extent as saliva. The silicone in thread conditions makes threads a little more likely to slide through, but it is still something extra on the thread, so I think you’d have to experiment to see if there’s any hang-up, compared to using just a clean thread.
I ordered both books but the alphabet one is sold out and it will be a couple more weeks before they receive the next shipment so I will be waiting on the other book. In the meantime I can admire your version of the smaller motifs.
Hi, Oriole – did you try both Needle in a Haystack and French Needle? They’re both carrying it, so it might be worth checking stock at both places.
Hi Mary! It looks like your experiment will be bright and cheerful. I have a question about the towels. Would they be at all suitable for counted stitching? If so, it definitely increases their usefulness quotient. Thanks!
They would work for “marking” with cross stitch – that is, you can do counted cross stitch on them (over two – but more likely three – threads, as the linen is quite fine), but the results will not be like today’s even weave fabrics like aida cloth that has a very square precision about it. The linen is a plain weave, but traditionally, “marking” was done on plain weaves that made up household linens, and it was not unusual to use cross stitch to do it. So yes, you can, but don’t expect that almost-scientific precision of counted cross stitch fabrics like aida cloth. Hope that helps!
Thanks for your reply. I do counted stitching on uneven weave linen occasionally, so it seems like I would be OK.
It does change the shapes slightly, but that’s not a problem for what I am considering! Your poppies are scrumptious!
Dear Mary
I was away yesterday helping to look after my nearly 2 year old Great Nephew he’s so cute. Anyway I thought you would get down to embroidering from the book. I love the bullion stitch on the wheat motif and your stitching looks fine to me. I’m afraid I’m a licker I can’t seem to get the hang of threading without licking, I’ve tried it and it takes ages without success, I should invest in a good needle threader. Good tip to cut off the end of the wet thread I will do that from now on. Thanks for sharing with us your new wheat project and for the tip on the bullion stitch very helpful.
Regards Anita Simmance
Hi, Anita! I hope your great nephew is thriving! Yes, I couldn’t resist delving into the embroidery pretty quickly. I’m going to tackle the poppies and the cornflowers today. Fun stuff!
Dear Mary
Thanks for your reply I hope you have a great day stitching the poppies and cornflowers yes it looks fun.
Regards Anita Simmance
Thanks for all the hints, Mary and Justgail! I had never thought of using the thread conditioner/beeswax just at the very tip of the thread – will try. I also bought one of those adorable micro threaders that I saw on here (the acorn shaped one) – it works great for larger eyed needles but is actually too big for the really tiny 10s (esp the Tulip milliners).
I can use that tiny threader on #10 crewel needles. Haven’t tried it on the #10 tulip milliners, but I was just using it on an #8, and it “just” fit, so I’m sure it’s not for the 10. You could always do a plunging lasso of a sort. I think I’m going to have to make my own needle threader out of something. I’m going to give that some thought!