


Good morning, and Happy Friday! I had a nice little break this past week, during which I was able to catch up on a few things, experiment with some stitching ideas, start a non-embroidery-related project, and get some of my other ducks in a row. I hope you enjoyed the break, too!
As usual, I didn’t get as much as I thought I could get done, done. Isn’t that always the way of it?
Today, I’m going to show you an experiment with embroidery design transfer and laundry bluing. It involves the prick and pounce method of transfer that I demonstrate a while ago here, so if you’re not familiar with the basic techniques, you’re welcome to read that earlier article.
Prick and pounce – though a time consuming method of transfer – is a tried-and-true method. It results in an accurate transfer of your design, and it can be used on both light and dark fabrics. It is an especially useful method of transfer for large projects.
But let’s get on with the experiment!

You might be wondering (and rightly so!) why the experiment in the first place. If this is the same technique as prick and pounce, why bother doing it with laundry bluing?
Well, I’ve read about using laundry bluing for embroidery design transfer in old embroidery books, but I never quite knew what they were talking about. I had a vague idea, but I didn’t grow up in an age where laundry bluing was a standard ingredient in the washroom, and I had never seen a bluing brick.
I’d also heard of using stencils to transfer designs, using a dry transfer agent and alcohol as the “ink.” The dry transfer agent depended on where I was reading about it. Charcoal, a blue powder, a blue cake – different transfer agents have popped up in my reading over the years.
Then, one day, I came across a bit of writing (and I can’t remember where – was it an old book? an article? I didn’t keep the reference, I just kept the name of the product!) that mentioned Reckitt’s Crown Blue as a transfer agent, when used with alcohol.
I found some Reckitt’s Crown Blue online, and I’ve kept the stuff stowed away since then. I decided to get it out a couple weeks ago, after a conversation about the prick-and-pounce method producing a more permanent transfer that doesn’t require “connecting the dots,” or drawing the design again over the charcoal dots left on the fabric.
So that’s the background of my experiment here.
For supplies, I used a little brick of Reckitt’s Crown Blue, which is a concentrated, dry bluing agent that makes whites whiter in the laundry; some alcohol (I used 70%); a pattern, which I printed onto vellum in my inkjet printer (both points – vellum and inkjet – are important later); a paper piercing tool; a piercing mat; a bowl; a spoon; fabric to transfer on (I used linen); and a scrap of felt.

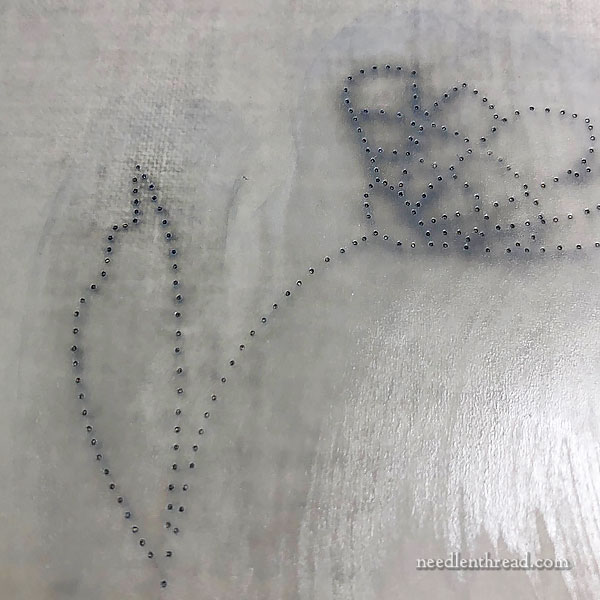
The first step was to pierce my pattern.
I printed this on a heavy piece of vellum – a semi-translucent paper you can find in the paper craft area of any hobby store – and I pierced it with a little paper piercing tool. Alternately, you can use a fine needle or pin, but it’s not as easy to hold. For a piercing mat, I just use a piece of craft foam from the craft store (a lot less expensive than a paper piercing mat, but made from the same material).
The vellum is important, because you want to use a type of paper that can handle being slightly wet without turning to mush and without allowing the wet to bleed through.

Here’s the little brick of Reckitt’s, open and placed in a shallow bowl. This stuff is a glorious blue!
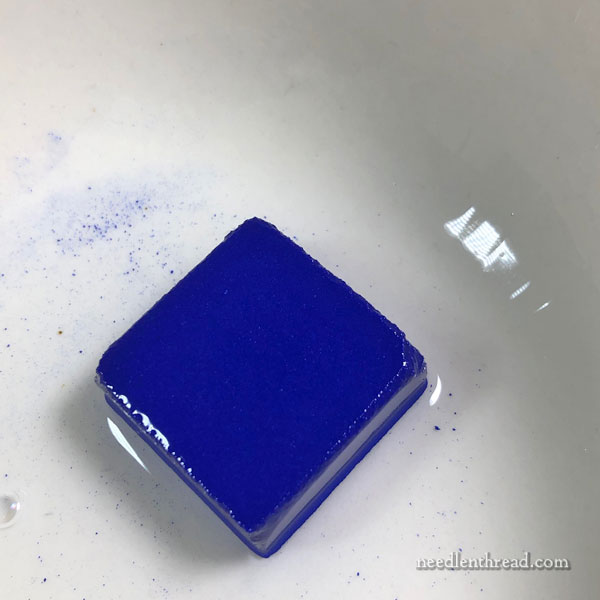
And here it is, with some alcohol dribbled over it.
In old books, they never give proportions, so I had no idea how much Reckitt’s to use or how much alcohol. I figured dribbling sounded like a good idea!
I half-expected the brick of bluing to dissolve into a kind of soft, inky mass of vibrant blue – kind of like what happens when you drip absinthe or coffee over a sugar cube. The sugar starts to soften.
In fact, nothing happened, really. The alcohol pooled on it for a bit, and then began evaporating.
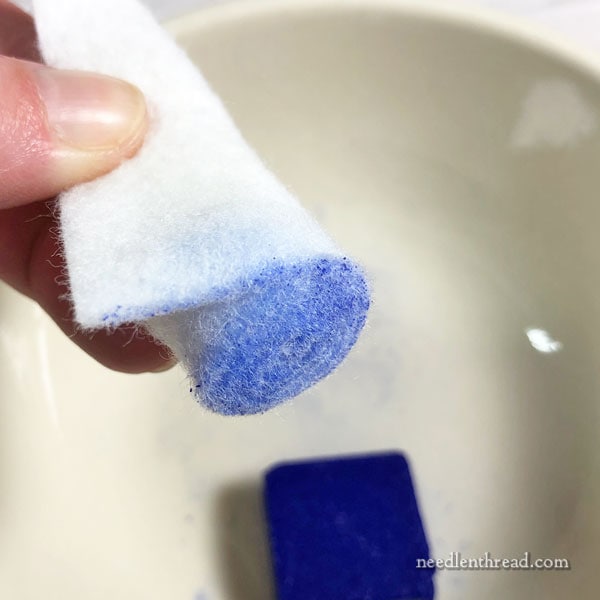
I took my little scrap of felt and rolled it up tightly, and then rubbed it around on the alcohol covered brick of bluing.
The resulting blue on the end of the felt roll was fairly light – but it’s a pretty color, isn’t it?
I didn’t know if this is what I wanted or not, but I figured I’d give it a whirl!

With my pierced pattern pinned to my fabric, I approached with the felt…
…and gave the whole thing a good rub.
Now, the felt had absorbed the alcohol from the bluing pretty well, so it was fairly damp with alcohol, though it didn’t pick up all that much blue.
Rubbing the felt over the pierced pattern resulted in removing the inkjet ink completely, but I wasn’t sure what had happened, transfer-wise.
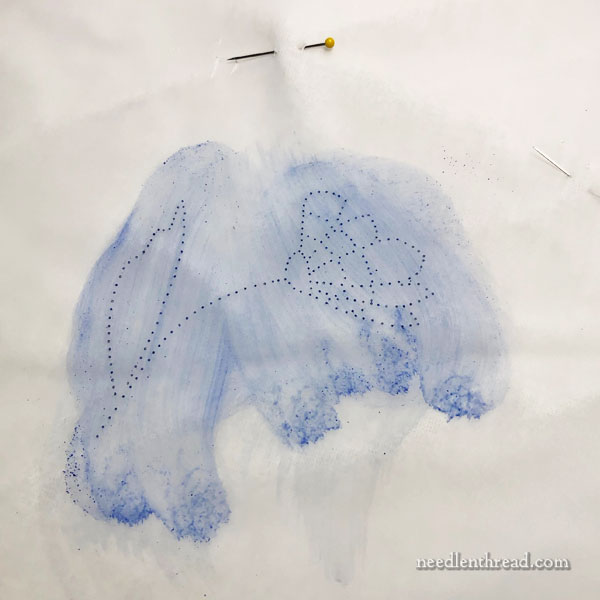
I lifted up the vellum, and this is what I saw.
Not very pretty.
The wetness of the fabric is from the alcohol which hasn’t dissipated yet. The spots? I couldn’t tell if they were the ink from the inkjet-printed design or if they were something else. They looked a little dark and black to me, to be the blue from the Reckitt’s.
Not too impressed so far…
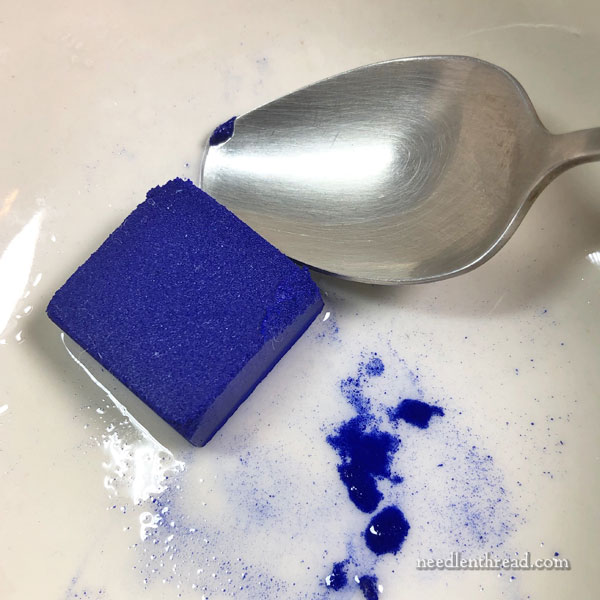
I decided I needed a little more bluing, so I grabbed a spoon and chipped off a bit of the Reckitt’s.
This stuff is hard! It requires a little scraping and chipping. But when the scraped bits meet the alcohol, they spread into little thick, blue pools. Pretty stuff!
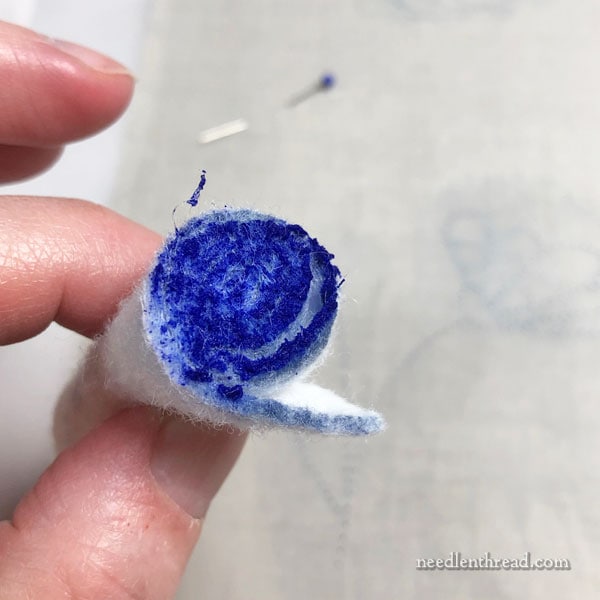
This time, I picked up quite a bit more bluing on the felt roll, and some of the alcohol from the previous dip had dissipated.
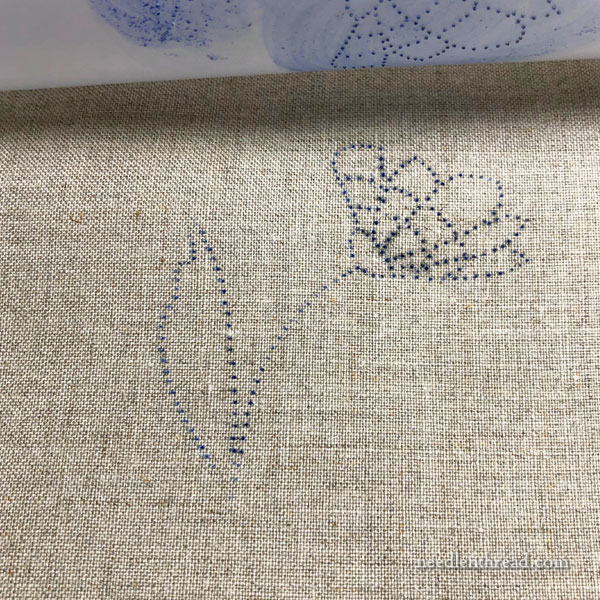
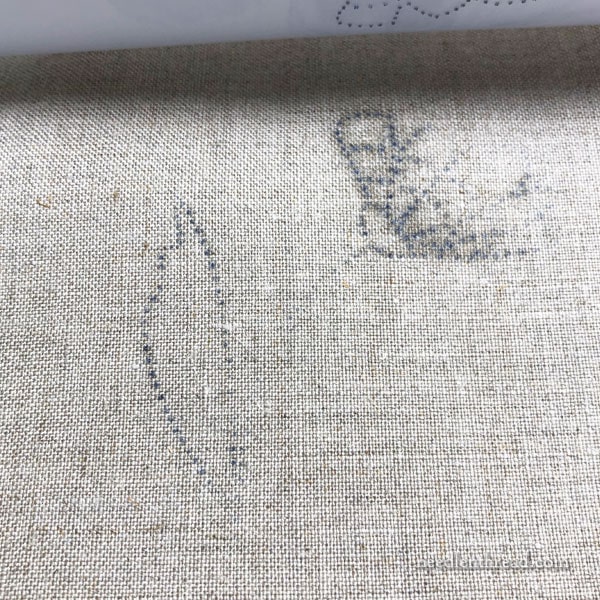
I gave the pattern a good rub with the heavier bluing, and this is the result on the fabric.
It still looks very dark, but since the inkjet ink was already gone, I didn’t think it could be the printer ink passing through the pierced holes in the vellum. I figured I’d give it a few moments to dry.
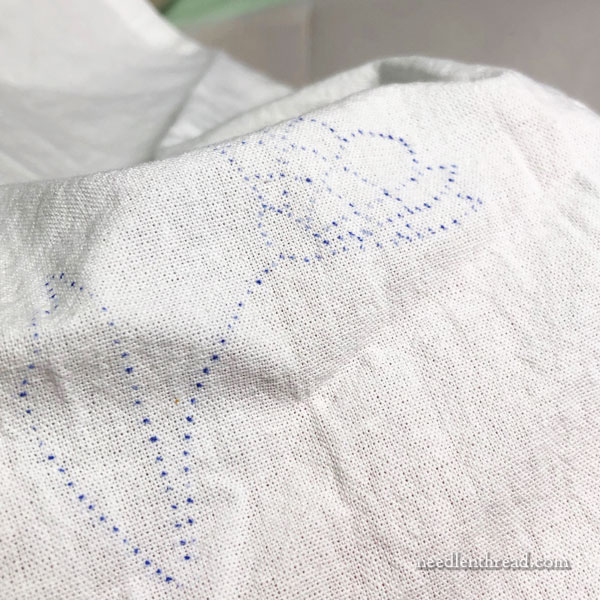
After just a few seconds of drying – allowing the alcohol to dissipate – the dots appear blue!
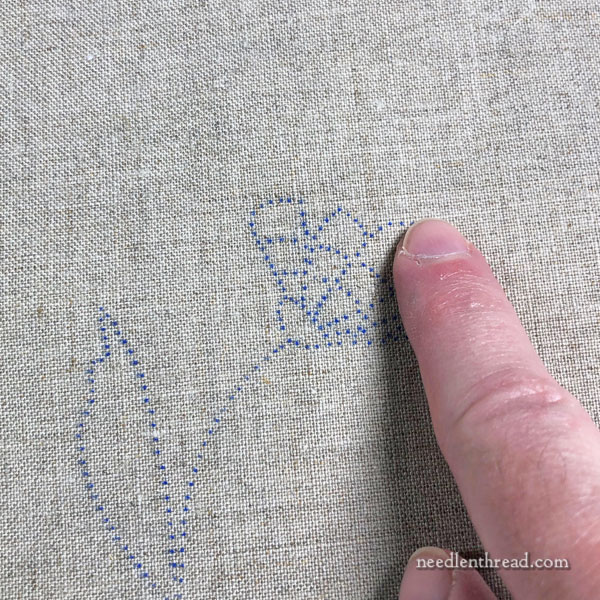
I found I could rub my finger over them without any of them smearing or any residue picking up on my finger.
This is a good sign, and exactly what I wanted from the transfer. Yay!
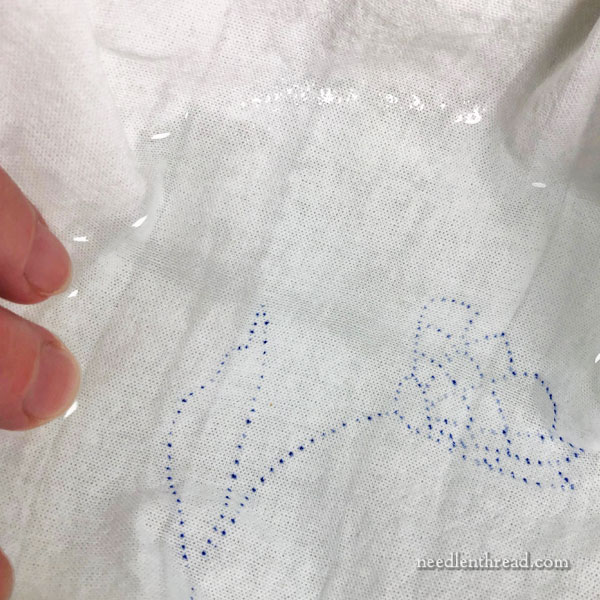
I took the pattern off and pinned it onto a cotton towel, just for kicks. The towel was not ironed (bad me – never transfer a design on an un-ironed, wrinkled ground fabric!), but I wasn’t too concerned about that. I just wanted to see how it transferred onto a softer fabric.
Notice that with the vellum, I can keep using the same pattern over and over again. It dries out between uses.
The design transferred fine on the cotton.
Then, I wanted to know how water would affect the bluing.
So I filled a shallow bowl with cool water and laid the cotton towel with the design transferred on it into the water.
I expected a bluish haze to release from the fabric and the design to dissipate under the water.
It didn’t happen. The design didn’t budge.
I left it there for several minutes, and still, the design remained.
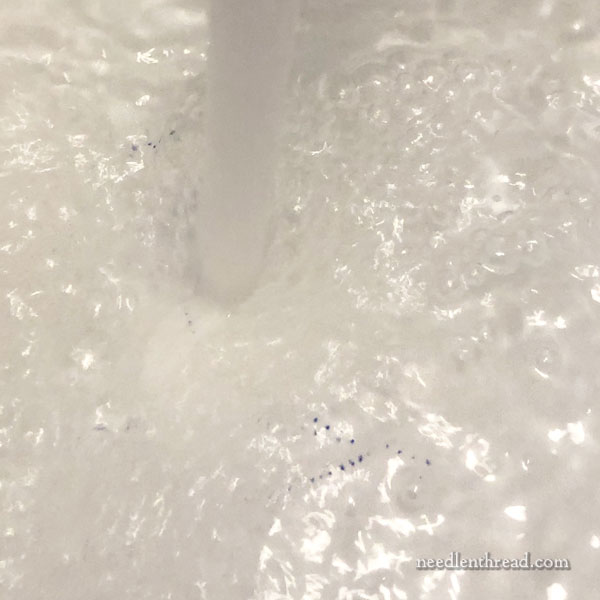
I then took the towel to the sink and ran it under hot water. The design began to release after quite a while, but I could still see it quite clearly, so I squirted on some dish soap and rubbed the design area together, to see exactly how stubborn those little blue dots were.
They’re pretty stubborn! Even with the rubbing, I could still see the design, though much fainter, which leads me to believe that after a few washings – if you’re transferring onto something like cotton or linen that will be laundered – the design will eventually fade completely.
I also think that, if you’re in a hurry and you want the whole design off, you could do as they do with Schwalm whitework and other similar whitework worked on linen. They boil the embroidered linen in a pot of water for ten minutes. I think the design would disappear. This is something I’ll have to experiment with later.
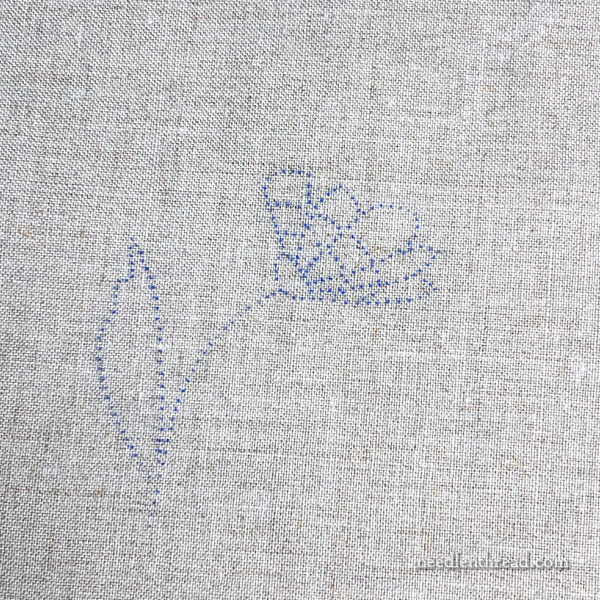
But back to the transfer on linen. This is a decent transfer. And it’s not going to brush off at all. I don’t believe it will leave any residue on the threads, either. It’s like a fine blue ink, dried onto the fabric.
So, my point is that here we have a decent design transfer method – similar to prick and pounce – that leaves more permanent dots that aren’t “dusty” (like the charcoal or chalk used for prick and pounce) and that don’t require connecting the dots to do the embroidery.
I’ll embroider this little flower to see how it goes, and then I’ll get back to you!
More Information on Design Transfer
If you’re looking for more information on embroidery design transfer, this article covers lots of methods for transferring embroidery designs. Read the comments, too! You’ll find a lot of input from the wider Needle ‘n Thread community in the comments.
Where to Find It
I’ve added Reckitt’s and Vrinda (a French version of the same thing) to my Amazon Recommendations page here. They come in large packs of bricks, and you’ll never need that many if you’re using them for design transfer!
But, if you have friends you can split them with, that might work. You can also use them for their original use, which is whitening whites – just make sure you read the directions carefully!
You might be able to find them online in smaller quantities by searching. I saw that there are some Etsy sellers that sell the bricks for other purposes, but they charge quite a bit for a fraction of the quantity.
This article contains an affiliate link to my Amazon Recommendations page, which means that any purchases made through that link results in a small commission for Needle ‘n Thread at no additional cost to you. Thanks!
Very nice experiment, Mary! Your transfer sheet looks exactly like my grandmother’s did…she had a stack of these sheets that she used to put embroidery designs on pillowcases, etc. and quilting designs on fabric. I watched her do it before I understood I should have taken notes. She must have used a similar product, but it was a powder that she sprinkled over the paper on the fabric first. Then she had her solvent (alcohol?) in a smallish bottle with a cordoroy-like top, held upside down and rubbed over the design like you did. I used to see dry cleaning bottles that reminded me of hers, and maybe that is what she used. I can still recall the smell, and it was not quite like rubbing alcohol. I think the blue she used is pretty permanent…can still see wisps of it on the quilt on my bed. But simply lovely to work with and easy to cover. Thank you for sluething this out!!
I love this experiment and will try it soon. I love prick and pounce but connecting the dots is not my favorite. I wonder if alcohol will remove the blueing from the fabric? Would you use charcoal the same?
Thanks for all this information: the photos, instructions and comments are so helpful. Using Bluing is an interesting idea- especially when you have a large design to transfer. I’m always looking for new and different methods, so I read your blog posts religiously. Thanks!
Thank you for sharing! I found this very informative and interesting! I wondered what bluing was!
What I find interesting is that it is reusable. That could be quite a time saver. Someone else commented that her grandmother had a stack of these types of sheets. That would make it so much easier to make a set of napkins, or pillowcases or even cards.
Yes, that is the greatest advantage of this method of transfer. If I wanted to transfer that design onto a dozen cloth napkins accurately and quickly, once the design is pricked, it would take not even five minutes to have all 12 cloth napkins accurately transferred.
Now, that’s an interesting method. I tried prick and pounce, but since I can’t get pounce powder over here and having no mortar at hand to grind the charcoal, it didn’t work and the result was a pretty mess. I will definitely give the laundry blue a try.
Interestingly, the German version of it (Waschblau or Wäscheblau) comes already as a powder. I wonder if this would be more convenient than scraping and chipping laboriously a hard cube? Maybe you would like to add our version to your Amazon recommendations list? However, I’m afraid you don’t get anything out of that, because amazon.com doesn’t offer it, only amazon.de, as far as I can see. Here’s the link, just for your information.
This is the cheapest offer I could find (didn’t search ebay, however) – 46 Euro ($ 51) per kilogram (35 ounces). There’s a German Jamaika Shop which sells Reckitt’s Crown Blue for 33 Euro ($ 37) per kilogram (0.50 Euro ($ 0.56) for a cube of 0.5 ounces). I’m afraid I can’t make sense of the price of Reckitt’s on amazon.com – is it really $ 19 for just 3.2 ounces?
Is Vrinda really a French product? The package says “Made in India”?
Angela from the Ore Mountains
Apparently it’s the brand commonly used in France. Yes, I would imagine that the powder would work the same way. It’s made from synthetic ultramarine, as well. Reckitt’s is one of those vintage products no longer widely available, so the price is definitely much higher. Plus, there seems to be other uses for it now, other than just laundry bluing, which entices people to purchase it. One tiny brick will go a long way for pattern transfers.
I use unscented baby powder for prick and pounce rather than powdered cuttlefish (or whatever you should use). Instead of ground charcoal, I use the blue powder used in DIY shops for putting in plumb lines. Both are much cheaper in the UK than the official materials. Both the baby powder and blue chalk wash out OK. I’ve found for a one off design transfer, I can “prick” the original drawing on photocopier paper and that has worked fine with no need for transferring to vellum or tracing paper. I’ve stuck felt on a cork (from a bottle) and that makes a cheap way of rubbing the powder on.
Great ideas, Sue! Thanks so much!
Nerd alert: Bluing use in laundry is Prussian Blue (ferric ferrocyanide). Like in the use of any chemical, please practice good hand hygiene i.e. wash your hands after use, especially before handling food, drink, or cosmetics. A pair of disposable gloves (preferably not latex), will help keep your hands clean. Avoid acids: vinegar, etc. Keep alcohol away from open flames or heat sources.
This sounds like a fun method for marking! (The thought of using chemicals sounds like fun!)
I think Reckitt’s is made with synthetic ultramarine, which I think is different from Prussian Blue? But in any case, yes, I generally figure adults will know the basics of any kind of hygiene and issues like not using alcohol with an open flame. Thanks for the reminder!
Dear Mary,
Thank you so much for this article! I have been looking for a way to transfer a large drawing, after fiddling around with various techniques I had settled on pouncing but was not happy with the smudging etc. I can’t wait to try this it looks like just the ticket.
Thank you for all you do for us.
Roxanna
I think I would try using a paint brush and treating the bluing cake like watercolor.
Hi, Marjee – The rolled up felt works great, and it takes about 2 seconds to do the whole design. That’s the advantage of this method, once you have your pattern pricked. You can do a series of accurate, repeated designs very, very quickly. I think a paintbrush would slow that process down considerably.
That’s interesting stuff, Mary! I wonder if it would work with the copper monogram stencils as well …
Yes, I do believe it would. In fact, I’ve seen the method mentioned with the stencils of old, so I’m pretty sure it would work! I’ll try mine if I get a chance!
Thank you for the info Mary.
I have a question. You mention to note that you used an ink jet printer. I had expected to read about a problem if a laser printer was used or that a laser printer would have been better due to the emphasis on the ink jet printer.
Since both of our 2 main printers are laser – which means that whenever we go to use one of the inkjets their ink is no longer good – I was wondering if there was a reason for the ink jet over laser, other than you have an ink jet and not a laser.
Thank you.
Exactly – I have an inkjet, not a laser.
It might be easier to use one of the brands of bluing that’s sold in liquid form, e.g. Mrs. Stewart’s Bluing.
Mrs. Stewart’s is made of Prussian blue whereas Reckitt’s Crown Blue is made with synthetic ultramarine, but it seems like it should work similarly.
Liquid bluing will not work the same way. It’s in liquid form – and the liquid part doesn’t dissipate like alcohol does.
I was just wondering — do you think that the ink would spread or run along the straight grain on a silk charmeuse or other type of silk satin? I have often run into this problem using ink-based transfers on satin material. I usually resort to white carbon paper, but that rubs off if I work on the project a long time.
I haven’t tried it on silk, but if I have a chance, I will. I think the key is to make sure the alcohol doesn’t saturate too much into whatever you’re using to do the pouncing with!
Sometimes the old fashioned way is still a good method. Thanks for testing this theory for us Mary. And now I’m curious, I wonder what would happen if you did this with a ‘pan’ of white watercolor on a dark fabric? If it can be washed out after embroidery but doesn’t move during stitching it would be fantastic don’t you think.
Happy stitching ~ Brenda
A few years ago, you could get those Reckitt’s bricks from a local hardware store called Birch’s – now closed, alas, it was a treasure trove and a wonderfully photogenic place with things hanging from hooks on the front. When I went in to ask if they had washing blue, the lady owner said they did: “the icing-sugar ladies like it to whiten their wedding cakes, and some of our white-haired customers use it for a final rinse”. Versatile stuff!
Thank you for your experiments, I was trying to mix it with water to paint designs and did not have any real success. Next time I will try alcohol.
I understand the pricking part… and wonder why if your design is on a smallish sheet of vellum, why not use your sewing machine to go around the design. Stitch adjustment and needle size for dot size… stitch length adjustment for the distance of the dots, but much faster than the prick method. As a caution, swipe off the inkjet ink before using the bluing? Some inkjet ink is a pigment ink rather than a water-soluble ink and may leave a residue as well.
On a small design, it is difficult to get the same accuracy with a sewing machine. I’ve tried it, but I think one of the keys to a good design transfer that can be used easily without much guesswork is to ensure that all the intersections of any lines – all corners, and anywhere lines cross – get their own little hole. This doesn’t generally happen on a sewing machine, and it’s easier to overshoot a line.
I think there’s gonna be a run on Reckitt’s bluing!
Thanks for trying out the method Mary.
Mary, I’m so glad you conduct these experiments so we can benefit from them. It pretty much looks like the blue used in commercial transfers. So intriguing. I’m always curious about old methods versus new (especially with the increasing wealth of technology in our modern age). Thanks for sharing.
I remember the blue bags from when I was a child. My mother used them on mosquito bites. The liquid is still available in Australia.
I never really understood prick and pounce before, but this really cleared it up for me. I’m impressed with the clarity and detail that can be achieved with bluing.
Very interesting! I haven’t seen bluing cakes in… ever?? I have seen bottles of it, but not recently.
If you don’t want to buy a special paper piercing tool, look for a pin vise in the tools section. It’s a small handle for using tiny drill bits, and work great for holding needles also. Of course, there’s always the trick of putting a needle into a cork for a handle as well.
Which alcohols should be used; surgical spirit or hand- sanitizer will do?
I used isopropyl alcohol – 70% – from the drug store.
Thank you Mary! I was so intrigued by this post that I had to go order some “bluing” to try myself. I’m always looking for better ways to get embroidery designs to fabric for my crazy quilting projects. You ROCK!
You’ll have to let me know how you get on! I’ve been stitching over my design transfer and it holds up great – no need to even connect the dots, really, and there’s no residue rubbing off on my threads or anything. It’s a great method of transfer, I think, especially for repeat designs!
I wonder if natural indigo would work. This still seems to be produced for washing, as well as dyeing. (Apparently this is what people used before synthetic commercial dolly blue became available.)