


There are some things I really shouldn’t blog about.
Felt and embroidery seem like a pretty good subject, though. And usually, it is!
But in this case? Maybe not!
The way I see it, though, is that sometimes, it’s more fun to learn from other people’s mistakes than it is to make our own – so here is a little lesson in… I don’t know what.
I thought I had the right concept (and maybe I do), but wow, this thing didn’t come out the way I intended at all!

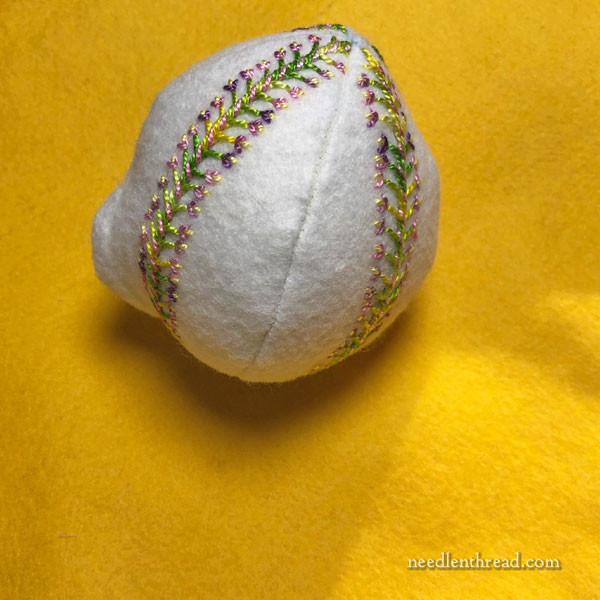
I’m calling it the Easter Onion, because whatever else it might be, there’s no way it’s an egg!
Years ago, I wrote this article, Stuff It then Stitch It, about embroidering a stuffed felt egg.
Since it’s a couple weeks before Easter, I thought I would update that article with some tips and techniques.
To do that, I set about stitching a new felt egg.
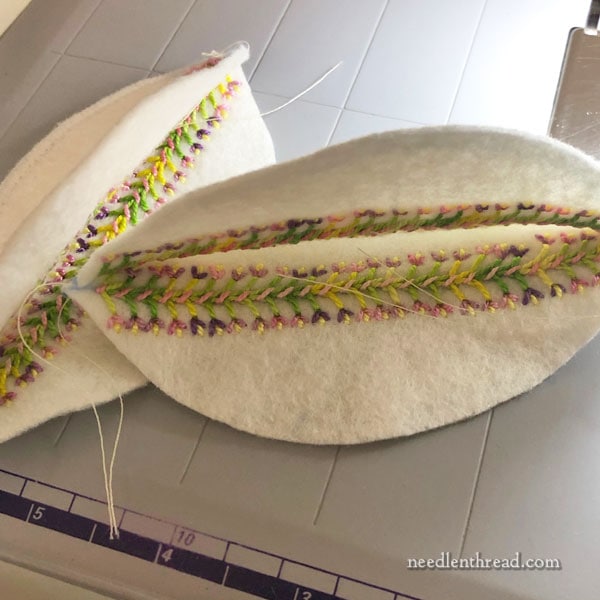
This time, I embroidered bands down in the middle of the four sides of the egg first. Once they were sewn together and the shape was stuffed, I’d embroider some kind of contrasting design over the four seams. That was my plan.
So, after sewing together one side on two sets of two, I sewed together the two sets of two sides, right sides facing, leaving a turning hole.
This all seemed very straightforward to me.
It made sense!
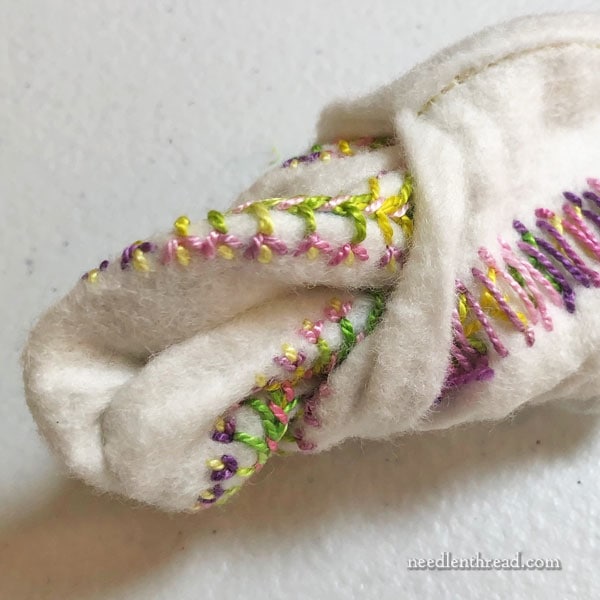
I turned The Thing inside out.
This was no small task.
I’m pretty sure the poor thing was wailing in pain.
This is what the seams I was going to embellish look like.
The turning hole got pulled a bit out of whack! Whoops.
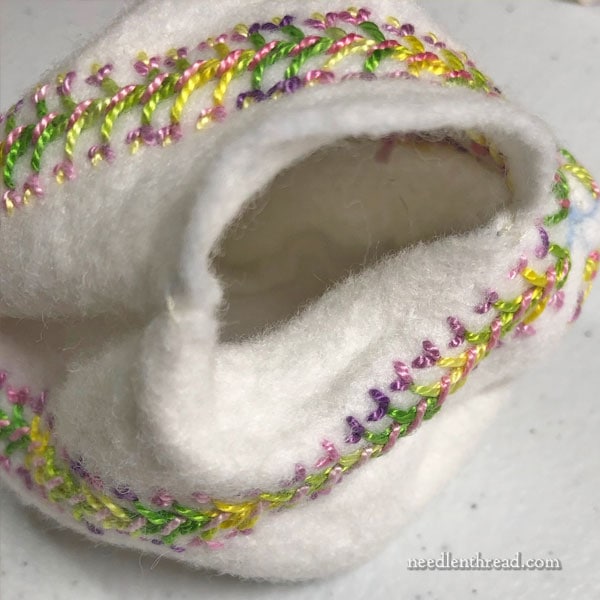
And this is as far as I went with the Easter Onion.
Retrospective
I think stitching the shape after it is stuffed seems to work better! See the original article. The embroidered vertical bands stiffened the felt up a lot, making it very hard to turn.
The shape I used to cut my four sides is wrong (if you hadn’t guessed). It bows a bit too much and it’s bottom heavy. If I try again, I’ll adjust that.
Maybe I overstuffed it? That could lead to unshapely results, too, I suppose.
The thing is, not everything you make will come out perfect, and that’s ok. I find the best approach to a failed concept is to learn from it, have a laugh…and move on!
What To Do With It
I might turn it into a pincushion or something, since I spent practically a whole day creating the ruin. Why waste it?
On the other hand, I might just top it with some green felt shoots and stick it in an Easter basket. Who knows? It might start a new tradition.
You know – kind of like the Christmas Pickle, only the Easter Onion?
“See if you can spot the onion in your Easter basket.”
Because of course you want an onion in your Easter basket!
I may very well experiment with shapes and approaches on this a little bit later.
And you know…. I may not!
Hope you have a terrific Monday and that all your projects are headed towards a perfect finish!
Can’t you use steam to adjust the shape? If it is real wool, this could work.
I may try that. Yes, it’s 100% wool felt.
You are a riot you know. I so look forward to your posts daily. This one in particular made me smile. You do admit your errors which I think is so neat. However I do admire you for spending so much time practicing, and all you do for us as well as yourself. Where did you get the time to do all you do do. I have only twenty four hours in a day and I am lucky to get an hour to play Your days must be at least forty eight. How do you do it??
LOL! Yes, I’m subscribed to the 48-hour day! 😉
Even if I could subscribe to a 48 hour day, I wouldn’t. I love bed time!
Thanks, Patricia!
Oh my, thanks for sharing your Easter onion. The embroidery is lovely. Yes we have all had failures. I am sure with your talent and experience you can make something yummy out of that onion.
If you go ahead and embellish the seams, I think it will look lovely.
Hello Mary
This article made me laugh…..but success in the end I think.
May I ask what thread you used for the stitches? Lovely colours and sheen.
Thanks for all the information you share……
Happy Easter Holidays
Sheila Shaw
DMC perle cotton #5! Glad you enjoyed the article!
I was going to ask the same question.
Sometimes I laugh out loud at your funny posts. This was one
that nearly distorted my computer screen with morning coffee.
Easter Onion….never was there a more lovely one. hahaha
In an attempt at making a felted Easter egg last year, mine ended up an Easter football. Though, I have to say, it’s a very cute football and sits on a shelf in my sewing room.
Thanks for sharing this. It’s gratifying to know even an expert–who’s work I greatly admire–can still make an onion every now and then…
Oh, you’ve made my morning, my whole day actually. I love your onion. Imagine it stitched in different onion colored felts with autumn colored stitching. It would make a fanciful center piece for Thanksgiving. I love it. 🙂
Perhaps the problem is turning. One of the delights of working with felt, at least good quality wool felt, is that it doesn’t need to be turned. Only things that will ravel, fray, or pull apart in some other way, need turning. Just embroider the pieces, then butt and embroider the edges together, then stuff, butt the remaining edges, embroider, and you’re done. In flattish shapes, overlapping the edges can work well for anything that might put stress on that area, but for something shaped like this, just butt those edges! 🙂
I didn’t think of butting the edges – that’s a good idea! I might give that a try on a different shape. It’s a good quality wool felt and nice to stitch on.
Dear Mary
First of all I wish you a very Happy Birthday and hope your day is going well and you are enjoying your special day. The I think your embroidery on the Easter/Onion Egg is lovely and I like your choice of thread colours. Perhaps you should embellish the bit that is bulging so it would look more like an egg. A pincushion sounds good or you could add it to an Easter basket, no one will notice. Enjoy your special day and enjoy yourself.
Regards Anita Simmance
Thanks, Anita! It’s been a jolly day so far! I celebrated yesterday with all my local family for brunch. Great fun!
Yes, I already started using it as a pin cushion, somewhat by accident – but it works well! LOL!
Dear Mary
I’m so glad you had a good Birthday with family and enjoyed yourself.
Regards Anita Simmance
I wonder if you hand stitched the seams? And what sort of thread you used? You might be able to avoid the misshapen edges of the ovoid pieces that stretched as you turned your Easter onion the same way one would stabilize an armhole or neckline==stitch just inside the seamline of each piece before stitching the seam. If the seams are hand stitched, I might put the stabilizing stitching right on the edge of the pieces. If possible, I would use a machine as machine stitching is likely to have much less play in than hand stitching seams do. In either case, the stitching limits the stretching on the edges. Using regular sewing thread for this job might assist in keeping the edge stable and unstretched given that it is much more tightly twisted than embroidery thread so there is less play in it.
I’d also try to leave the turning opening at the spot with the shallowest curve/angle, so mid-side might be good. Or the bottom if you are going to flatten it a bit so it can stand. (And the seam where you’ve turned the “pinion:” won’t be on display till you pick it up to look at it.) Since you plan to cover the seam with some decorative element, the closure won’t show–and the shape of the onion will be more consistently ovoid. Even if you stabilize the edges, it’s really easy for curves (bias) to stretch as you work on them. Felt hasn’t got a bias–but it stretches some amount in all directions, and more so if you are using wool felt.
Hope these thoughts are useful for you.
It’s a bunny body! Needs a head, some floppy limbs and ears, and a cute little tail.
Now there’s a thought! Might be worth a try!
I’m thinking that if you tried rolling it with the palm of your hand, you might be able to make it more egg-shaped. Worth a try.
Another thought to help keep the shape you started with is to d steam it into shape using bursts of steam from your iron and form it with your fingers, almost like clay, to shape it or, in this case, reshape it. Wool felt is very amenable to shaping
After looking again at your “onion,” I wonder if this shape is more like a lemon?
You posed the question what to do with your “onion.” Since it is now stuffed, depending on how stuffed it is and the sort of stuffing you used, you might try forming the shape so that the misshapen side becomes the base when you display it If you’ve made dolls, you might have hard packed the dolls to give them a stable shape and you can apply that technique here; no real egg sits upright so laying on its side is ok. No one who sees it will know about the journey it took, and it will be a great addition to your spring/Easter decorations without needing any camouflage or re purposing, just rethinking how to display it.
Hi Mary,
What kind of felt are you using? 100% Holland wool felt should hold its shape well enough to be turned without stretching. Could the felt be part of the “onionizing”?
Regards, Sandy
It’s wool felt, Sandy. I really REALLY stretched that section. LOL!
Using the Temari techniques may give a smoother base to embroider. For those not familiar with Temari: start with a styro egg (you choose the size), wind yarn (you choose the color) around the egg until a base of 3/16 inch is achieved, wind 50 weight thread (old sewing thread works great, again you choose the color), make sure to fully cover the egg with the thread. Now embroider what ever you choose.
Of course this works on sphere styro bases as well.
The embroidery looks lovely though 🙂
And perhaps instead of an onion, you could say it’s a tulip bulb or some other spring flower, and pretend it was intentional… 😉
Kindest regards,
C.J.
But Mary – it’s the cutest Easter Onion ever! This is the kind of thing that happens to me ALL the time – despite much preplanning so things like this won’t happen – and I’m so happy you have these “unexpected” results occasionally too 🙂 Sometimes we get Bob Ross style “happy accidents”, and sometimes there’s just accidents LOL The stitched band you used is so pretty, and has lots of potential! Hope you can find some way to reuse it 😉
I found the best embroidered egg was to make it from fabric, backed with a fusible weight stabilizer, sewn and stuffed from the bottom. Then I embroidered the seams which indicated the space on each panel to sew.
I would love to share a picture but not sure how. I have tried wool felt and it just didn’t speak to me.
How is your mom doing?
Love the Easter Onion/Christmas Pickle – your humor is delightful! And it shows we grow by mistakes.
Hi, Krista – Mom is doing much better, thanks! She’s even finally getting out and about! Yay! Thank you so much for asking!
Glad you like the Onion!
those “turning edges” always get stretched out of shape, so I always stay stitch (with my machine) on the seam allowance of those edges. this stops it from stretching out AND you know where the seam allowance SHOULD be when you are ladder stitching it closed. works like a charm with round pincushions! Happy Easter!
Thanks for the laugh Mary! Had to put down my drink!
I want the 48 hour day! Just for a little while, till I “get caught up”! The onion-it’s really an Easter hacky sack. And a riot. Your “failures” are nothing like mine, which are epic. I’ll trade your pretty failures for mine…
Thank you! This is what I love about your newsletter. The idea is great. The work is beautiful. And then after much effort and writhing, it just goes sideways. And that is a great lesson, because I, like I’m sure many others, think that projects always turn out perfect for the professionals. I always think a project will proceed and end up just like I imagined. And I’m so disappointed when it doesn’t. Instead, this lesson is a confidence booster, to be sure. I do like the idea of an Easter onion. I think I want to try one.
Oh Mary Please, please, pretty please delight us with a bunny.
It’s
such a wonderful idea that Monique shared to see a lovely Lovey bunny. Then you could tell everyone that was your plan all along. Happy, happy B day . Friend April
I think an “Easter onion” would be perfect, for the right person!
Thanks for being honest. I still like it though. I think it would be sweet in a basket with a stuffed rabbit or something. I guess I’m not as picky as you, because this, for me, would be a successful project.
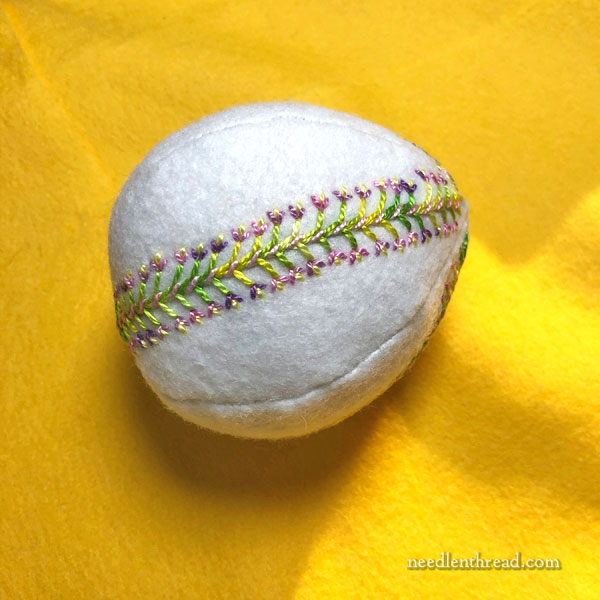
I think it looks a little like a baseball and could be put into a basket of someone who likes to play baseball.
You do almost have an egg shape. I can see it. It just seems that maybe it needed to be longer. But I can see how the stitches would restrict the stretchability and the flexibility. Those would also be so charming on yellow felt. = )
I would happily add the Easter Onion to my Easter egg display ! (It would make a lovely pincushion as well).
Best wishes
Ellie
I am rolling on the floor (like an egg?) laughing. You are so much fun. I think it’s egg-like, maybe just not a chicken egg…..
I’d try to steam this one out like others suggested. And for the next one, before embroidering, sew a line just inside the seam allowance to stabilize the edges and keep it from stretching. Getting round-ish objects to turn out not pointy is not easy for me. Any angle where the seams meet results in points. And it is not easy to judge how far back to start/stop the curves sot it all flows nicely.
It could be a ‘spring opening’ baseball! It is a pretty mistake.
Ohhh… this little thing is really cute. It reminds me of a flower bud. But the suggestion of a bunny is an option as well.
So… no fail, just a little project diversification 😉
Happy stitching.
Thanks for your wonderful blog.
It’s really not that bad! Maybe try throwing it in the washer & dryer. Might help! Couldn’t hurt since you’re unhappy with it anyway!
I like it, it looks enough egg-shaped to me! Now I want to play with felt and make an egg!
I still think the embroidery is pretty no matter what you call it.
I’ve seen many eggs our of scrap fabric – they don’t break when your two-year old discovers the basket of dyed eggs you put out for display! The egg shape is more successful with 5 pieces, and a little fussing to get the exact size and shape that appeals to you.
Instead of turning, it might work to sew the first four seams right side together, then sew the final seam from the outside.
Perhaps an egg holder would be happy for company!
I have a handmade wood egg in its matching ‘soft cooked egg’ holder that was made for my maternal grandfather by his best friend as a going-to-America gift. It’s the only thing I took when moving out of my mom’s home.