


Years ago, I wrote a series of articles on hand embroidered writing. The articles take you step-by-step through different embroidery stitches that work well for embroidered writing.
Today, we’re going to add a stitch to that list – particularly, a stitch known today as the “Quaker Stitch” because it was formulated to work as the stitch used for the text on the Quaker Tapestry. The stitch is a combination of split stitch and stem stitch, so, in effect, it is a split stem stitch.
While at first glance, it might look like stem stitch, the ingenious splitting of the “inside” portion of the stitch raises the stem stitch line up to make a nice, precise, slightly raised line ideal for writing with thread.
Let’s take a look at it!
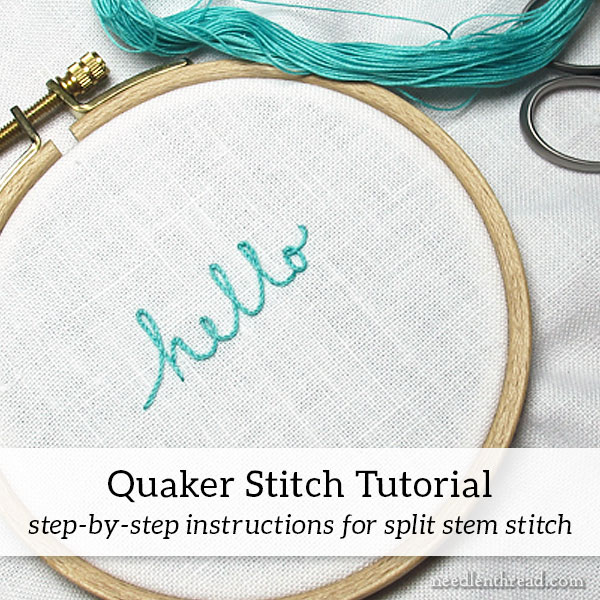
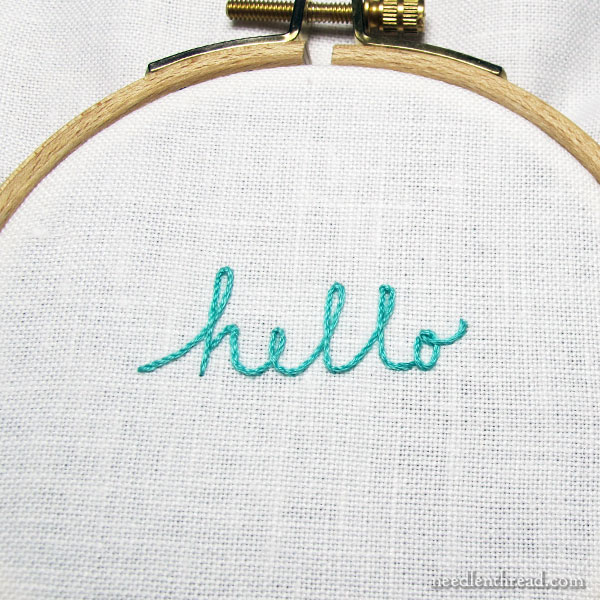
See what I mean? At a glance, the embroidered “hello” above looks pretty much like it was worked in stem stitch. But there’s definitely something about it that’s slightly more chiseled, or defined, than stem stitch.
Quaker stitch makes the script sit up just a little more proudly, a little more clearly, and little more precisely on the fabric.

From the side, you can get a good sense of the raised look of the line.
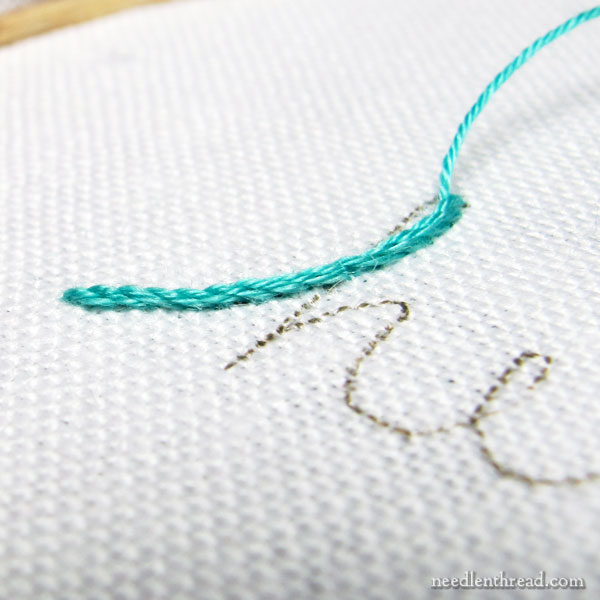
On the “bottom” side of the stitch (imagine the lower side of the stitch, when you’re working from left to right, and looking at the lower portion of the stitch), you see a well-defined stem stitch.
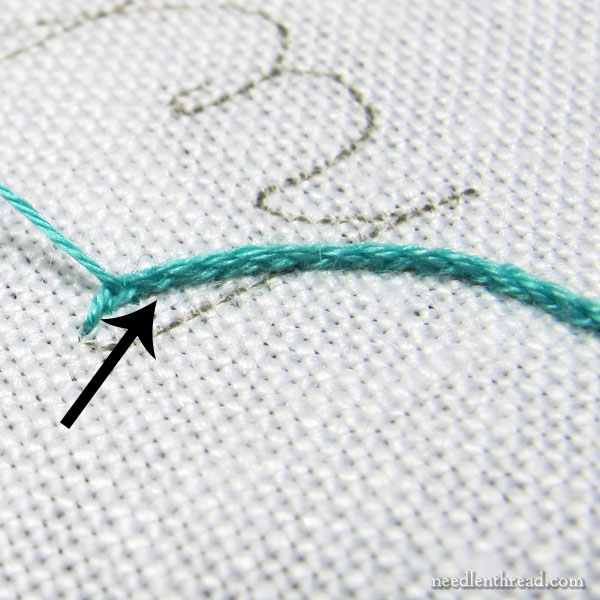
If you look at that left-to-right line from the top down, you’ll notice that there’s a somewhat braided look to the line as it sits right next to the fabric. You can see what looks like an extra layer of stitching underneath.
It’s not really an extra layer of stitching – it’s just a modification on the stem stitch.
So let’s take a look at how to achieve this.
In this tutorial, I’m using coton a broder #25, also known as broder special – I’ve written about coton a broder here, if you’re not familiar with it.
I chose coton a broder because split stitch invariably works best on thread that is non-stranded. That is, the thread is not meant to be split into smaller threads for stitching. It is meant to be used exactly as it comes off the skein. Perle cottons are non-stranded threads, but they are much more tightly twisted than coton a broder and they are made out of fewer (and fatter) plies.
You can definitely practice the stitch with three strands of regular stranded cotton embroidery floss.
I’m stitching on linen, using a #7 crewel needle.
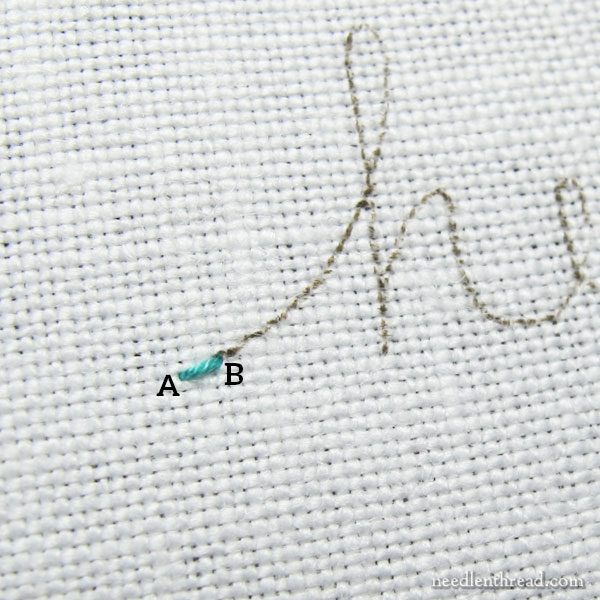
Begin at the beginning of your line, making a small straight stitch from A to B. This stitch is about one-half to two-thirds the length that your stem stitch will be. This stitch is probably about 1/8″long. How long you make your stitches will depend on the thread you use and the look you want. Practice and experiment!
You don’t have to be super precise on the measuring of the stitch.
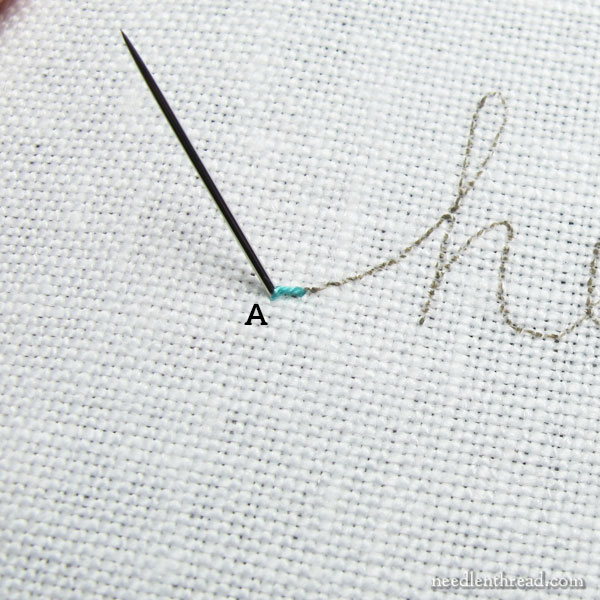
Bring your needle and thread to the front again at A (same hole).
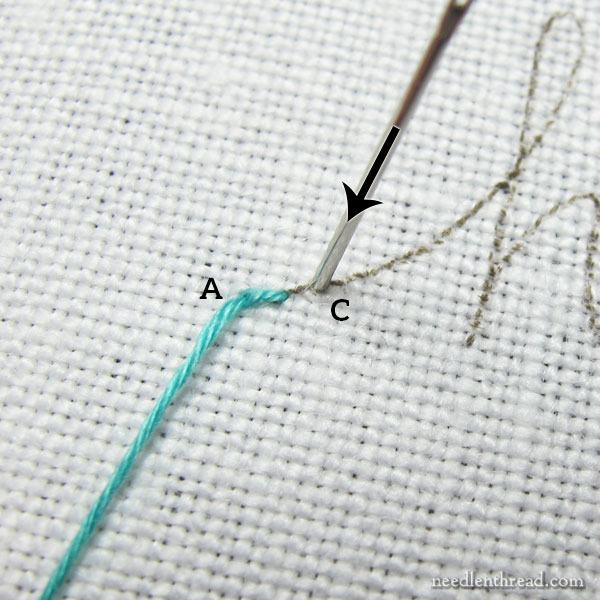
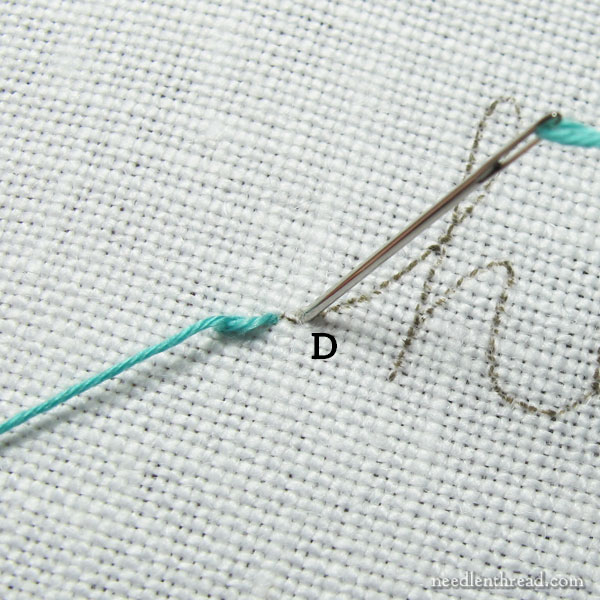
Then, moving past B, take your needle down into the fabric at C, which is about one-third the length past the straight stitch A-B.
Don’t pull all the way through. Just like regular stem stitch, this stitch is easier when you leave a small loop of working thread on the surface of your fabric for working the next part of the stitch.
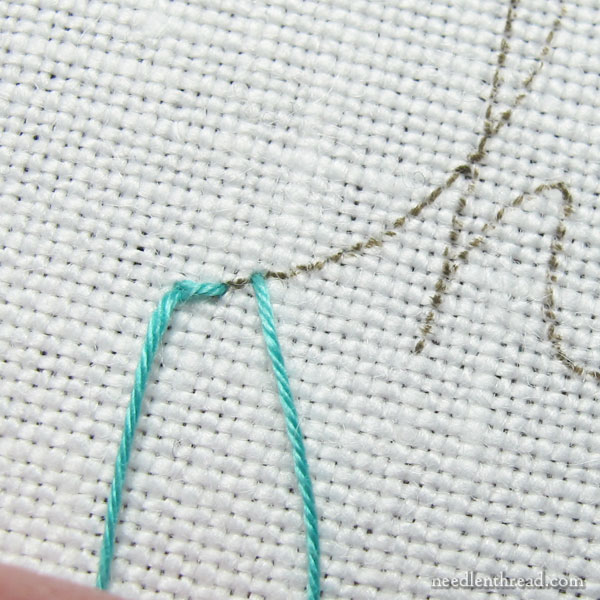
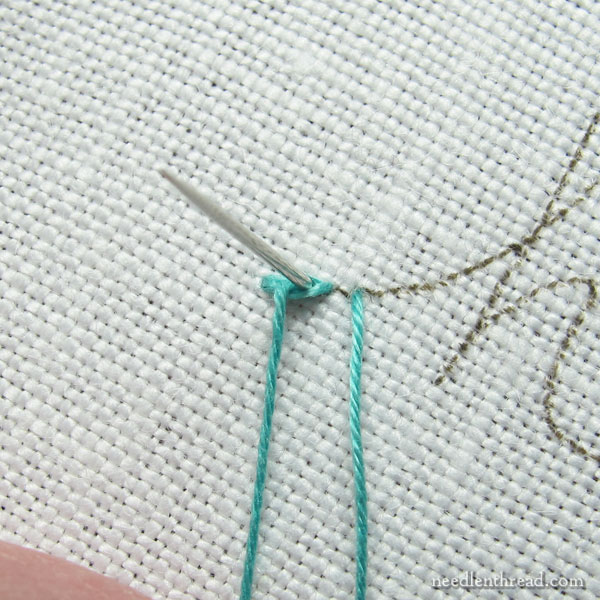
This should be your configuration of thread after pulling your thread mostly through and leaving a small loop on the front of the fabric.
Hold the loop below the line (working left to right) so that the stitch A-B is clearly exposed.
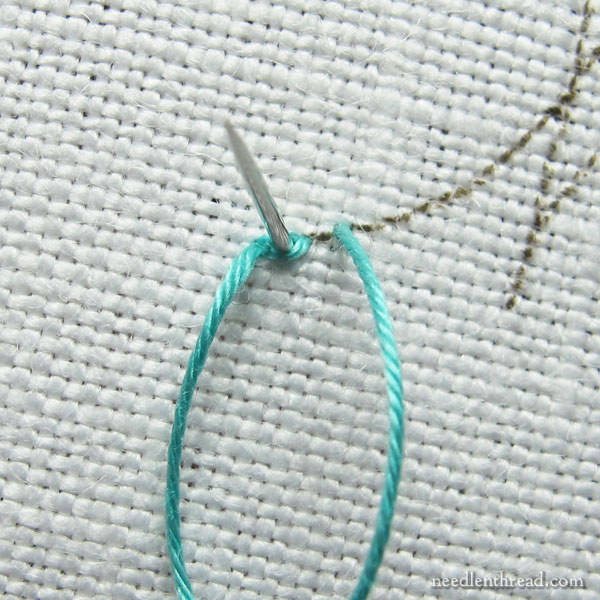
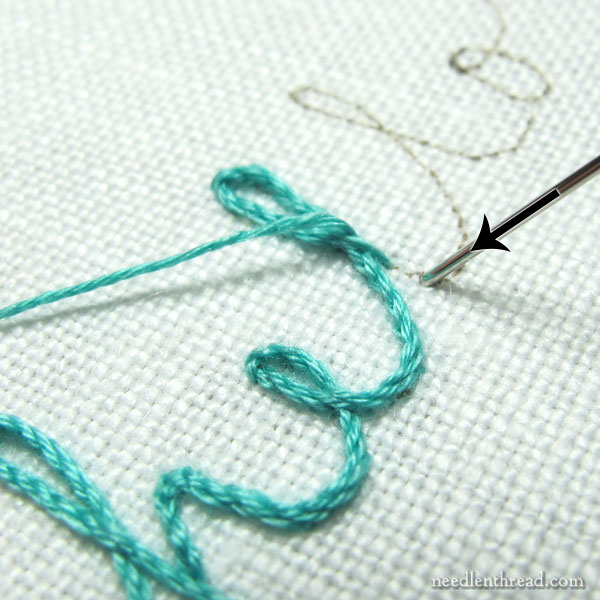
Then, bring your needle and thread to the front again, splitting A-B, as shown above.
This is the split stitch portion of Quaker Stitch.
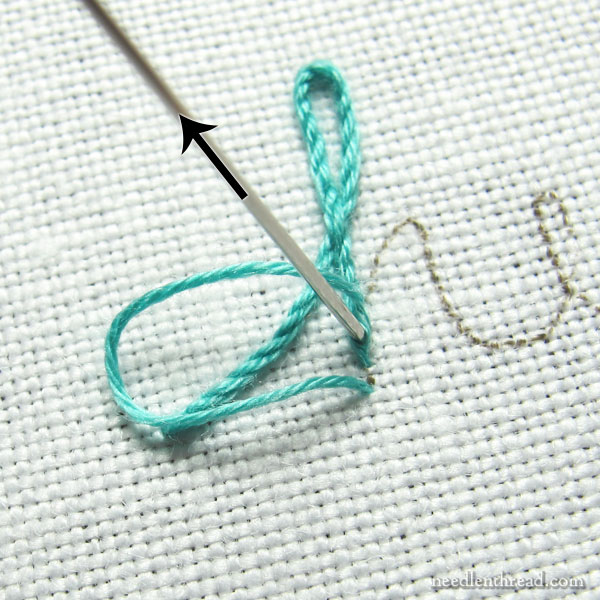
Pull your thread through, so that the stitch A-C lies on the fabric, and move forward to D, about one-third to one-half the length beyond C.
Take the needle down into the fabric, leaving a small loop of working thread on the top of the fabric.
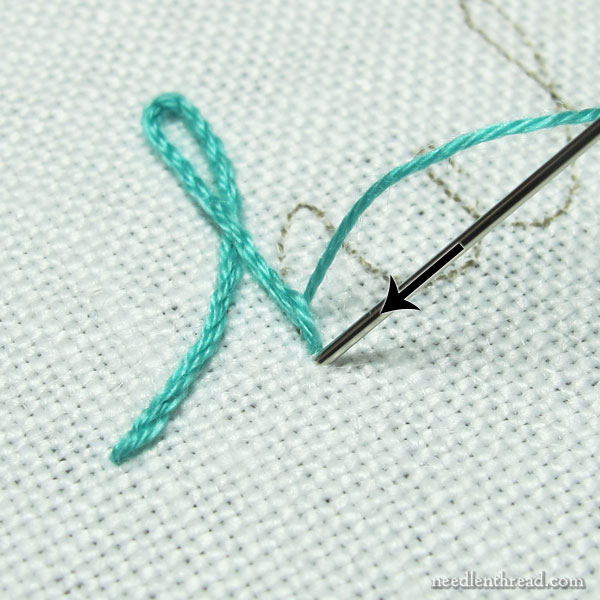
Come up into the stitch A-C, in the forward half of the stitch, splitting it, as shown above.
You can see at this point that the whole sequence of this stitch is simply a stem stitch, but that, instead of coming up in the fabric in front of the previous stitch, you’re going to come up into the front portion of the previous stitch and split it.
When it comes time to end a line of split stem stitch, work the splitting portion of your last stitch…
…and then pull through, then take your needle and thread to the back of the fabric just past the end of the stem stitch.
Starting a New Thread
If you need to start a new thread while working Quaker stitch, here’s how to do it:
After splitting and pulling the thread through, take your stitch forward for the straight, long portion of the next stitch and pull the thread all the way through, without leaving a loop on the front of the fabric.
This will cover up the stitch you’re supposed to split, but that’s ok.
Turn the work over and end off your old thread.

To start your new thread, bring it up in the portion of the stitch you’re supposed to split, before the last long straight stitch you just took. You’ll need to nudge that straight stitch to the side, to access the stitch behind it and split it.
Now just continue forward as before!
Why, hello!
Wasn’t that fun?
This is a wonderful line stitch, and definitely worth adding to your embroidery repertoire! Take some time to practice it, and I think you’ll agree that it’s a great stitch for fine lines and for writing with thread!
You can read more about the Quaker Tapestry here on their website. It’s a fascinating community embroidery endeavor!
If you happen to be a patron of Needle ‘n Thread over on Patreon, you’ll find a PDF version of this tutorial over there shortly. Don’t forget to stop by and pick it up!
Mary,
I received your tutorial in my email and am so grateful. What a beautiful stitch, and your explanation is really clear. Now if I could just attain the precision of your stitches …. Practice, practice! 🙂
Thanks!
Beth
This Quaker Stitch tutorial is perfectly timed – just what I need for the project I am beginning. Thank you for continually posting helpful tips and tutorials. For a beginner such as myself, your blog is invaluable.
Thanks for this Mary.
The Quaker Tapestry is well worth a visit if you are in the UK.
The Museum is in Kendal, a convenient stopover on the way to the Best and Beautiful Lake District (can you tell I’m from Cumbria) from London and the south 🙂
Wow, that looks good. Thanks.
Oooh, thank you, thank you, Mary! What a wonderful discovery!
Linda
Thanks Mary! That was a great tutorial! I will definitely try it. Margie/TN
I am definitely going to try this stitch asap! Thanks!
I just want you to know how much pleasure I receive everyday in my inbox from your emails. Even if I don’t get it read the day it comes I never skip reading your emails. They are fabulous.
Yesterday I taught a group of 30 somethings, male and female, to cross stitch. It was wonderful to be able to give them your website as a resource as they begin to stitch. I have to admit it was yours and subversive stitch.
But really, thank you so much for all you contribute to the needlework community. Your knowledge is amazing.
🙂 Thank you, Joanna!
Very attractive and useful stitch and great tutorial. Thanks to you, I had the opportunity to view the Quaker Tapestry in Kendal, England in 2015. How you ask? You wrote an article about Philippa Turnbull’s upcoming retreat “Arts and Crafts retreat in the Lake District”. It sounded wonderful and I registered and attended but went early and stayed afterward spending almost a month exploring the Lake District. Of the many things I saw and visited, the Quaker Tapestry had the most impact for me. It is truly something I will never forget. Being able to do just 1 of the stitches brings back wonderful memories. Thank you.
Would you recommend Quaker stitch for something that will get a lot of laundering and ironing, such as a tablecloth, or would it be best to stick to ‘flatter’ stitches?
I think it would work well!
Wow, this takes me back! I guess it must be 20 years ago that I saw the Quaker Tapestry and learned to work this stitch. I agree, it’s an excellent choice for good clear lettering.
Wow… that is awesome… looks like a combination of the stem and split stitch! I’ll have to try that next time I need to outline something clearly!!! Thanks for the stitch out and demo.
Mary,
My thoughts are with you, your mother and your family. Life can be difficult at times and none of us enjoy the difficult patches. Anna is out of action too. Please, reduce the pressures on yourself. We will survive less frequent postings. They are always good – especially the Quaker Stitch. I did not know that one at all.
Best wishes, Ann B.
Lovely to see this. The Quaker Tapestry is amazing, I’ve seen it several times and see so much more every time I look at each panel. It’s also a great way of learning Quaker history, although it is mainly UK Quakerism. (Some panels were worked in other countries and sent back to join). I was lucky enough to put some stitches in when at our Yearly Meeting in 1989, my then 8 month old daughter also managed a couple of stitches too.
If anyone is in the UK, there are workshops teaching motifs from the panels and you can also buy kits from the shop/on line.
what beautifully clear instructions. Thank you.
Can you tell us what you think is the smallest scale text that could be worked with this stitch, and what thread you’d suggest. I “paint” pictures and landscapes with fibres, felt and stitch and like to add the quotation that inspired the pieces. I have difficulty in making the script fully legible sometimes and this stitch looks like the answer.
Hi, Ann – I think it’s something you would want to test, to see what scale to stitch this. I think it can be used for very delicate lettering (one strand of floss), but testing it yourself to see if it meets your needs is usually the best way to go.
Thank you for the wonderful tutorial, Mrs Corbet.
This is the first time I have ever even heard of this stitch, and the result is beautiful!
Stem stitch has long been one of my favorite stitches, but there have been times where I have used this one without realizing it was a different stitch I thought I was just fudging the rules.
This is a wonderful stitch! A game changer.
I frequently use the saying, “Something’s gotta give.” myself. You are wise to realize that we cannot do everything in times like this and are doing the right thing. Best Wishes to you and your family.
Dear Mary
What a lovely stitch and your tutorial is so clear especially with the added tutorial photos. I can’t wait to try it I can see that I could use this in all sorts of embroidery and even add to my project at the moment which making a quiet book for my niece which involves some needlework. Thank you for sharing with us this lovely quaker stitch I can’t wait to try it. I hope your mother is better and improving. Take care.
Regards Anita Simmance
I really love the look of this stitch and saved this post to come back to when I was ready to stitch with it. Is there/will there be a YouTube instructional video any time soon? I so appreciate having access to your video tutorials!! 🙂
Even though I have studied your tutorials and watched your videos, I still cannot seem to accomplish a stem stitch that satisfies me. I have done smaller stitches as you recommend, but I still get eyelashes on my curves. So simple, so easy. So UGLY! But this stitch! This I can do! I don’t know why I never thought of anchoring the previous stitch with a split. I have a new fave. Thank you! Much Quaker stitching in my future!
Thank you so much for the really clear instructions for this stitch. It is just the stitch for the hair on my current piece of work.
Hello Mary,
I always appreciate the info you provide to your readers. The Quaker stitch is beautiful and I wondered if you have a video of how to perform the stitch? I have basically taught myself how to embroider by watching your videos because I get confused when I read the directions only. It’s helpful for people like me that need to see the stitch done in person or via video.
Thank you in advance of your reply.
Acho lindo bordado frito a mão o seu e perfeito parabéns
This is such a beautiful simple stitch. Thanks for the directions!
Thank you for sharing this is lovely
Love this stitch, tutorial is well written and I can’t wait to try it on a project I’ve already begun in wool. Thank you!
What a beautiful stitch! Is the font your own hand lettering or is it a font you used? If it’s a font, can you tell me the name of it?
Oh, that’s just my own cursive handwriting directly on the fabric. 🙂
This is such a great demonstration and very easy to understand. Thank you so much!
Thank you Mary for your instructions and clear photos for the Quaker stitch. Practicing before adding it to my wool fall project that includes a cursive “Mahalo” (Hawaiian for thankful). So Mahalo Mary! Once again you are the BEST!
Laura
Thanks, Laura! 🙂
Such a lovely stitch and your tutorial is so easy to understand. Many Thanks.