


Are you ready for Part 4 of this series on how to embroider strawberries? I am!
Our last installment focused on Burden Stitch as a stylized filling for a strawberry.
But before we go any further, I have two things to tell you:
1. Hallelujah! It is Friday!
and
2. There’s now a specialty thread pack available for the perle cottons I’m using in the strawberries.
So read on, and I’ll tell you all about it…
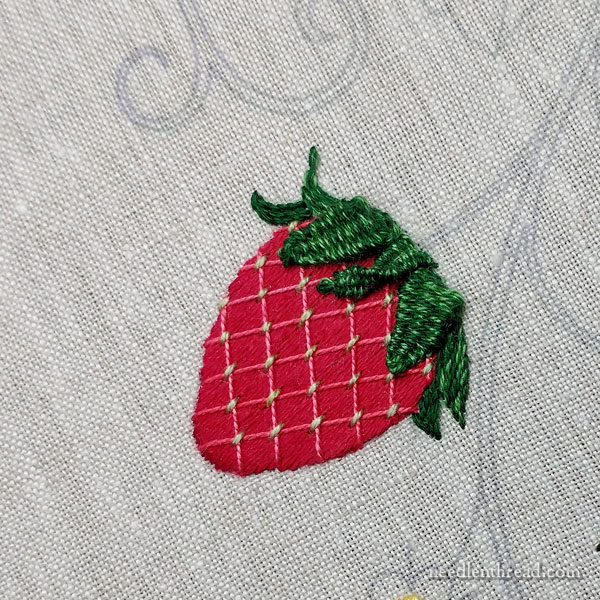
This is the strawberry we’re stitching today. (We’ll discuss the “bangs” further down!)
Thread News
After getting inquiries about the House of Embroidery perle cottons, Richard at Global Artisans contacted me about the threads. They decided to put together a specialty pack of the perle cottons just for the strawberries. If you’re keen to try them out, if you haven’t started your strawberries yet (or maybe you plan to stitch another set), you will find that thread pack here at Global Artisans. It is on special right now (along with many of their mini collections). They’re taking orders for them now, and they’ll arrive a little later in April.
That’s just a heads-up, if you want the exact threads. I realize now that I should be a little more precise in my thread choices, so that you’re not put to too much trouble in tracking them down. Big ‘Pologies!
At the same time, I do hope that you feel free enough with these tutorials to make your own thread choices, to experiment, and so forth. I hope that the tutorials will help build confidence in choosing threads and stitches.
And now, the strawberry:
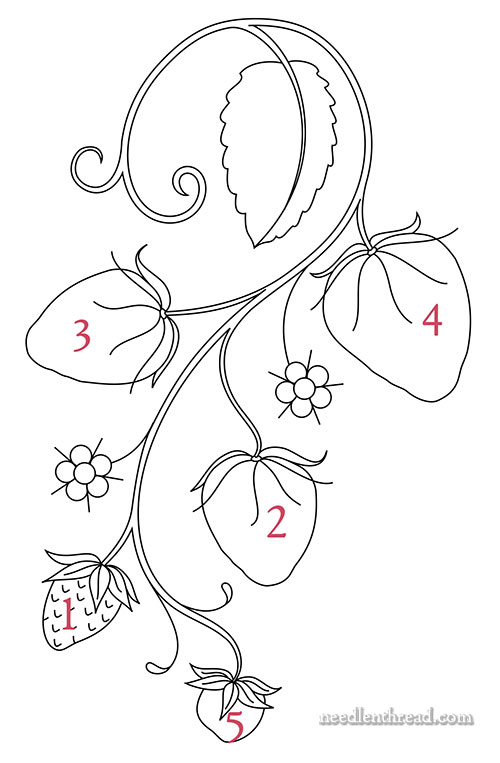
The strawberry in question today is #3 in the diagram above. It’s a big fat strawberry, and we’ll be working it stylized, using surface satin stitch with an overlay of couched lattice work.
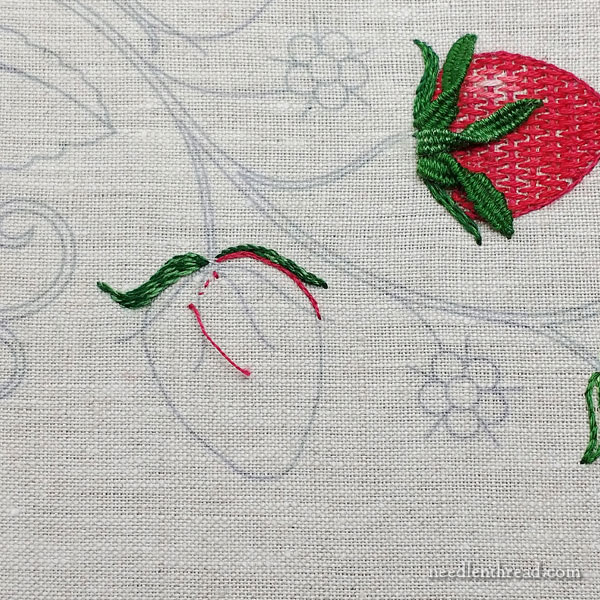
As with Strawberry #2 in burden stitch from last week, begin by stem stitch filling the back sepals on the strawberry using two strands of green in the needle (one dark, one medium).
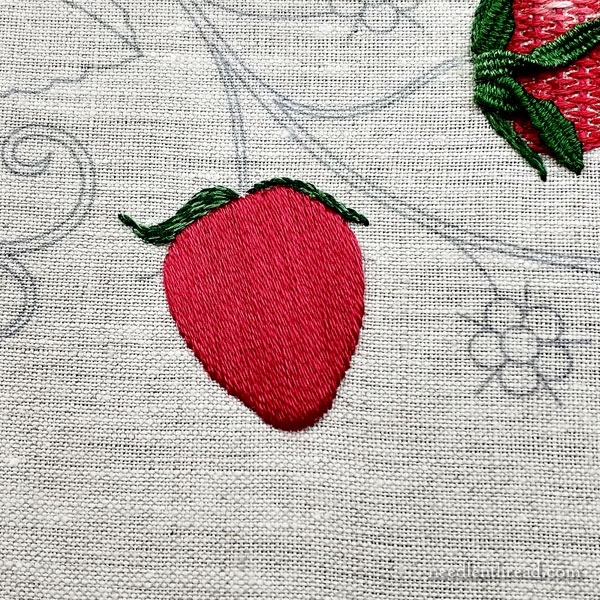
Then, switch to red and, using one strand, split stitch the outline around the strawberry shape.
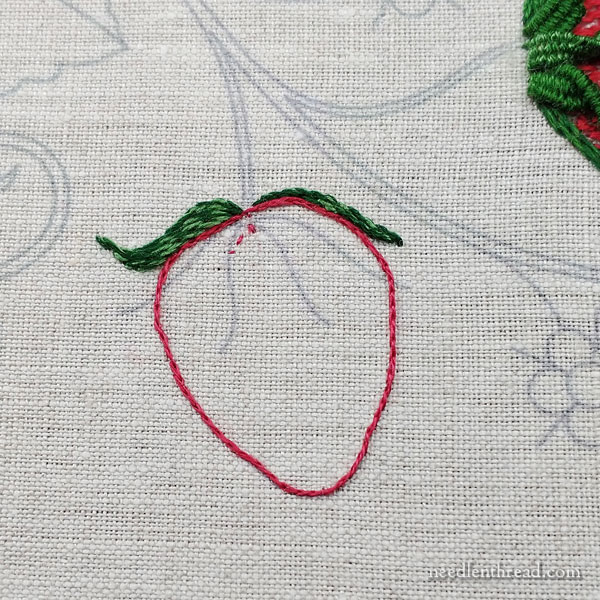
Lo! The finished split stitch outline.
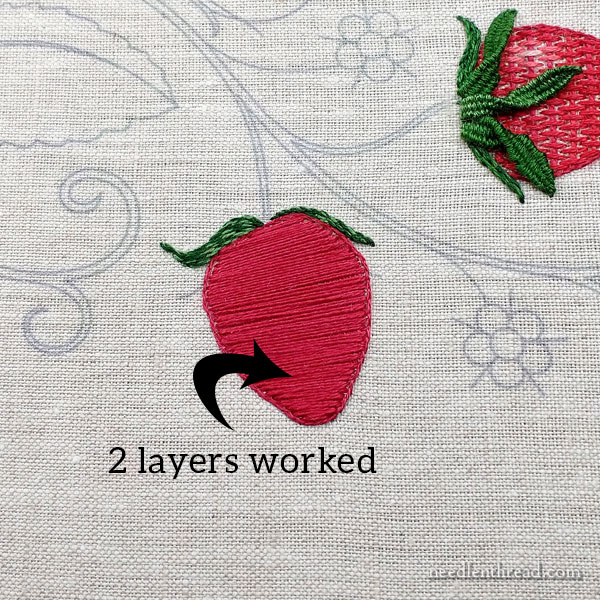
Now, fill inside the strawberry.
Use two strands of red in the needle, and work two layers of filling. The first layer should run vertically down the strawberry, from the stem to the tip of the strawberry.
The second layer of padding should run horizontally across the strawberry.
In the photo above, you can see the second layer. There’s another layer behind it.
Notice that the padding layers are inside the split stitch line.
As you work these layers, use a surface satin stitch. What’s a surface satin stitch? It’s a satin stitch that does not cross the back of the embroidery. Instead, the next stitch begins right next to where the previous stitch ended. You just step sideways to work the next long stitch on the front of the fabric.
This is the same movement that we talked about with the burden stitch, when working the foundation lines, only with the satin stitch, it’s much closer together.

After you finish the two layers of padding, switch to new thread.
For the satin stitch on this strawberry, here are some important points:
1. You can use two strands of floss in the needle, but it’s really, really important that your stitches lie flat and smooth. You might have to use a laying tool to make this happen. (It’s the best way to make it happen!)
If you don’t have a laying tool, use a very large tapestry needle or maybe even a knitting needle or something similar – some kind of completely smooth shaft will work. Here’s a video that will show you how to use a laying tool.
2. You can work the satin stitch as surface satin stitch.
Surface satin stitch works well here, because we’re covering the satin stitch with couched lattice work.
3. Start in the middle of the strawberry, work towards one side, and then go back to the middle and work towards the other. When you go back to the middle, it’s a good idea to change your thread again if you haven’t changed it since you started the top layer of satin stitch. This will keep the satin stitch looking good!
There’s the finished satin stitch.
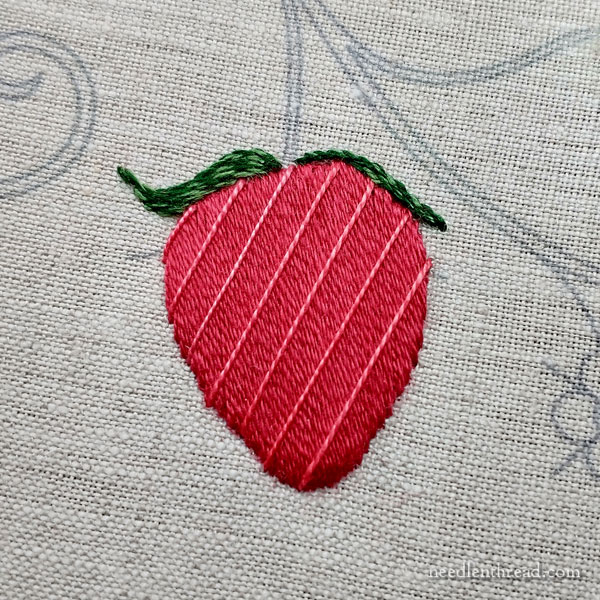
Now, switch to a pink perle cotton.
Work long stitches diagonally across the body of the strawberry.
These stitches should be about 1/8″ apart, maybe a hair farther, but not much farther!
Start in the middle, so that you can work an equally spaced layout over the whole strawberry. And again, follow the same movement as stitching the foundation lines for the burden stitch – that is, don’t take long stitches across the back. Just “step” up or down the design line on the same side of the strawberry for the beginning of the next stitch.
To ensure equal spacing and parallel lines (important for a neat finish), you might use a small ruler or maybe an index card to help you line things up.
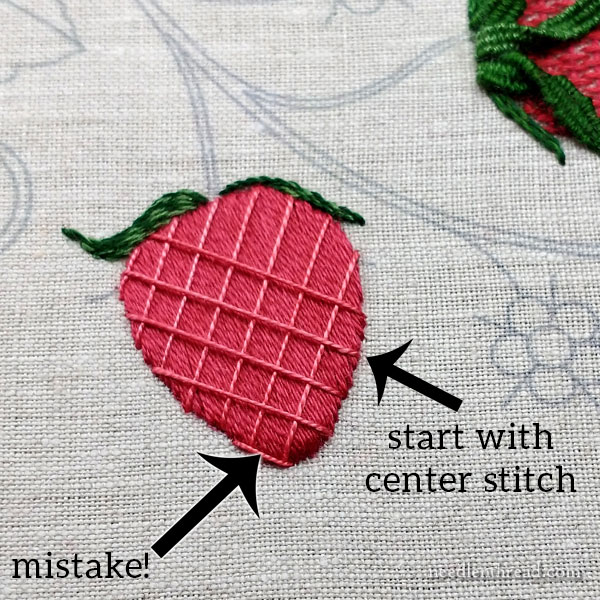
The second layer for the lattice will lay over the first layer, perpendicular to it, to form a diamond grid atop the strawberry.
Two things to note: start with the center stitch again (to ensure equal coverage of the shape)… and be careful of adding too many stitches.
The lowest stitch there on the left (the arrow is pointing to it) had to come out, for obvious reasons. It’s too close to the edge.
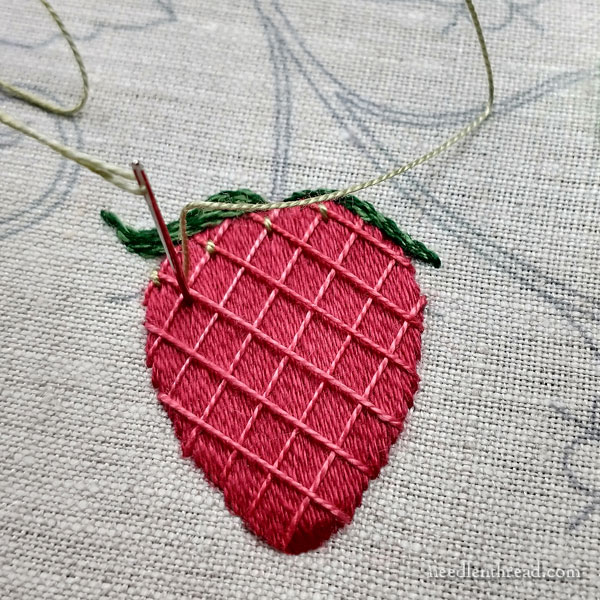
Once you’ve completed the lattice layout, switch to a light green perle cotton and couch over the intersection of all the lattice lines.
Your couching stitches – which represent the strawberry seeds – should run vertically down the strawberry. Keep them small, just crossing right over the lattice lines, but be careful not to shift the placement of those laid threads.
In fact, it’s better to make the couching stitches too long, than to try to make them so small that they cause the laid threads to shift.
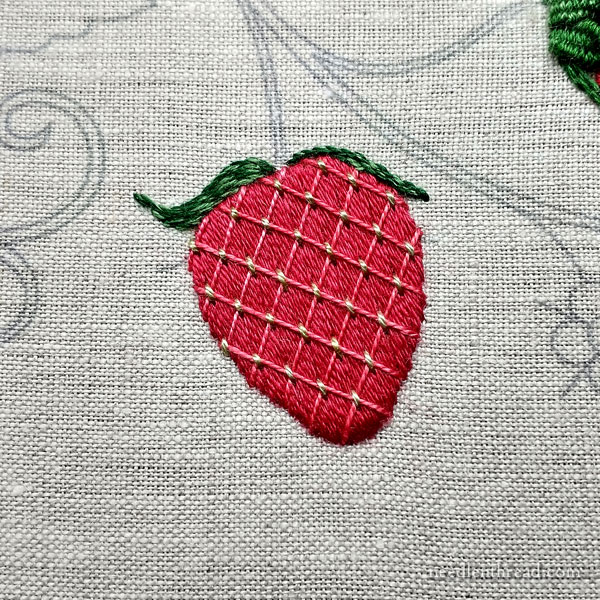
There ’tis, all stitched up and ready for some sepals!
Now, this is where the Peanut Gallery is more than welcome to comment, because the sepals kind of ended up looking a bit silly!
You’ll see what I mean…
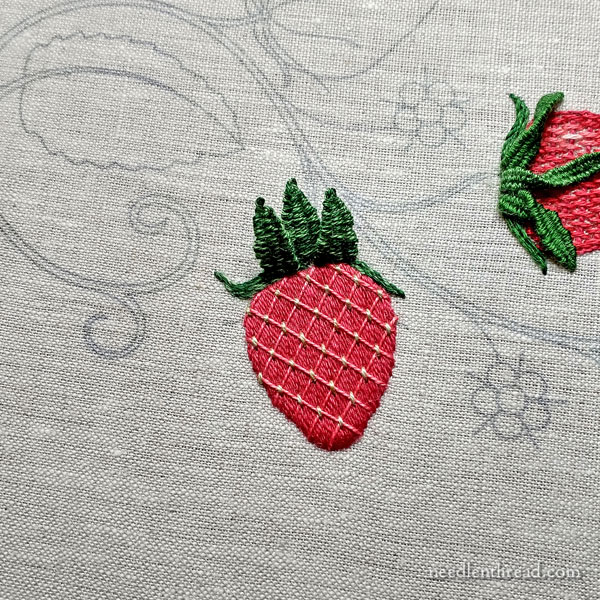
Using two colors of green in the needle (dark and medium on this one), work the sepals in the same manner that you worked them for the burden stitch.
Please… please! Feel free to get wild and crazy with them! Make them however you want them to look!
In this case, they were lined up straight across the front, which is probably not the best approach. You’ll want to make them narrower, and change the length up a bit to get some variation in them.
To alleviate the uniformity of these three woven picots, the middle one got a little twist and was tacked to the side somewhat. It helped. But still…!
You can also add in some stitched little green bits at the top of the strawberry, if you want to get rid of the flat-head look.
These are things that normally I would work out when first stitching a piece, but in the interest of moving things along, you’re getting it without too much correction!
In the photo above, you can see the sepals before the twist.
I know! You just want to sing All We Need is Love, don’t you?! I’m pretty sure if the Beatles were reincarnated as strawberries, they’d look similar.
Give your sepals some twists, be inventive with them, experiment! You can work out a good arrangement for the strawberry bangs, I’m sure!
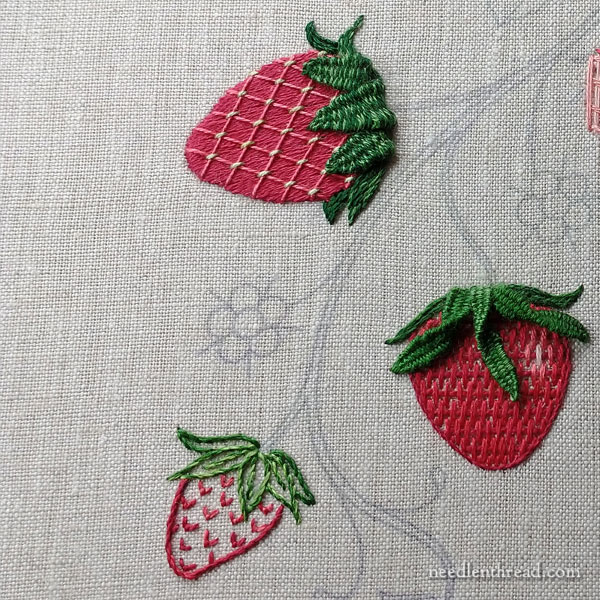
So that brings us to the end of Strawberry #3.
Next time, we’ll do the 4th strawberry – the remaining big one – in another stylized approach. Strawberry #5 will be a lot of fun, too – it’s our “realistic” strawberry, with some proper shading going on.
The final installment will cover the stems, leaf, and the little flowers.
If you’d like to follow this project from start to finish, you’ll find all the installments, including the free design, materials list, and all the tutorials (along with other projects in this How To Embroider (Blank) series) listed in this index.
Members on Patreon already have this installment in the PDF covering strawberries 2 & 3. If you haven’t downloaded it yet, you’ll find it at Needle ‘n Thread on Patreon! Strawberry #4 will be up for the weekend later today, so we are a little ahead over there, but we’ll sync up next week.
Dear Mary
This is a beautiful lattice work on the strawberry and a great tutorial, I like this strawberry it stands out with the lattice work. I’m learning a lot from the series on the different how to embroider series, it’s a great learning curve and even though I’ve been embroidering for many years I still learn a lot from these specific embroidery topics. The different tips and technics are so helpful in learning how to embroider different stitches and the different threads to use with the embroideries make it interesting. Thank you for sharing with us the different techniques on the strawberries and the other how to embroideries.
Regards Anita Simmance
Hello Mary
I live in Brazil.
Would you have a Garden Party e-book with only the drawings and stitchs? I would like to buy.
Thanks
Hi, Angela – I may make it available as a PDF collection for purchase in the future, but I am working on a few other things at the moment, so I’ll have to circle back to that idea in a little while. Thanks for asking!