


It’s time to bring the Bee-Jeweled Pincushion project to a close!
If you have not had a chance to stitch the pincushion yet but you still want to, you can find all the articles, with design, materials lists, and step-by-step instructions, here in the Bee-Jeweled Pincushion Project Index.
I’ll continue to stock the pincushion kits in my shop, so if you decide you want one, I can help you with that! They are out of stock right now, but I’m taking a waiting list via email, so if you drop me a line, I’ll add you to it. It’s an affordable way to gather all the materials you need from one source.
Today, we’re adding the Palestrina stitch edges to the pincushion. We’re going to embroider the bottom edge first and then the top.
Please read through the instructions before you begin!
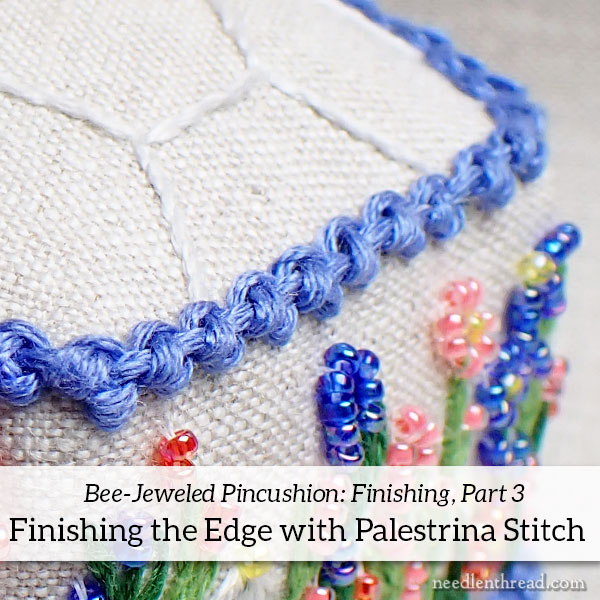
The Palestrina stitch is a favorite finish of mine for the Edges of Things. It makes a distinct knotted edge that can be dressed up and down and manipulated in various ways.
On the pincushion, I’ve arranged the Palestrina stitch to sit in a particular way, to enhance the edges with a kind of knotted scallop look. To achieve this look, you’ll need to pay attention to the orientation of the pincushion while you’re stitching on it, and the direction in which you’re stitching.
If you are not familiar with the Palestrina stitch as a knotted line stitch, you might take a look at my video for Palestrina stitch here.
It might be a good idea to practice the Palestrina stitch on a piece of scrap fabric, using 6 strands of floss in your needle, to get an idea of stitch spacing. You want the knots to sit next to each other, not too crowded, and without a long bridge between them. You want their shoulders to touch!
Work with all six strands of floss in the needle at once. If you’re comfortable working with longer lengths, you can cut about 20″ – 24″ at a time.
I separated the strands and put them back together before threading them in the needle. This is called “stripping” your floss, and it helps to achieve a plump, full stitch. You can read about stripping floss here, if you’re not familiar with the process.
I used a #7 crewel needle (provided in the kit) for this, but if you meet with too much resistance or it bothers your hands, you may need to use a larger needle.
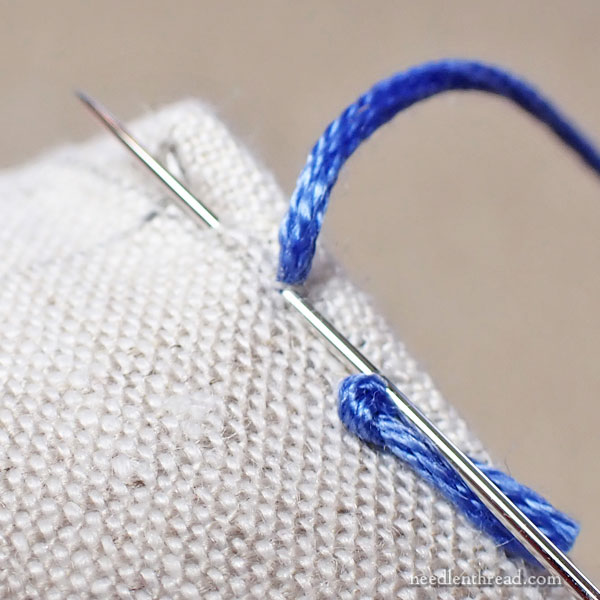
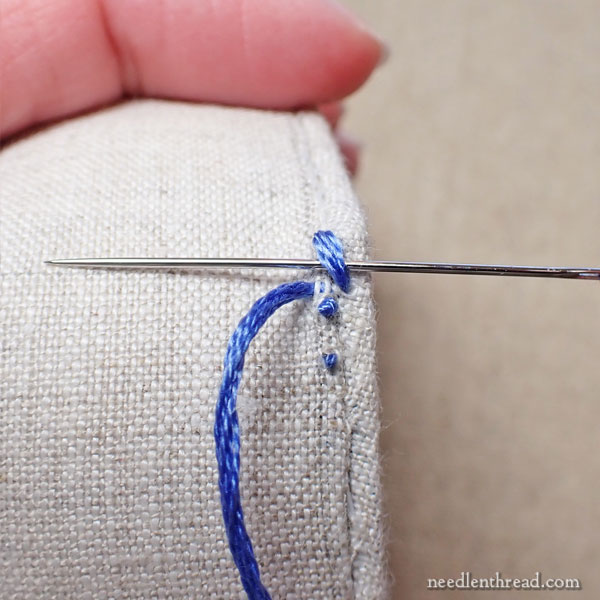
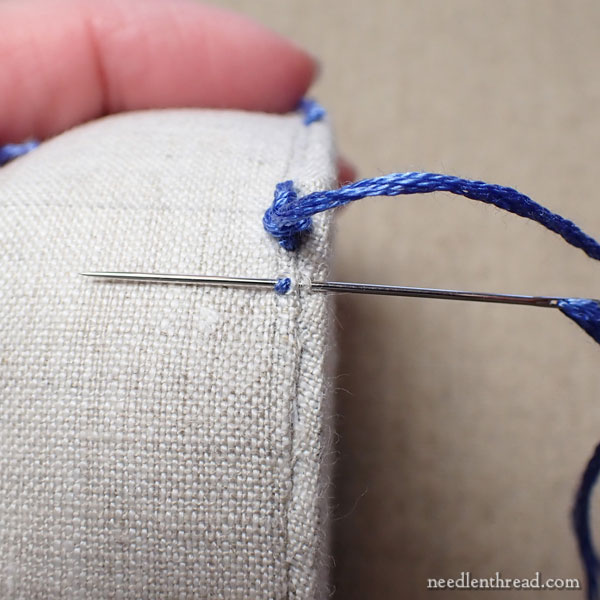
Begin with a waste knot at the end of your thread. Pass into the base of the pincushion at the seam, about an inch away from a corner. You’ll be initially preparing your thread by going towards that corner.
Pass into the fabric and out again, maybe 1/4″ away, so that the knot catches on the front of the fabric right near the seam, and then take a tiny backstitch into the fabric right by the seam and bring the needle out again about 1/4″ or so down the seam. Make another little backstitch and come up in the corner this time, where you will begin the Palestrina stitch.
Snip off the knot.
If you pull up on the knot and snip it right next to the fabric, the thread will sink into the pincushion and disappear. If it doesn’t sink all the way in, fiddle with it – push on the fabric or jiggle the next backstitch, so that any tail of thread disappears inside the pincushion.
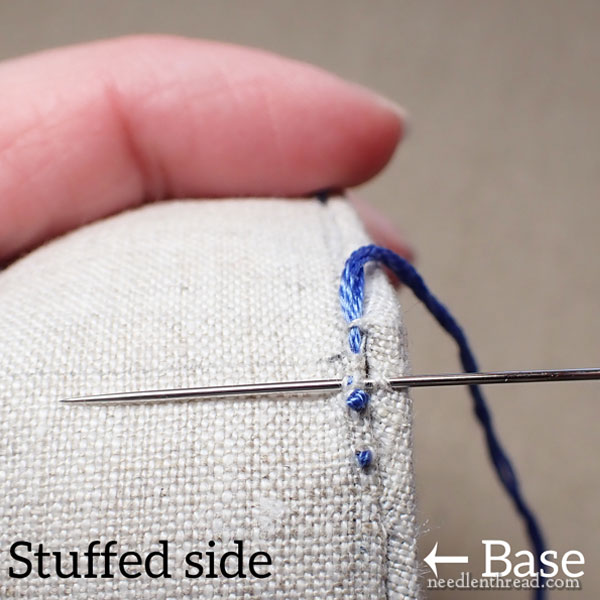
This orientation is for the right handed stitcher, but lefties should read this part, too!
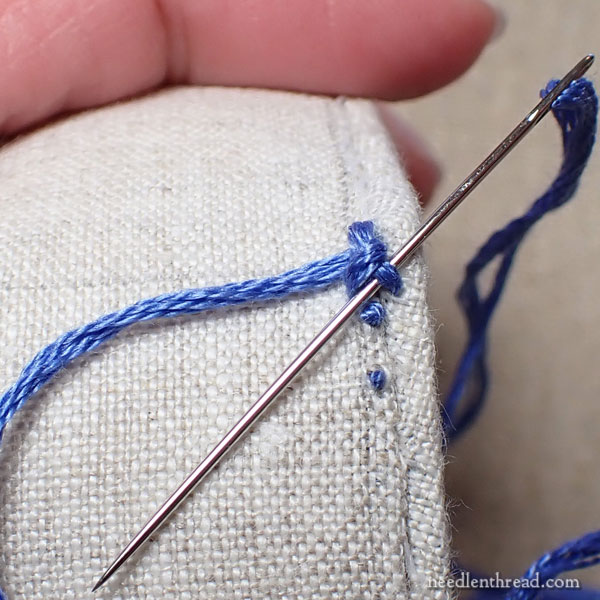
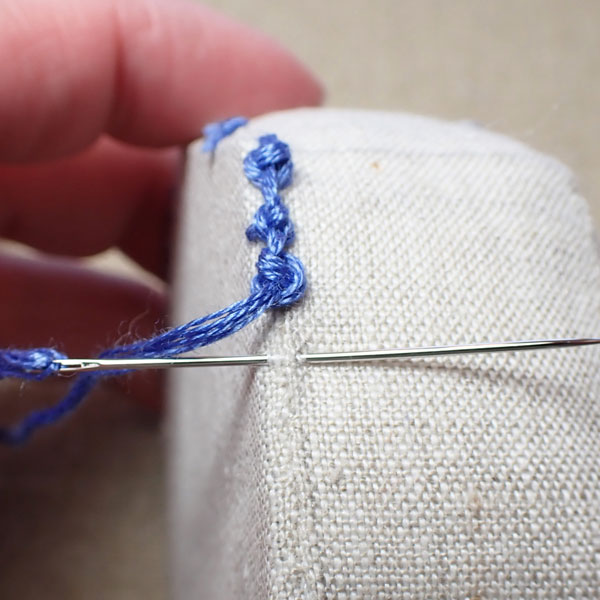
Holding the pincushion in your left hand so you can stitch with your right hand, make sure the stuffed side is to the left and the base is to the right, as shown in the photo above.
You’ll be stitching from the corner down (or towards you). This is important!
Moving down the line towards the backstitches you just made, and working between the outside top edge of the base and the outside lower edge of the side, passing from right to left, pick up a little fabric on the base and a little fabric on the side, as shown above.
The stitch you’re making right now should be about 3/16″ away from the the corner. With the Palestrina stitch, you don’t want to crowd it (because you’re using six strands of floss, anything closer would really crowd the knots), but you also don’t want to elongate the “bridge” that will form between the knots. You want the knots to sit right next to each other, touching shoulders, as mentioned above.
This first motion of the stitch creates a diagonal straight stitch that goes from the corner (or from the previous stitch) into the base.
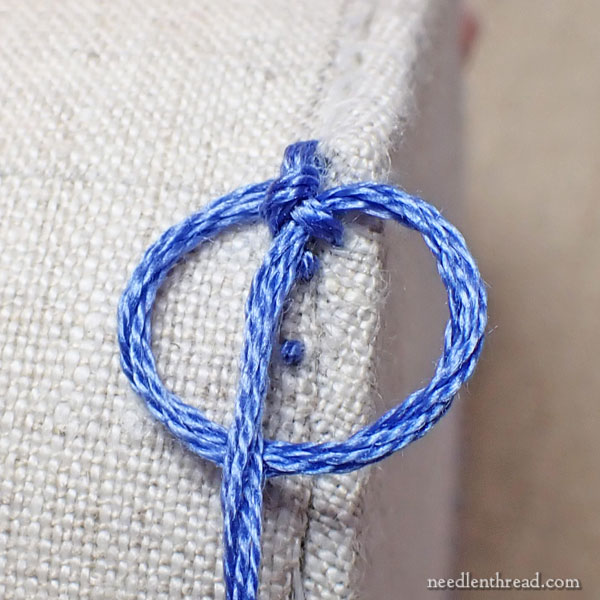
Pass under the diagonal stitch from right to left without picking up any fabric.
When you pull through, this will tighten around the diagonal straight stitch and you’ll have to “legs” on each side of the stitch, one going into the base and one going into the side.
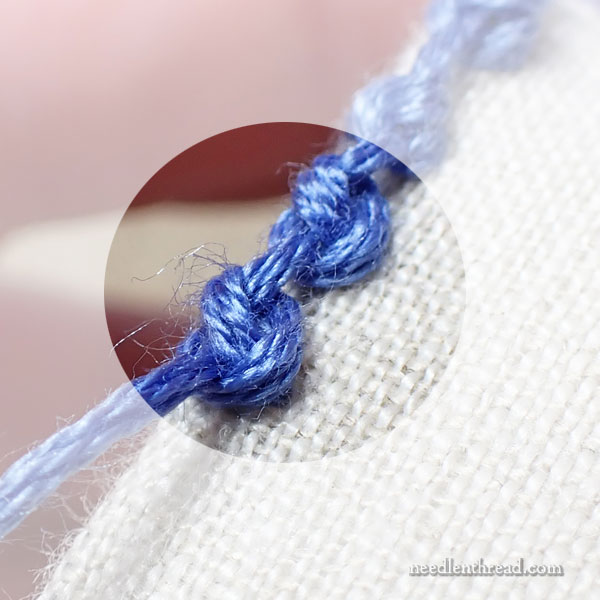
Pass the needle from right to left again, and downwards, so that you’re passing between the two “legs” of the stitch, under the right leg (the first diagonal stitch) only.
Bring the needle out from between the two sides of the stitch and over the working thread.
You will see that the working thread will form a kind of loop – you want to come up inside it, so that the loop, as you pull through, tightens around the stitch. This is what is meant by coming out “over the working thread.”
As you pull the thread slowly through, this is what it should look like. Note that the thread coming out of the stitch is over the loop.
Pull slowly and gently. You want this to snug up next to the stitch, but you don’t want it to choke the life out of the stitch. You want a plump, jolly knot.
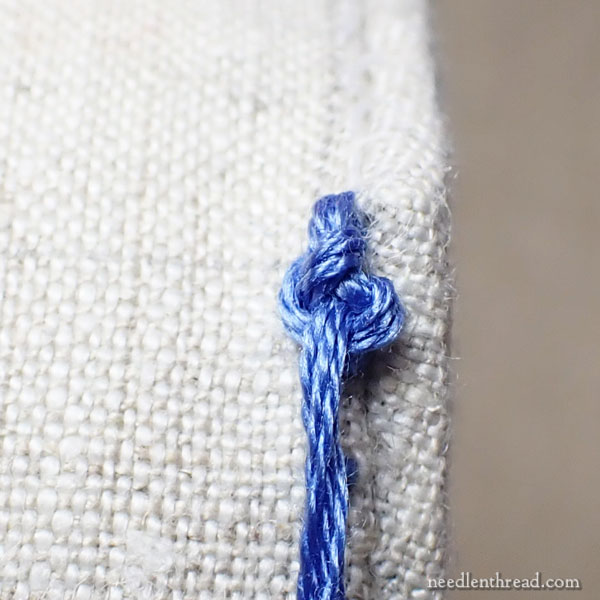
There it is.
Notice that I’m pulling the working thread in the direction that I’m stitching, down the line. Important!
Now, you’ll move down the seam, about 3/16″ again, to start the next stitch.
In the photo above, I’ve passed under one of the tiny holding backstitches. This doesn’t matter. Pretend they aren’t there and just cover them up as you go.
This is the movement from one Palestrina knot to the beginning of the next, creating that diagonal straight stitch.
If you need to end a thread and start a new one (you will need to), this is the movement of the stitch where you do that.
You’ll end with the diagonal stitch in place. Then, just pass your needle up inside the pincushion to some area on the seam that hasn’t been stitched yet close by, and make the same type of tiny backstitches along the seam to end the thread. You only need to make about two. Then, pass the needle and thread out anywhere on the sides of the pincushion (on the seam, or even among the embroidery on the sides), pull on the thread, and snip it off close to the fabric.
Then start a new thread the same way we did at the beginning of this process.
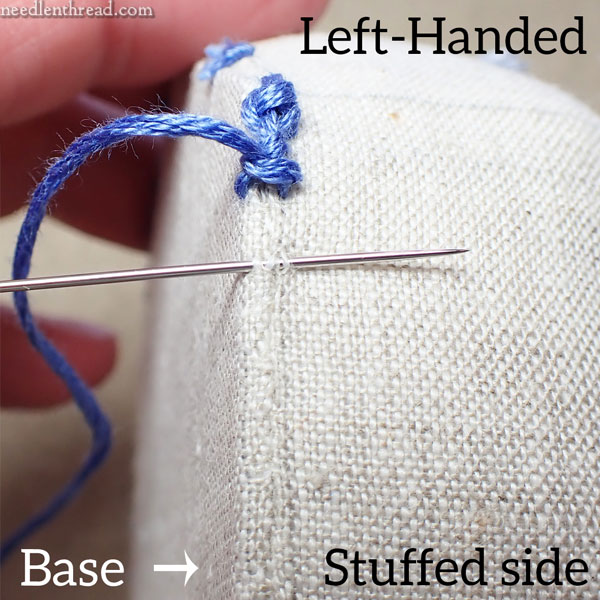
If you are left handed, there are two things that must change for you:
1. The pincushion should be oriented with the base at the left and the stuffed part at the right, as shown. You’ll hold the stuffed part in your right hand.
2. You’ll pass the needle from left to right with the stitch, picking up fabric on the base then fabric on the side.
Notice that you’re still stitching down the seam towards you. Important!
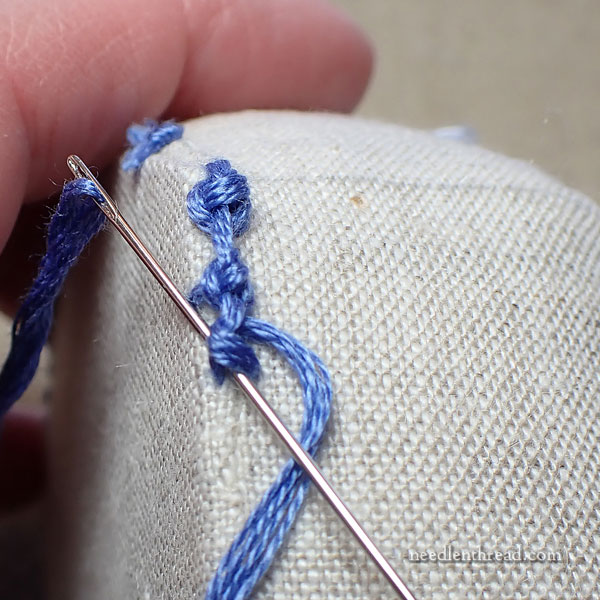
Every time you pass under the stitch, remember that you’re passing from left to right. It won’t be hard to remember that, because it is the natural way to pass the needle if you’re holding it in your left hand.
The photo above shows the final pass between the two “legs” of the stitch and out over the working thread.
Here, I’m moving down to the next stitch, passing from left to right.
(I have to hold the pincushion in my left hand still, because I’m taking photos at the same time. Otherwise, the stuffed side of the pincushion should be held in the right hand.)
Now, why is this whole orientation thing important?
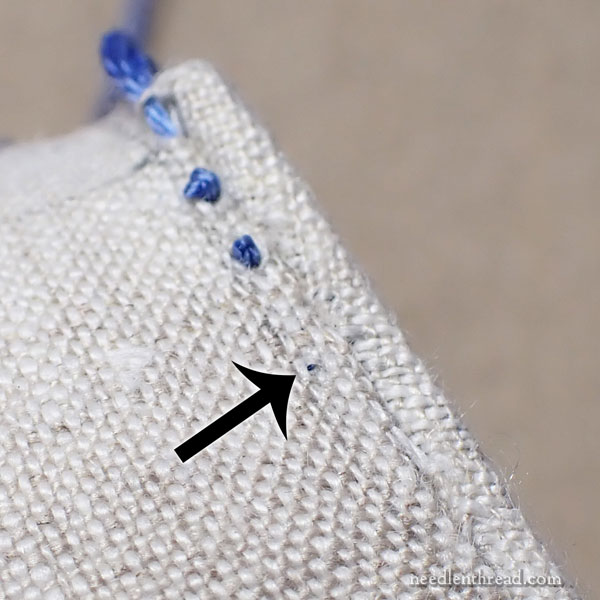
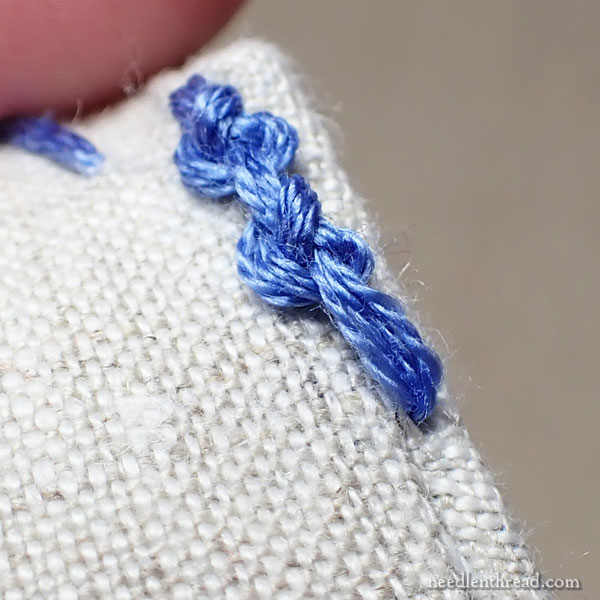
These are the two knots I just stitched with my left hand. Notice that the rounded part of the knot sits on the top, towards the stuffed side of the pincushion.
This is what you want. It makes a kind of scalloped look to the knots, along the lower edge of the pincushion.
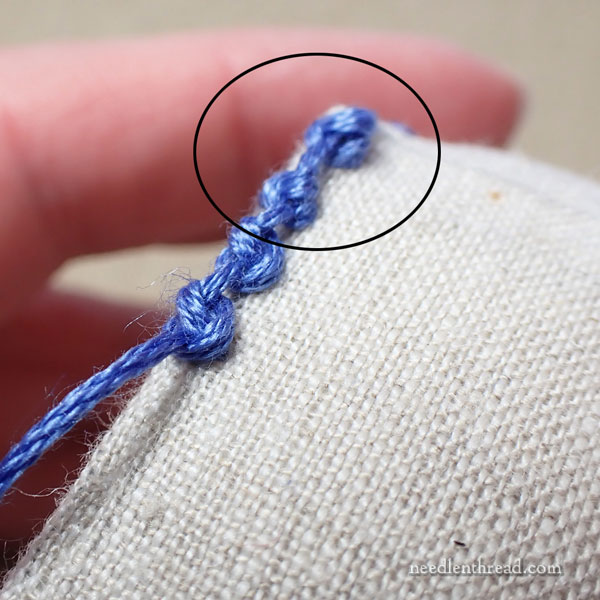
If you do it any other way, you’ll end up with the pretty side of the knots facing down on the sides of the pincushion instead of up, like the two circled in the photo above.
Finish It!
Continue around the base of the pincushion with the Palestrina stitch. When you get to the last stitch, you’ll end it by passing into the fabric over the loop of the last stitch.
Then, bring the needle directly out, underneath a nearby Palestrina stitch. Making a tiny discreet backstitch underneath the Palestrina stitch, as best as you can, in a way that the tiny backstitch can’t be seen.
Do that again, and then pass the needle and thread into the pincushion and out anywhere on the sides among the embroidery or along the seam under the Palestrina stitch, where it wouldn’t be seen, and then snip carefully close to the fabric.
Squish the fabric to make sure the ends sink back in and are not visible.
And now do the perimeter of the top in exactly the same way.
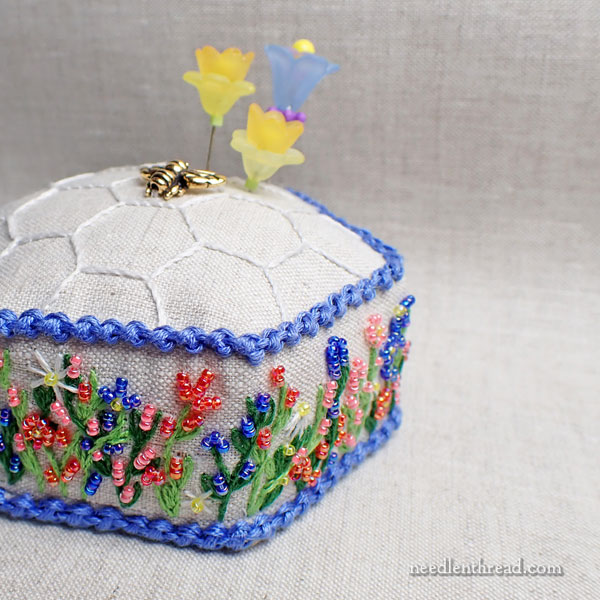
Why, congratulations! You have done it!
It’s probably taken me longer to write this than it took you to finish the edges.
More Stitch Snippets
The next Stitch Snippet project will launch some time in April, if all goes as planned. Look for it! We will have kits. I’m planning enough to satiate the initial interest – here’s hoping I did it right this time!
We’ll cover the project step-by-step here, with downloadable and printable PDFs available for members over in the Needle ‘n Thread community on Patreon as usual.
Hope you enjoyed the project!
Stay tuned for more exciting Needle ‘n Thread content in the days to come!
Thank you for providing instructions for us “lefties”!
I love your explanation of the Palestrina Stitch. This stitch has confounded me many times. I always turn to you to straighten out my knotty problem.
And, everyone is entitled to make mistakes. Cut yourself some slack and have a great day.
Even though I’m not left-handed, thank you for including those instructions. And no worries on the post order mix-up.
WOW another fantastic project…Totally got me wanting to do this and your instructions are so great. I love learning about making the 6 strands of floss more full when making your stitches. Thank you.
Thanks, Tracy!
Hi Mary,
How do you seamlessly meet up the first and last stitches around the edge? I’ve taken a stab (ha!) at it but I’m wondering what the “real” way is.
Thanks as always!
As you approach the meet-up point, you’ll want to gauge the length of your stitches so that you can end with the knot, which should land at the first corner where you started, up against the first long stitch you took to start the Palestrina edge.