


Ok! It’s time to finish up the outside sampler cover for Cotton Quartet! We’re going to finish the outside today, and then the next steps will be the inside embroidery, followed by construction and then finishing the outer edge.
So we’re not too far away from the finish. The finishing requires a bit more instruction than the rest of the project, though, so I’ll try to break it down into really manageable, easy-to-follow steps.
If you’re just joining in on this stitch-along project on Needle ‘n Thread, you can find all the previous installments (with instructions, tips, & techniques) available here in the Cotton Quartet project index.
For members of the Needle ‘n Thread Community over on Patreon, I’m going to be combining this lesson with setting up and embroidering the accent on the inside lining of the tool wallet, as well as other pre-finishing tips. I will have that PDF up for you before the weekend.

The last rows on the sampler cover are all relatively easy stitches and combinations, but some of them will take a little bit more time than others.
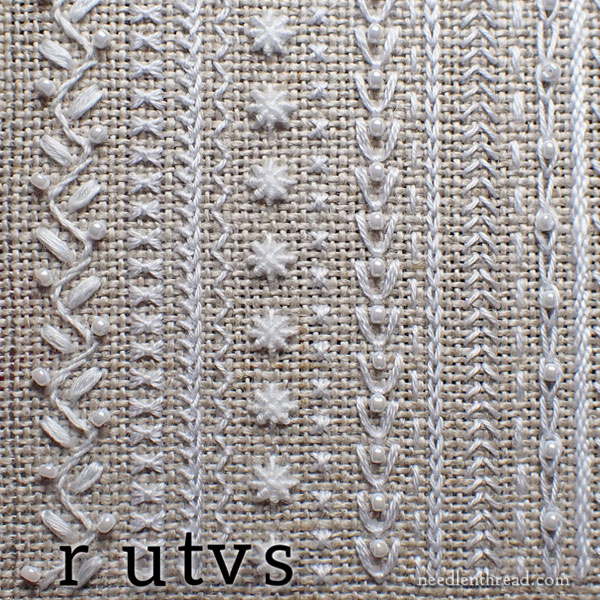
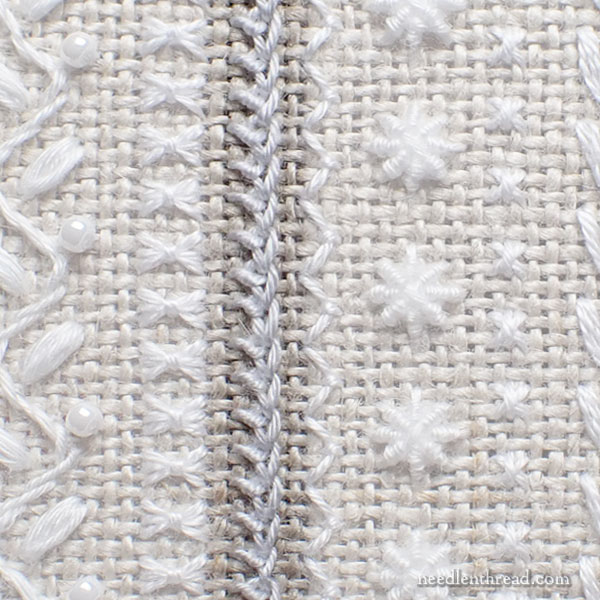
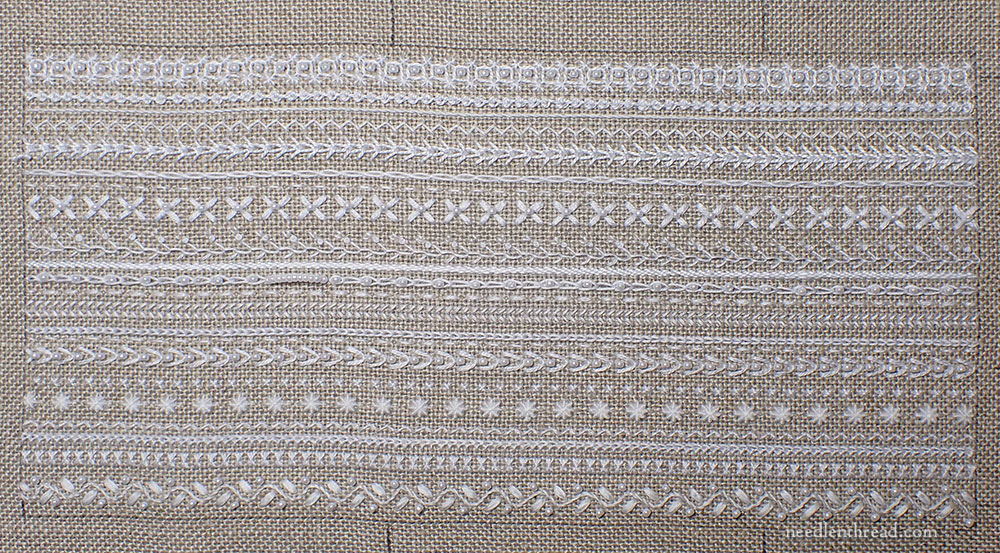
I worked in alphabetical order (R, S, T, U, V), but you can see that they aren’t quite in order on the sampler. As I explained in previous lessons, I worked the edge first here, so that I could establish the width (and “weight” to the design) that I wanted on the edge without running into the very edge of the design area, and then I went back and filled with stitches until I achieved the balance that I wanted on the sampler.
So we’re going to start with R, which is the left most side of the sampler. The tips of the granitos (the petal shaped elements) on the left side of the band should be at least three fabric threads from the edge of the design area, to leave room for finishing neatly.
The bead that you see in the very lower left corner will eventually be removed. It got in the way of finishing because it’s simply too close to the corner!
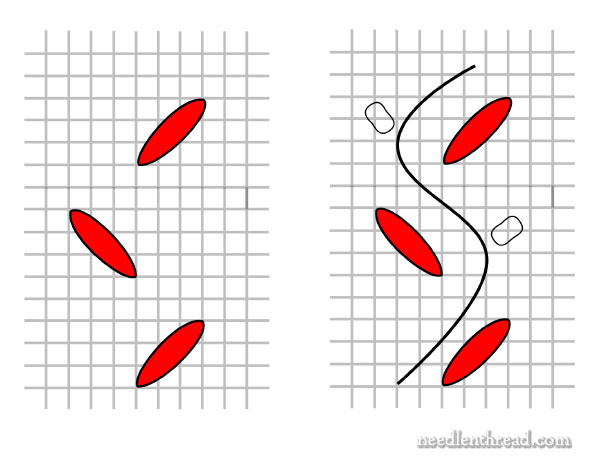
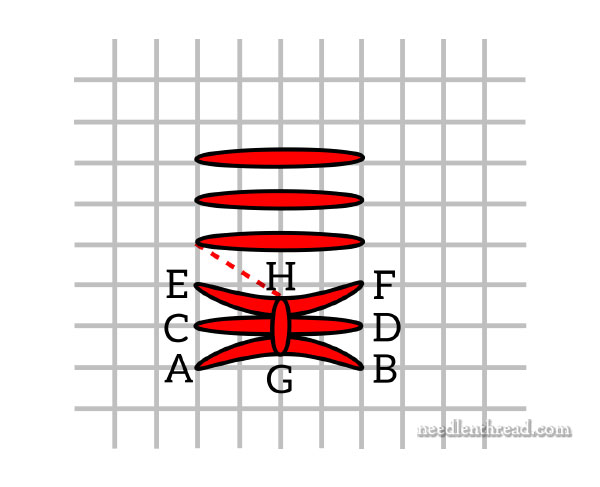
I started by stitching the granitos using floche. They’re represented by the red stitches in the left side of the diagram above.
A granito is simply a series of straight stitches worked repeatedly in the same holes of fabric. Start with a straight diagonal stitch over three fabric threads, and then work at least two (for a total of three) more straight stitches in the same holes, nudging those next two stitches to each side of the first straight stitch, so that they form a nice, plump little “kernel” or grain. If you want to work four or five stitches for a plumper grain, that’s fine, too.
You can find a video tutorial for granitos here.
Note the spacing on the granitos. Counting their layout on the fabric provided in the kit will give you the same layout that I managed. Essentially, the beginning of each stitch (the lower part of the stitch closest to the vine) begins five threads up from the beginning of the stitch before.
Once the granitos were stitched, I switched to coton a broder and a crewel needle.
Then, I worked a free-style stem stitch vine meandering upward between the granitos, as shown in the diagram above.
This is not counted – it’s simply a stem stitch line that undulates as you work from the bottom of the design to the top, between the two off-set rows of granitos.
As you stitch this wavy line, you will start to notice where you need to turn, and you may end up actually counting threads in the fabric, but it isn’t necessary to count. If you need to, you can mark the wavy line in lightly with a white chalk pencil or a white gel pen.
If you use a gel pen, be very careful – it’s better to make some tiny dots to mark the path to aim for, rather than trying to draw a heavy gel pen line that can’t be removed if you can’t cover it or you make a mistake on it.
Trust me, though, your easiest approach is going to be to work the stem stitch without marking the fabric, taking it slowly, and working out the path in a free-style manner.

The path does not have to be perfectly spaced! Just keep it within the boundaries set up by the granitos.
Once the path is finished, sew a bead to the tip of each curve in the path, as shown in the diagram.
Row S: Ribbed Spider Wheels
Row S is work in coton a broder and floche. You definitely need to use your tapestry needle for the floche part!
Row S is made up of these delectable little morsels of ribbed spider wheels. You can find instructions for this stitch here.
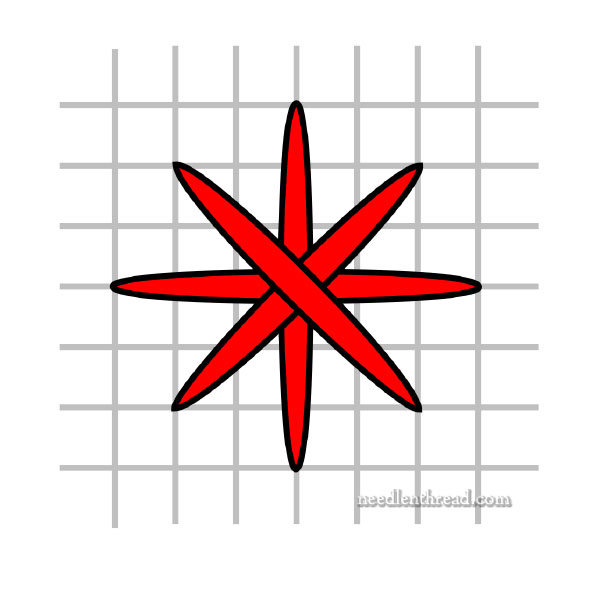
Using coton a broder, and beginning four threads of fabric over from Row I (the tiny cross stitches with an upright bar over them), begin with an upright cross stitch over 6 threads of fabric, and then work a regular cross stitch on top of that, over four threads, to give you this configuration:
Work a whole row of these straight up the sampler, spacing them three threads of fabric apart.
These are the foundations for the ribbed spider wheels.
Now, switch to floche, and use the floche to work the ribbed spider web over the foundation spokes, as shown in the directions for ribbed spider web wheels.
Row T: Mountmellick Stitch
Here’s a simple and quick row that has a very nice stitching rhythm to it.
Row T is worked in Mountmellick stitch worked in coton a broder. You can find instructions for this stitch here.
The stitch length is about over three threads of fabric. The row is situated about 6 fabric threads to the left of the center of Row S (the ribbed webs).
Row U: Sheaf Stitch
Row U is made up of sheaf stitch bundles in coton a broder.

This row is about three threads of fabric from the right of the right-most tips of the granitos in row R.
The sheaf stitch is quite simple. It starts with a foundation of three parallel horizontal straight stitches worked over four threads of fabric.
Then the needle and thread are brought up in the center behind these three stitches, then taken over them and back down behind them, pulling the three stitches together into a sheaf.
This diagram illustrates the stitch:
The parallel bundles are spaced one thread of fabric apart, and each stitch in each bundle is one thread of fabric apart.
Work from the bottom of the sampler upwards. As you get to the top, you may have to cut a bundle short, if the spacing doesn’t work perfectly.
Row V: Fly Stitch
Row V is the fly stitch worked in coton a broder.
It begins about two threads of fabric to the right of Row T (Mountmellick Stitch).
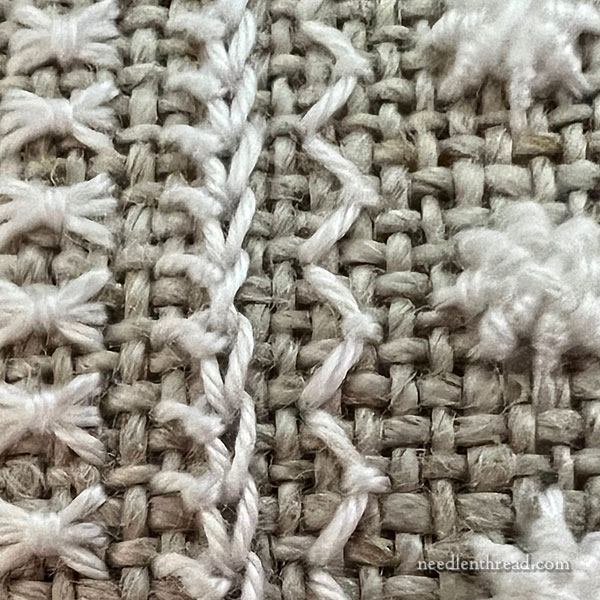
The fly stitch is worked over four threads (vertically) and couched in the center of each stitch, only one thread to the right of where the stitch begins. (So the “V” is only one thread of fabric deep, essentially.)
Although the fly stitch is going vertically up the sampler, it is fly stitch worked horizontally, and you can find instructions for it here.
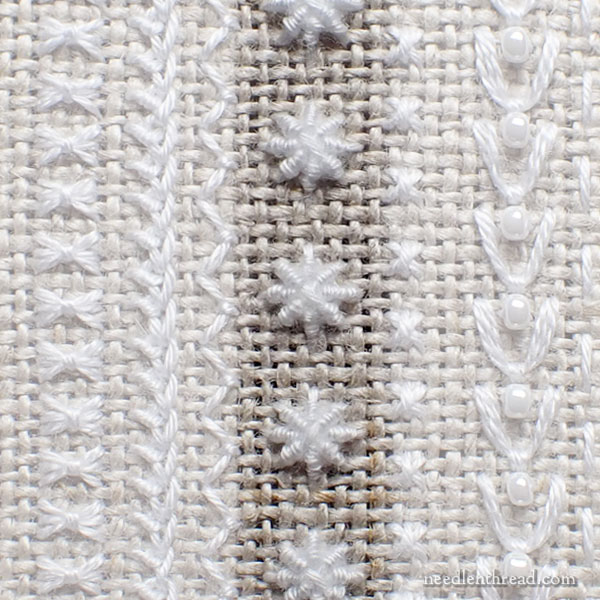
Not to scare you too much, but here’s a very up close photo of it:
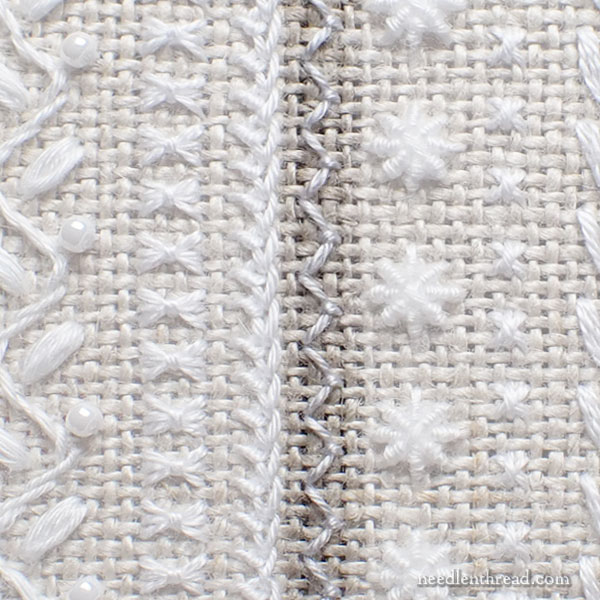
Finished!
Well… finished with the cover, anyway! Much more to come with finishing instructions for the complete tool wallet.
If you click on the photo above, you’ll get a larger image of the completed sampler cover of the tool wallet. There’s a bit of wiggle in mine, but that comes out with the next step, never fear!
Looking for More?
You can follow this project step-by-step by consulting the project index here.
Members on Patreon will be able to pick up the next PDF in the series – which will include this lesson, as well as working the embroidery on the inside – before the week is out over on Patreon. Keep an eye out for it!
Help! I am enjoying stitching my cotton quartet which is coming along just fine. However, my quartet is in danger of becoming a trio. I am in the UK and cannot get hold of floche. Can you suggest an alternative please Mary. Many thanks.
Sure! Just use two strands of regular floss (stranded cotton), or use one strand of coton a broder. (I’d probably use the two strands of floss, since it’s “softer”).
Dear Mary
The stitches above are really lovely and all the lined stitches complement each other and such detailed instructions and techniques on how to place the stitches. Even though I’m not following along I still like to look at the instructions for the tool case. Thank you for sharing with us the lovely selection of stitches and instructions/techniques for the tool case and for the photos above.
Regards Anita Simmance
Mary I loved your design and the clear instructions. I live in Australia so couldn’t buy a kit but I was pleased to be able to get the 24 count Rain Barrel linen you specified. However I find that following your instructions carefully and double and triple checking I don’t see how it is possible to stitch the stitching you described in 4.5 inches of 24 count linen. I have had to omit lines of stitching and the overall balance of the design is lost. I had loved your website and the mass of information it contains and was planning to join on patreon but I am losing confidence in how reliable you are. What count linen or what dimensions are correct?
Hi, Judith – I’m so sorry you’re having difficulty with the counting. Rain Barrel is a 24 count linen. The size of the sampler wallet is 4.5″ wide. There’s not a lot more I can clarify about that part, I think. I’ve laid out the stitches on the charts (where they are counted stitches) as I stitched them, and I have approximated the spacing between stitch rows – but usually it’s pretty correct, as you can see from the close-up photos. When following the charts, keep in mind that the intersection of lines on the charts do not represent threads of fabric – they represent the “space” between the fabric threads, and the square of the chart (the empty space between the lines) would be representative of the thread of the fabric. If you are used to doing counted work on canvas using charts (which cross over the intersection of the lines, and the blank blocks represent the holes in the fabric) this could lead to reading the stitch charts wrong here, but I’m not sure what else could be the problem. I’ll see if I can post something in the next installment that might help for those who have trouble counting the placement. I’ll also go back and double check the charts to see if anything is off, but I’m pretty sure they’re correct. They were drawn up directly from the stitched sample. If I come up with any errata, I’ll be sure to clarify it in the next installment. Thanks for pointing out your difficulties!
Hi, Judith – I just spent some time going over the cover meticulously and charting the whole thing out on a piece of graph paper. Keep in mind, this is not actually a “charted” project. It’s a band sampler worked with a more spontaneous approach, which is why the bands are not stitched in a precise order across the sampler. I didn’t start with counting – I started with measuring, and my 4.5″ width worked out to approximately 109/110 threads of fabric (rather than the more precise 108 if you multiply 4.5 x 24 count fabric). When we worked through the side pieces especially, I mentioned to make sure you’re approximately 2-3 threads of fabric from the edge, to give room for finishing. So these types of elements can throw off a strict grid approach – but even then, there’s plenty of room to get all the bands in. You might end up with one band here and there a thread closer than I mentioned, when you’re filling in a band between two already-stitched bands. Here’s a link to my hastily mapped out sketch of the bands on the sampler, using graph paper and counting, taking into consideration the instructions in the blog posts and graphs:
https://needlenthread.wpengine.com/wp-content/uploads/2022/06/cotton-quartet-on-graph-paper.jpg
Please let me know if you have any further questions. You can also email me directly at mary (at) needlenthread (dot) com if you are stuck in any area, and hopefully, I can help you out!
Thank you for going to so much trouble. I had checked the count but not the number of threads actually in my 4.5 inches. It is only 105. It should be 108. Also you say your sample had 109 or 110. As I was at least 4 threads short I couldn’t stitch all the lines in the project.
I intend to stitch another copy and will work from the centre to the edges in order. I really love the design and am so grateful you have helped me to see why it wasn’t working out for me.