


Good morning, my friends! For those of you who celebrated Thanksgiving last weekend, I hope you had a very happy holiday!
I apologize for being a little late with today’s article. It should have been up yesterday, but there were unforeseen circumstances popping up all over the place! There are still a few brewing in the background, but I’m determined to ignore them until we get our Christmas Tree ornament prepped and ready for the final assembly.
So let’s get started!
If you’re just joining us for this last Stitch Snippet stitch-along of 2022, we’re making a darling little Christmas tree ornament, featuring a Christmas tree. You’ll find the first installment here.
The embroidery kit is designed by Tamar Nahir-Yanai, and the finishing kit was put together here at Needle ‘n Thread. I will have more kits shortly, and once they are in stock, I’ll announce it on the website.
If you still want to make an ornament but you’re a little behind, no worries! The instructions will be here on the blog for you, in an index under Tips & Techniques, where you will also find the previous Stitch Snippets for this year.
Members of the Needle ‘n Thread community on Patreon will receive a complete PDF of all the instructions for creating the ornament shortly. It should be finished by the end of the day tomorrow. I have one more tutorial to photograph, that I want to include in the complete PDF so that you have everything you need all in one easily downloadable and printable document.
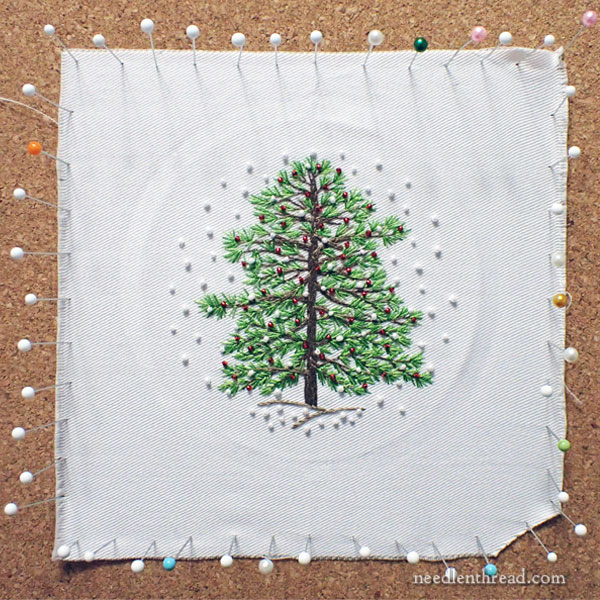
First things first: Once your embroidery is finished, you’ll need to block and damp stretch it.
You can find instructions for blocking and damp stretching in the following two articles:
Blocking & Damp Stretching Embroidery
A Damp Stretching Tip: Easier on the Hands
The second article is how I invariably damp stretch, using the same tools discussed there. If you don’t have a piece of cork board to pin your work on, I have heard from many folks who use their ironing board cover with good success.
Once your embroidery is completely dry, you can move on to the next steps.
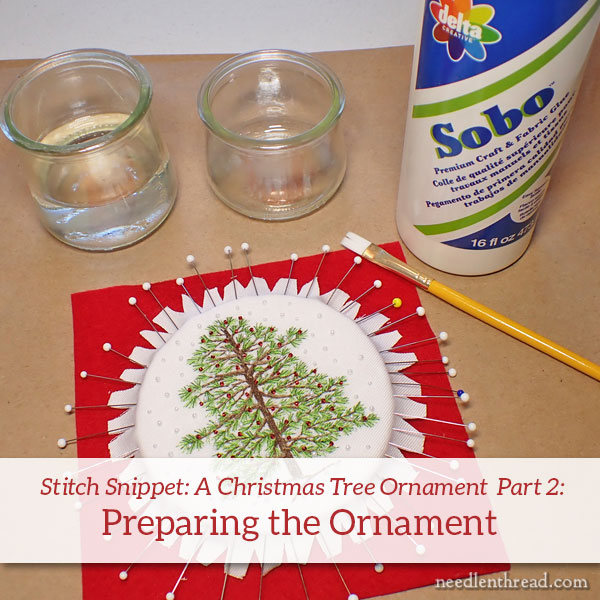
Gather Supplies
In cooking, it’s called mise en place: gathering all your ingredients together and preparing them. It’s an important part of the process.
It’s just as important when you’re finishing an item of embroidery. You want everything you’ll need and all your pieces prepped before you begin the finishing process, so that you can work through to the end successfully.
To finish the ornament, I used:
- Circular cut foundation (4″ circle cut from archival mat board)
- Wool felt for backing
- Low loft batting for padding
- White grosgrain ribbon: 1″ cut of 3/8″ wide ribbon (1/4″ would also work)
- 7/8″ wide taffeta red gingham ribbon (about 12″ or so)
- Cording (3mm two ply twist, cut 12-15″ or so)
You’ll also need on hand:
- Sewing pins (ball heads are easier on the hands)
- Clips (like Clover wonder clips – not essential, but helpful)
- PVA glue (I use Sobo, but any PVA glue will do)
- A craft paintbrush and some water
- A glue stick (optional)
- Scissors
- White chalk pencil to mark felt (not essential, but it helps)
Prepare the Pieces
The next step is preparing the pieces that you’ll use to assemble the ornament.

Using the 4″ circle cut mat board as a measuring tool, cut a 4″ circle from the red wool felt. You want it to be the same size as the board.
You can hold the felt piece and the board in your hand together and cut around the board if you’re careful, but I preferred to use a white chalk pencil and outline around the circle. Then I cut just along the inside of the pencil line.
You want to make your cuts as smooth and long as possible – try not to cut a jagged circle of felt!
Then, cut two circles of low-loft batting. In the finishing kit, there’s one piece that you’ll cut two circles from. With the batting, I held the batting against the circle and simply trimmed around it.
The Ribbons
Next, prepare your ribbon pieces.
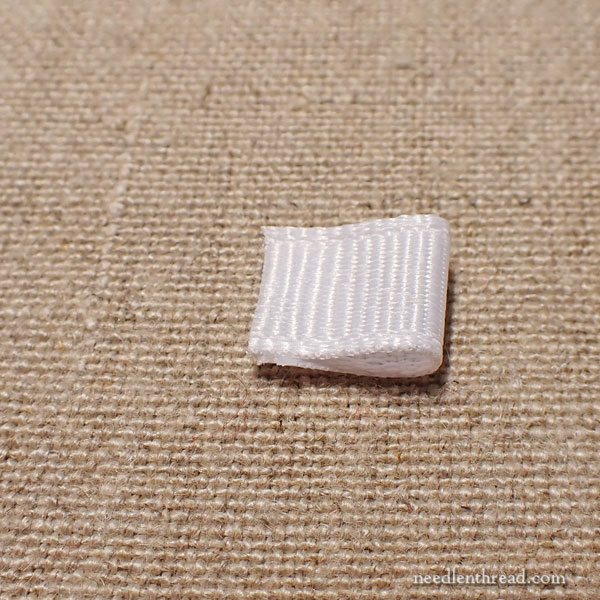
Fold the white grosgrain ribbon in half and glue just the edges together. You can use the PVA glue or you can use a glue stick, which works faster, is decidedly less messy, and just a whole lot easier.
Pinch a bit of glue stick on a cut end, fold the piece of ribbon in half to make a very short loop, and pinch the cut ends together so that the loop holds.
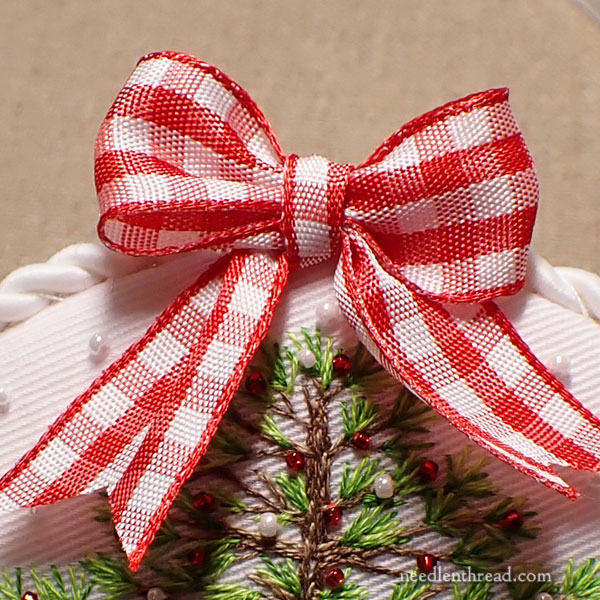
With the gingham ribbon, tie a bow that is approximately 1.5″ wide, and then trim each side of the excess ribbon to about 1″ long, cutting the ribbon in an inverted “V” shape.
If you have difficulties tying nice, small bows, never fear – I’ll post a photo tutorial for it soon! The bow is the last thing you’ll attach to the ornament.
Make the Sandwich
This is going to be the most time consuming and fiddly part of the finishing process. It’s really important to do this part carefully, to pay attention, and to take your time.
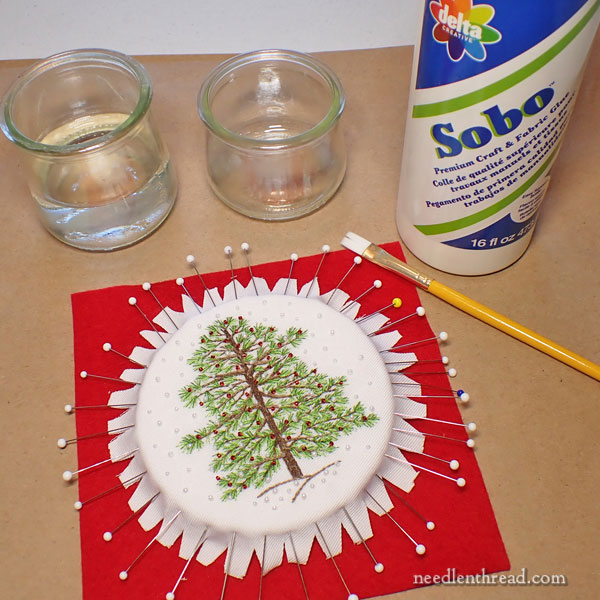
You’ll need your finished embroidery, your batting, and your circle board. You’ll also need sewing pins, scissors, glue, a craft paintbrush, and some water.

Place your embroidery face down on your work surface. I usually have some white felt or a soft white cloth on the work surface when I’m doing this.
Place your batting over the back of your embroidery, centering it on the back of the embroidery.
Place the round board over the batting.
Now, turn this sandwich over, and carefully situate the embroidery and the batting onto the circle, so that the embroidery is centered on the board, with the batting between.
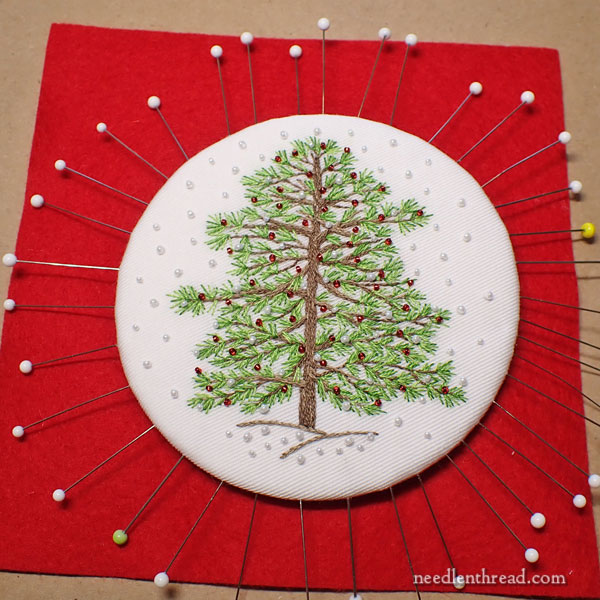
Gently fold the fabric down and push the tip of a pin into the fabric and into the board, at each point of the compass: north, south, east, west (like noon, three, six, and nine on a clock).
Start with north, and place your pin. Then move to south, and gently pull the fabric and pin at south, across from north.
Then move to west, and pin through the fabric and board, and then to east, pulling every so slightly, and inserting the pin through the fabric and just into the board.
Be very gentle here! You don’t want to jab the pins into the board, tearing through the board and out into the embroidery. You just want to gently gide the tips of the pins just into very narrow edge of the board.
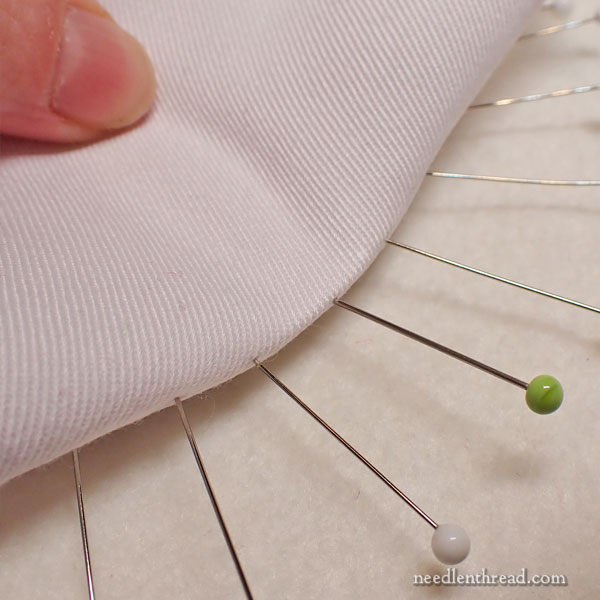
Once you have the points of the compass pinned, turn the work over again, so the embroidery is face down. Now, you can pull the fabric over the back of the board to continue to place pins around the board.
Pin in the middle of each section around the board, so that you’re always pinning opposite sides, and then fill into smaller and smaller sections. You’ll end up with pins at least every 1/2″.
Just remember, whenever you place a pin, the next pin should be opposite the one you just placed, and you should be gently pulling the fabric over the back of the board.
Occasionally, turn the piece over and make sure your tree still looks nicely centered.
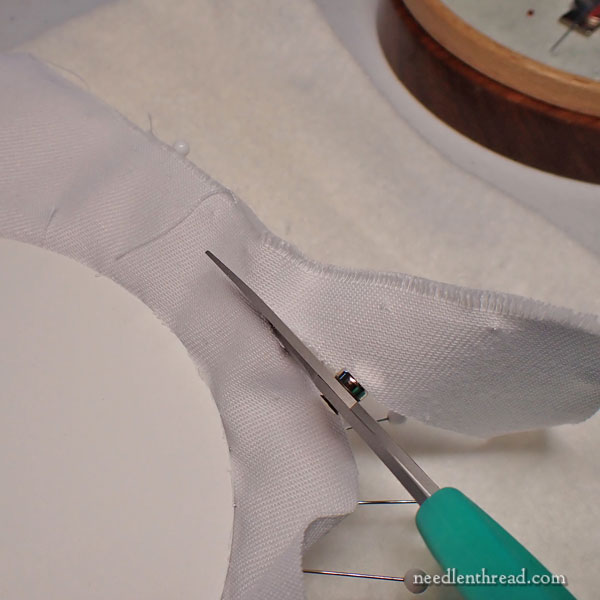
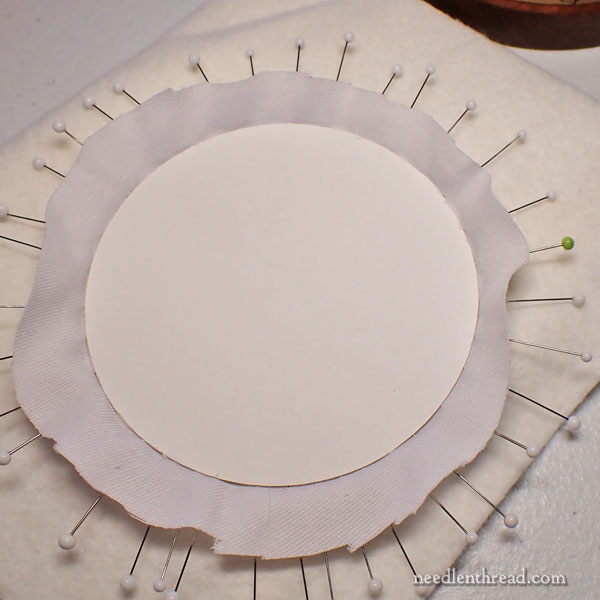
When you’re finished pinning and you’re thoroughly satisfied with the placement of the embroidery on the board, leaving the pins in place, trim the excess fabric around the ornament. You want to trim so that there is about 1/2″ (or 5/8″) of fabric beyond the board.
When you’re trimming this, you’ll be cutting the fabric above the pins, so be careful! Don’t cut the pins, and don’t knock them out of the board. Take your time, and trim all around to remove the excess fabric.
As you can see, your cut edge at this point does not have to be beautiful. All of this will be on the inside of the finished ornament and no one will ever see it.
Do Not Remove the Pins!!!
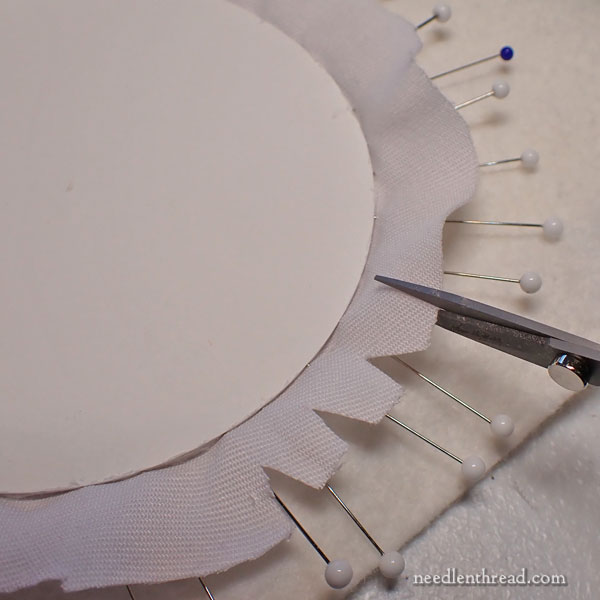
Now, work your way around the fabric, cutting inverted “V” notches towards the board. Do not cut all the way to the board – leave a good 3/16″ between the board and the tip of the inverted V.
When you flip the piece over, it should look more or less like this.
Do Not Remove the Pins!!!
Now it’s time to glue.
You’ll want to have a small craft paintbrush, if you want to avoid getting your fingers gunky. You’ll also need a little dish of water to rinse the brush in, and also to thin the glue if necessary.
I like to put a little glue in a tiny pot and a little water in a separate tiny pot for this work. That way, if I need to thin my glue, I can dip the brush in water and then work a tiny bit of water into the edge of the glue in the pot until I get the consistency I want.
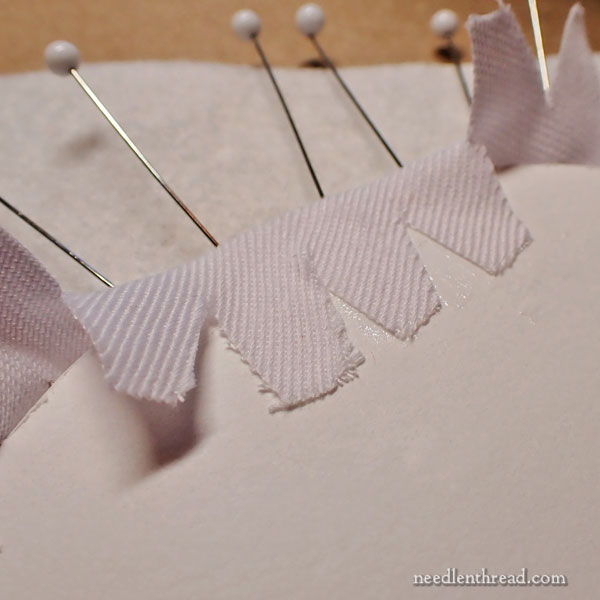
Now, brush a thin layer of glue just inside the edge of the back of the board and fold down the tabs formed by the fabric onto the glue. Work an area of about three tabs of fabric at a time.
Make sure you are pulling the fabric so that there is not any excess “give” between the pins and the glued fabric. You want the front of the ornament to be taut across the padding and board when everything dries.
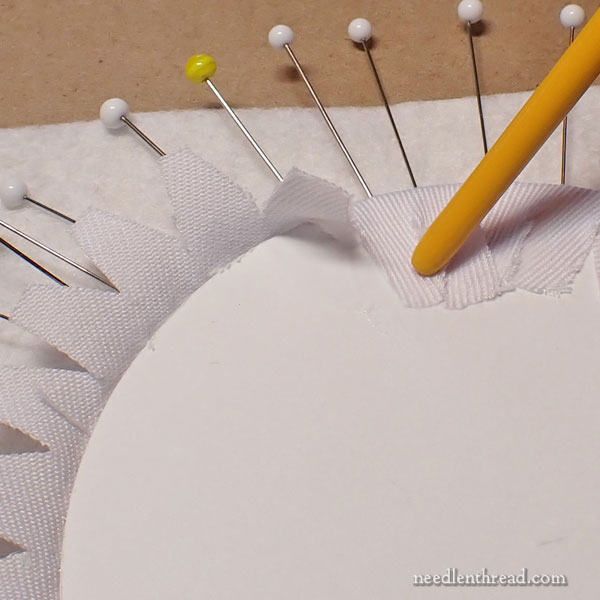
Since I don’t like to get glue on my hands when I’m doing this kind of work, I use the end of the paintbrush to situate the fabric tabs.
If you need to push on the fabric with your fingers, use a piece of wax paper or something similar so that your fingers stay clean.
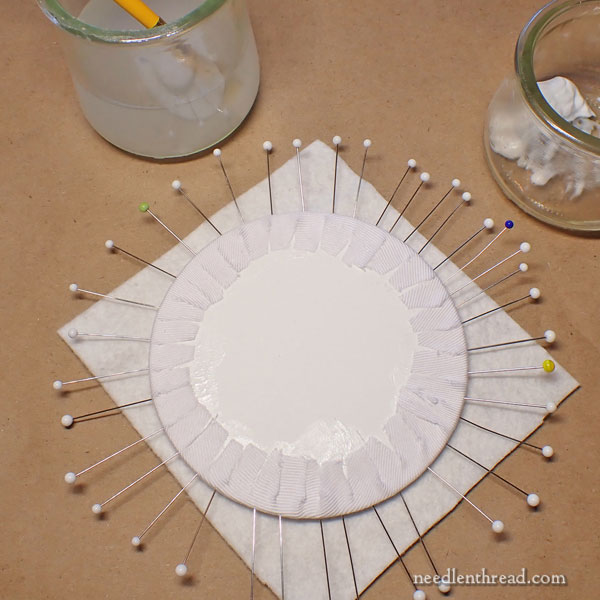
Glue all the way around.
When you turn the ornament over, the front should look like this.
Leave the ornament to dry.
Then take the pins out!
We’ll finish this up in the next installment!
Coming Up
On Friday, I’m going to show you how I make small bows that look consistently decent for use in finishing small things.
On Friday, I’ll also announce the winner of last week’s give-away, so if you haven’t chimed in on that yet, do!
Next Monday, we will definitely be back to our regular schedule! We’re pretty much settled into our new space and we’ve almost caught up to our normal daily work routine. So next Monday, look for a lovely give-away devoted to silk ribbon.
And then, besides finishing the ornament, I’ll give you a little studio tour and we’ll talk about a few details in the new space – including organization and equipment.
Hope your week is off to a fabulous start!
I’m looking forward to the studio tour! Congratulations on the new headquarters! So happy for you Mary!
Love this project and your detailed instructions. This is the best my embroidered ornamanets have ever looked. Thank you!