


Finally, we’re back on the road to finishing Little Blooms! Thanks for your patience with this stitch-along!
If you’re just joining in on this project, you’ll find the Project Index for Little Blooms available here. That’s where you’ll find all the previous articles relating to this project listed in chronological order so that it’s easy to follow along.
If you’re waiting for a kit for Little Blooms, we’ve started putting a new batch together, but we are waiting on a few items still. As soon as they’re available, we’ll have kits ready again. Please keep an eye on the website for the announcement of new stock.
For members of the Needle ‘n Thread community on Patreon, I’ll post your PDF a little later today, covering parts 4 & 5, with little extra tips and stitch tutorials. For Dedicated and Avid Stitchers on Patreon, I’m working on two more videos for this project and I’ll post them as soon as they are ready.
And now, let us move forward with Little Blooms!
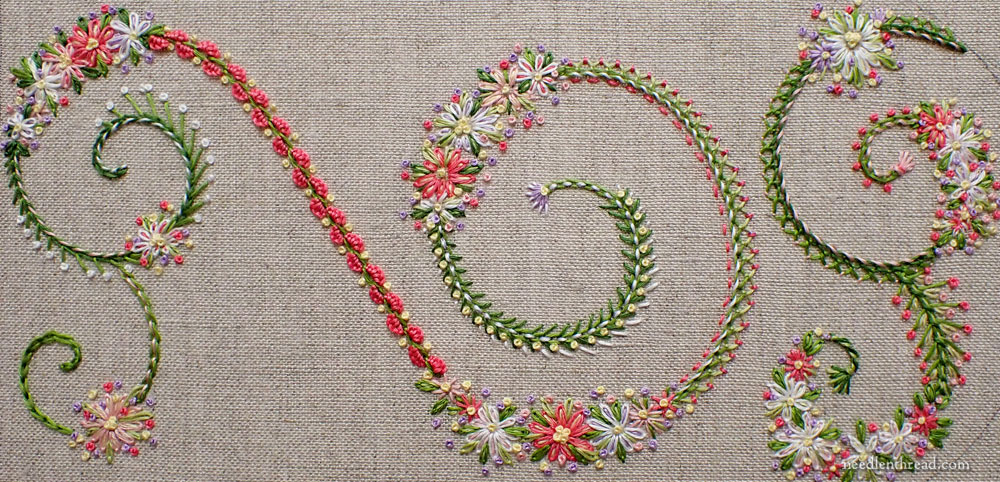
In this installment of Little Blooms, we’re going to embroidery the rest of the vine areas.
As you work out the vines, keep in mind that you don’t have to use the same stitches and techniques that I used on the sample. Maybe you have something you like better – a favorite composite stitch or a favorite combination of stitches that you think will look or work better for you. No problem! Don’t confine yourself to the stitches on the sample if you have other ideas. This is a great project for playing around with stitches!
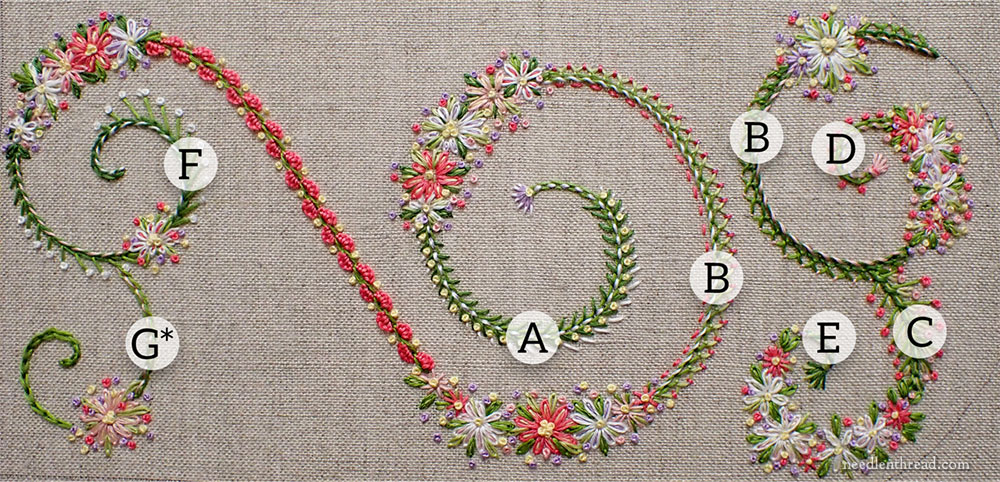
You can click on the photo above for a larger version.
This is a “map” of the vine segments on Little Blooms. We’ve already done the scalloped buttonhole chain stitch running down the approximate center of the vines. And we already explored A and B in our last installment. Today, it’s everything else!
We’ll start by looking at the repeat of B on the right side of the design.
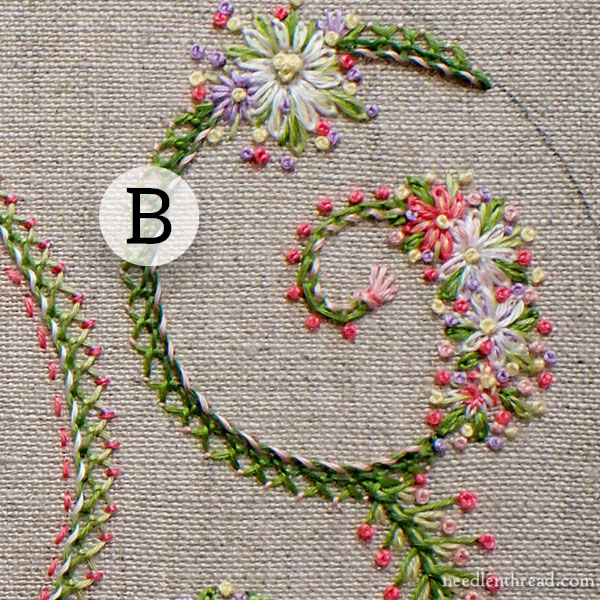
The segment above repeats the same techniques used on B in the last installment of Little Blooms.
The foundation chain stitch is dark green. The interlaced outer side of the chain stitch is medium green. The couching stitches on the interlacing are light pink. The whip stitch on the opposite side (the inside of the scroll) of the chain stitch is also light pink.
You can find a tutorial for the interlaced chain stitch band here. Only one half of the chain stitch is interlaced and the other half is whipped. You can find a tutorial on how to whip a stitch here. In this case, whip only half of the chain stitch by passing in and out of the center of the chain stitch.
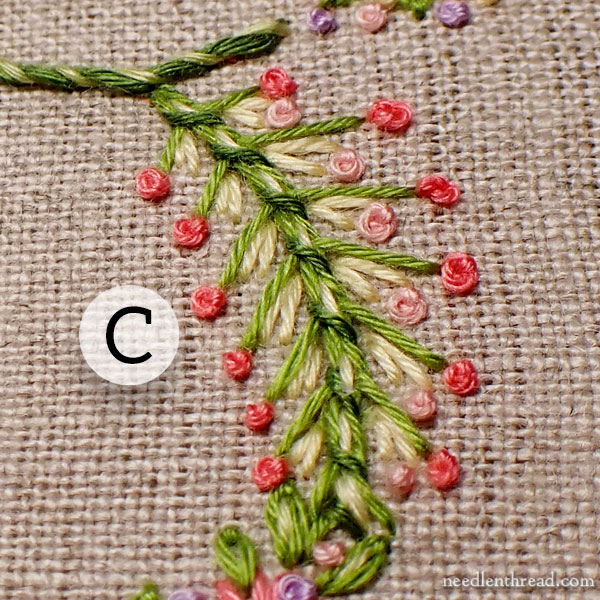
Segment C is a short but wide segment made up of a combination of different stitches.
The segment begins with a chain stitch foundation in medium green. Next, add long “barbs” on the side of the chain stitch (also in medium green) in the same method as working a mock wheat ear stitch (which we also used in the last installment, on segment “A”).
Notice that the “barbs” on C increase and then decrease in size from one end of the segment to the other.
Backstitch down the center of the chain stitch in yellow. Then whip the entire chain stitch spine with dark green.
Using the same strand of yellow if you have any left over, work two small straight stitches between the barbs, as shown in the photo. These are in a “V” configuration, with the tip of the V nestled in the intersection of each barb with the chain stitch foundation.
Finally, work dark pink French knots at the tip of each long barb on both sides of the vine.
On the outer side, work light pink French knots at the top of the yellow “V” as shown in the photo.
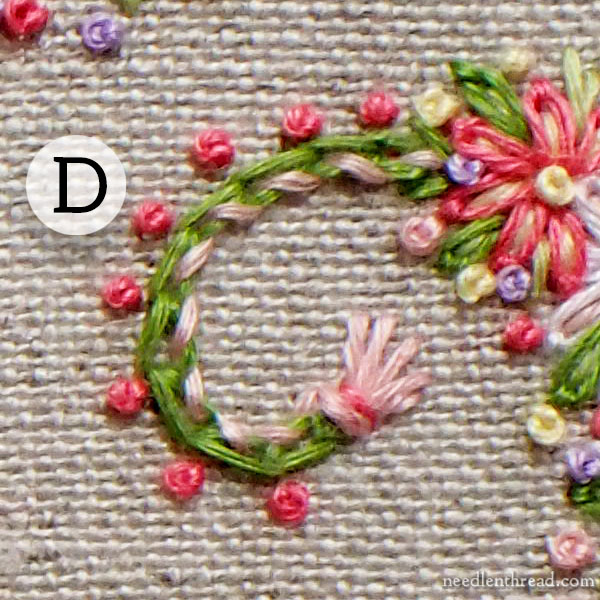
Segment D completes the inner scroll on the second B segment (explained above).
The chain stitch foundation is medium green. It is whipped on the inside with light pink.
At the end of the spiral, using the same light pink, a small fan of straight stitches extends from the tip of the scroll about 1/4″ out. On top of the fan of straight stitches, work a dark pink straight stitch by the “neck” to a tassel-like end to this segment.
Finally, dark pink French knots are evenly spaced along the outside of the chain stitch line.
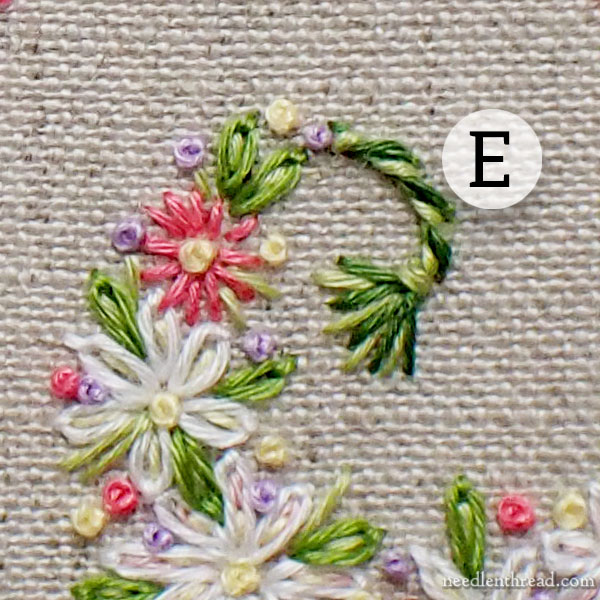
The small segment “E” is the inside tip of the scroll that shares “C” worked above.
This is simply a chains stitch foundation in dark green whipped over the whole chain stitch in light green. There is a small tassel-like end to the segment, made with fanned dark and light green straight stitches. A couple light green straight stitches are sewn across the “neck” of the fanned stitches to create the tassel-like look.

Segment F is where your snap should be sewn. On this particular sample, I didn’t place the snap until later. But your snap should already be sewn in place! It is much easier to sew the snap on before any embroidery is done.
This segment begins with a dark green chain stitch foundation.
The barbs on the outside of the chain stitch foundation are medium green. They increase and decrease in length as they progress round the spiral, as shown in the photo above.
Each barb is tipped with a white French knot, beginning about 4 or 5 stitches in from the large floral bunch.
The inside of the chain stitch is whipped, first in pink up to the small floral element, and then in white on the rest of the scroll.
You can tip the inside of the scroll with a small tassel-like fan of stitches if you wish, to finish it. I did this a little later, and you can see the results in the photo further below of this finished segment with the snap sewn in place.
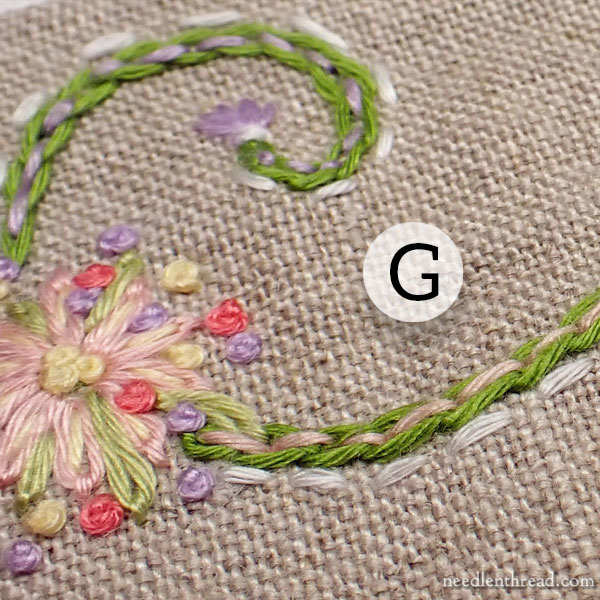
Shown on the map at the beginning of this article, Segment G was not finished. In the photo above, you can see that the segment was further embellished.
Segment G begins with a medium green chain stitch foundation. It is backstitched down the center of the chain stitch, first in pink up to the small floral element, and then in purple after the floral element.
A small tassel-like fan finishes the tip of the segment on the inside of the scroll. The fanned straight stitches are finished with a couple white stitches over the “neck” of the fan to form the tassel.
A white running stitch along the outside of the chain stitch scroll finishes the segment.
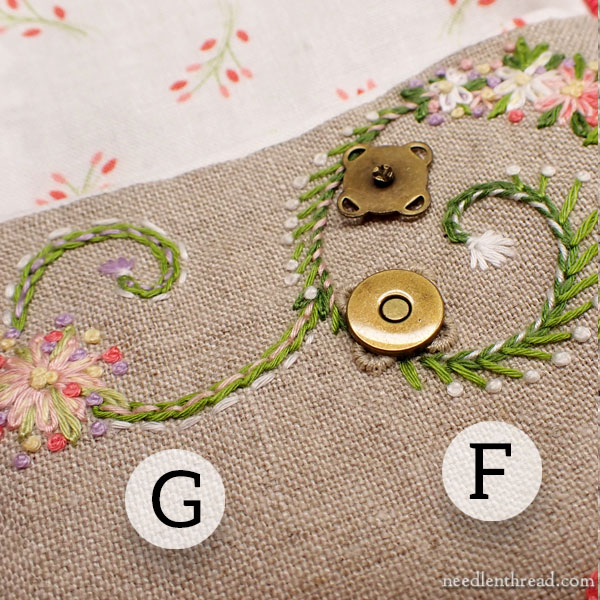
Here are both F and G with the base of the snap sewn in place.
This area (where F and G are located) is under the flap when the mini snap purse is completed.
This is the completed embroidery of the entire design, although segment G was further embellished after the fact, as explained above.
And this brings us to the conclusion of the embroidery part of the mini snap purse!
Our next adventure will be the assembly work to turn this into a little pouch.
You can find all the articles for this project here, in the Little Blooms project index.
If you have any questions, please feel free to use the comment form below this article on the website.
I hope you’re enjoying this project and that you’re looking forward to the next installment as much as I am!
Buon pomeriggio ,come faccio a vedere i video ?
Grazie dell’attenzione.
I’m late to the game because I got the 2nd kit batch. I’m just finishing F & G. Is it OK to extend the border a little lower because I don’t have room to do the vine embellishment on “F”. Thank you for teaching me a different pattern application. I’ve always used pencil only. Thank you for allowing me to add my own touch by using different flowers and no expectation to make each flower cookie cutter perfect. Also, I do a lot of Italian needle lace (self taught) and no article or tutorial every said to graduate the size of the scallop buttonhole stitches. I really like the scallops made your way. I did some of my own flowers using this technique.
Absolutely! You can adjust it as you need to! Just make sure it’s within the seam area.