


Well, well, well, here we are, at the very last step of Purple Posy, our latest Stitch Snippet stitch-along here on Needle ‘n Thread.
If you’re just coming across this stitch-along project, you can find all the previous lessons for the stitch-along in the Purple Posy project index here. You’ll learn, step-by-step, how to create a beautiful covered tape measure for your needlework toolbox.
If you’re just joining in and you’d like to create your own covered tape measure, you’ll find a complete materials kit available here, with all the components you need to embroidery and build your own covered tape measure – including the retractable tape measure, fine embroidery linen, full skeins of embroidery floss, all the finishing materials, and the specialty beads, charm, and wire.
For members of the Needle ‘n Thread Community on Patreon, you received the PDF for this installment of the stitch-along yesterday. You can find it posted over on Patreon, ready to download and print.
Let’s move on to this last step – creating the beaded pull fob for the tape measure!

Before we start, just a reminder to read through all the instructions thoroughly before you begin, and to gather all the supplies and tools you’ll need, so that everything is on hand and convenient.
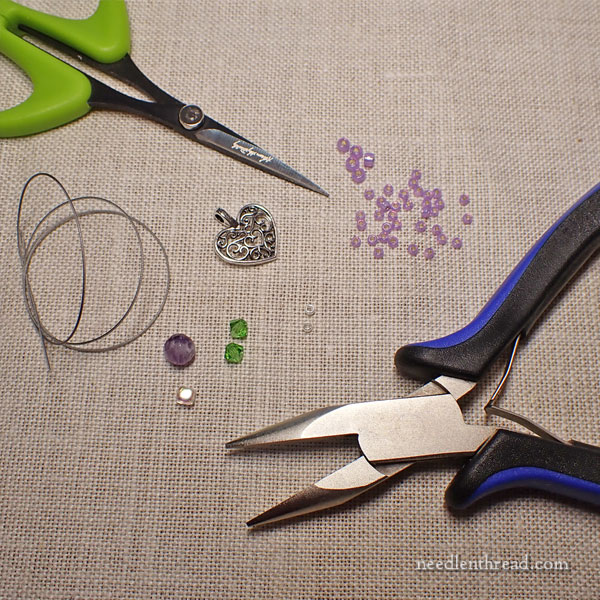
I made a few samples for this project, and below, I’ve included the supplies I used for all of them. I varied the size of some of the beads, due to availability, and both sizes of those beads work fine. For those who have the kit, you will have either a 4 or 6mm square spacer bead and a 6 or 8mm faceted amethyst bead. Everything else is the same. You can, of course, substitute any decorative beads you like. Up to you!
These are the supplies I used for the samples shown in this tutorial:
- 11/0 and 15/0 seed beads (the same used for the embroidery)
- one Clear AB Sparkle Glass Cube, Czech Glass Spacer bead, pastel rainbow effect (4 or 6mm)
- a 6 or 8 mm faceted round amethyst bead
- two 4mm peridot crystal bicones
- two silver bead crimps (silver-plated brass, 2 x 1.5mm with 1.3mm inside diameter)
- a silver filigree heart charm 16 x 15mm
- Accu-Flex nylon & stainless beading wire, clear 49-strand, 0.019” diameter (approx 12”)
Additionally, you will need some tools:
A pair of wire cutters is helpful, but you can also use a strong pair of scissors (not good scissors!). I used my goldwork scissors, since they are used to cut wire anyway.
A pair of needle-nose pliers (the finer the better) or a pair of bead-crimping pliers. I used needle-nose pliers. The standard ones that you’d have in a home tool box are fine. If you have specialty ones for beading, though, use them.
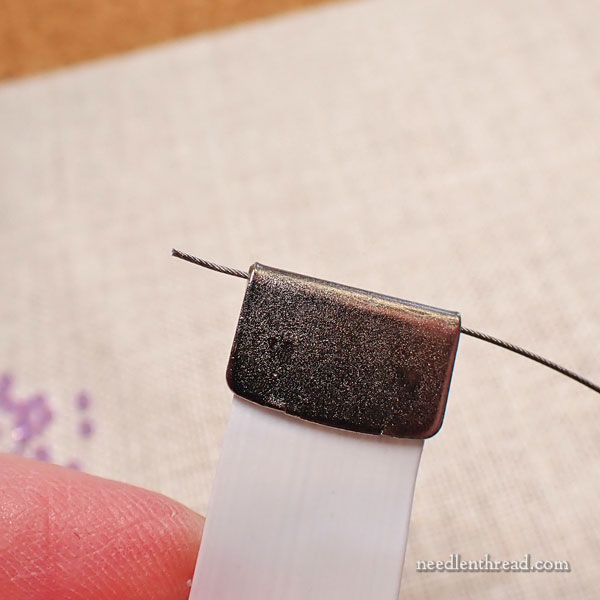
Start by threading the beading wire into the folded edge of the metal tab on the tape measure.
This can be tricky! But we tested with many random tape measures, and we were able to get the wire in even the most difficult ones. It may take a little patience. If necessary, try from both sides of the tape measure, to see if the wire passes into one side more easily than the other.
Tip: trim your wire, and then hold it between your finger and thumb, with just about 1/8″ sticking out. Push this 1/8″ end into the metal tab on the tape measure, right where the fold is, slowly pushing a little bit more, and then a little more through the metal tab. Hold the wire close to the metal tab, so that you can use the wire to push itself into the fold in the tab, without the wire bending on you. If you give it too much wire, the wire will bend and be more difficult to manage. Go slowly and carefully.
When the wire emerges on the other side of the tab, pull some through.
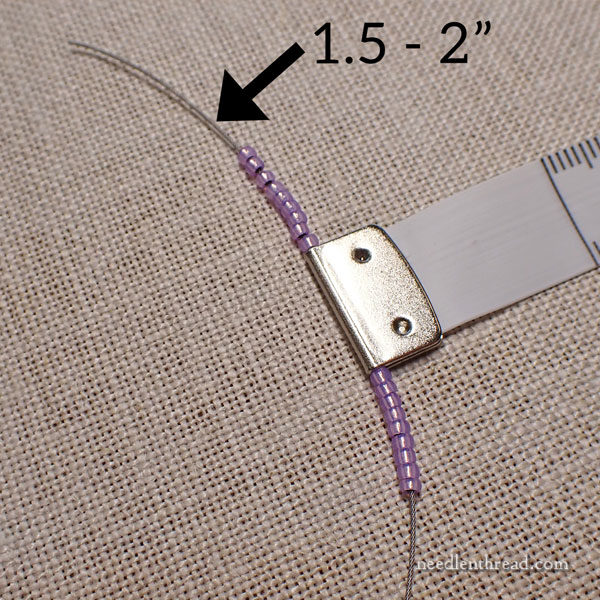
You’ll want about 1.5″ – 2″ of wire pulled through the tab.
Onto each side of the wire, string nine 15/0 (smallest) seed beads.
If you want, you can put a clip on the end of the short wire, to keep the beads from slipping off while you work.
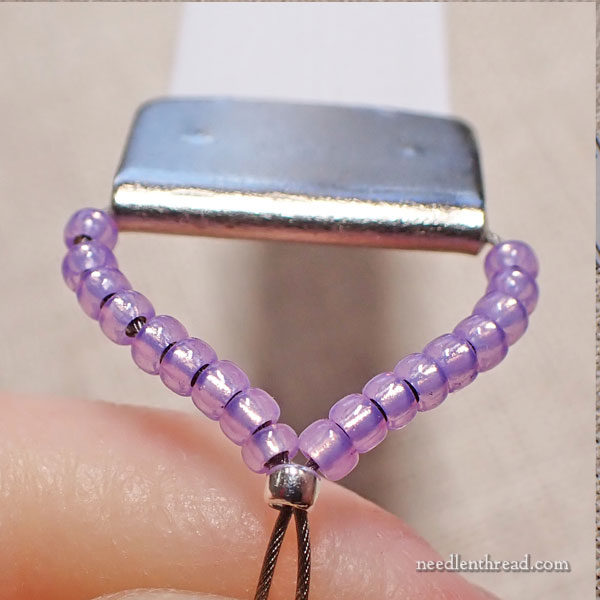
Bring the two sides of the wire together and string both sides through one small silver bead crimp, as shown above.
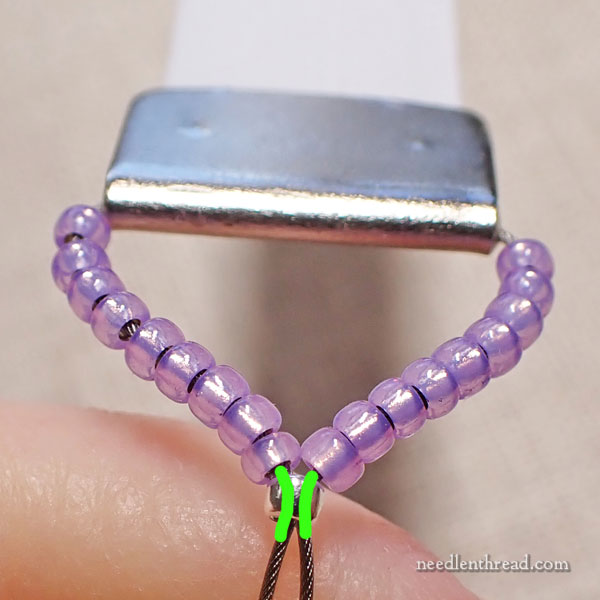
Make sure that the wires pass through the crimp without crossing over each other, as indicated by the green lines in the photo above.
Situate the crimp bead so that it is aligned with the center of the metal tab and so that the seed beads to the left and right are equally distributed and hang without buckling.
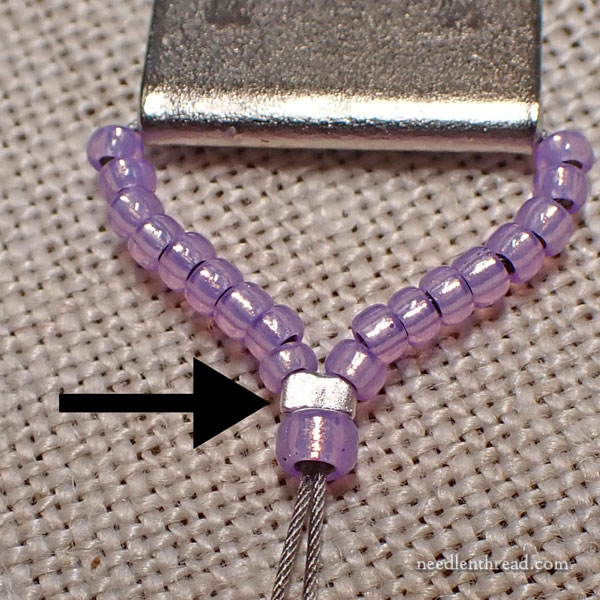
Push the crimp bead towards the tab while holding the two wires, to tighten it somewhat against the seed beads.
Be careful! While you don’t want a lot of wire showing, you also don’t want the beads so tight that they buckle. You want them to fit the space so that the wire has some movement to it, without the beads buckling up again each other.
Use needle nose pliers to crimp that bead flat, to hold the wires exactly where you want them.
Take your time with this step. While you can adjust the crimp bead by un-pinching it (squeezing it in the opposite direction), you can only do that maybe once or twice without weakening the crimp bead.
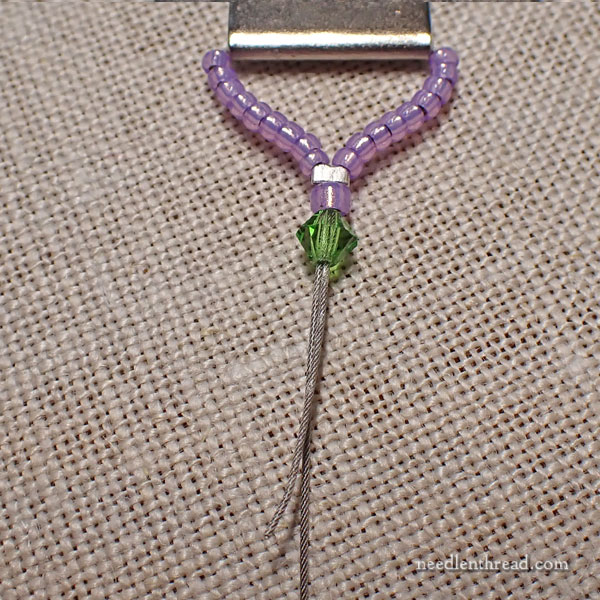
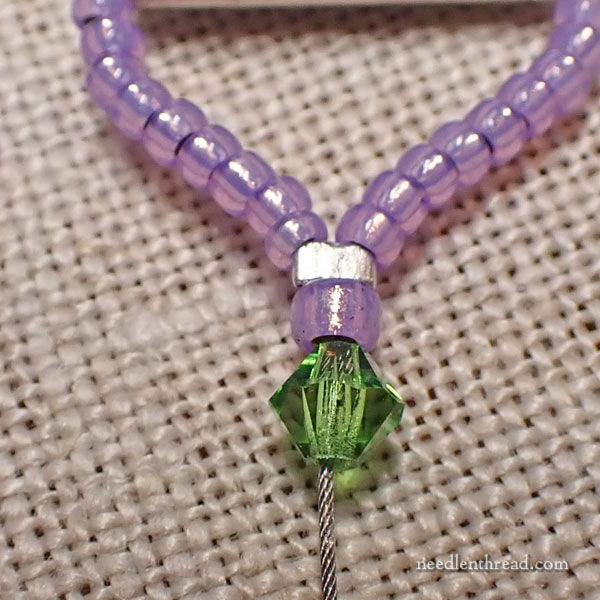
String an 11/0 seed bead onto both wires right after the crimp, followed by a peridot bicone.
The short wire still needs to be trimmed, and this will be done so that the end of the short wire is situated inside that green bicone.
Once you have slid the 11/0 seed bead and the bicone onto the wire, take a good look at how much wire is covered by the bicone. You want to cut the wire so that the remaining short wire is covered at least halfway by the bicone.
Pull the bicone back and push the 11/0 bead up to the crimp and then snip the wire, leaving about 2mm of wire (half the length of the bicone) beyond the 11/0 bead.
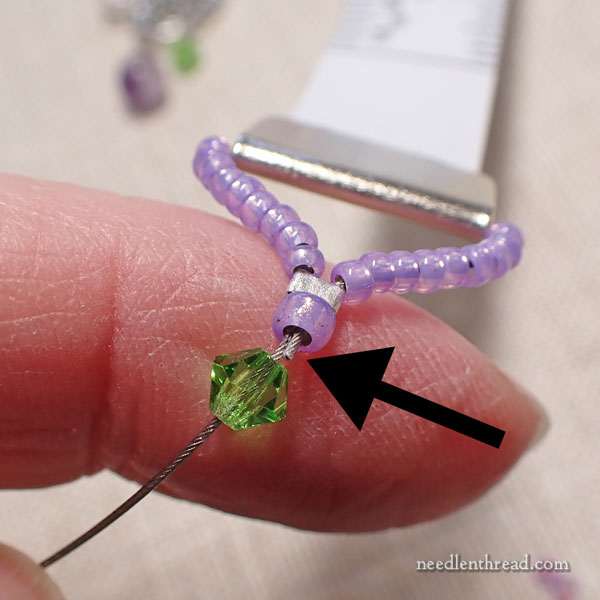
In the photo above, you can see the cut short wire protruding from the 11/0 bead.
Push the bicone over the cut wire end so that it is hidden inside the bicone.
In the photo above, you can see the wire hidden inside the bicone.
After the first peridot bicone, slide a 15/0 (smallest) seed bead on the wire, followed by the square clear spacer bead, followed by another 15/0 seed bead.
Follow this with the second peridot bicone.
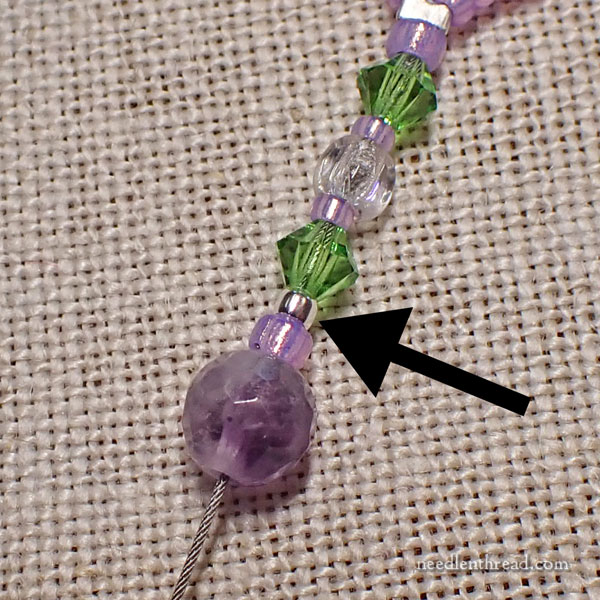
Follow the bicone with the second tiny silver crimp bead.
Then, string on an 11/0 seed bead (the larger seed bead), followed by the faceted amethyst bead.
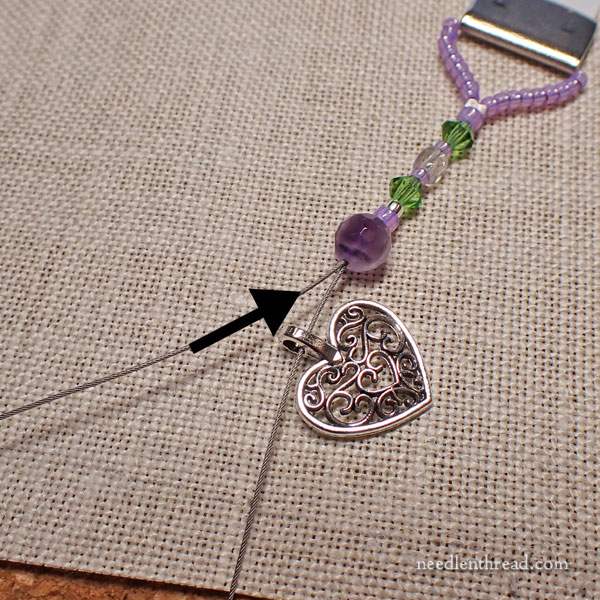
Slide the charm onto the beading wire, taking care to make sure it is oriented in the right direction if there is a front and back to the charm.
Feed the beading wire back into the amethyst bead, doing your best to keep it parallel to the wire that’s already running through the bead.
Keep feeding the wire through to the far side of the first peridot bicone that you come to on the return journey, allowing the wire to emerge at the other side of that bicone as shown above.
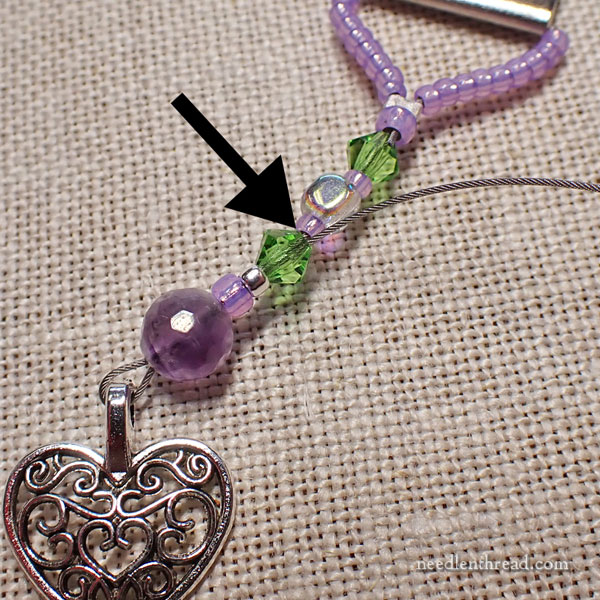
Now, you’ll use the excess wire to tighten up the string of beads and the charm, by pulling gently on it until everything is situated as you want it – but be careful! You don’t want the beads and charm pulled so tightly that they buckle. You want them to have just a tiny bit of wiggle room – not enough to see a lot of wire, but enough to keep the string of beads from curving or buckling. The loop of wire inside the charm should be loose enough that the charm hangs straight and doesn’t buckle off to the side.
Do not cut the wire at this point!
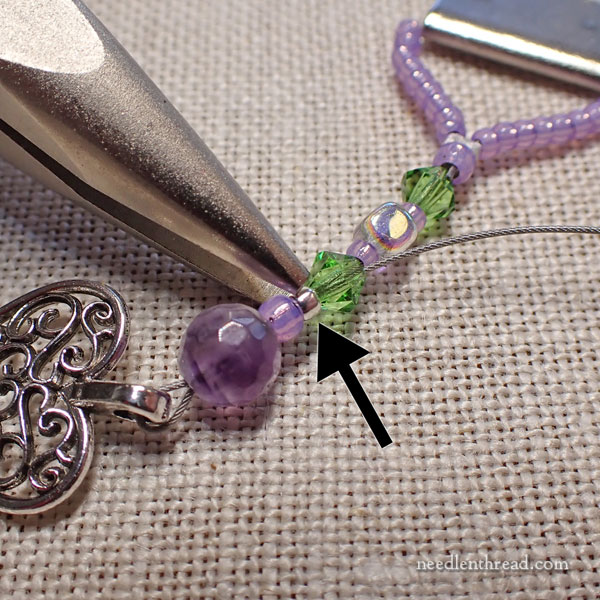
Before cutting the excess wire, you need to crimp the silver crimp bead. This requires a little care, because you don’t want to shift the wire or beads too much, once you have everything in position.
Ease the tip of your needle nose pliers into place and give the crimp a good squeeze.
Now you can cut that excess wire. Cut it as close to the beads as possible. If there is overhang, do your best to situate it inside either the bicone or the small bead following the bicone. You’ll want to avoid having a sharp wire tip poking out from the side of the fob.
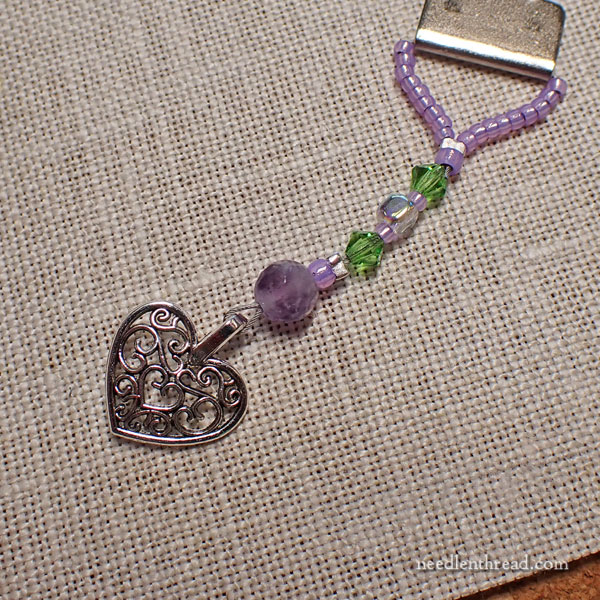
Here’s the finished fob.
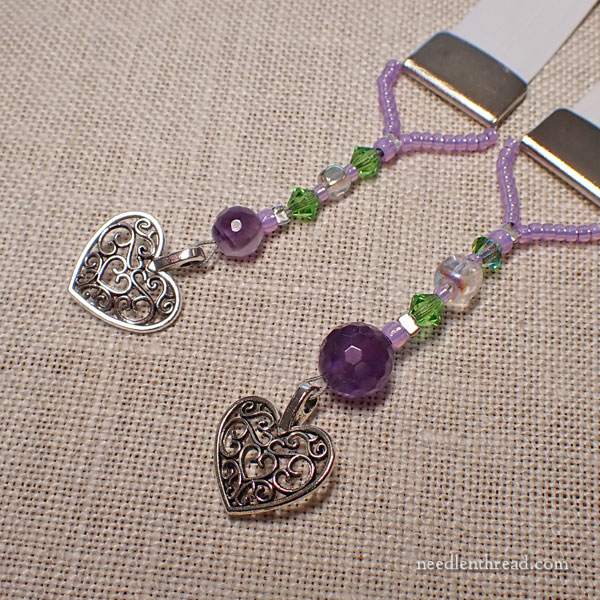
Here are two samples of finished fobs. The top features a 6mm amethyst and a 4mm clear cube. The lower right fob features an 8mm amethyst and a 6mm clear cube. All the other beads are the same.
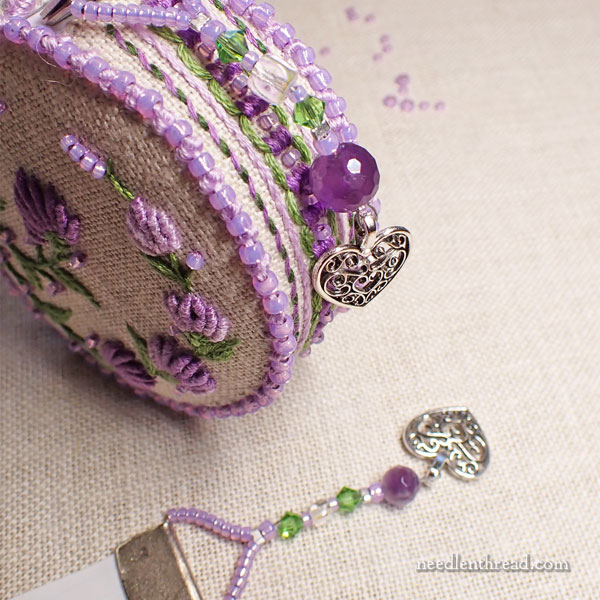
And here’s the fob on the tape measure cover – which brings us to the end of this stitch-along for Purple Posy!
I hope you enjoyed the project and I hope that your beautiful covered tape measure gives you years of use and pleasure in your needlework tool box!
Looking for More?
You can find all the stitch-along lessons for Purple Posy listed here in the Purple Posy Project Index, if you would like to work this project at your own pace.
You can find all the Stitch Snippet stitch-along projects listed here under Tips and Techniques in the main menu on Needle ‘n Thread.
If you count these five How-To stitch-along projects from 2021, there are now thirteen stitch-along lessons projects from these past four years. Each project includes materials lists, pattern, and step-by-step instructions so that you can recreate – or adapt – the project and learn a wide variety of techniques and procedures for embroidery and finishing.
Have a wonderful weekend!
Leave A Comment