


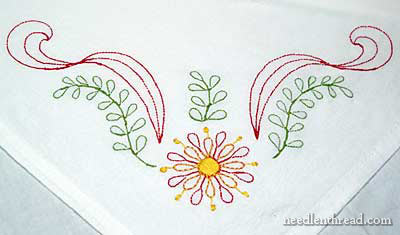
Last week, I told you about the iron-on transfers from Mani di Fata, which I purchased at Lacis while on vacation. Here’s a little towel I worked up, using one of the corner designs in that package. I’m also going to show you (gasp! shock! horror!) the back of the embroidery.
As I mentioned earlier, my favorite way of transferring an embroidery pattern – even if it’s an iron-on – is actually by tracing. That’s what I did with this particular towel. I taped the iron-on to my little light box and traced the design on using a regular mechanical pencil with #2 lead. There are other ways of transferring designs, of course! I’ve got a bunch of them explained in the articles under Tips and Tricks for Hand Embroidery, if you’re looking for some other way to get your embroidery design onto your fabric. For me, though, for this type of embroidery, I prefer just to trace with a pencil. It’s easy, it doesn’t require special equipment (you can use a sunny window instead of a light box), and it’s really fast.
After transferring the pattern, I picked out colors. Generally, on towels, I stick with no more than four colors, and often only three. In this towel, I used four: green, red, a lighter orangy-red, and yellow.
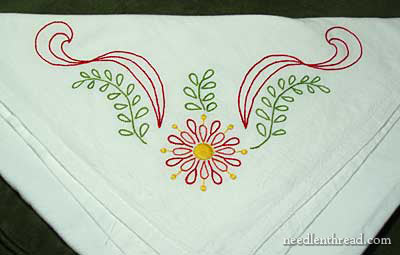
The design is pretty simple, but bold.
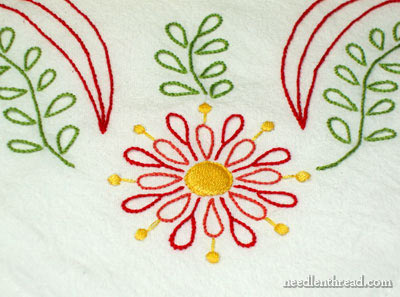
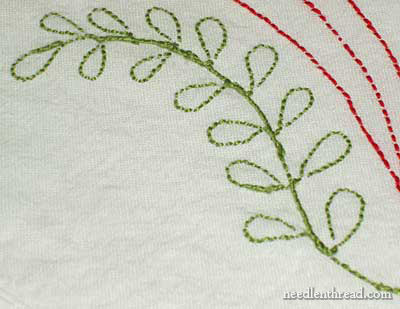
The entire thing is stitched in stem stitch, with the exception of the satin stitched dots around the outside of the flower and the satin stitched center of the flower.
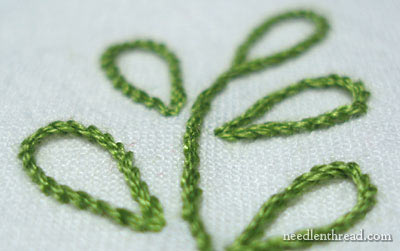
Stem stitch is an absolutely delightful stitch. It’s my favorite for line patterns, because it’s easy, quick to work, and its rope-like appearance is pretty. Despite arguments contrary to the fact, there is a difference between stem stitch and outline stitch, by the way! If you choose to use outline stitch for lines, you won’t get that rope-like appearance.
The Back of Embroidery is generally a subject that comes up either in hushed tones or apologetic tones… I received a funny e-mail from a reader, asking Very Apologetically if I would mind showing the back of my embroidery some time. She was worried because, especially on the towels she was making, the back is not covered up. “Slugs” where the end of the thread is anchored were a concern.
You can see the “slugs” where I wrap the ends of my threads around the backs of the stitches to anchor them. I either wrap (whipping around the backs of the stitches), or just pull the threads through the stitches, taking one extra backstitch around the back of the threads to anchor the thread. You can read about this under Ending Embroidery Threads, if you want. In any case, this is generally how I end stitches in a line on the back of towels.
In certain types of embroidery (needlepainting, goldwork, etc.), if I’m filling an area and I haven’t filled it all the way yet, and I need to end a thread, I’ll end my thread by taking it into an area that will be filled with other stitches and working several tiny backstitches that will hold the thread. It’s the same concept as beginning with anchor stitches, only, in a filled area, you can work the little anchor stitches perpendicular to (and into) each other (without building up a lump!). I’ve shown this technique on the video tutorial on bullion rose buds, if you want to take a look.
But, on line stitches on the back of a towel like this, where I don’t have anywhere to hide little anchoring stitches, I wrap the end of the thread through the stitches on the back. Yes, it makes a bit of a slug. But it’s the back! So I think it’s ok! Just trim your little fuzzies, and clean it up as best as you can, and I think it’ll look fine for the back of the work!
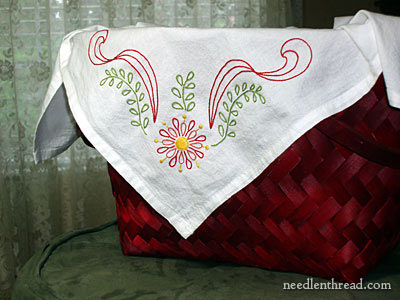
Decorated flour sack towels are useful for a number of purposes besides just drying dishes, hanging on the fridge, wiping the countertop, or sopping up messes. They make terrific basket liners, for one thing. We use them to line bread baskets for serving bread in at the dinner table. You can fold the corners up over the bread to keep it warm, and if you put your embroidered corner on the top, it’s very pretty!
Additionally, you can line gift baskets with them. This is great for wedding showers! Instead of wrapping the gift, put it in a basket lined with a towel, and fold the towel over the gift, with the embroidered corner on the top. A nice personal touch!
I like embroidering flour sack towels when I’m in the mood for relaxing, easy needlework that doesn’t require any kind of thinking or planning. I usually keep a couple towels “kitted up” in my work basket, ready for moments when I need something to do with my hands, but can’t afford deep concentration on needlework.
Hi Mary –
I love your towel projects! I fell in love with the design you shared in you posting on Monday, April 06, 2009 — Grab and Go Embroidery Project: Spring Towel. I purchased a dozen floursack towels via mail order, and have almost finished the first one, using a much simpler design than the one you did in April. The towels will be perfect for me as I refresh and expand my embroidery skills in preparation for the calendar quilt project that my mother and I will be doing together. Your instructions on starting and ending, transferring designs, types of threads, the various stitches, etc. all are so, so helpful — and inspiring!
Katrina
Ohhhh! Those satin stitched dots soooo perfect! I just can't do those little dots,and I'm so sorry…
Other day you doubt if the lines of iron-on transfer would disappear with washing – I can say that the iron-on tranfers from Rakan(italian magazine too) wash very well.
And its fun you were asked to show the back of embroidery just now – Tomorrow I'll have a post with an embroidered linen towel and… its back!!!
Thanks for showing the back of your work. It is so neat. My backs aren't nearly so neat. But after seeing yours I am going to strive harder to neaten up the back. Keep up the good work.
This made me smile – on my first project (cross stitch bookmark) the first thing my mother (an avid cross stitcher) did was flip it over and say "And the back looks good too!". A proud moment, for sure!
I don't think I have commented before but I really enjoy your site. The tutorials are a big help. Right now I am embroidering one of your patterns as a gift, and it's coming out beautifully!
Oh, and I love stem stitch too – though I am increasingly prefer split stitch.
Hi Mary, I love this design, and the colours are work beautifully together too.
In April, I joined my local Embroiderers Guild and in May attended their annual May Day.
There, I learned a new way of stitiching, it's called Wessex Embroidery and Gay Eaton was the tutor (google this); the colours I chose to use for my small sample are exactly the same you used for this design.
I will scan and email tomorrow.
Thanks as always for a great topic. I love seeing the work done by other people and seeing the back of your work means that I can see if I am doing things 'right'.
Mary,
Just beautiful. I'm sure some people would be thrilled if the front of their work looked like the BACK of yours! Linda
Hi, All!
Thanks very much – glad you like the little corner on the towel!
Marian, yes, do send a photo! I have the book, Wessex Stitchery – in fact, it was on my list for a review this week, and I think I'll actually do it today!
Thanks again, folks!
MC
I just LOOOVE your website!!! I've had my fill with little embroidery projects from Michaels, and was dying for something more. I'll soon be making an Edwardian dress, and had thought about embroidering lapel panels, but didn't know where to go beyond wishing. Found your site, and loving the designs! Have many new projects in mind! THANKS!!!
Thank you so much for posting the videos! It's so helpful to see them done live. I, as I'm sure many others, appreciate your gracious efforts!
Thank you for the inspiration. Your website has helped me dust off my embroidery skills that my gramma taught me as a child. I just finished a set of tea towels for a gift. The back is…ok… I used tearaway interfacing, but some of it is still in the open spaces. Can I iron on fusible tricot to help protect the threads from unraveling? How should I best unsure that the strands do not come undone? I want the towels to be used, but don’t want the monogram & design to pull out. Any help would be greatly appreciated! I’ve searched books and websites and just haven’t found the answer.
Thanks for bringing Mimi’s (my gramma) spirit back in my life!
Hi, Abby –
Normally, if your threads are secured while you’re stitching, you shouldn’t have to worry about finishing the back with interfacing or anything to keep the threads in place. What normally happens is, once you wash the piece, there will be a bit of shrinkage that will further secure the threads. I stitch tea towels and so forth quite often, and they survive the wash very well! So I wouldn’t fret about the threads coming out, as long as they have been secured well.
I hope that helps!
~MC
Re Flour sacks. I just bought some organic cotton ones and the weave is very loose–it’s like gauze. Will I be able to embroider (monograms) on them? Any tricks to help? Smaller stictches? Special thread?
i have some old flour sack towels that my great grandmother embroidered with the days of the week and holly hobby type girls with bonnets and dresses..unfortunately i am missing thursday and friday. does anyone know where i could find these patterns or know of someone who could recreate these designs? i would love to be able to display them as a set.
Thanks so much for your clear and helpful tips! I just finished my first needlepoint project and #2 is going to be a tea towel and I was really worried about how the back would look with various knots, etc. This post is incredibly useful!!
Great work Thank you
remarkable, ilike the simplicity
Thank you! This just gave me some inspiration for christmas gifts…off to shop for towels!
Hi Mary,
I really enjoy reading your blog and am inspired to start up embroidery. As i am from India, we dont have thread and fabric option. I am planning to get it through my friends from US. For the flour sack embroidery, could you tell me which thread did you use?
Kani
I learned embroidery as a young girl from my mother and grandmother. Life intervened and it fell aside. Later (30 years +) I took it up again only doing cross-stitch. I did pictures and a number of Serpendity Angels and began their Navitity. Still not finished.
Last year I converted to Catholicism and began religious embroidery. I am working on a piece about St Ann for my church–I designed it as I went along. It is almost finished. “The Lord’s Prayer” was similarly designed and is still in progress. It will go to my childhood church in honor of my parents.
I have referred to your site repeatedly. Thank you so much for it.
I’m glad it comes in handy, Bella! Thanks for your comment!
This is a really good informative post! Thanks! I know it’s old, but I just found it and it was very useful! Now if I could just find out how to keep my flour sack towels nice and white without using bleach! I’ll keep searching:)
Thanks for the article! I was looking for info on embroidering flour sack cloth, as I’m new to embroidery. Such a cute design there.
I followed your link, but wanted to let you and other readers know that the American Chair Store url has changed… it’s now https://www.acshomeandwork.com.
My shelter in place experience has drawn me hand embroidery and the serendipitous discovery of your website is a thrill.
Thank you for sharing your passion.
Hi! I am new to your blog. I would love to purchase the iron on patterns from Lacis, but can’t seem to find it on their website. Any help you can give me?