


This embroidered quilt square of an old-fashioned Sunbonnet Sue was worked in simple embroidery stitches on flannel, using stranded cotton. I’ve already displayed the complete Sunbonnet Garden square, but I thought you might want to see some close-ups with some embroidery stitch explanations.
This embroidered quilt square is an 8-inch square, in soft pink flannel. I transferred the design by tracing it with a Macro art marker in two stages: first, I traced the Sunbonnet girl, which I had saved on my computer. I sized the pattern in Photoshop, then traced it using my monitor as a “light box.” I don’t necessarily suggest this practice – but it worked for me!
After I finished the girl, I wanted to add a garden, so I flipped through my copies of Inspiration Magazine, looking for a little inspiration. I found a great pattern for a needlecase in issue #53, and I drew my garden from that. I loved the fact that the needlecase had bees on it – so I had to have a bee, too!
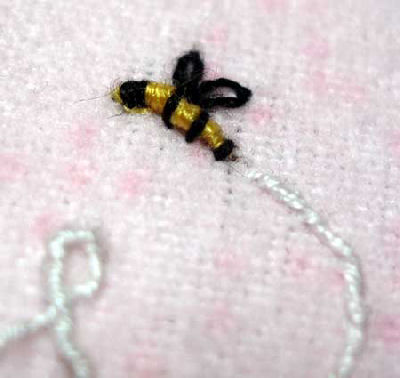
This little bee is worked in the following order: first, a bullion stitch in yellow forms the body; second, using black, I added some stripes and a head by just couching over the bullion; last, a couple lazy daisy stitches make the wings. The flight trail was originally going to be worked in a dashed black line using running stitch, but instead, I decided to use white so the contrast was not so obvious. Unfortunately, the write in running stitch didn’t show up too well, so I decided to use a whipped running stitch instead.
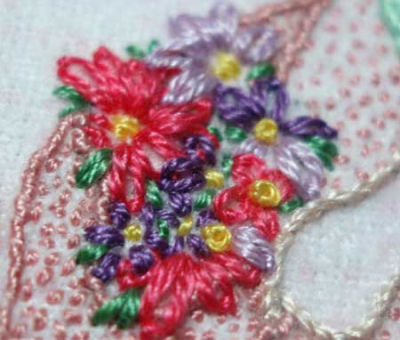
The flowers in Sue’s apron are a combination of lazy daisy (petals and leaves), straight stitches, and French knots.
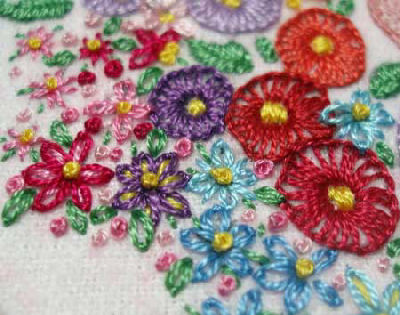
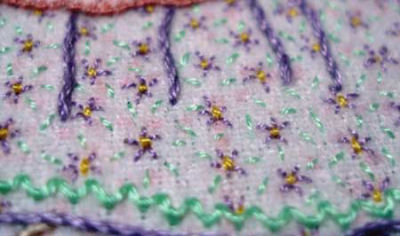
The daisies in the flower bed are the same – on some of them, I filled in the centers of the lazy daisy stitch with straight stitches in a contrasting color. The centers of the flowers, for the most part, are French knots.
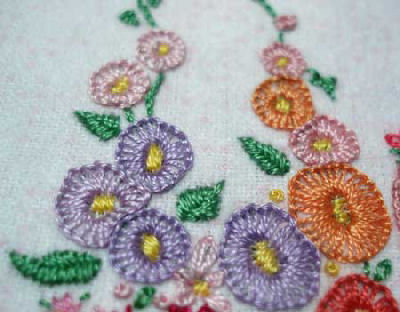
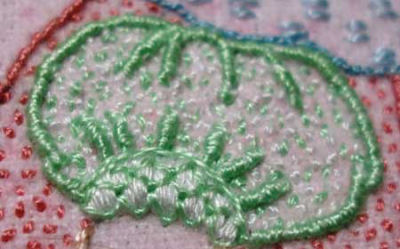
The hollyhocks are made out of buttonhole wheels, and the centers are satin stitched in yellow. I’ve posted before about hollyhocks – I think they make great flowers in embroidered flower gardens! The leaves are worked in fishbone stitch.
Sunbonnet Sue’s dress was a lot of fun! It is outlined in a medium purple, in stem stitch, using two strands of DMC. Then, I added a horizontal fly stitch border in green. The little flowers that make up the print of the fabric are just straight stitches, worked in one strand of DMC. Then I speckled the background of the fabric with light green straight stitches, randomly scattered all over.
Now, her little sleeve was troublesome. Originally, I planned to work it in white, so I stem stitched a white outline around the whole thing, and then added white seed stitches in the middle. I embroidered the cuff of the sleeve in white, in a padded satin stitch. But the whole thing looked awful, primarily because it didn’t show up well. So I decided to go with green, but I couldn’t pick all those stitches out, or I would have ruined the fabric. Instead, I whipped the stem stitch with the green, covering up the white completely. Then I added green seed stitches, intermingling them with the white. On the cuff, I worked a series of horizontal fly stitches so that it would look a bit lacy.
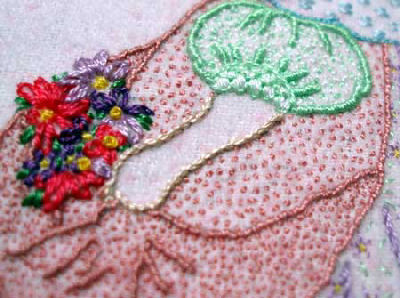
The apron is worked in two strands of medium pink DMC, the outline in a whipped stem stitch, then the whole thing filled in with seed stitch. I wanted a contrast between the front of the apron and the turned up hem, so I just worked the seed stitches closer together on the turned up part of the apron.
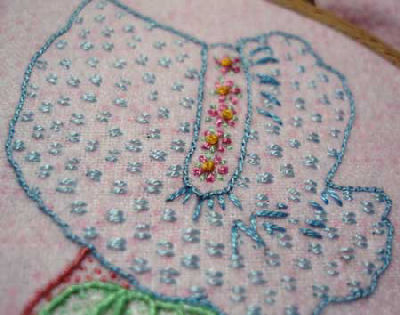
I was somewhat pleased with the way the bonnet turned out, especially considering that, when I started it, I didn’t like it! The blue on the outline was a little too dark. I worked the outline in backstitch, so I was able to whip the backstitch with a lighter blue to lighten the whole thing up. I was going to leave the inside of the bonnet blank, but it looked “too” blank, so I worked double straight stitches of light blue in a semi-pattern over the whole thing. The flowers on the band are straight stitches (two for each petal, worked in the same hole) and French knots.
So there’s my little Sunbonnet Garden Girl. I like her! I think the quilt will be darling – and I can’t wait to see it, either!
I think this square is a good example of what you can do with random mixed simple stitches. There’s nothing difficult about any of the stitches in this particular square. If you want to learn them, please check out my video library of hand embroidery stitches.
Have fun stitching!
Thanks so much for the details, Mary. I enjoyed seeing this block when you first posted it. But I admire it even more, now. The bee and the cuff are my favorites details. But it is all so well done.
Hi Mary,
I like to embroider and I would like to try my hand at your Sunbonnet Garden. I not an expert at it but I do love it. I not comfortable sewing without a pattern and I was wondering where or how I can get a printed copy of the Sunbonnet Garden? I love your website. Thank you.
Hi,Brenda – If you look around online for images of Sunbonnet Sue gathering eggs, you’ll find the design of Sue gathering eggs, which is what I used. Then I just sketched in the garden elements. I’m afraid I didn’t actually draw out a pattern. :-/ Sorry!