


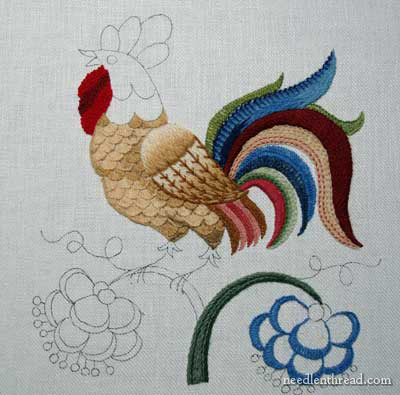
A couple points to reiterate on this crewel embroidery project, which I’m calling (oh-so-appropriately) The Crewel Rooster: 1. The first purpose of the project was to experiment with a variety of wool threads that I have on hand. I’ve had the opportunity so far to play with seven different wool threads made for surface embroidery. 2. The rooster is stylized. I know he isn’t going to turn out looking real! Just take a look at his mouth – that says everything. I just felt the need to clarify those two points so that you don’t think I’m positively nuts, going through the whole rooster stitching process the way I am! (Did I say “stitching process”? Stitching? Have I been stitching?…)
Not to let the over-abundance of stitching-in at the end of yesterday’s post on the wing outweigh my picking-out, today we’re picking out again. I re-stitched the tail feathers that were bothering me. I don’t know if you will like this any better, but I guarantee you one thing about the tail:
I’m
Not
Changing
It
Again.
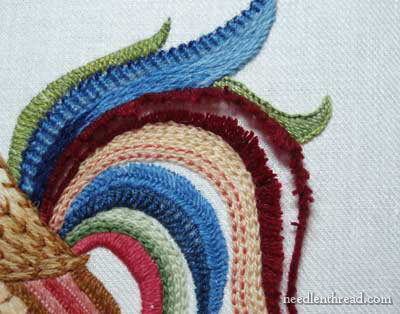
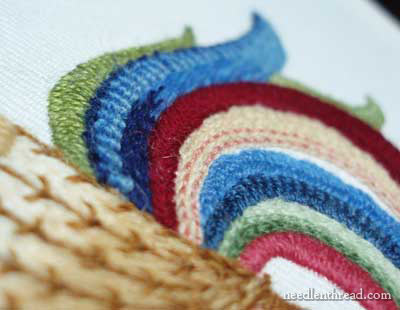
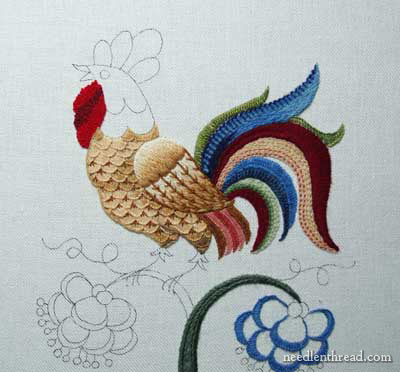
This is where we left off. Ok, fine. I will probably change those “under feathers” below the wing….
The large brick red tail feather has to go. I don’t like the satin stitching after all – the direction of it, or the fact that, in the wide parts, without padding underneath, the stitches have loosened up and become somewhat discombobulated.
The lowest feather on the tail – the Pepto-Bismol Pink one – also has to go. It’s not that I don’t like the pink, because I do. I just don’t like it there. And it’s the satin stitching again. Something about it. Gosh, I wanted satin stitching, but it just isn’t doing it for me on the feathers.
“Knock, knock.”
“Who’s there?”
“Earwig.”
“Earwig, who?”
“Earwi-go again!”
As corny as it is, it says it all: here we go again! The feather was sliced open and…
… returned to its bare state.
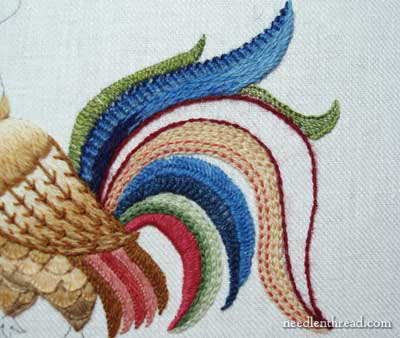
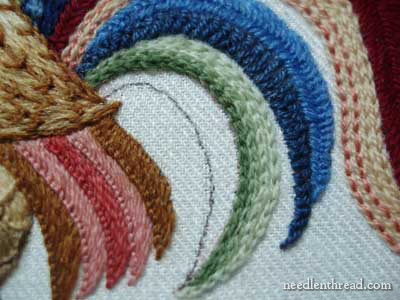
Into the same spot, with a slight bit of difficulty keeping the edges smooth while trying to work around the feathers already there, I stitched a dark red feather in fishbone stitch. I like the feather better, stitch-wise. The thread is actually a bit brighter. It’s still a brick-ish red, but slightly brighter. The wool is from the Renaissance Dying collection.
I like the way the colors line up on the tail. Well, Pepto-Feather has to go. But other than that, I like it so far.
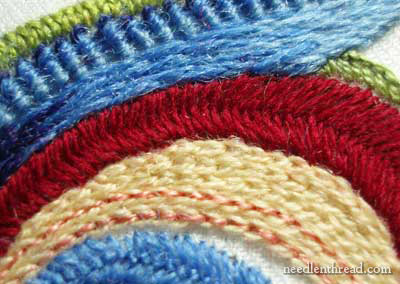
And I like the fishbone stitch.
Now, it’s Pepto-Feather’s turn. Say good-bye!
All sliced up here – this is Heathway wool. It is soft wool and it makes beautiful satin stitches. It also picks out very easily, without leaving those wooly shards all over the place.
My goodness, the linen twill holds up marvelously. It looks great! You can see where I picked out one of the green chain stitches accidentally….
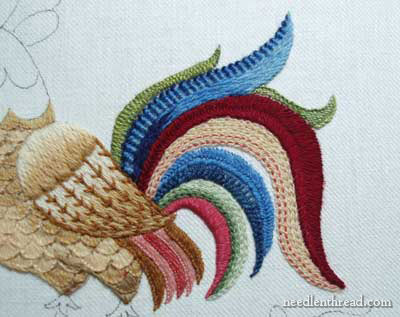
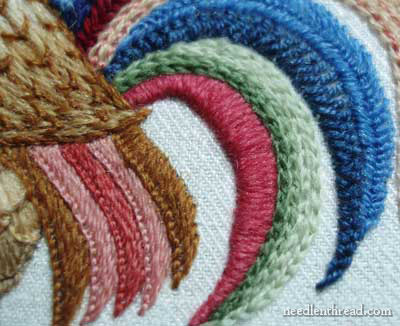
Mwahahahahaha. Some of you are probably cursing me right now! It’s true. I used the dark red again. I like the lower feather of the tail in the dark red. It finishes the tail. I used stem stitch in the dark red Renaissance wool, and filled in the area with rows of stem stitching.
Do you notice anything else? Yes, the body is getting some more color there. It’s not all in, so it looks a bit blocky and systematically linear or geometric or something. I don’t know. It looks bizarre.
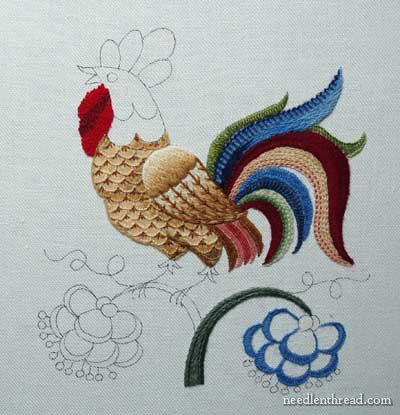
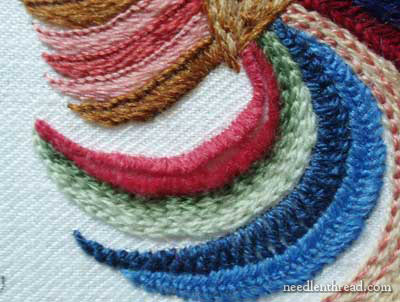
Ok, I’ve added the rest of the darker gold. It doesn’t look AS bizarre. Well, not bizarre-bizarre. Only sort of bizarre. But – wait. Just wait! Once the neck and head are done, trust me. It won’t be nearly as noticeable!
Yes, the more I look at it now, the more I’m convinced the colors on the “under feathers” below the wing there have to change. Any suggestions? What color? Body color? Or tail colors?
For further posts on this project, feel free to visit the following links:
Free Hand Embroidery Pattern for The Crewel Rooster
Setting up The Crewel Rooster Project
Choosing Threads for The Crewel Rooster – and the first flower
Crewel Design Books
Stem Stitch Filling on Flower Stems
Scalloped Feathers on the Rooster’s Body
The Beginnings of the Rooster’s Tail
French Knots on the Wattle
Adding the First Blue Feather using a Raised Backstitch
The Rooster Tail, Finished for Now
The Wing – Three Attempts
The rooster is looking beautiful. It's getting very colorful.
My goodness, Mary, this really is turning into an adventure. He is looking very handsome. I really like the long and short stitch shading on the wing feathers and I don't think that I said before how much I like his French knot wattle.
I was thinking about all of those wonderful kits that are available. I look at them and think how fantastic they are, but I never stopped to think that the designer may have tried out several stitches, threads and colours on each element before coming up with the finished design. This has been such an insight.
I vote for body colors. I think tail colors would make. Him bottom heavy.
I actually like the stitching on the under wing a lot!
My only suggestion would be that both the body and wing look a little dull in comparison to that glorious tail. Have you ever noticed that many colorful birds' feathers have a slight iridescence to them? How about tucking in some tiny touches of green and blue in behind the brown to give him a bit of the semblance of a shimmer (notice I said tiny — maybe the barest bit of a fly stitch buried under an existing element so that you only see it if you tilt the piece?
He's well on his way to being cock of the walk!
Karen from Arcadia
I also vote for body colors, but make them a bit darker so the feathers stand out a bit. I also like the suggestion of adding some iridescence, maybe some blending filament?
My husband keeps wondering why I laugh out loud reading a needlework blog. Keep up the great stitching and commentary!
I'm glad to see the Pepto pink gone…somehow it just didn't fit with the whole. As for the smaller under-tail feathers…how about going more blue & green?
In response the the anonymous comment – Mary's site ALWAYS makes me want to stay home and stitch! It's so interesting to follow the process and gives me more confidence to try things and then snip the out if they don't work. I really like the french knots, too! It's the best bit thus far!
I'm so happy to see the scallops on the body are still intact. And you made them even better! I want to reach out and touch this proud bird. The feathers under the wing? Not sure. They aren't important feathers that need a lot of attention. I kind of like them as they are. They don't compete with the tail feathers but they don't drag out the body colors and shape. Too bad they exist at all. All I can say is whatever you do, keep it subtle. The big red does look better with a change of direction.
Mary,
I just love the rooster so far…the body is turning out to be a work of art. Just received my Keepsake Quilting catalog & thought of you when I saw the rooster patterns by McKenna Ryan of Pine Needles Designs on page 39…thought you might get some ideas.
Mary,
For the wing feathers I think some darker greens and purples. Remember that in bird species the males are colored so they stand out and attract attention – like the peacock. I can't wait to see what you choose.
First, let me say that your rooster is becoming very handsome! I admit, I was getting a little uneasy there, when you were working on the tail, but you have worked your usual magic after all.
As for the under feathers, maybe you should leave them until you have done the comb? I don't know what your plans are for that, but I'm imagining lots more color. Once the head of the bird is done, it might be easier to decide if those bottom feathers should be vibrant or discreet.
Hi Mary, Oh he's looking gorgeous. I don't know how you keep knowing where to pick out and try something different, but it certainly "clicks" when it's right! I liked the color of the Pepto-feather, but you were right, it didn't look right. I thought that up next to the shaded green, it almost looked like a watermelon wedge! I love the embellishments to the body scallops. I don't think the wing under-feathers look bad, but they don't "click" yet. I think they should echo the tail colors, slightly less contrast, from one to another, adding overall balance, but not becoming a focal point. Here I go again, offering advice when I don't know what I am talking about. Didn't I just say I wasn't going to do that? Feel free to ignore me, Mary.
WendyBee
Wow, removing the pepto bismol feather changed the tone of the whole piece. It's gone from a fantasy out of this world rooster to a more traditional stylized look, I think. I really like it! Who'd have thought that one feather would make such a difference… clearly you did!
I really like what you've done with the body and the wing, it's textured enough to suit the piece very well. I think you're right that the under wing feathers aren't quite right, but I'm not sure what would be better.
It's looking GREAT, Mary! How about using that pale green on the second tail feather from the bottom. It's close to the same color value as the scalloped body, but still differentiates two areas. Then bring in that darker brown that you have on the scallops to show the lines between the feathers.
You've probably already started. Will be fun to see what you choose.
Sheila
Wow! The body really "pops" (looks 3d) now!
And the tail looks great.
I'm with the lady who said – do the rest, including the crest, then re-visit the bottom feathers.
G'day Mary,
I'm so glad I'm in on this project.
He usually looks pretty right to me and then you point out something to change and that particular part sticks out like a sore thumb!!
So I watch the underfeathers with interest and anticipation.
Cheers, Kath
Well, Mary, you might not agree, but I think those tail feathers might look really good in the same colors as the wattle! I have been so enjoying your stream-of-consciousness stitching on this rooster! 🙂
I'm with all the others who are saying body colours, although maybe darker..
I don't know how well it would work for anyone else, but if I am doubtful about colours I photocopy my design a few times and then get going with coloured pencils. Then with a bit of luck the unpicking is only about stitches and not about colours!
You're doing a great job, Mary – keep at it!
Gosh, I am so inspired by this rooster, I feel I have to comment on almost every post. The tail is now AMAZING, and your accents on the body look brilliant, tying in with the wing, and making your shaded scallops seem perfectly placed.
What a joy it is to follow this work!
And what a joy it is to see that ‘reverse stitching’ is part of other people’s work too. 😉
Thanks, Melissa! The fun thing about this kind of stitching is that if you don’t want to work with wool, you can do the same thing with cottons or silks. They don’t cover quite as fast, but they would still look great!
it is nice.i like to know about this ,
Hola Mary corbet
Cómo estás, tu página es de lujo, he realizado varios de tus tutoriales quiero saber si tienes los bordados de celosia de alguna forma especial para comenzar a realizar trabajos, quiero hacer un libro con tus tutoriales solo bordado y al pasar de tus instrucciones te los enviaré para que tú veas lo maravilloso de tu trabajo. Para personas como yo es lo máximo.