


Earlier this week, we looked at smooth passing thread in my current goldwork embroidery project. Today, we’ll take a look at another real metal thread used for embroidery, called check thread.
Check thread is a real metal thread that’s quite similar to smooth passing thread, but it’s crimped and wavy. It looks a bit like rococco, which is also a wavy real metal thread couched on the surface. As far as I can tell, the only real differences between check thread and rococco are that check thread is quite a bit finer than rococco, and that it’s not quite as soft. In fact, the fine stiffness of it makes it easier to work with than rococco, I think.
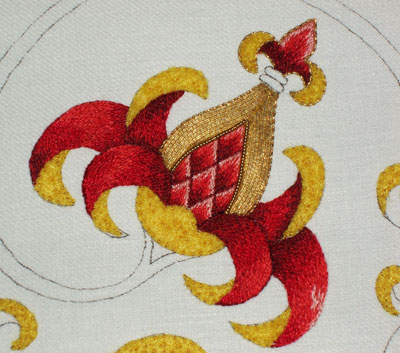
Both rococco and check thread are normally used for filling threads, in the same way I used the smooth passing thread on the first section of the goldwork. But with all three couched threads – check thread, smooth passing, or rococco – you can also use them to outline, and that’s what I’ll be doing here.
If you’re interested in reading a wee bit about rococco, you can peruse this article I wrote for CQMagazine, on using goldwork for crazy quilting. If you scroll through the article, you’ll come to a section titled “Rococco.”
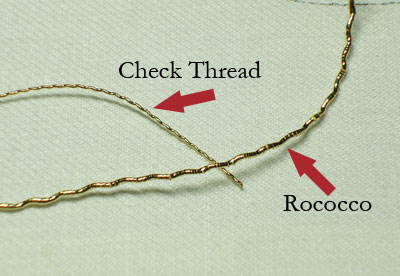
In the photo above, you can see the difference between rococco (on the bottom) and check thread (on the top). The check thread I’m using comes from Tanja Berlin’s website, and it’s 2% gold, in either size 16×3 or 8×2 (the size actually wasn’t marked on the envelope, and that’s as close as I can get by measuring).
Just as with smooth passing thread, check thread is couched onto the surface of the fabric. I’m still using YLI #100 silk in color #215 to couch the check thread, with a #11 crewel needle. I’ve run the silk couching thread through beeswax before couching the gold.
The nice thing about check thread is that it’s very easy to space your couching stitches evenly! I couched the thread at each little crimp.
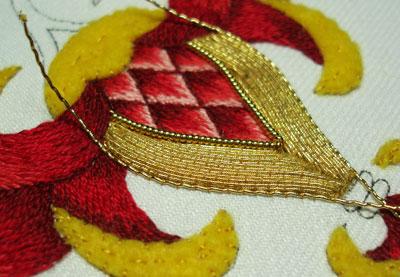
I used the check thread to outline the outside of the fruit. The check thread fits right up to the side of the smooth passing, and creates a fine, wavy edge. I like the look of it – I love the way the check thread catches the light.
After outlining the main body of the fruit, I used the check thread to outline the fleur de lys tip of the pomegranate, couching the thread around the outside, and on all sides of the felt padding.
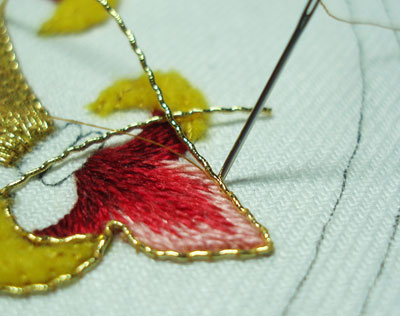
I haven’t quite finished the tip in this photo. The key to making the couching easy on small design elements is to find the longest line you can follow, without having to start a new couching thread. I started at the top inside of the felt padding, moved down the inside of the felt padding, rounded the tip (pinching the thread with tweezers to get a nice sharp fold), and then followed across the top of the fleur de lys, around the outside of the padding on the other side, around the tip (pinching with tweezers) and then up the inside of the padding. Unfortunately, I underestimated the length of the check thread and didn’t make it up the inside of the felt padding on the other side. But that’s the route I would have gone, if I had cut a long enough thread!
(Is this where I say, “Do as I say, not as I do”? —- Tsk, tsk. Not the best teaching policy!)
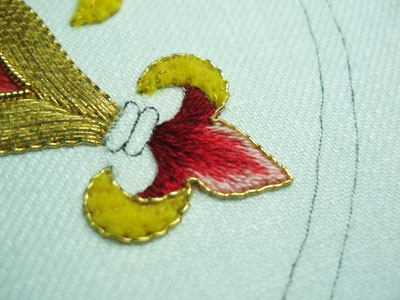
Now, you may well ask why I worked the outside of the felt padding first, before filling it in. It’s true – if you were using a couched thread that has to be plunged (like smooth passing thread) to cover that felt padding, you should definitely cover the felt before outlining it. I’m going to be using chip work up there, and I’m hoping the outline will keep me from “overflowing” the chip work on those tiny turn-overs and making them look too fat. So I went ahead and outlined the turn-overs on the tip. You don’t have to – you can wait on outlining this until you’ve covered the felt, but for me, this worked best.
To end check thread, you plunge it in the same manner as you would with smooth passing thread, and then secure the thread on the back of the work by stitching over it with your couching thread. You can strip the check thread exactly as you do with smooth passing thread, too.
So that is check thread. We’ll be coming back to it later, as I intend to use it for outlining other areas. I Really Like this metal thread! (Note: I don’t like rococco – it’s a real pain in the neck to work with!)
When next we visit the goldwork project, it’s time for chip work – a particularly spectacular filling technique, if you like sparkle. (And really, who doesn’t like sparkle?!)
For all the posts in this series, please visit the following links, which are arranged in the order of the project’s development:
Stylized Pomegranate Pattern used for this project
Setting up the Project on a Frame
Preparing the Ground Fabric with Felt Padding
Selecting Colors of Silk for the Project
The Stitching Begins – SIlk Shading
Continuing the silk shading – the left side
Finishing the silk shading
The Goldwork Begins: Smooth Passing Thread
Check Thread for Outlining
Chip Work Filling with Check Purl
Outlining with Stretched Pearl Purl
Filling the Bowl with Passing Thread
Finishing
the Tips with Passing Thread
Finishing the Fruit
Beginning the Stem
Continuing with the Green on the Stem
Almost finished! Chip work on the Stem
The Finished Goldwork Pomegranate
Hi Mary Am following the goldwork project and followed your lead to CQ. Another site in the UK is http://www.maceandnairn.com
Wonderful!
"Chip work" sounds familiar but I'm not sure what it is – I think you've written about it in a previous goldwork of yours…is about something I've never seen in real life.
So let's wait for next post. lol!
This is turning out so beautifully. You have again shown me how little I know about a subject, thank you! I had no idea that there were different types of gold threads, though once I think about it, it makes perfect sense. I love learning on your site, you do a great job with explanations. Thank you again Mary.
Beautful work I also read the wonderful article in Crazy Quilt magazine. It had so much information I saved it. I wasn't expecting the I don't like Rocco at the end of post.
Thank you so much for your posts! I've learned from books and from trial and error. It's great to have someone take the time to do the photography and the step-by-step you do!
I also really appreciate the resources for suppliers. Thank you!
This project just keeps looking more spectacular with every new post. I always love your work, but the contrast between the red silk and the gold threads is utterly breathtaking.
I can't wait to see the finished project!
Karen from Arcadia
"As far as I can tell, the only real differences between check thread and rococco are that check thread is quite a bit finer than rococco, and that it's not quite as soft.".
And then you mention that you don't like working with rococco. For these reasons?
Very clear instruction, Mary. Thanks!
This is such a beautiful project, Mary!
I love goldwork. And this piece is stunning!