


A few weeks ago, I posted a free hand embroidery pattern that I’m currently using as a goldwork embroidery project. For those of you who are new to goldwork, it is a form of surface embroidery that employs real metal threads. When it’s mixed with silk shading, I think it’s possibly the richest of all surface embroidery techniques. I mean, really – silk and gold! What more could you want?
So here begins a series on goldwork, wherein I’ll take you step-by-step through this project with me. I’ll try my best to give some clear instructions so that those interested in goldwork can give it a try!
Last week, I showed you the set-up of the goldwork project on the frame. I use Evertite stretcher bar frames, but if you have a slate frame, it is always considered the best choice of frame for goldwork. With goldwork, don’t use a hoop! (My opinion, anyway!) You want your fabric to be drum tight, and you want it to stay that way, or at least to have the option of tightening it (hence, the Evertite frame or slate frame) without warping your fabric while you adjust it in the hoop. Another point: you won’t be able to iron out hoop rings! Just trust me on this – goldwork is much better done on a frame than in a hoop!
With the project set up on the frame, the preparation for stitching can begin. All the areas where the gold will be applied to the design are going to be padded with yellow felt. This accomplishes a few things: it lifts the gold a little bit above the rest of the stitching and gives it a more finished look, I think, and it also provides a color base behind the gold, so that the white fabric, should it show through, will not be as visible.
For the felt, I’m using a regular craft felt which can be purchased in small pieces at your local fabric or craft store. I prefer a slightly thicker wool felt for this step, usually, but I didn’t have any on hand. So this will do!
Besides the felt, I used a light fusible interfacing (similar to Wonder Under) for this step.
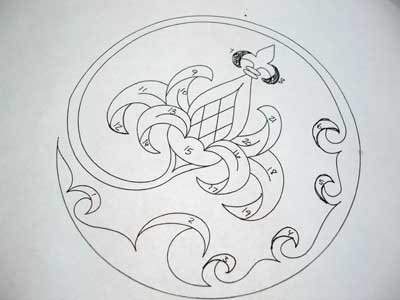
I took my pattern, and numbered each piece that would be cut out of the felt. This way, I wouldn’t confuse which little piece of felt goes where on my project.
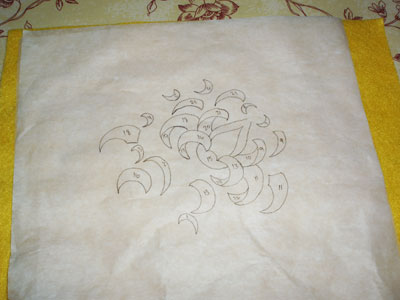
Then, I inverted the design (very important!) and traced out all the pieces where the gold would go onto the paper of the fusible interfacing.
I numbered each piece as I went, to make sure nothing got confused. And I traced out some extras of certain parts of the design, because I wasn’t sure yet if I wanted to pad some areas more than others. (As it turns out, I didn’t use these extra pieces.)
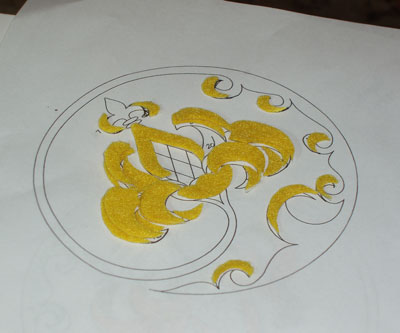
After ironing the fusible interfacing to the felt, I cut out each individual piece and left the paper on the back. Remember, the paper has the numbers on it. Then, I took my pattern and laid out all the pieces on it. Now, I’m ready to stitch the felt to the ground fabric.
First, peel the paper from the back of the felt. The fuzzy side of the felt goes up – not the side where the interfacing is. The interfacing merely makes it easier to cut the felt in accurate pieces.
Then, place the piece on the fabric and thread up a needle (I’m using a #9 crewel needle) with whatever thread you like to use for couching your gold onto your fabric. I’m using either Tire silk (50 wt) or Kreinik gold couching thread.
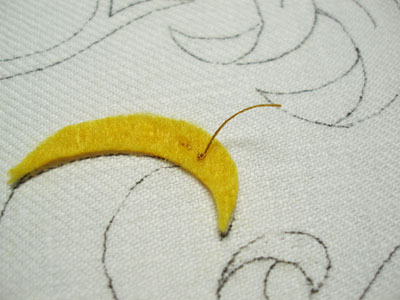
Knot the end of your thread and take your needle down into the felt, stitching some anchoring stitches into the felt, and then cutting the knot off the top there. (You may want to look at this photo tutorial for using anchor stitches to start a thread, if you’re unfamiliar with the technique.)
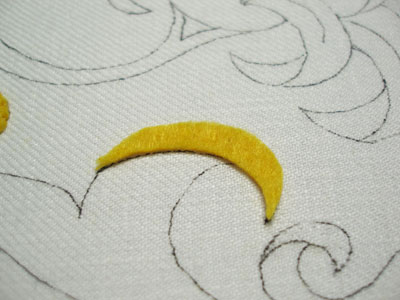
I’ll generally stitch some straight stitches down the middle of the piece of felt, to hold it in place while I stitch up the edges. It makes it easier to stitch the edges without the felt shifting.
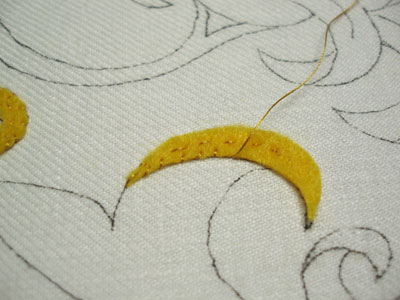
The felt is sewn onto the ground fabric with small stitches all around the outside perimeter of the shape. To do this, it’s easiest to bring your needle up into the fabric and take it down into the felt.
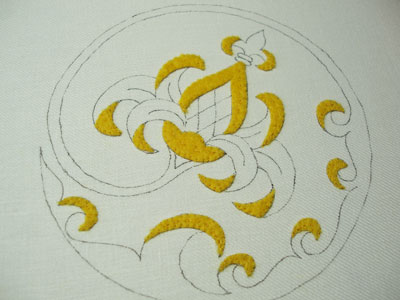
The process is repeated with each piece of felt, until all the areas where gold will be used as a filling are padded and ready to go!
So, that’s the second step in the set-up process, and now I’m ready to stitch. I’ll actually be stitching all the silk work first, and the goldwork last. This way, my silk threads won’t get caught on my goldwork threads.
Next up – color selection, then silk shading!
For all the posts in this series, please visit the following links, which are arranged in the order of the project’s development:
Stylized Pomegranate Pattern used for this project
Setting up the Project on a Frame
Preparing the Ground Fabric with Felt Padding
Selecting Colors of Silk for the Project
The Stitching Begins – SIlk Shading
Continuing the silk shading – the left side
Finishing the silk shading
The Goldwork Begins: Smooth Passing Thread
Check Thread for Outlining
Chip Work Filling with Check Purl
Outlining with Stretched Pearl Purl
Filling the Bowl with Passing Thread
Finishing the Tips with Passing Thread
Finishing the Fruit
Beginning the Stem
Continuing with the Green on the Stem
Almost finished! Chip work on the Stem
The Finished Goldwork Pomegranate
I'm with you Mary, silk and gold, there is nothing better. I love the design and am looking forward to watching you stitch it.
I will be in silk and gold paradise next week. I have a two day gold leaf course Saturday/Sunday, then a 5 day Japanese embroidery course beginning Monday. My cup runneth over 😀
Unfortunately I haven't the supplies to do this work but I'll keep your newsletters about it for sure!
Speaking about supplies soon I'll write you an e-mail asking for some advise…:)
Did you really mean to pad the undersides of the 4 bottom leaves on the pomegranate? If so, I can't wait to see what you do with them. My stitching friends and I are amazed at your productivity.How do you do it?
Could you post a list of gold work supplies for this project? I think I'll need to order them. And also, maybe the colors of silk you'll be using.
Thank you.
Ooooo, I am so inspired by this project, from the design to seeing the beginnings of it. I am beginning to feel a need to do something along these lines. I love how you give little tips that you don't even thing of while you're writing, such as doing the silk first so it doesn't catch on the gold work.
I am eagerly anticipating watcgubg the progression of this project.
I am so glad to see you doing a "tutorial" goldwork piece! I've been very interested in learning how this is done (even tho' I don't plan on doing any in the forseeable future) and your posts are always so educational. I can tell you are a teacher, as everything is so well-explained. I'm looking forward to printing this off and adding it to my "Mary Corbet" notebook!
Hi, All – thanks for your comments!
Christine – I debated about padding the underside of the two bottom leaves on each side, because they would naturally be farther away from the eye, and the curling top of the leaf would be higher up. I am hoping that my plan for those four sections works out so that it doesn't look awkward. There will be some shading involved in there, that will hopefully pull the underside back, and, at the same time, the turnover on the upper leaves will be fuller. So we'll see how that turns out. If it doesn't look the way I intend, I'll just pick it out. They're very tiny sections, so I won't lose much over it.
Cindy – I have a fairly large stash of various sizes of metal threads, and there will be some trial-and-error involved in selecting the right sizes, I'm sure. So I don't have an absolute list yet. I know I'm using #5 smooth passing in 2% gold and different sizes of pearl purl, twist, and check purl. I may use some bullion (smooth purl) for the neck – we'll see. But I'm not sure yet what specific sizes of each metal thread.
I order my metal threads from two sources: Tanja Berlin in Canada and Hedgehog Handworks in California.
I'll post the colors of silk in the next installment.
I'm glad you're all interested in the project! Thanks again for the comments!
MC
That's a beautifully clear explanation of the process, Mary – thank you!
I will second (or third or fourth) the comment that these step-by-step tutorials are very helpful. Epecially for techniques where most of the books on the subject are written in other countries than the U.S., and in which the names and types of materials differ. Trying to "kit" projects from Inspirations magazine can be a real trial, for example.
Hi Mary,
I am waiting for the list of supplies since I may get some of them here, but if not I will get my sister to send them to me. I love the design and the way you go about explaining each step. Thanks
I've been following your blog for a little while now and I'm amazed at your productivity and skill. I embroider, but not on this level! I'm both inspired and intimidated. I will look forward to seeing this project reach completion.
*excitement*
Thankyou for the tip on using interfacing to make cutting out those tiny but need-to-be-accurately -shaped pieces. Been there, struggled ….
You make this look so precise and easy at the same time! I am almost convinced I could try this…
I use the interfacing-on-the-felt method, too. It's wonderful. I was just recently able to put felt on a fairly small area that has even smaller tendrils. I wouldn't normally have been able to use felt on these small areas, but using wonderunder made it possible. I find that wonderunder on felt provides the following benefits:
1) It holds the felt together better than just using a plain piece of felt so you can use it in small spaces.
2) Placing the wonderunder side down on the fabric helps the felt stay in place a bit better than plain felt. It doesn't seem to slide around as much.
3) As Mary says, wonderunder also makes it much easier to cut out nice, clean pieces, especially small pieces. It's so easy to get a crisp edge with the wonderunder.
I've thought about ironing the felt to the backing fabric since it has the glue and then stitching around the edge, but I haven't tried it yet. You could run into big problems if the felt moved as you ironed it down! I don't think I'd do that on a really small piece of felt, but perhaps on a larger one. Also, I tend to use a slightly smaller piece of felt than the outline of the area that I'm covering. I then sort of coax the felt to the edges. In this case ironing wouldn't do much good. I have problems with exactly sized felt being a little too big. If I make it just slightly smaller I have better luck getting a nicely sewn down edge. I suspect that I have a natural propensity towards stretching the felt slightly when I'm stitching it down so I need it to be a tiny bit smaller.
One more comment regarding the areas of turned under leaves that are covered in felt and are higher rather than being recessive. I don't know how the forward parts of the leaves are going to be stitched, but if they were to be fully covered, they could be covered in felt to at least bring them to the same height (or higher with extra padding) as the turned under parts. For those of you who remember the goldwork pomegranate, that's why the body of the pomegranate was covered in red felt. I wanted the surface stitching and goldwork for the entire body to be at the same level. The red felt also provided a nice edge to lay the pearl purl outlining against.
G'day Mary,
This is so intriguing.
Many, many, thanks.
Cheers, Kath
I have already learned a ton and you've barely started! Thank you once again Mary for all the work you put into these tutorials for us – I hope you know how much we appreciate them (AND you!!).
I am so excited about seeing this design progress, I'm loving my version of it… the stitching isn't perfect but it's my first time at crewel work!! I'll be posting another picture of it soon hopefully I have finished the main part of the flower almost now all i have to do is the endless amount of satin stitch for the border swirly bit … I might have to add more turnovers to mine as i'm loving them on yours!
P.S. I'm staying up late to see if I was lucky enough to win your give away which I really really really want
Mary, I can already see the finished project in my head! Unfortunately I'm behind already!I am just finishing some attachments for something I'm working on.I have been dragging my feet I think. I haven't been able to get out to look for the thread,for this but I will watch while it is worked.
Mary,
I hadn't heard of using the interfacing as a means of cutting accurate shapes in felt for padding before. Thanks for the tip!
Like Christine, I'm curious to see how the turn-unders with the extra padding are going to turn out!
mam, i really enjoyed ur embroidery tips your tips are golden gifts to us hats of to u mam