


Here’s a little more progress on the goldwork embroidery project I’ve been working on lately! Today, we’re going to finish the tips of the “petals” or bracts – the turned-under parts, which will be covered in smooth passing thread.
Before delving into this part of the goldwork project, you might wish to read my first post on using smooth passing thread, earlier in the project. I’ve touched on some basics there and won’t re-cover the same ground here.
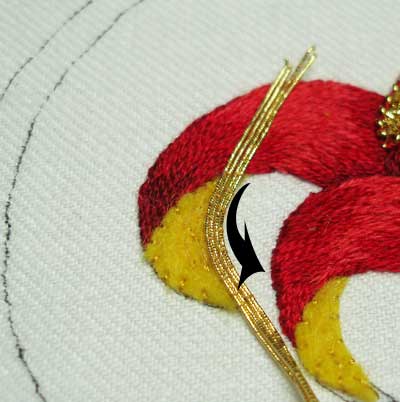
I’m using the same smooth passing thread that I used up the sides of the body of the fruit and on the “bowl” underneath the fruit – it’s a #4 gilt thread. The smooth passing thread is couched in pairs, starting on the widest part of the turn-under and following the curve of the turn-under. I left about an inch of thread on each side, to use for plunging. You can get away with less, actually – about 3/4″ is still easy to manipulate with a plunging needle, and if you’re using a plunging lasso, you can leave even less (easily 1/2″). (I covered using a plunging lasso in my article in CQMagazine Online on goldwork and crazy quilting. You can also find a good tutorial on making a plunging lasso on Threads Across the Web.)
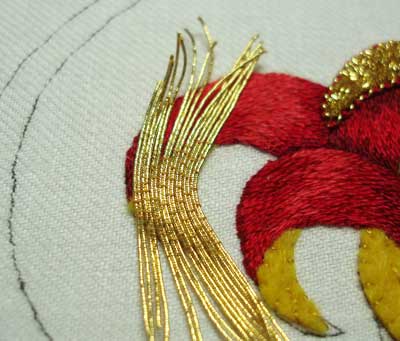
I filled the whole area, always starting with a couching stitch right at the edge of the felt padding underneath the gold, so that the gold was firmly covering the padded area.
Once the shape was covered with gold, I plunged the threads on one side, making sure that I held onto the gold threads. While pulling the plunging needle through, I held onto the other ends of the passing thread, so that I didn’t shift the gold threads (or pull the whole thread through!).
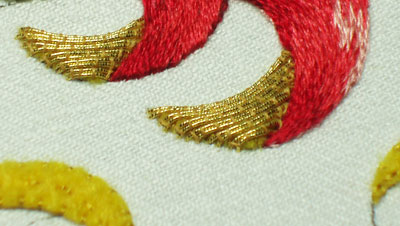
On the side next to the silk shading, I positioned the plunging needle right between the felt and the silk shading, and popped the threads on through. You can see the tiniest tip of yellow felt right at the “elbow” of the shape – but no worries, this will be covered with an outline.
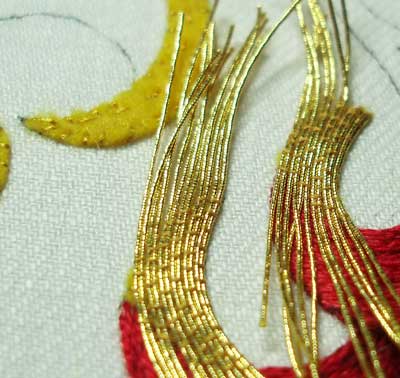
I moved on to two at a time on the other side…
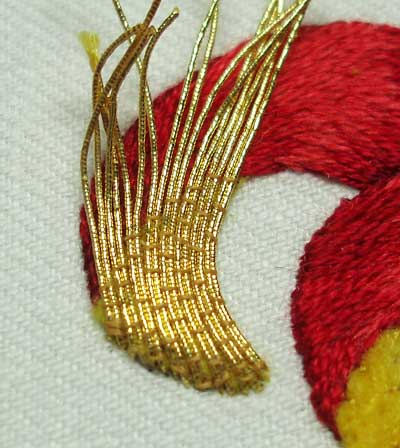
… and got those plunged and anchored on the back.
Doing the turn-unders was fun, even though the shapes were small enough to make it seem rather tedious. But, despite all the threads to secure on the back, it went faster than I thought it would.
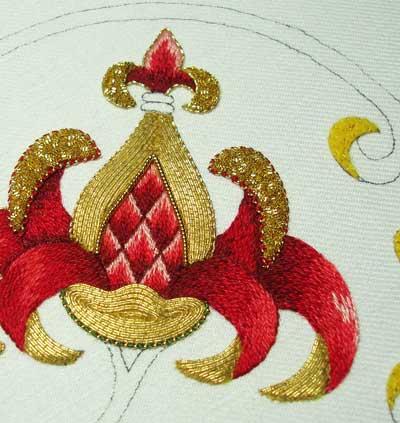
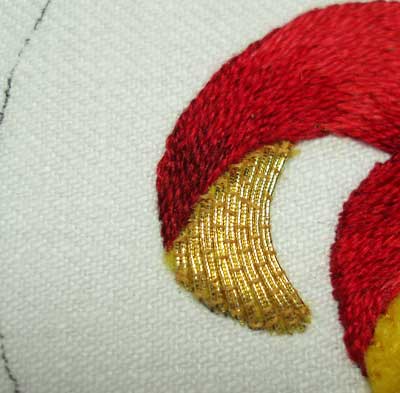
And here’s the progress so far, including a stretched pearl purl outline at the base of the “bowl” below the fruit. I couched that stretched pearl purl with a medium green.
Next up – outlining the turn-unders, the rest of the petals, and the top of the bowl, and then the body of the fruit is finished!
(I think?)
Any questions so far? Feel free to leave a comment below!
For all the posts in this series, please visit the following links, which are arranged in the order of the project’s development:
Stylized Pomegranate Pattern used for this project
Setting up the Project on a Frame
Preparing the Ground Fabric with Felt Padding
Selecting Colors of Silk for the Project
The Stitching Begins – SIlk Shading
Continuing the silk shading – the left side
Finishing the silk shading
The Goldwork Begins: Smooth Passing Thread
Check Thread for Outlining
Chip Work Filling with Check Purl
Outlining with Stretched Pearl Purl
Filling the Bowl with Passing Thread
Finishing the Tips with Passing Thread
Finishing the Fruit
Beginning the Stem
Continuing with the Green on the Stem
Almost finished! Chip work on the Stem
The Finished Goldwork Pomegranate
G'day Mary,
I wondered if, with more gold, it wouldn't appeal to me as much but am finding it as enchanting as ever.
Thank you, Cheers, Kath
This is becoming sooooo beautiful, Mary!
I think this is a dificult part of the project, but as I'm not doing it (only saving these lessons) I don't know what to ask 🙂
And I do love that green couching in stretched pearl purl! It's just lovely.
Thanks for all you teach in this blog. It's precious. Thank you!
It's SO beautiful! I'm loving it 🙂
I was wondering what you do with the pieces after plunging them to the wrong side. Seems to me like you'd have lots of short pieces leftover. Are those reusable?
I love to see it growing up.
And I'm learning so much…my supplies are still not arrived and I can't wait to start it !
You make look so simple and I am sure that Goldwork is something that I am going to take time learning. But your work looks so beautiful. Thanks Mary
Coming along beautifully. I love the neat technique you just used for the underside of the petals. It gives the piece a look of the straight veining, evident in real foliage.
The touch of green on the bottom is gorgeous. It looks like a string of emeralds.
Mary, a suggestion: the "upper lip" may gain distinction if you added a brown couching thread to sit beside the yellow. It would give, I think, an appearance of an underside being curled up, and over, the fruit. The darker thread would give it a gentle shading and distinguish that area from the continuous teardrop loop that you created.
I'm the one who questioned your padding the turn-unders. The passing thread works beautifully! I'm guessing it's because the passing thread is relatively flat and it's laid in a linear pattern. This is one of the reasons I love your site. Very few days go by that I don't learn something. Thank you!
This isn't about your current piece but about goldwork in general: have you ever used soft string (bumpf) for padding? I've read about it in goldwork books and seen it for sale, but don't know of anyone who's used it. And you seem like a good person to ask since you've done more goldwork than most people I know!
Hi, All! Thanks for your comments!
Karen – they aren't really re-usable. They're just little bits left over. Maybe someone super meticulous could find a use for them, but by the time I get them through the fabric, trimmed up, and ready to stitch down on the back, they've kind of been through it, if you know what I mean!
Hi, Janice – The soft string padding that you see in goldwork books is usually for underneath purl (or bullion), which is sewn down like beads – cut the length to fit over the padding and then the needle and thread are taken through the purl and it is sewn over the bump of the string – kind of like satin stitch. The other times string is used is to create kind of a woven look with passing thread or Jap, by laying the string down in rows and couching between alternate rows. I've done both. You can use any string, really. I have a hank of yellow cotton yarn that's a little bit firmer than regular knitting or crochet yarn. You run the yarn through your beeswax, and then either lay it in lines (for the woven look with the passing threads) or bunch several up (for the rope look with the gold purls)…. I had actually considered an all-gold stem done in purls on this piece, using string for padding, but the stem around the pomegranate is a bit too elaborate for that. I'll save that technique for a smaller project some day!
MC
This is looking totally beautiful! I have a question, although it's not about goldwork – what type of camera do you use that takes such great close up photos?
Hello, Mary!
Your work is fabulous, as usual! But, would you mind showing us the back side? With all those ends back there, where do they go? What about lumps on the back? Would you mind also explaining how you do it _ I mean the back side!
Thanks,
Didi
Beautiful, impeccable work, as always.
Hey, Mary! Looking great – love the touch of green couching! I, too, was wondering if the turn-unders should be padded but the passing thread works well and makes it look quite organic. I'm wondering about the outlining of the turn-unders; as it is now, they really do look like an underside and I'm wondering how you will outline them and still have them recede visually. So, I'm ready to be wowed! (No pressure ;->) I do have a question/comment about waxed thread. I have been told that one is supposed to iron the waxed thread or run it over a lightbulb or heat source to melt the wax into the thread rather than leave it in its sticky state. You had mentioned your not liking to use it for a certain technique because of that problem and I wondered if there is a reason why you don't heat it in or if that's not supposed to be done for goldwork or on the silk? As always, thank you for your time.
Mary, thanks for the bumpf info! It sounds like I could get by with using yellow perle coton, floche, or tapestry wool thread for this. I just can't see ordering yellow string all the way from England.
Mary this is getting more beautiful as you go along. I don't think that if you did more goldwork it would be better. I think you have just the right balance. in it so far. Karol
In the past two posts, I've found 2 really good tips that I haven't seen elsewhere
– on turning a corner, the pair of threads wouldn't have fit into the corner, so I ……
– and the one pointing out in this post that that tiny corner will be covered in the outline thread. I would have covered it with passing thread,then outlined it, then wondered why I had a clumpy corner ('clumpy') is the word that comes to mind – there's probably a more technical one – blunter?
Part of me wants to put a short line of some type of purl (in a larger size) in the middle of the lips as a 'decorative' feature so it looks less like lips. Tho I don't know if the idea that it looks like lips wouldn't have ever occured to me if you hadn't pointed it out.
Should the 'front side of the top of the bowl' have green stretched purl couched onto it? On each side, this couching would be hidden by the emerging red acanthus.
You don't want to add a gold pearl purl line (as you've done for gold couching inside the acanthus) coz the green is darker, and will 'retreat' to the eye, and make the bottom of the fruit look like it's sticking out over the top of the bowl, rather than giving a sense of depth.
Wow I wish I had read this before I did the rooster's tail on my wool crazy block last night this would have worked perfect. Thanks for the great pics and tutorial.