


When I lived in a dormitory in college, I was desperate for a light table for tracing embroidery designs. But light tables were way beyond my means. But I had a friend! And he had some left over plexiglass! So he gave me a large sheet of it. It was 1/4″ thick, very stiff, not quite as brittle (or breakable!) as glass, and a whole lot lighter. I put my desk lamp under it, and used the make-shift plexiglass table as my light box. It was GREAT. It was big – about 36″ x 40″ – and it was free. I ended up using it practically permanently as an extension to my desk, even though it meant there wasn’t a whole lot of room left in the room!
I’ve been venturing into some new embroidery projects which I already briefly introduced to you a while ago. The project I’m concentrating on first (“Proserpina”) is about 12″ long, which necessitates either moving the design around on my minuscule plastic light box (which is actually a kid’s tracing box from a local craft store), or finding some other solution to transferring the design. I was a bit frustrated at first…. but then….. wistfully recalling the spent days of my youth, and waxing melancholic over the joys of living in a cramped dorm room, I bethought myself of plexiglass.
Now, if you can afford to, you can certainly buy large, pre-made light tables that are used for drafting and so forth, but they are wickedly expensive. The small light tracers that are sold for basic tracing of small things (and have about a 9×12″ surface) are more affordable, but the 9×12″ surface is not everything it’s cracked up to be. For one thing, the brightest part of the tracing area is smack in the middle, and as you move towards the sides, the light grows dimmer and dimmer. So to see anything detailed with clarity, the design needs to be centered right over the middle of the area – no good, if you’re tracing a larger embroidery design.
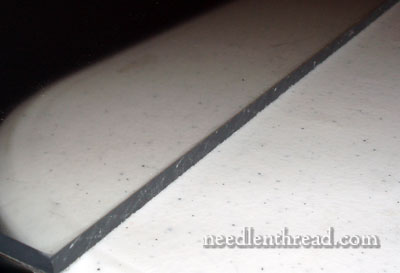
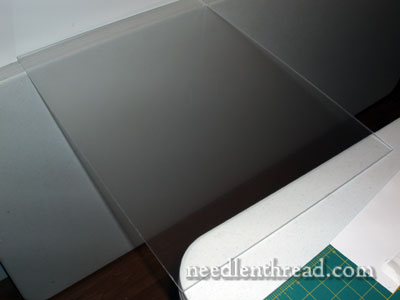
For a larger tracing surface, consider a piece of either clear or translucent white plexiglass. It should be around 1/4″ thick, so that it is firm and hard, even in a large sheet, and can support you and your work while you’re drawing. The thin plexiglass (a bit less than 1/8″ thick) is too flexible and won’t work as well.
Here in the US, for an 18″ x 24″ sheet, it’ll cost around $20 – $22. I bought mine at a local hardware store, and I left the protective film on one side of it, just to help diffuse the light a bit.
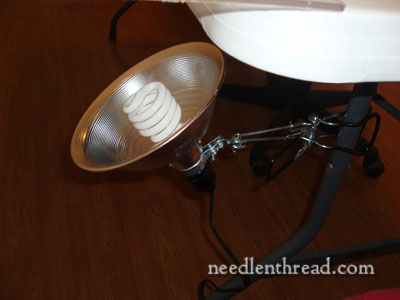
I happened to have on hand a utility clamp light. This is the kind with the extra-strong grip and an on-off switch. They cost about $11 at a local hardware store. The bulb is separate, but most folks have spare light bulbs floating around the house, so you probably wouldn’t have to invest too much for the bulb. Use a bulb that puts out enough light – the equivalent of 100 watts or more, if possible.
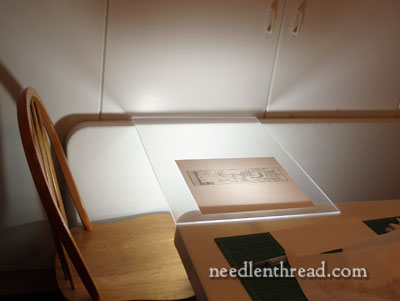
You’ll need two “sides” to your light table. I’m working outside in my garage-gone-studio, where I have two 6-foot folding tables. I usually only have one up at a time, to save on space, but the other is leaning against the cabinets there, so I used the one that’s up to support one side of the plexiglass, and the edge of the folded one to support the other side. I clamped the utility light on the leg of the table and turned the lamp up towards the plexiglass. And voilá! A perfect light table with a large hard surface, good illumination, and a relatively small dent in the pocketbook.
And it’s pretty easy to store, too!
So that’s what I’m using these days for transferring my current projects. These projects will be taking up most of my time in the next few weeks, which means I should have a lot to show you as I go. Right now, I’m musing over some thread choices and stitch choices, so I’ll discuss that process with you, too. I hope you had a terrific weekend! It was a “catch up” weekend for me, and now I’m just about ready to launch into some Really Fun Stuff! I hope you’ll join me for the journey!
While reading about your suggestion of Plexiglas for a light table to trace designs for embroidery a light bulb went off (doesn’t happen too often), my computer desk is “glass”! All I have to do is put my desk lamp under it. And all this time I’ve been very frustrated on tracing large designs for quilt/pillow tops. But I will also use your idea. Thank you.
sue
Great idea Mary. Used to have an old coffee table with a glass top and would use a desk lamp and did this many times when I was tracing patterns. Thanks for the reminder! 😉
What a great idea. I would take a leaf or two out of my dining room table and lay the plexiglass across the gap.
Dear Mary ,
It will be fun to join you and to see what comes up next. 🙂 In case you might think I have forgotten about Trish Burr’s Lilac Breasted Roller, I have not. You need not worry though, I have a few projects waiting for me I want to finish first, so I will be patient…. for now 🙂
Hey! have a wonderful week !! xx Regards Elza, Cape Town.
Very ingenious, Mary – this could be really helpful!
Hi Mary- I’ve used plexiglass for tracing as well, and it does work great. This year, I had the chance (finally) to set up a small office/needlework area in my house. I needed a desk (or preferably drafting table) and at the same time I was considering purchasing a light box. I was excited to find a glass drafting/craft table at our local art supply store (Dick Blick) that fit all of my needs. It is my desk when I work on my laptop, I tilt it up when I’m drawing, and when I need to trace I place a lamp or a string of white Christmas lights underneath the glass. No more pulling out the plexiglass and supports, or hoping for a bright day to tape to a window, and nothing extra to store. I wouldn’t have bought the table just for tracing, but it met 3 needs so was worth the cost, which I believe was $99- less than the fancy light boxes are all by themselves. So, if anyone else ever has the need for both a desk and a light box consider combining the two.
Your college tales made me smile. For my makeshift light table I would take a picture out of its frame (the largest I could find), leave the glass in the frame and balance it on piles of books. Position the desk lamp to shine up through it (as much as possible) and There you Have It!! I don’t think I even KNEW about plexiglass back then (or maybe they didn’t even have it!!).
What a great idea! Right now I use a large living room window. It faces west so the best tracing time is in the afternoon. I tape the pattern to the window, then the fabric on top of that. It works okay for now, but I’m going to look into getting a plexiglass sheet.
One of my quilt teachers showed me this trick. She suggested using a Hobby Lobby 40% coupon and buying glass from them. They have assorted sizes for making your own couch tables etc. The edges of course are finished and if you’ve always wanted a couch table here’s your excuse to buy the whole thing. And if you don’t you can store it when not in use.
Her other great tip was putting a piece of bright colored masking table on the edges of your glass/plexi. This way if you have it set up in an odd area (meaning one other people might be walking through) there’s a visual clue to them to keep them from walking into your tracing surface.
Another advantage of the plexiglass/light combination – much easier to store than the purchased light tables. Especially if borrowing a lamp from elsewhere. I like the glass-top desk/table ideas too. Another advantage of the tape around the edge is helping prevent chipping.
My problem with the window trick is that most of our windows have furniture in front of them that would need to be moved.
Back in my photography days we used the plastic covers for in-ceiling fluorescent lights to make small light boxes. They’re 2′ x 4′ (or 2′ x 2′). Flexible enough to be coaxed into a gentle 90 degree curve without breaking, yet sturdy enough to hold a few pounds. They come in a nice variety of patterns to diffuse light as desired, are inexpensive, lightweight, and available at most home improvement & some hardware stores. Set atop a milk crate or similar “whatever-is-on-hand” they could make a good tracing table. Just remember to put the smooth side up!
Hi, Mary
I have been using a makeshift light box with a 36 inches by 24 inches plexiglas sheet for the last year or so after I read about your light box. We don’t get light boxes here and I wanted one to get clean trace lines. I must say that it has worked so well for designs of all sizes and most of all I love it.
If you have a sign shop around, they will most likely have plexiglass in all kinds of colours. White is great as it’s not so transparent and they can cut it to whatever size you need. My local sign guys were amused by my request and went out of their way to find a workable solution for me. They even sanded the edges!
When my son worked for a glass company he brought home a sheet of plexiglass which I used by opening up the dining room table and laying over the opening where the extension would go and placing a lamp underneath.
Now I have a plexiglass extension for my sewing machine which I can use as a light table by opening my Ott light and laying it underneath.
Since I teach I often want to take a light table along for a class. I use a rig similar to yours when I’m home, but it’s not that portable. When I saw the price of a decent light table of any size I remembered why I hadn’t bought one before. What I did in the end was to take a shallow drawer from a being-replaced kitchen cabinet, drilled 5 holes across the back of it for heat release, if necessary. I drilled a hole on one side to accommodate a cord, and on the same side mounted a couple of shortish hooks to wind the cord around when not in use. Then I mounted 2 (very cheap) circular florescent fixtures in it and wired them to a cord with plug. On the top I mounted a sheet of plexiglass cut to fit.
The drawer handles I left in place. Easy to use and transport; stored with the cord wound and the handles up, it fits into a “slot” space about 6″ across. And best of all–economical enough that any of my students can duplicate it without giving up stash money!
Wow, you are an ingenious lot.
As others have commented, I used to use a glass topped coffee table with a lamp under it but when we lost the coffee table in a move something needed to be done.
My clever husband made me a light box from various second hand materials he acquired from all over the place. He took an old fluorescent light fitting in its own steel ‘box’ with two tubes still in it, drilled holes for a cord and for heat dissipation and topped it with a piece of white perspex (which I guess is the same as your plexiglass). It is quite large but I can store it on its side so it doesn’t take up much room.
Mary,
Thank-you so much for instructions on making your own light table. I have been wanting one for years but could not afford it. The first of the year I will be making myself one.
I really enjoy your newsletters and have learned much, and your videos are outstanding.
Sincerely,
Andrea
I am a pretty crafty person and I thought this is a wonderful idea. I had the Plexiglas, I also had some boards in the barn. As I started out to get the stuff and some tools I happened to see the coffee table & the end table I have had for 40 years. BINGO, they are glass tops. I have no idea if anyone else has thought of this idea but NEVER EVER toss out good furniture. I now have the best light tracer I have ever had. I just wish I never sold my glass top table!
Thank you very much for posting this. I just finished an embroidered quilt top and am fighting that red stuff from ironing the pattern on. Next time I’ll use your idea – easy to rig up something like this.