Today, I’m pitching the curved needle. You definitely need one of these for your needlework tool box! They come in awfully handy.
I’ll show you what I mean by looking at the back of my current embroidery project, and then we’ll talk about curved needle sizes and resources.

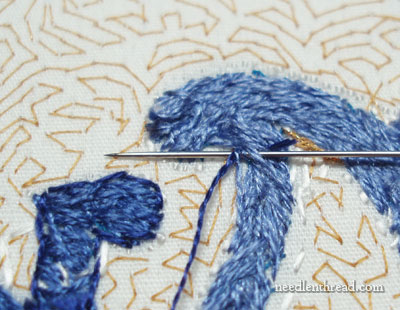
This is the back of the Medallion Project. Because the whole front of the center of the project is completely covered with stitching now, to start and end threads, I have to run them under the threads on the back of the project to make sure the working thread is anchored.
When working goldwork (you can see the type of work I’m doing right now, if you read this article on using Lizardine wrapped with silk thread to outline the monogram), you often have to plunge threads to the back of the fabric and anchor them there by whipping over them with another thread.
Imagine a very taut piece of fabric on the frame, with lots of tiny stitches on the back that you have to slip a needle under in order to anchor a thread. So you slip the needle under. The fabric is very taut, remember! And you don’t want your needle traveling under much thread on the back – you don’t want to take it too far away from your starting point, right?
So, you have to get some leverage on that straight needle to pick it up before it decides to keep going straight forward underneath a few inches of stitches! There are times when I make use of a fingernail in situations like this: I slide the needle under a few threads and onto the tip of the underside of my fingernail. Then I pry up the tip of the needle up until I can get a hold of it.
But there is a Much Easier Way (and a much safer way – I can’t tell you how many needles have slipped into my finger using the above method!) to accomplish getting your needle under the stitches on tight fabric.

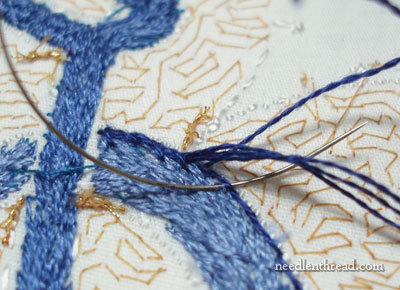
And that way is by using a different needle – the curved needle. If you’ve been stitching for a while – especially if you’ve done goldwork – you’ve probably run into the curved needle. But if not, trust me on this one! Curved needles come in especially handy for anchoring threads on the back of fabric. In the photo above, I’m anchoring the bunch of silk floss that is plunged to the back of the fabric after couching on the Lizardine wrapped with silk.
The curved needle just scoops in under the stitches and comes right back up in a nice swoop. It’s easy to grab hold of, and it makes stitching in a tight spot like this super easy and very quick.
To use the curved needle, when it’s time to anchor a thread on the back of your fabric, just unthread your regular embroidery needle and thread the curved needle onto the working thread. This may seem inconvenient, but in fact, it saves much time and effort in the long run. Then insert the tip of the needle underneath a few threads on the back of the fabric and gently push the needle out from under the stitches. Let the curved needle do the rest of the work. It’s got its own built in leverage system – no prying is involved to get this thing back up off the fabric!
Finding Curved Needles
Most commonly available curved needles at sewing stores are rather thick in size, and if your thread and your stitches are relatively fine, the thicker needles (like those sold for quilting or upholstering) don’t work as well for this use. It’s just harder to coax a thicker needle under those stitches on the back of the fabric.
So the question is: do they make fine curved needles? And the answer is: Yes! They do! What you need to look for is a curved beading needle. These are hard to come by in local sewing stores, so I generally get mine online, through Colonial Needle. Just search “curved beading” and you’ll find two brands on the second page of search results.
Curved needles come in handy for lots of other things, too. If, for example, you’ve ever wanted to make a fabric box – if you’re planning on making Carolyn Pearce’s Home Sweet Home project? – the curved needle is practically essential for the finish work on such projects. If you have one or two in your needlework tool box, you will certainly find a use for them at some point in your stitching endeavors.
A job can be done with greater ease, with greater efficiency, and with greater pleasure when you use the right tools!
Never underestimate the power of the curved needle!
If you’d like access to all the tips and techniques discussed in the Medallion Project, including complete step-by-step coverage of the Tudor-Style Rose, conveniently collected in one document, interlinked, referenced, and indexed, why not add the Marian Medallion Project e-book to your library? It’s packed full of all kinds of embroidery tips for undertaking a project like this, all in a convenient electronic format for easy searching.


G’day Mary,
This is really interesting. To be reminded of items, one would know of if they’d thought about it, is particularly informative and helpful!!
The thick, larger curved needles were known as bag needles in the days when the likes of potatoes, and some other vegies, were picked up by hand and tipped, by the bucket full, into large hessian bags. The bags were then sewn up with string using the curved bag needle. As a kid, I liked watching Dad ply that needle. I used to wonder too if it wouldn’t keep coming around and prick him. It seemed to want to keep going and it fascinated me to watch his deftness.
Mum always had a couple with her kitchen utensils. She used them to sew up the ready-to-cook chooks so the stuffing wouldn’t fall out!
Hubby often buys old Singer (treadle mainly) sewing machines. I’ve found a few old curved needles in the drawers, both finer and bag needle sizes. I’ve never stopped to think what significance they might have had with actual embroidery and home sewing.
Thanks for causing me to wonder.
Cheers, Kath.
That’s pretty neat, Kath! Good to know – I love hearing how tools used to be used. We take things like that for granted these days. How many of us actually sew up our own bags of potatoes?!
And yes, Colonial Needle is replete with needle stuff!!
MC
PS, Mary, that Colonial Needle store is a goldmine of interesting ‘needle things’.
Thanks for the info. Kath
Thanks, Mary, for the link. I used a bulky curved needle for making a box, all the while thinking there had to be something finer out there somewhere. I actually cast a covetous eye on the exquisite little curved needle an ER doctor used to sew up my husband’s sliced thumb. But it seemed bad manners (and possibly illegal) to dig it out of the bio-waste box.
LOL! Too bad, eh? Yes, it would be hard to explain to the doctor, too! “I just want a souvenir” probably wouldn’t fly! 🙂
Hehehe…usually those needles are ‘swaged’ onto the filament and don’t have an eye. On the other hand, they DO make suture needles with nice eyes and all kinds of curves and sizes. Those are the ones I pick up at vet conferences for use in all kinds of things!
You might simply ask if the hospital or doctor knows of either a source or if they have dulled needles they would otherwise throw away. If they’ve been cleaned and sterilized, they are no hazard and come in quite handy. 🙂
Hi Mary,
I’m a big fan of curved needles, and have them in a range of sizes from very large upholstery needles to tiny little ones that are next to impossible to thread (though that could just be me!). They’re great for assembling 3d items such as boxes or book slip cases, or for doing the lacing on the back when mounting embroidery onto a board, for example. They can be a bit awkward and need some getting used to, but they’re worth the effort.
Best wishes,
Ruth
Thankyou for this tip! I even *have* a beading curved needle!
I have an easier source: If you do a lot of hand-sewing involving whip-stitch and flat-fell seams (in my case, English-paper-pieced patchwork and a couple shirts out of a spongy-stretchy rayon blend that my sewing maching Just Doesn’t Like) your grip on the sewing needle will make it curve. I have about 3 size-20-sharps that are now about 15 degrees off of straight. They are NOT good for surface embroidery – they’re difficult to aim accurately – but great for fastening off.
This makes such perfect sense! I have seen these types of needles but mostly in the larger sizes. I never would have thought of them for embroidery but they make such perfect sense for tight spots and going under threads! It such a pain to have the needle slip through on the right side of the work. Thank you so much for sharing this. I am definitely going to be adding a few to my work box.
I’ve use curved needles in regular sewing, sometimes it’s just the tool for the job. But I never thought about for needlework – curved beading needles will be on my shopping list.
Hello Mary,
I found some lovely curved needles here, too:
http://www.barnyarns.co.uk/Curved-Needles-c-1332.html
I like them better than curved beading needles for the work I was doing (fabric-covered boxes) and you can never have too much variety in your needles!
Kind regards,
Megan
Hi all. I have a difficult time keeping the needle where I want it when getting to the bottom of a picot stitch. Do you think a curved needle would work there? I am going to try it. I also have a question about picot stitch. I am making Stumpwork turtles for brooches and pins and to put on pincushions. I have had to make my own pattern for them because no amount of searching has come up with one for a turtle. I can’t figure out how to make their noses square with picot stitch. Does anyone have a suggestion for me? Thanks.