


How do you solve the Dot Dilemma?
Not sure what the Dot Dilemma is? Well, then! Please allow me to show you:
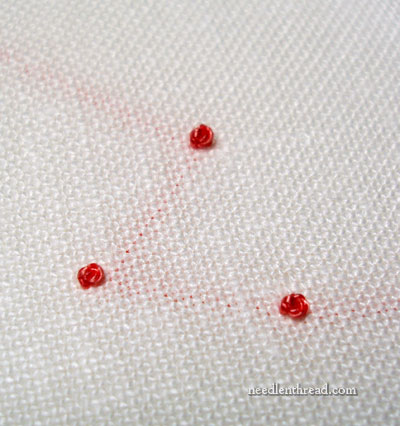
That is the Dot Dilemma. There you see them – three French knots, situated a distance from each other. As French knots go, these little mites look fairly happy, don’t they?
But they’re knot. And the reason: because they’re uncomfortably connected to each other. They want to be independent, to stand on their own little knotty feet, but no – they are tied to each other. And not only are they tied to each other, but the Whole World knows it, because their obtrusive ties scream through the fabric. Poor, poor little things! My heart bleeds for them.
Besides conquering the French knot itself (it’s not as difficult as it seems – I have a how-to video on the French knot if you need a little help), the second greatest problem that French knotters face is the question of space: how do we conquer space when working French knots?
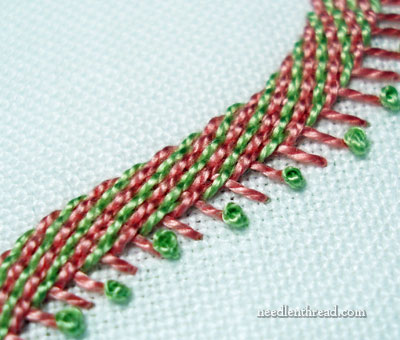
It’s easy enough to conquer the space question when your French knots are situated against another bit of embroidery, as in the photo above. There’s so much going on in that little element and the knots themselves, while slightly spaced, are not too spaced apart, that it doesn’t matter if the thread carries from knot to knot. You can’t see it (or at least, not enough to really notice it).
But if the knots are really supposed to be independent and spaced much farther apart, how do we avoid carrying threads across the back of the fabric from one knot to the next?
Spacing French Knots: Two Problems
You see, carrying the thread from knot to knot actually poses two problems that stitchers should try to avoid:
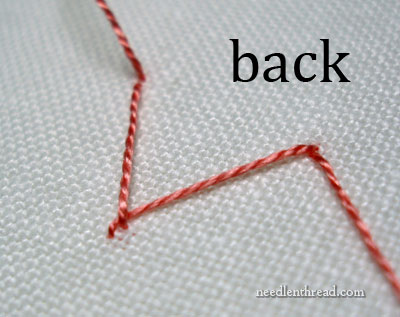
Problem #1: The carrying thread is often visible from the front of the fabric, so you end up with faint lines connecting each dot. This is not usually very attractive. You might be tempted to use thicker fabric, or to line your ground fabric with another fabric, so that those connecting lines can’t be seen, but that brings us to problem #2.
Problem #2: The long lines of thread on the back of the fabric can get caught on things and pulled, resulting in devastation for those little knots on the front of the fabric. It’s generally better not to carry threads any great distance on the back of your fabric. If you can slide the working thread under other stitches on the back of the fabric, then that’s great. But to carry across empty spaces can pose problems for the finished embroidery.
How do YOU space French knots?
Back to my question: How do you solve the dot dilemma?
I have two methods that I’ll show you next week. I think I stitched ten million French knots yesterday, just to work up decent photos (that’s how much I love you!).
But as I was working on all those knots, I got to thinking: Rarely in embroidery is there only “One Way” (or in this case, two) to accomplish a thing. Usually, there are several variations of doing embroidery-related tasks that lead to exactly the same result. So I’d be interested to know how you solve the dot dilemma and conquer the space between distant French knots.
If you’ve conquered space and solved the dot dilemma, how about sharing your technique with the rest of us? Or if you have any question or suggestion about the whole subject of spaced out French knots, do leave a comment below, and let’s conquer this problem together!
Today’s the last day to sign up for the Beginner’s Guide to Goldwork book give-away, don’t forget! If you want a chance to win this book for your library, don’t forget to swing by the give-away article today and leave a comment!
Hi Mary!
When there’s open space between knots I just make each french knot it’s own complete entity. It make take longer but those long threads between seem to always show. It’s an awful lot of knotting front and back but I think it’s worth it in the end. Is it knot? 😀
Jen
xo
LOLLLLLLLLLLLLLLLLLLLLL Mary!! I am just LAUGHING OUT LOUD over this one. What I have done in the past is do everything that does NOT show through first. Then I layer an extra layer of white fabric over the back. That is enough to do exactly what you are doing now with the French Knots skipping from place to place. The extra layer of white fabric can hide those pesky French Knots, a;so lettering, and a multitude of “other sins”!! (The extra layer of fabric does not need to be too thick. I even did a stamped quilt top years ago. When I layered it over the batting, the batting showed through. So I got an extra new, white sheet and layered that between the top and the batting. I also used another new, white sheet for the backing and then started hand quilting it together. I would send you a picture, but I moved in the last two years and have not found it yet. (amongst all the other things still in boxes and still lost in box outer space!) Linda in NC
I finish spaced french knots in one of two ways, depending on the ground fabric and the number of threads in my needle. I was taught by a wise seamstress that if you stitch in place three times the result is a permanent as any knot and so this is my preferred method, unless the finish will be too bulky to be ignored on the face of the work. If I have a bulky problem, I divide the threads of the needle – on the back of the work having taken one stitch in place – place the needle as if taking another stitch and wrap the divided threads around the needle in a figure 8 using both “sides” of the threads, now pull the needle through. This is a form of milliner’s knot and it is as permanent and flat as any needleworker may wish. I have used this knot countless times and it has never unravelled, even having been through washer and dryer. Now I have a question for your readers. How do you attach a strand of seed beads – such as one might use to make a flower petal – to ground in a strong and permanent manner? I have an old blouse with “Indian” (N.A. aboriginal) beading on the two shirt fronts.
The beads appear to be couched, but that blouse has been washed – oh my it must be hundreds of times – and that beading is still in place, with not a ravel in sight. How did they do it????
Cheers to all
Maggie
If I want a strand of beads loosly secured, then I couch them. If the beads need to stand up to wear and tear, then I use a couture method. Cut a length of thread no longer than 15”. Wax and knot the thread. Bring needle up through the fabric to the right side and thread two beads onto the needle. Bring the needle back through the fabric to the wrong side right next to bead two bead. Back stitch by bringing needle up between the two beads. Thread the needle through bead two, add a third bead. Continue sewing beads using this back stitch. You end up with two strands of thread attaching each bead. Since each bead is connected to the ones beside it, they won’t move.
Maggie, this sounds great. Any chance you could take a picture?
Do you mean beaded blouse from India?
Here, beading on sarees and other dress-materials are done using a longer, hooked needle. The work is called ari work. I do not do this myself, but have found a video on youtube.
https://www.youtube.com/watch?v=omu0296CLYs
I don’t have a good answer, Mary, but I’m looking forward to yours and reading anyone else’s. The French knot is my favorite stitch, in addition to the bullion knot, and I always look to make it better. Thanks for asking the question (and for doing those 10 million dots, LOL!)
Oh,Mary – another delightful and insightful post! I sure look forward to next week’s solutions you will write about. Thanks for all you do for us!
Tomi Jane
I think the long lines always show, no matter if the fabric is thick or if I lined it. Maybe because I know the lines are there? I will read tomorrow’s post with great interest. I am so glad you brought this up. Thanks.
Hi Mary, a goodweekend to pose a problem. I may get needle & thread out later to play on this (it is after 10.30 pm Aussie time). But as long it isn’t a 5 or 3 perle or 6 stranded cotton I use the smocker’s knot. Hopefully, ‘the smocker’s knot’ is the same everywhere so we are on the same page.
I learnt it at Country Bumpkin and it is such a quick, no nonsense way of ending a thread. I’ll have a look tomorrow in my A-Z’s, it will be in the Smocking one but not sure if covered elsewhere.
What I also like is that it doesn’t leave a large or ugly knot on the back and it is invisible from the front hidden by the french knot.
Trust this is understandable….
Have a fun weekend…..
This is how I solved the dot dilemma in my work because I dislike the shadowing of carried threads, and like you said, long threads that could be caught doing other work.
Place a quilter’s knot about 1.5-2 in away from thread end. (i.e. a long tail) I’m not sure if quilter’s knot is the correct term, but is where & how I learned the knot, wrapping thread tail around needle and pulling it through as opposed to knotting thread by wrapping around my finger like great grandma taught me, :).) Pull thread up through fabric snugging it up to the knot, do the french knot on top, go back down through fabric. With the knotted long tail and working thread tie a square knot and clip threads, and repeat, giving yourself individual French knots with a little thread waste.
Cyndi:
what a marvelous idea! i learned the quilter’s knot a couple of years ago and won’t make any other kind anymore. it’s second nature to me now. i have avoided french knots that are separated in the past. no longer, thanks to your idea. Thank you! Do you think just leaving a long tail without any knot and then just tying the two ends in the square knot on the back of the work would work as well for use on sheer or thin fabrics?
My first thought was to put a small piece of some reinforcing fabric behind the location for the knot. Once the knot is finished, trim the reinforcing fabric as close to the knot as you are comfortable doing. I have not tried this but, aside from being fiddly, it “ought” to work. Looking forward to seeing your suggestions. You are amazingly creative.
Marilyn in Las Cruces NM
G’day Mary,
“I love you right up to the sky”,
10 million French Knots high. (G-R-O-A-N, there I said it for you!!)
I’ve kind of avoided doing French Knots so spaced, so am really interested in all the solutions.
Cheers, Kath
I will follow this with interest because I’ve often muttered about this very thing and wondered if there was a solution. I generally try to avoid doing French Knots at a distance apart or I add another piece of fabric behind as camouflage.
I stitch the knot leaving enough tail to tie the ends together on the back and always cut each one individually. I do not like the trailing threads in any of my stitching and was taught that if it is more than an inch away, always end your thread and start new to avoid long pieces that will catch on jewelry, etc. I’m not Native American, but most of the cultural beading I have seen is couched with a separate thread very closely and it lasts forever. Fortunately, I was in MT when a group was doing a demo at their state capital last year and it was beautiful and fascinating to watch these folks work.
Hi Mary,
I leave a slightly longer starting thread on back and a longer ending thread, then tie them off with a knot (a careful, tiny knot). It seems to work.
Greta
To fix the problem with contrasting threads showing through the ground, I make the knots separately, starting and tying off each knot. To fix the spacing, I draw it out and then prick n pouce them into place.
I generally just line the fabric with something else. I’ve never worked French knots so far away form other stitching that I can’t catch the long lines on the back underneath another stitch to make them shorter, so I’m interested to see what other people say and what your solutions are.
I actually groaned when you wrote, “I have two methods that I’ll show you next week.” All that lovely buildup and now I have to wait.
Dear Mary
Interesting dot dilemma! Can’t wait to hear your solution Mary, I would probably stitch each knot individually and I would end each knot with 3 small stitches at the back although time consuming you would not see the thread at the back. But maybe I’m wrong!
Regards Anita Simmance
Hi Mary
This is a very timely problem as I am embroidering a pillow with writing and of course there are dots above certain letters. I had no idea how to do this right but did a small knot and left a tail to begin with. Then I did the French knot and came back down through the fabric and did another little knot. then I knotted both tails together a couple of times and then clipped the thread very close to the finished knots. It looks fine but hope it holds. I will be waching for your info on how you would do it.
thanks
FredaB
I just avoid the little %$#@!s. I use beads when I must have dots (I’m a cross stitcher so it’s easy enough). I used to tie knots behind the french knots and clip the threads as close as possible to the fabric. Easy going is the trick as you don’t want to pull the knot out of the front or leave a big knot in the back to interfere with how the fabric lays. I have never tried place a piece of clothe behind the stitching….I think I will stick with avoidance at all costs! LOL
I just knot off each one individually, and so far I’ve not had a problem with bulkiness. Could be because I always embroider on quilters’ cotton, not even weave. I look forward to seeing your methods next week. I always learn so much from you!
I can’t wait to see your tips! I usually make the french knot (I use 2 to 3 threads) leaving a long tail in the back, split the threads into two that I can just tie into a knot on the back. I once tried it like your photo with long lines showing through (my fabric was doubled already) but the french knot became all “wonky” & loose later. I pulled on the long line to tighten the knot back up and put some frayers check on the back to keep it taut-didn’t like it but what the heck.
I just found your web site yesterday, and I love it! I agree with you about carrying threads on the back of the fabric. I’m careful about that when I cross-stitch. But I’m new to embroidery, and my question relates more to starting and ending the thread for a free-standing french knot. Any tips?
I don’t carry the thread if it shows on the front or would create a hazard to the piece if the back thread got hung up on something. I just end it and start over on the next one. I will be interested to see the response to this problem. Sounds like potential for learning a thing or 2.
Hi Mary
I want to thank you for all the help that you provide us girls to who are interested in needle work and embroidery. Coz me!!!!!!!!! I always had the crazy for Embroidery since I was in Grade5, my mom was the one who encouraged me to stitch and told me that i have a good talent in needle work. Embroidery is not just and art for me its my life that, its like!!!!!! how a human cant live without water so i cant do without my art of needle work. i seat on the net almost every day viewing your video and wanting to learn more and more good stitches.
Please Mary I wold need Your help to teach me how to learn and explore my talent in needle work.
I’m also an artist, I do painting, free hand and portrait artist too.
Waiting for your reply.
Thanking you so much and may the almighty god bless ya and ur Family with good health and prosperity.
Oh I can hardly wait for the help! I hate trying to space french knots.
I embroider a lot of clothing and much of it white. To cover the ‘jumps’ from knot to knot, I back the embroidery with another layer of fine white cotton and embroider through both. Neither the lining cotton nor the “jumps” show through. Also, as Maggie says in her comment, I divide the threads, for me if the colours are dark, and deal with them separately using the milliners’ knot.
Have a great weekend, everyone!
Ann
Every day I look forward to your posts, I know I will learn something new every time, and/or correct something I was doing wrong. I make a knot with another under it. I need to know what I have been doing wrong all these years.
The time and work involved in teaching us these embroidery traits and related subjects is not only wonderful, it is an education one does not find anywhere else.
Thank you Mary, from the bottom of my heart.
Oh I’m so glad you are addressing this because I don’t know the answer. Jumping seems like the lazy approach, but it is what I’ve done in the past because I don’t know the answer. Loved reading all the other comments, and now I’ll have one more thing to work on to improve the quality of my embroidery. Can’t wait to see what you’ll show us.
I was embroidering my granddaughter’s christening gown and the design called for french knots scattered about. There was no way to hide the “jump” stitches. I tried tying the waste knot and finished french knot tails together but the knots immediately untied themselves. I was using silk thread. So I threaded up a small needle with cotton bobbin thread and put a couple of tiny stitches in the tied tails knot. It took a few extra minutes but those knots are still tied after 16 years.
Hey! Mary,
I love your humor! Your willingness to make soooo many dots to get a photo which soooo perfectly shows me your message is why I keep coming back for more. Your work is superb.
Now, for the French knots. I tie off each knot when the distance between dots creates “dot tails” where you don’t want them. I do a light knot on the back side, cut the “dot tail” leaving about 1/2″, then apply Fray Block (not Fray Check which dries hard). I hold the dot tail up and apply the Fray Block so it runs down the tail and ends up on the knot only. I then trim the knot to about 1/4″ so as not to allow the tail to flop over and make a deposit on my embroidery fabric. Then, I let it dry completely. After it is dry I have the option of snipping closer, if needed.
Joann
I have got to look up the millner’s knot for ending, but to begin, I do a very small X, just as you do in counted thread. You come up, go down to the back, catching the tail then up, making the X, and back down through the loop again. Pulling snug and crossing the ends locks the stitch. It also makes a firm foundation for the knot so it won’t pull to the back.
I always embroider on quilter’s cotton or muslin and I use a thin interfacing on the back of the whole piece. This gives extra stability and you don’t see loose threads through it. It it thin enough to not give extra bulk when I sew it in a project.
About the French knots. If they are far apart I do them individually, if they are close to eachother the interfacing will hide the thread shadow. This works for me.
Mary Corbet, you’re a terrible tease, you are… But we love you, and we wait, breathless, for your answers next week.
Re: The Dot Dilema
When I do a French Knot, and there is space between knots.. I create the knot, then when I pull the needle to the back, I insert the needle and pull the thread almost all the way through, then holding the thread so it crosses the loop, put the needle under the big loop, and over the crossing thread, pull the thread slowly until it tightens and makes a secure knot close to the underside of the French knot.
This is a secure finish in many aspects of sewing and beading..and it works to secure a French Knot as well.. and eliminates the connecting thread across large span on the back of the project.
I hope this is understandable..it does work.
Pat Clark
If I need an isolated dot, I use a granitos (from Madeira embroidery) instead of a French knot. Since the start of the stitch anchors the knot and the thread can be anchored in the completed stitch, there is no reason to carry the thread between stitches. The appearance of a granitos iis slightly different from a French knot.
Believe it or not once I wrapped a white thread over the offending reds and greens in a cross stitch piece. Wrapping those longish red and green threads in the back with white floss made things almost invisible.
This is the perfect illustration of the value of a backing fabric.It minimises ‘show-through’ and also gives the opportunity to take a tiny stitch through just the backing fabric to reduce the length carried threads.
Not good with technology,but want to thank you for all good things you share !!I love french knots ,I remember as a child ,my mother taught me how to make them ,and I made a whole bunch in a scrap of material and my mother said “what a beautiful hydrangea !”I was so proud of myself !!Ha ha Well thank you ,from Argentina I send you blessings…..
My only dilemma with french knots is that I hate how they look so very very much! I have spent the past 4 hrs trying to find an alternative to them with no luck, everywhere assumes your hate stems from lack of ability (try again & you’ll get better) rather than a question of taste. I just want a tiny nice & flat black dot for an eye on my cross stitch, I don’t want a bulky bulging from the sockets eye.
I just find even ones which are supposedly done well to be ugly lumps. They make me feel uncomfortable too. I don’t want to try xyz method to do one, not even for the first time. But I’m new enough to embroidery techniques that I don’t know what to even search for to get what I want to create. It seems pretty simple – just a small dot which is circular (I found dot stitch but feel like dash stitch would be more accurate a name). I just want this -> • not something raised & uneven due to how knots work. I want something smooth & neat looking.
Any ideas of what terms I could search for? Only other alternatives I have seen people mention are using seed beads but again, those make something 3D & lump looking. And I don’t want that. It will look wrong on my otherwise smooth cross stitch piece.
Satin stitch dot. It’ll only take about three tiny stitches.