


Yesterday, we looked at how to prepare linen for a hand embroidery project. Now that the linen is nice and smooth and ready to work with, I’ll show you how to ensure an accurate layout for your embroidery project.
Keep in mind that I’m working through all the steps for the Hungarian Redwork Runner project. But even if you’re never in your life planning to work this project, these steps hold true for any type of similar project. So you can apply these concepts to just about any embroidery project that demands an accurate layout and placement of the design.
Are you with me, then? Ok, let’s do it! You’re going to need a sewing needle of some sort (I used a #9 crewel needle), a contrasting color of regular sewing thread, a ruler, and maybe (depending on your eyesight) magnification.
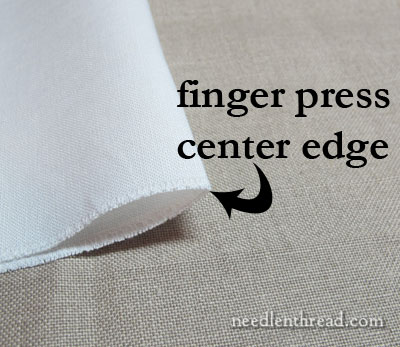
Grab your prepared linen off the table, where it’s been lying flat and has no wrinkles in it. Today, you’re going to put new wrinkles in it!
Fold the linen in half lengthwise and finger press the very edge in the center of the fold, to mark the middle of the fabric. You just want a little crease on the very edge of your fabric – don’t finger press down the length of the fabric! Just a tiny crease right on the edge, to mark the center.
Then, thread up a long length of sewing thread in your needle (I double it in the needle, just so I can really see the basting lines clearly).
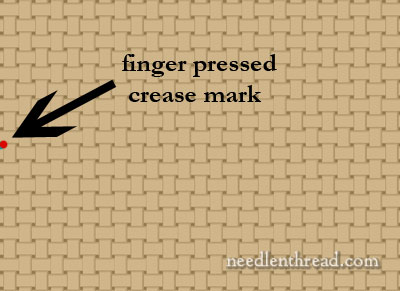
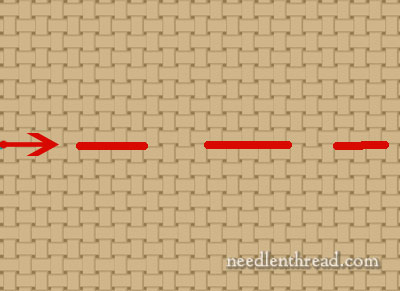
Starting right on that center crease where you’ve finger pressed, begin basting down the center of the fabric, following exactly the fabric thread, and never straying from the center line.
It’s really, really important to stay right on that line in the fabric, where you’ve marked the center. This is why magnification may be needed. On the Alba Maxima, I find it fairly easy to see the threads of the fabric, but if you have trouble with that, do use really good light and magnification if necessary. You don’t want your center guidelines going all over the place, because they are your guarantee that your design will be centered.
When you baste your stitches, just use a regular running stitch, sewing fashion, and don’t bother counting fabric threads. Don’t make the stitches so long that they become discombobulated and can’t keep a straight line, but you don’t need to make them tiny, either. My stitches run anywhere between 1/4″ to 1/2″. They don’t have to be even, and it’s a waste of time to obsess over their being even. But they do have to follow precisely that middle mark, so that’s the only thing you should obsess about during this process!
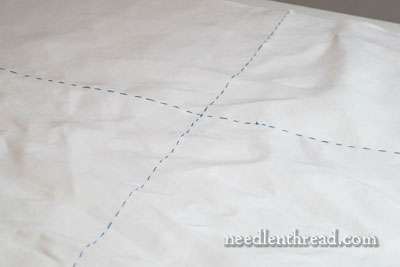
After basting the length of the linen in the above fashion, baste the width, too, so that the lines meet in the very center of the linen. By this time, the linen will no longer be perfectly smooth, but that’s ok!
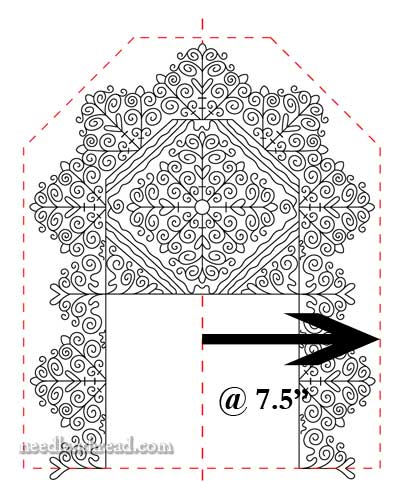
Now, because I want my hem to be exactly along the fabric grain, I’m also going to mark the outer edge of the design, indicated by the red dashed line in the embroidery pattern I’m using.
Remember that I enlarged the design so that it is 15″ wide, from the two outer dashed lines along the long edges. So I know that half the design, measured from the center line, is 7.5″ wide. For the edge guidelines, I measured from the center line (easiest to do this right on the edge of the fabric) 7.5″ out, and basted a long line down the side of the linen (7.5″ out from the center line running down the length of the linen).
Then I measured out from the center line to the other side, to mark the edge on the other half of the linen.
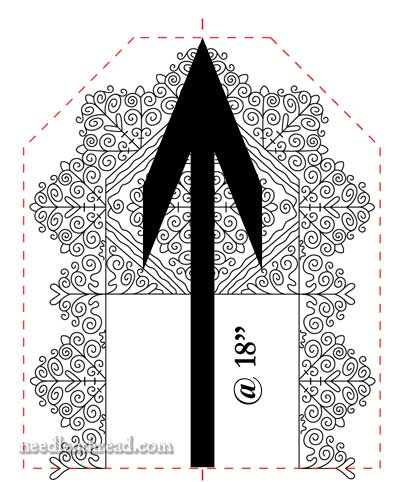
I know that the design from the center dashed line that crosses the width of the embroidery (indicated by the lower horizontal dashed line in the embroidery pattern) to the outer edge is 18″.
So, now I measure 18″ from the center line that’s basted across the width of my fabric, and baste another line across the width of the fabric to mark the outer perimeter, and then repeat that process and measure from the center 18″ out on the half of the fabric and baste another line.
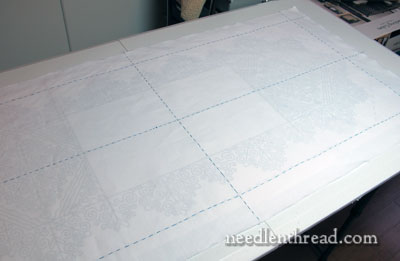
You can now see in the photo above the basted guidelines in the center of the linen and the guidelines that mark the outer edge of the finished embroidery design. At this time, I am not basting in the cut corners – that will come a little later.
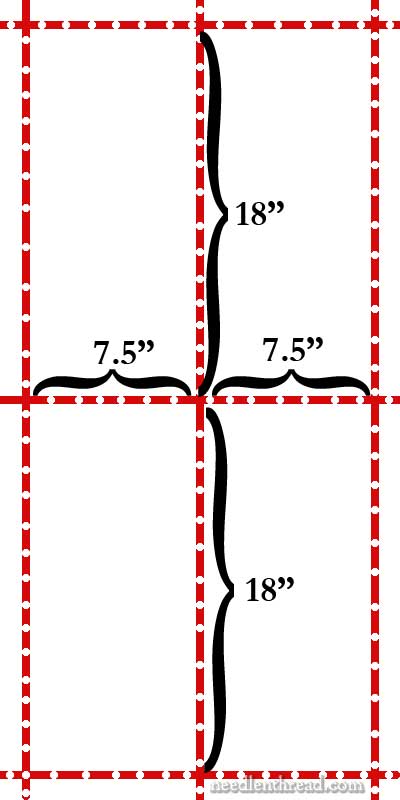
In diagram form, this is essentially what the basting layout looks like.
One more step before we can start stitching, and that’s the transfer of the design!
Any questions? Feel free to ask!
Book review, give-away, and Stitch Play (oooooooo – a fun one!) coming up later this week!
If you’d like to follow along with the Hungarian Redwork Runner project from start to finish, you’ll find all the articles so far listed in chronological order in the Hungarian Redwork Runner index.
My stomach is all aflutter! Thank you so much for taking us on this exciting journey with you!
Mary,
I used to use regular thread to make center line designations. I now use upholstery thread. I’m less likely to split it when stitching. Some stitchers prefer very fine fishing line that is red.
Sally
Hi, Sally – Thanks for the tip! Do you leave your thread in while you do the stitching, or remove it from your stitching path before you stitch there?
I think for this type of work, pretty much any sewing thread will do the job. There’s no strain being put on the thread, and it’s removed before the embroidery is actually worked over it. So whatever anyone has on hand as far as a spool of thread goes, will work. The only absolute is that it’s a contrasting color that can be easily seen.
MC
Dear Mary, As ever, I continue to enjoy and learn from your daily blog.
Today you covered basting the centers and edges of your Hungarian Redwork piece. You suggested one use a thread of contrasting color to do so.
I work a good deal with Heirloom fabrics (mostly white) and have had difficulty with anything that may leave a mark on the pristine white. When I teach, I encourage my students to baste with the same color or just slightly off the base color as I have had the unfortunate experience of having even the thread I use to baste with, leave unwanted color behind. I notice you used a light blue. Perhaps if you think it is relevant, you might caution your readers to make sure to be judicious in their choice of basting thread.
Again, so enjoyable to read you each day. Floss Hurley
Floss,
As you mentioned, I have found problems with high contrast, such as red, on white fabrics. So I use a light blue basting thread and remove the thread before stitching an area.
Kimberly
Hi Mary, thank you for sharing the tutorial on setting up your linen for this project. This is something I need to start doing but wasn’t sure exactly how to go about it. You’re piece is going to be beautiful. I marvel at your work!!!! Thanks again.
Dear Mary
Thanks so much for this very informative, helpful article. I certainly will follow your example of basting centre and edge before stitching. I always learn something new from your daily articles. Just one question do you remove the stitching when you start to embroider. I look forward to this journey with you on the redwork project.
Regards Anita Simmance
Hi,
I have been reading your site for quite sometime now and am completely in love with your creations. I find your posts extremely informative.
I loved the Hungarian embroidery project and am actually planning to make one myself. I want to make this pattern on a plain cotton bed-sheet. Please let me know how feasible that would be.
I was just reading one of your reviews and you mentioned that you use a “lining” fabric. Can you do an article or just write back and explain the purpose of this and in what circumstances it would be used.
Thank you
Gina in Vancouver BC.
Canada