


After testing the embroidery threads for the Hungarian Redwork Runner project and making up my mind about the ground fabric, the next step was to cut the linen and prepare it for embroidery.
I have my own little ritual for preparing linen for hand embroidery. Most stitchers have their own way of working through these preliminary steps in preparing their fabric, but for those of you who haven’t figured it out yet or like to see what other people do, we can go through the grunt work together here!
1. Measure & Cut the Linen
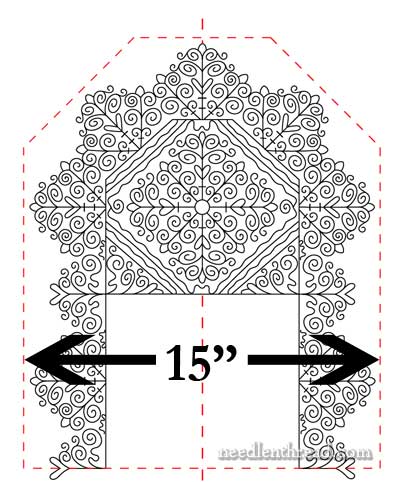
Using the final modified embroidery design, I enlarged it so that the design is 15″ wide, from dashed line to dashed line. This makes the length of this half of the design 18″ long. The finished embroidered area, then, is 36″ long x 15″ wide.
The fabric needs to be at least two inches larger than this all around, to provide room for hemming. If you plan a deeper hem, though, you might need to add even more fabric all around. That part is up to you. Whatever your final size, add one more inch in length and width. You’ll see why the extra inch below.
My final cutting size for the linen (which is, again, Alba Maxima by Legacy) was 41″ x 20″, giving me 2 inches all around, plus one inch extra.
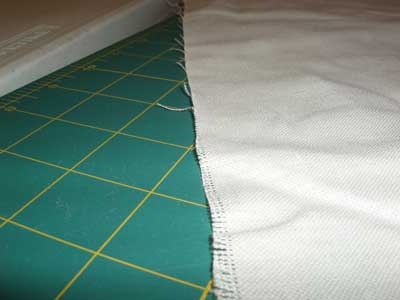
Cut the linen on the thread. To do this, first make sure all your sides of the linen are on the thread. In the photo above, you can see that the cut of the linen is not “on the thread” of the fabric – there are some shards of threads sticking out there. Remove those shards, until you have one long thread running the length of the each side of your linen.
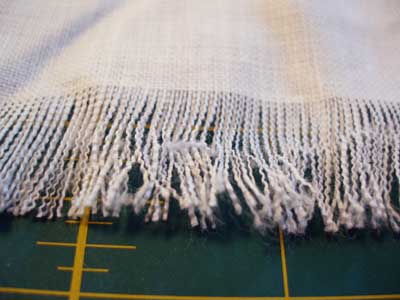
You might end up with some fringe. That’s ok – trim this off and do your measuring from the clean edge.
Then, measure the length and width of your piece and make a little pencil mark on the edge of the linen. Cut along the thread of the linen, to make sure that you are cutting the linen as square as it can be.
Neaten the Edge
Using either a sewing machine (much faster!) or by hand, “neaten” the edge of the linen. Essentially, you are sewing over the edge or along the edge of the linen, on all sides, to prevent your linen from fraying as you work.
How you do this is up to you. Some folks use a zig-zag stitch on the sewing machine. Some use a whip stitch and neaten the edge by hand. Some people use a serger. I use my trusty, rusty old lucky-I-found-it-so-glad-I-bought-it Bernina, and I use the overlock foot to neaten the edge.
However you do it, make sure your tension is right and there’s no puckering of the edges of the fabric.
Rinse and Pre-Shrink the Linen
Remember that we’re working a table runner – an embroidered linen that will undoubtedly need laundering in the future. I think it’s important to rinse and pre-shrink linen before setting out on this type of venture.
Not everyone agrees with this view, though. I know there are, for example, expert Schwalm embroiderers who insist that the linen should not be washed in advance. I suppose I prefer to err on the side of caution. I haven’t met a linen yet that didn’t have a good bit of shrinkage in it.
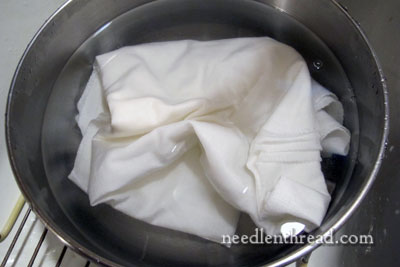
So, to rinse and pre-shrink, take your linen into the kitchen, and using a clean bowl that is large enough to hold it, run very hot (as hot as your tap will allow) water over the linen, and leave the linen to soak a bit.
Then, fill up the tea kettle with water, and set it to boil. (Alternately, you can boil a pot of water).
While the kettle’s boiling, let the linen in the hot water cool down a bit, and then turn your tap on as cold as possible. Dump out the hot water in the bowl and fill it with cold water, swishing it through the linen as you go. The linen will get very hard.
Leave it to soak in the cold, until the kettle finishes boiling. Then dump out the cold and pour the boiling water onto the linen. Use a clean spoon to submerge the linen (don’t stick your hand in there!).
Leave the linen in the boiling water for about 10 minutes, and fill up the kettle again to boil.
Dump out the water and run ice cold tape water onto the linen again, swishing it through all the linen (it’ll feel really stiff by now). Leave the linen to soak in the cold water for a bit.
Finally, dump out the cold water, and pour the new boiling water into the bowl, making sure the linen is covered. Leave the linen to soak until the water cools down to room temperature.
To recap: hot water, cold water, boiling water, cold water, boiling water left to cool. The extreme hot and cold is what shrinks the linen.
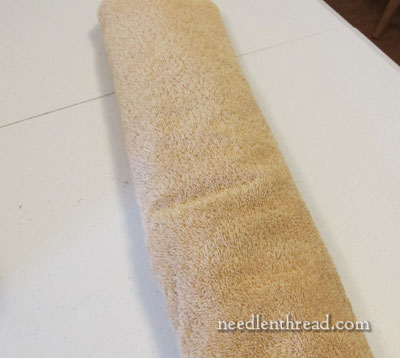
Remove the linen from the bowl. Don’t wring it. Just lay it flat on a bath towel, and roll the bath towel up, and then press on it with your hands to remove excess moisture.
On this particular piece of linen, the shrink was almost 1/2″ in one directions, and just under 1/2″ in the other. Hence, the extra inch all around when cutting the linen.
Iron the Linen
Now it’s time to iron the linen. It should still be quite damp when you iron it. Make sure your ironing board cover is clean or put down a clean cloth or sheet over it. Use a dry iron, set on the linen / cotton setting.
Iron the linen exactly horizontally and exactly vertically, but never diagonally.
Iron to remove the wrinkles, not to dry the linen. If you think in terms of drying the linen, you may end up scorching it. Don’t leave the iron in one place for any length of time or iron over the same place over and over again.
You can turn the linen over and iron both sides. Move the linen around as you need to, to fit your ironing board, but remember – don’t iron diagonally.
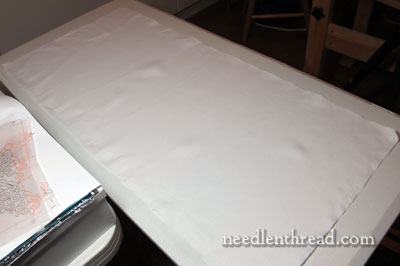
When you’ve finished getting the wrinkles out and the cloth is nice and smooth, lay it out on a table. You can see the rippled edge in the photo above, and some ripples in the middle of the linen. The linen is not completely dry all over, and the ripples are caused by the difference between the wet and dry spots. But the linen is smooth and the wrinkles are gone.
Leave your linen on the table overnight or for several hours, until it is completely dry. Then, do a quick once-over with a dry iron to smooth out any remaining ripples. You should now have a perfectly smooth, beautiful piece of linen.
Next up, the remaining preparation and design transfer!
If you’d like to follow this project each step of the way, you can find all the articles relating to it listed in this Hungarian Redwork Runner Index.
Thanks Mary! I learned something!! Normally don’t do the hot/cold/boil/cold/boil/cool. Makes much sense.
Dear Mary
Thank you sooooooooooo mmmmmmuuuuucccccchhhhhh for this very informative, very useful fantastic article on how to cut and wash linen. I recently embroided a piece and I thought I had cut the edges correctly but unfortunately I realised to late that not only did it warp but it didn’t fit into my frame properly and no amount of adjusting, washing helped. As you say if the ground work is done correctly then everything else will fall into place.
Thanks again
Regards Anita Simmance
Why not iron on the diagonal – I’ve never heard of that…Is the same true of cotton and is it true of clothing (that it comes out best if you go with the grain?)
Hi, Heather – This is just for setting up linen for an embroidery project. You don’t want to stretch it out of shape – when it comes time to transfer the design, you don’t want the fabric warped or skewed on the bias. If you iron on the grain in either direction, this is less likely to happen. MC
Nice job, Mary – that is brilliant! Thanks for posting all of this info for us “regular” people to learn how to become a little more perfect!
Heavens, what a process. Nobody really knows what embroiderers go through to produce that gorgeous perfect piece of work.
I didn’t know any of that, and would probably have put the fabric through a cold water machine wash or a quick rinse in warm water by hand. But now I know, there is no excuse. Thank you, Maestra (I am guessing that this is the feminine of Maestro but again I could be wrong.)
You’re correct – she’s a Maestra.
Fascinating. The process makes finished linen seem like a magical creature.
Thanks for the clear precise instruction Mary. I’m about to start on a piece of embroidery using Linen sent all the way over from London so having this extra bit of information on preparation is a Godsend!
OK, I’ll bite: Why does the linen get stiff? and does anything (maybe the ironing?) unstiffen it? Do you know why the extreme temperature swings increases the shrinkage? Janet.
Hi, Janet –
The extreme hot and cold causes the fibers to constrict. You know when you buy a new cotton shirt that hasn’t been pre-shrunk and put it in the wash? If you put it in a hot / cold wash, the same thing happens. Most natural fibers do that, but I don’t know the actual science of why. I’m sure there’s some sort of structural / molecular type explanation!
The linen gets stiff in the cold water but it does soften up again when it dries. Linen generally has a certain stiffness or crispness about it, anyway, but when it’s soaked in cold water, it tends to feel really hard. But as soon as it dries, it loosens up again. And as you start handling it in the embroidery process, it gets softer still. The nice thing about linen is that, even with use and washing, once ironed or blocked, it still looks wonderful!
MC
Hello Mary
I normally just place my linen in a warm wash/cold rinse program – will this not cause “enough” shrinkage? Will the linen continue to shrink with further washing (I´ve never noticed/measured)?
Another question: I never wash my linen when doing drawn threadwork (to facilitate thread removal)and then proceed straight on to the embroidery work, only washing on completion. Would you recommend going thru´ the shrinkage process even in these circumstances?
Thank you.
Extra tip on machine-neatening of the edge: I use my late mother-in-law’s Singer 347 which she purchased in 1960-something, for which I have yet to find an overlock foot. I use the zigzag function, but ordinary zigzag stitching over a raw edge frequently causes the fabric to curl. So, I pull the thread I want to cut along, leaving a bit of a “seam allowance” outside, zigzag along the pulled-thread space, then cut the ragged edges off.
And, omigosh, yes, hot-cold-hot-cold-hot-cold rinses are the only way to go with linen. I’m not sure even the cheapest unbleached muslin shrinks as badly as linen can. (‘Course, if you’re making fitted garments, you also have to watch out because linen can then turn around and stretch like crazy. It’s OK – I’ll still take it over an artificial fiber, for any application you can name, except maybe tent roofs. I like them waterproof :).)
HELP! I am trying to understand how many threads to cross-over for the very 1st leg of the Smyrna in Margaret Boyles Bargello Workbook, pg. 86 for starting Interlocking Squares. I’m sure I will feel foolish but I have worked it on my scrap canvas twice but it does not look right. I think the color chart conveys going over 3 threads.
HI Mary,
What a fund of knowledge you present;I am so grateful for you. I can’t seem to print archive material such as S vs.Z twist thread but the daily articles print out just fine. Any suggestions?
Mary, I have questions. When the linen has finished with the water bath and has been ironed will it remain stiff?
Also, do you know which linen/fabric Elsa Williams used for her kits?
Thanks, Carol
Most good linen will “crisp up” with ironing. It develops a beautiful, smooth sheen and gets a little crisp – not really “stiff” like a board, but firms, with a bit of body to it. It will still drape if there’s enough bulk in the piece of fabric to make it drape. For Elsa Williams’s kits, it depends. Some were on linen – I think the majority of her finer kits were produced with linen (Belgian and Irish). Then there are some that are linen / cotton blends. And there are even some that are 100% polyester! If you’re looking for a good all purpose linen for Elsa-Williams-like projects (especially with wool), I’d try Alba Maxima by Legacy (Hedgehog Handworks carries it, as does Needle in a Haystack). It’s a medium-ish weight – not heavy, but not fine or sheer. There’s also a cream version of Alba Maxima (can’t remember the name, but the folks at Hedgehog could help). ~MC
Dear Mary,
I too am a fan of not washing a material that shrinks before embroidering. The reason for this is that when the fabric shrinks, the grain tightens and makes embroidery slightly more difficult. I usually embroider it and then wash before hemming (the fabric must be measured, cut and neatened before embroidering though). I really enjoy all your advise and pictures!
Hi Mary,
Quick question. I am purchasing linen by the 1/4 (fat quarter), is it best to pre-shrink the whole piece or should I wait until I need a specific size?
Hope all is well with you! You’re always in my prayers.
Christi
If a piece of linen is marked “softened” has this procedure already been done?
Hi Mary, I’m a beginner and I would just like to express my thanks. I’ve I love all the tips & techniques you share on your site. I’m learning all the time from you. Your work is exquisite. Much love, Michelle from Brisbane Australia 🙂
Hi Mary,
I am a huge fan of your embroidery tutorials and have learnt a lot from your tutorials. They are really very helpful from beginners to intermediate ones. I look at your website as a bible for needlework. However, i have a query for which i did not seem to find a solution for. I want to start with embroidering hoops and use it as a wall decor.I would be using web picot stitch for stitching rosettes. However, in a country like ours ….its quite easy for dust to get accumulated on things. So, its like we have to clean almost every week. But, i have noticed that the web picot stitch comes off easily if poked even slightly. I didnt do it on purpose. I just accidentally poked the rosette while i was distracted. So if i wash such kind of embroidery, there’s a higher possibility of the stitch coming off completely. I hope you have understood what i am trying to say here. Can you pls help me with necessary instructions or maybe a tutorial (may help someone else too!) for the same.
Regards,
Vrishali
Hi, Vrishali – If you mean the woven picot stitch, I think that, as long as you make sure your anchor stitches (the three foundation stitches actually attached to the fabric) are spaced out enough to pick up enough fabric to keep them attached, then you shouldn’t have any problem with the whole woven picot coming off the fabric. If it’s not the woven picot you’re talking about, I’m not sure what stitch you mean. Do you have a link to it or to any instructions for it, so I can see what stitch it is?
Here in Kansas, dust is part of our life. We have to dust the house a couple times a week to keep it clean, even when the windows are mostly closed. This is why I prefer finishing embroidery for the walls with a frame that has glass on it. Otherwise, I wouldn’t be able to keep displayed needlework clean.
Do I still need to pre wash as you have described if the finished embroidery is going to be stretched over a canvas and hung ie it will never be washed? Thanks.
You don’t have to, but if your embroidery gets dirty in the process of being created – even, say, accidentally – and you have to wash it, then it could change the outcome of the finished piece.
Dear Mary,
I have an 18 by 18 inch Legacy Downer piece of linen from Needle in a Haystack. The edges are finished. I plan to make two needle books from Lavender and Honey. Should I cut the linen before or after I rinse and pre-shrink the linen?
Sincerely,
Mary
I would cut it after!
Thank you for the advice to rinse and preshrink the linen with finished edges before I cut. It looks beautiful. However, do I cut exact measurements at this time for the needle books?
No, I would pre shrink the linen first, and then cut it to the exact measurements. Otherwise, whatever you’re making may end up a little bit smaller than intended.
Is it possible to start linen before using. I am so used to using stiff Aida or pre gridded even weave, that now I have a piece of linen I find it very hard to use as I keep stretching the holes when pulling the thread. I try to be gentle but …. starching it would help me when stitching I think. If you think no problem, would I used a spray starch or soak in starch solution? Thank you
Perfect! Thank you Mary! I found this info very helpful indeed…just what I was looking for and glad I found it!
Take care
Toody
Hello Mary, This blog post is several years old, yet I’ve found it to be quite valuable info as I begin to prepare a tablecloth project for my son’s wedding. I’ve tested the process on a smaller piece of linen so I know what to expect for my full size piece, but am wondering if I should have the edges merrowed and “hemstitched” (not hemmed, but like a pulled thread detail) before doing any of the embroidery. The piece is an oblong shape – straight sides with curved ends – so hemming a folded edge might not turn out so well. And if I go for the merrow edge, should I do that myself or find someone who might have lots of experience with that? I’m up for it, but time is of the essence and my learning curve is almost straight up for some of this. LOL
I love your site – such great information presented with very clear instruction. Thank you!
Hi, Erica – If you’re doing a pulled thread hemstitched hem, it doesn’t normally work on an oblong (rounded) hem, because the thread that you pull – and the hemstitch – follow the weave of the fabric (it’s a warp or weft thread). The exception would be, of course, if you are having it done by machine or doing it yourself by machine. I’m assuming that, by merrowing, you mean overlocked or overcast along the edge, before it’s hemmed? You can do that before you do your embroidery – it’ll keep threads from loosening from the cut edge and will keep your work neater. It’ll be easier to embroider the piece before you do the hem, because you’ll have more room to move your hoop around while you stitch, if the piece is not hemmed.
Hope that helps!
Hi! Not sure if you still see comments here, but I wanted to know if you recommend this process for pieces you don’t anticipate will need washing—just in case?