


The other day, we looked at Griffin Stitch, a lattice filling, as part of the Stitch Fun series. While playing about with that particular lattice variation, I discovered something that you might discover, too, if you’re fiddling about with lattice stitches any time soon.
They’re kind of addicting.
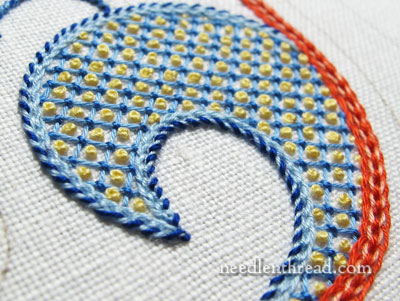
Here’s a really simple lattice variation that’s a lot of fun, and that has the added bonus of texture – thanks to the French knots. French knots are lovely little things, aren’t they? And they’re nice and bumpy.
Today, let’s look at this lattice filling, and chat a bit about working lattice stitches on plain-weave fabric when counting isn’t an option.
In this article, I’m working on a plain weave linen that has approximately 40 threads to the inch, but since it’s plain weave, it’s not necessarily perfectly even in both directions. I’m using coton a broder 25 for all the threads.
Well, if you’re not working on an even-weave fabric which allows you to count off spaces for perfectly spaced lattice lines, what’s one to do?
Lattice on Plain Weave Fabric
There are two options for spacing the lines of your lattice on plain weave fabric: you can either eye-ball your line layout as you take each stitch, or you can mark your lines on your fabric, either during the transfer process or before you outline and fill the area. Once you get used to working lattice stitches, it’s much easier to eyeball the line placement, but until you’re confident in doing so, marking would be the better option. A wonky lattice tends to look… well. Wonky.
It’s much easier to mark in your lattice lines when you transfer your design in the first place, but this doesn’t necessarily work if you’re “doodling” without a definite idea of what stitches are going where, which is what I’m doing on this particular sampler.
If you decide to add a lattice filling after you’ve already mounted your fabric on your stitching frame or in your hoop, you’ll need to put something underneath your work (like a book, or something else that’s hard and fits inside the back of the frame or hoop) while you use a ruler to mark in at least the beginnings and ends of the lines.
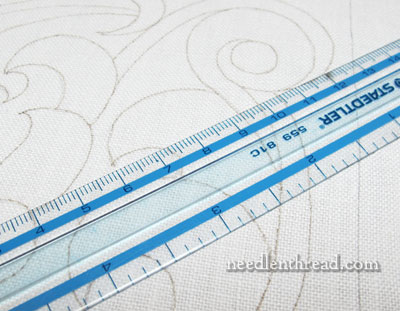
I find it easier in situations like this to use a clear, small ruler. A small clear quilting ruler with eighth inches marked out would be ideal, but I couldn’t find mine, so I resorted to this one.
When you mark the lines in – whether during the design transfer process or while you’re stitch doodling – keep the markings as light as possible, but make sure that they’re still clearly visible and that they extend a way beyond the edge. When you outline the edge of the shape, the lines should still be clearly visible.
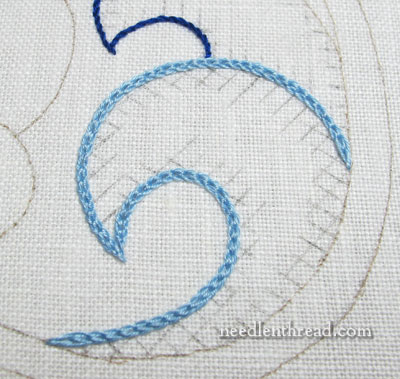
Outline first. Why? Two reasons:
1. Your outline stitches will give you a place to anchor the lattice threads invisibly on the back, and…
2. Outlining before you stitch ensures that the outline is accurate. It won’t be discombobulated by coming into contact with the lattice stitches. Sharp and accurate outlines are important, so it makes sense to pay attention to stitching an accurate outline first.
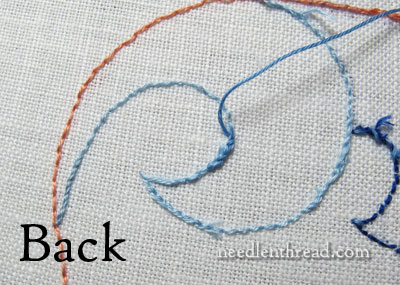
After you’ve stitched your outline (the type of stitch you use is up to you), you can use the stitches on the back of the fabric to anchor the threads for your lattice stitches by whipping the working thread around the back of the stitches.
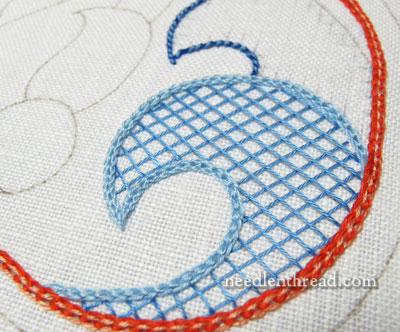
Work your lattice in one direction and then in the other, just as we did with the Griffin Stitch.
(I know, I know, that reddish orange line looks a bit bizarre. I’m not sure that it will improve down the road.)
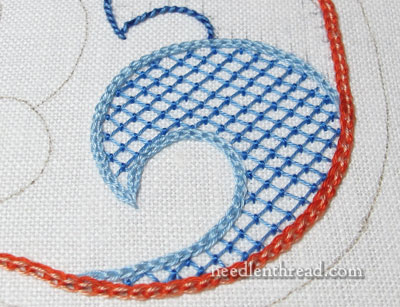
Once you’ve got your lattice threads laid down, couch over the intersections with your choice of thread and color. Follow a reasonable order as you couch, working either down the columns of intersections or across the rows.

Then, if you want, fill the middles with little French knots!
Ahhhh. I like these little lattice things! And there’s bound to be more to come…
Stitch Fun is a series of stitching tutorials here on Needle ‘n Thread, where we explore different types of embroidery stitches just for the fun of it. If you’d like to peruse some of the other tutorials in the Stitch Fun series, feel free to stop by and visit the Stitch Fun Index, where you’ll find links to all of them!
G’day Mary, that’s most appealing. All set out so nicely for us too. Thank you.
I don’t mind the orangey line as is seen there but would depend on the whole.
And…what fun. Discombobawhatever! The thesaurus actually had synonyms for it so I’ve learnt more than stitch fun tonight.
Hope our temp prediction for here isn’t correct for tomorrow. 45ºC. Was to be 43º today but stayed under 40º. That’s under the wide veranda on eastern side of house in the arvo. Didn’t drop below 30º all night though. Thankfully we’re out of a bush fire area just here but am so sorry for those who aren’t and are suffering loses.
Cheers, Kath.
Hi, Kath – yes, I’ve been reading about the soaring temps. My heart goes out to those suffering losses in the fires down there! Strange to think we’re expecting freezing temps tomorrow… Today, though, you’d think spring had sprung… In Kansas, if you don’t like the weather, you only have to wait about 24 hours for it to change drastically. Stay out of the sun! MC
Is this part of a project that has already been shared? I would love to see what the whole thing looks like. This looks like one I’d love to play with 😉
Hi, Shana – Nope, haven’t shared it yet. It’s just really a “doodle” but if it doodles into something worth sharing, I’ll definitely share it! I’m not 100% satisfied with it just yet, as a pattern. It definitely needs tweaks, and I’ll discover what tweaks as I fill up some samples for different articles here on Needle ‘n Thread. For one thing, that left line is Really Weird. Not sure if it’s my stitching yet, or the shape of the line! ~MC
I’ve been on a crocheting spree lately, but the more I see your articles, the more I’m inclined to find a stitching project (the last one was long and tedious and I needed a break!) Thanks so much for the inspiration!! You take stitching to a level I never imagined!!
I haven’t done embroidery for a while either, but lately I’ve been itching for a project. I just need something good to stitch 🙂
Hi, Tracy! Good to hear you’re contemplating embroidery again. It’s always a good idea to take a break when a project gets long and tedious. Maybe some day you’ll go back to it with fresh eyes and new determination! Happens to me all the time….! Glad you enjoy the series! ~MC
Thanks Mary, I look forward to seeing the finished project 🙂 Off to stalk your other patterns for something purty 🙂
Ahh, it *is* appealing… :)) Wish I could apply something like this on practice… some day… soon… something a bit random and fascinating and appropriate…
But at the moment I find myself sadly annoyed… because I look and I look and I can’t figure out what stitch you used for outlining… I’m such an ignoramus :o)
Hi, Lily – the outline of the completed “wave” there is Hungarian braided chain stitch. You can find the video here: https://needlenthread.wpengine.com/2012/07/hungarian-braided-chain-stitch-video.html It’s a lovely stitch, and once you get used to it, it works up pretty quickly! ~MC
Mary,
Beautiful work! I follow your blog almost daily. Was wondering what you used to transfer your design onto the fabric.
Hi, Ann – I traced it and used a the pen that I talk about in this article: https://needlenthread.wpengine.com/2012/11/hungarian-redwork-runner-embroidery-design-transfer.html
Hi Mary!
You used french knots as the center of your lattice work. What if you wanted to do a small design. How do you figure out the size of the lattices or the horizontal/vertical lines for the lattice?
Oh, and I just enjoy reading each day’s tidbit you give us so freely. You are truly wonderful.
Thank you, Nick in New Orleans
Hi, Nick – I think that’s just a matter of figuring what’s going to look good, considering the size of the design and the type of thread you’re using. For this size of design (which isn’t so big, actually), using the coton a broder worked out well, because it’s a fairly fine thread. It still left me room inside the squares of the lattice to work the knots. But if I had used a larger thread (like a perle cotton #5, like I used for the previous Griffin Stitch tutorial), I’d probably not have room for French knots. The lines here are about 1/8″ apart, so the squares are rather small. Perle cotton would have made the space between even smaller, and would have crowded the whole look of the filled area. If I were going to use perle cotton to fill that area, I’d make my lattice lines much farther apart – probably 1/4″ apart. There would be much fewer lattice squares, of course, but the filled area wouldn’t look packed in, either. The spacing would “fit” the thread better. So I think it’s a matter of considering the size of the area you’re filling, the type of thread you’re using, and then considering how close or far apart the lines should be to make it work. ~MC
Hi Mary, when I saw your post this morning immediately had so many questions about lattice. But, you were so thorough all were answered after reading the post. One thing I did want to ask, is do you consider the degree on which you place the lattice lines? I’m working a kit now that indciates lattice lines should be 45 degrees. Thanks for the great info. I do have problems especially when the lattice is small, but I think this tutorial will help. Thanks again.
Hi, Jeannette – I always determine my angle with the first line, which I put in the middle of the shape (either on the pattern itself, or straight onto the fabric). Then, I build the other lines from there. I’ll most likely cover this very point a little bit later down the road, with another example. But yes, I think 45 degrees is probably the best choice when working a diagonal lattice! ~MC
Oh, that is really delightful, Mary! Thanks for sharing!
A while ago I was working on a fabric that was difficult to mark on. I ended up cutting a thin strip of card to use for spacing. I established the first line, then placed the strip of card right next to it to determine the placement of the next line of stitching. Worked like a charm. 🙂
Hi Mary !!!
Thanks for this amazing tutorial on lattice stitches. Inspired by your previous tutorial on the same I am also trying my hands on it. I will share the same in my space http://luvforcrafts.blogspot.in/ when I am thru. Thanks once again for sharing.
Moushum1
Thank you, Mary 🙂
I must say I like this stitch much better here than in tutorial… And seeing it done in 2 colours was a bit confusing
Olyan jó volt régen, mert volt az oldalon fordító, és a magyar nyelvű is közötte volt. Most nem tudom miért, de eltűnt. Ki lett kapcsolva, vagy csak én nem találom?
Hi, Eva – the Google translator on the left side of the website. If you click on it, you will see the choice for Hungarian in the list. Thank you! -MC
Hello mary,
lovely tutorial, thanks.
Dear Mary
Thanks for this tutorial I love lattice work especially the french knots it looks so lovely and I really like the stitch fun series. I always find lattice work difficult to measure the spacing between the lines.
Thanks for this
Regards Anita Simmance
It’s wonderful, it’s magical!!!
This looks like it would fit lovely in the little scroll in the Sept 16 2006 Jacobean pattern with butterfly – https://needlenthread.wpengine.com/2006/09/jacobean-era-revisited-pattern-with.html
Hi Mary! When you’re putting in lattice filling on a drawing before you transfer to fabric, would it be advisable to trace the lines with graph paper? Or maybe even put graph paper under the fabric and trace like that too. Would that work or is there a reason not to do it like that?
Hi, Katherine – Graph paper would work fine, if you can see the lines through the fabric. Most graph paper lines are light blue, and very hard to see through fabric, even with a light behind it – unless you’re using a very thin fabric. But on the actually pattern, graph paper works great! -MC
Hi Mary
Thank you for explaining the different widths in placing latticework and thread types. Having a “doodle cloth” to try out different spacings and threads before actually starting the project can be a sanity saver while providing the opportunity for stitch and colour exploration.
I’d also like to wish Kath a “cool” weekend. I live in a part of New South Wales, Australia, that is lucky to see 25 degrees Celsius in summer. Today, Saturday, we are expecting 38. I wish I had your lovely wide verandah Kath! When I visited the explorer, Hume’s, home near Yass, they used to tip water over the floor of the tiled wide verandahs to keep the house cool in summer.
All the best.
I was reading the new Nordic Needle catalog this morning and saw that they are carrying Coton a Broder thread. I just checked their web site (http://www.nordicneedle.com) and see that they are carrying just white, ecru, and black. Since it is brand new for them, they may add other colors if it sells well. I know I’ll order some the next time I order from them.
I had to smile at the commend of it being 43-45 degrees. That’s what it was in the Indianapolis area yesterday, only we were 45F, which is great for this time of year. It will be in the 50’s on Saturday, then drop back to below freezing next week.
Mary,
Wonderful articl! Wanted to add my 2 cents on rulers! The clear, THIN rulers are wonderful – C-Thru makes a whole line of these that you can ussually find in the drawing section of your local craft store, as well as the supply stores in the garment districts in NYC and LA. The thicker rulers used for rotary cutters can make a difference in the accuracy of your design, and your stitching can only be as accurate as your design!
Love reading your posts – thank you so much for all of your info,
Vaune
The latticework is beautiful, and I love the effect of the dark blue thread added to the outline. Did you wrap the outer edge of each chain stitch, or is it done some other way?
Lori
Hi Mary, I love your site and the daily emails! There is so much inspiration here! When I am stitching lattice that is 1/4 inch apart I use quilters quarter inch masking tape. I mark 2 intersecting lines and then stitch one and lay the tape next to that line and stitch the next one and so on. It works like a charm and you only have to mark the 2 intersecting lines.
this is beautiful! please share when it’s finished. i love the lattice inside that shape. do you know where to find a pattern similar?
I had cataract surgery in November and havent been able to stitch, get my new glasses today…….so happy. So it will begin again and you have given me so many new ideas to stitch……thank you
I would LOVE a copy of your ‘Jacobean Jumble’design..sounds fun and uses lots of new stiches for me to try out.
Love your daily e-mails..your a star MANY thanks
so very beautiful ! love your work, thanks for sharing.