


Ahhh…. finally! Today, we are going to see how to add some embroidery to empty eggshells that we’ve already prepared by drawing the design, drilling, and cleaning (which is what we covered in the last article in this whole series on embroidered eggs).
If you’re just stopping by Needle ‘n Thread for the first time and want to know more about embroidering eggs, you can check out the Embroidered Eggs Index, where all the articles on the topic are listed.
Let’s look at a how to embroider lines and swirls on a whole egg shell, using a technique that creates a smooth, flowing line. Once you get this concept down, you’ll be able to apply the concept to other stitches. But I think it’s important to start simply, and then to move forward to the more complex.
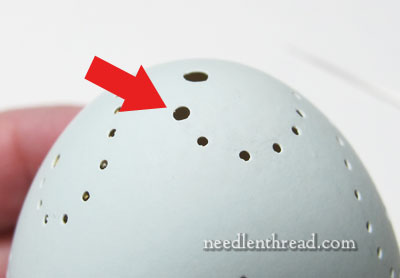
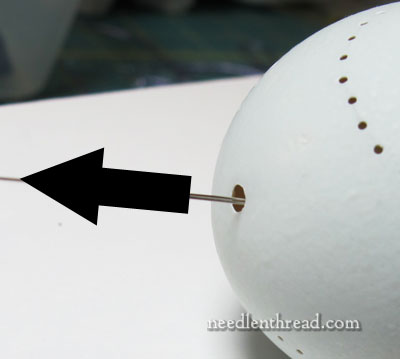
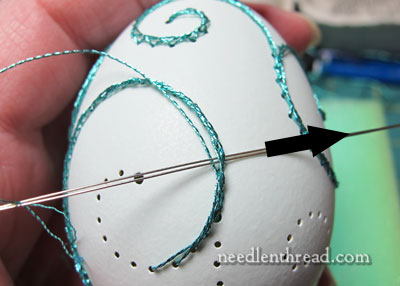
The hole with the red arrow pointing to it is the beginning of the embroidered line (but not where I begin the embroidery). Notice that it’s a little bigger than the other holes.
On swirly designs, at the intersections of the swirly lines and at the beginnings and ends of the swirly lines, I enlarge the holes slightly while I’m drilling. At the intersections, I’ll have several threads going through the holes. And the larger holes at the beginnings and ends of lines give me somewhere to pass the needle if I need to, even if they already have a stitch coming out of them.
So the red arrow points to where the design line starts, but it isn’t actually where I’m going to begin the embroidery.
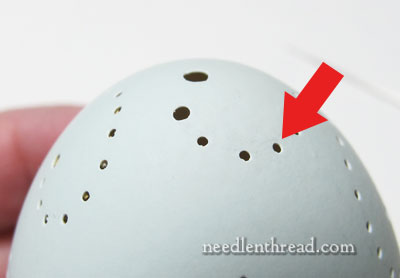
I’m going to begin the embroidery three holes away from the start of the line, so that there are always two holes between the holes that mark the beginning and end of the stitch.
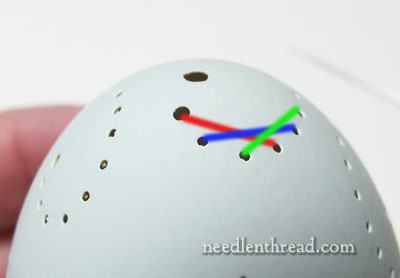
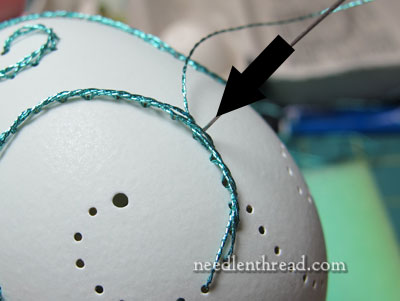
The stitches that we’re going to take will end up like the colored lines above. The red line is the first stitch, the blue is the second, and the green is the third. Each stitch always has two holes skipped.
Why this stitch? It creates a smooth curve, that’s a little open and lacy (so it broadens the end of the swirl a bit), and it’s easy.
You can switch it up a bit if you want, keeping the needle above the working thread the whole time, as you would with a stem stitch, and that will tighten the line around the curve up a little bit. But I’d suggest starting as simply as possible, so that your good results (with as little frustration as possible) will encourage you forward to try other techniques.
If we were doing backstitch on this line, by the way, the swirl would be embroidered, but it would be a little choppy looking. We’re shooting here for a smooth swirled line.
So that’s how the stitch is going to work. Let’s see how to do it.
Put a nice fat knot at the end of your thread. It needs to be large enough that it won’t pull through the small hole where the first stitch starts. (That’s why we’re starting the first stitch there, and not in the big hole at the beginning of the line.)
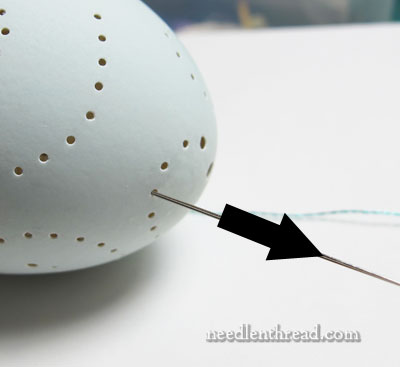
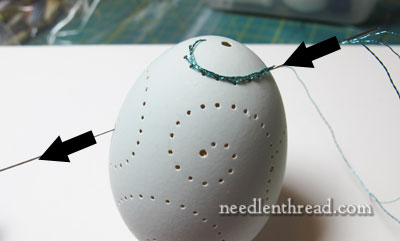
Enter the egg somewhere opposite to your first hole. For me, it was the large hole at the bottom of the egg. Make sure that whatever hole you take the needle into the first time is large enough for the knot to pass through. The knot will pass through the entry hole, but catch behind the smaller hole where you’ll begin your stitching.

Pull the thread through until the knot catches, and then take your needle into the egg wherever the first stitch ends.
Pass the needle through the egg to a larger hole opposite. At this point, I’m still working in the hole at the base of the egg, but eventually, the angle will become too extreme, and I’ll choose a different hole on the other side of the egg.
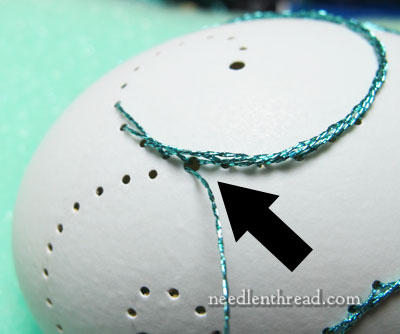
Pull the needle through, then pass back into the same hole you just came out of, and take the needle out on the other end at the beginning of your next stitch.
That’s it! That’s the concept, in a nutshell! You always have to move out of the exit hole at the end of one stitch and back into the same hole you just came out of, to enter the egg and begin your next stitch.
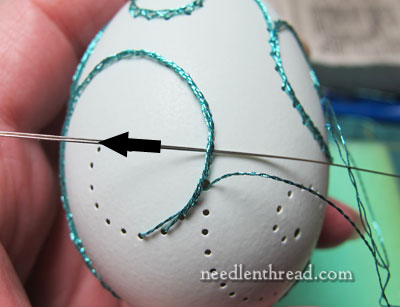
As your embroidery on the egg progresses, the angle in which you exit the egg and re-enter will change, and so you have to seek out other holes to exit and re-enter the egg. You want to find holes that will allow you to move the needle in and out, without creating pressure on the egg due to a strange angle on the needle.
The exit hole also must accommodate the working thread, and the threaded needle. Sometimes, you might have to pull that working thread out of the way as you pass back into the egg, to create as much space as possible for the threaded needle to pass through.
Remember those long-eyed beading needles I talked about when we spoke of embroidery supplies for embroidering eggs? This is where they come in Really Handy. First, they are long, so you can pass across the whole width or length of the egg easily; second, they are flexible, so the pressure the needle might make on the egg if you’re slightly off-angle is not nearly as intense.
When I need to end the thread on this type of stitching, this is how I do it.
I bring the thread up into a whole on an already-embroidered line. If there’s a larger hole available, that’s great, because it’s always easier to get in or out a larger hole.
I pass the needle and thread underneath the embroidered line, one hole up on the egg (but I don’t enter the egg).
Then I move up another “space” and pass under the embroidered line again, in the opposite direction.
Then I go down into the egg in a relatively “tight” hole (but not too tight that it won’t take the threaded needle, or it will crack!)…
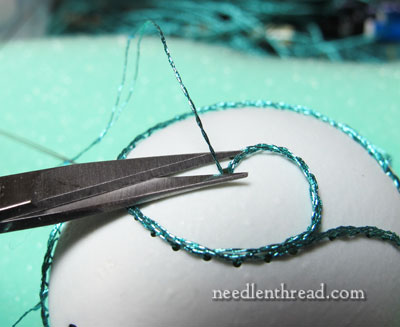
… and out another hole, and snip the thread close. The thread end will float around inside the egg, and it will most likely eventually get caught behind other stitches. Even if it doesn’t, it’s secure enough that it isn’t going to come back out of the egg.
You can also pull the end through the hole at the base of the egg, and just hold it out of the way while you embroider the egg. Eventually a stitch or two will pass around it and pull it and hold it inside the egg. Or, you can just hold it out of the way until you’re completely finished, and incorporate it somehow into a tassel or something at the base of the egg.
Some Egg Embroidery Tips
1. Use Good Lighting! Most of the time, you’ll find you’ll need the light a little bit behind the egg. If you backlight your egg slightly, it’s easier to see the needle to aim it out of the egg again. After a bit of practice, it becomes easier to find the exit hole with the tip of the needle.
2. Don’t be inhibited by things you wouldn’t do on fabric. Most of the time, you just have to improvise to see what will work best, especially for things like ending threads, starting threads, making a stitch look right. There’s not really a chance of “doing it wrong” here, because… well… there’s no rule book on embroidering eggs!
3. I can’t emphasize the big eye beading needles quite enough. I haven’t broken an egg since using them. They’re worth it!
4. Once you get comfortable with this simple technique for lines and swirls and the whole exit-enter thing with the way the embroidery works, experiment with other stitches! The concept of how the embroidery is done will remain the same – as long as you have an exit and re-entry hole, you’re good! – so working out how to do other stitches is just a matter of trying them.
Next time, we’ll talk about some other stitches that work really well on whole egg shells. Hopefully, I’ll have the turkey egg in the photo above finished by then!
Any questions? Feel free to ask them below!
If you want to follow along with this whole sequence of tutorials on embroidered eggs, check out the Hand Embroidery on Eggs Index.
Wow, this is amazing, never thought you could embroider an egg! Thank you for your instructions which I will give a try when I have gathered everything. Perhaps you could do a short video showing the basic process. I am new to embroidery and still learning stitches, so again, thank you for all your fabulous instructions.
These are so pretty! Will there be video tutorials to go with the tutorials. They are always so helpful. Thank you for sharing this!
Ren
Mary
So love watching this!!!! and want to try it sometime. Wouldn’t it be interesting to dye a
Ukrainian egg and finish it off with some embroidered gold thread accents!!
I too would love to see you do a little video on how you go in and out of the egg with the needle. Thank You so much Mary I so love your emails every day.
Robin Marks
Dear Mary
Your right about the long beading needle so easy to pass through the holes and about making sure you have holes while passing the thread through the various stitches on the eggs.
So excited how did you do that rose please, please tell me, after looking at various photos I thought I would like to try a rose yours is lovely. I love using the River Silk ribbon so soft and easy to pass through the egg. I’m so addicted I can’t stop thinking about different designs, stitches for eggs. Thanks for your tips on starting and ending the thread. Look forward in anticipation to the next instalment on the eggexperience, love it.
Regards Anita Simmance
This whole subject of Embroidery on Eggs has been so intriguing and delightful. Thank You so very much for sharing your knowledge and vast diversity of embroidery.
Thank-you Mary! This series has been wonderful to follow (well, all of them are). I’ll probably be doing this along with my Easter pysanky now. I like a previous comment on enhancing pysanky with embroidery, though I’d be nervous taking a Dremel to an egg I’d painstakingly written, but I’d get over it pretty fast 😉 Thank-you again for all the hard work you do to make morning coffee exciting and inspirational!
If you do successfully enhance your pysanky eggs, will you please share photos with us? I would love to see them!!
If I manage some successes I will absolutely share Joyce! I’ll be sure to raid the farmers markets for some thicker shelled eggs 😉 I break enough of them just doing traditional pysanky… I’ll need all the luck I can get when power tools are involved!
Oh how fun! Thanks for showing how to end the thread. That was what I was wondering about. I can’t wait to try this. I’ll have to get some egss from a friend who has chickens. Those suckers are TOUGH! I have an emu egg, but I think I’ll practice on the chicken ones first.
Thanks for doing the tutorials!
I never thought this is even possible!
About using a rubber band on the eggs to mark lines:
That scares the h… out of me – especially with the more fragile eggs.
I suggest doing like the quilters and using a tacky spray on the back of a strip of paper (easily curved around the egg), the strip being cut to the size you want and applied vertically, horizontally or diagonally to the egg.
Hi, Nicole – Thanks for your comment!
The rubber band trick is something I learned when doing Pysanky. It’s a common way to mark off eggs, and it’s quite easy. I’ve not had any eggs that can’t withstand a rubber band, unless the rubber band is just too small, but you can always tell that before you bind the egg with it.
But if you have a selection of sizes to work with, rubber bands works great.
I’ve used paper strips – the disadvantage with paper is that it’s fiddly, whereas the rubber bands are not. For one thing, it doesn’t lie flat without some kind of notching or the strips. If it does lie flat, it’s only on one edge, and it’s difficult to get the paper to lie flat on that one edge, while encircling the whole egg symmetrically. And you can’t overlap the paper strips, because one edge is always sticking up! But you can overlap the rubber bands, which is helpful when marking things out accurately.
The adhesive is another question – and another ingredient. I don’t like using spray adhesive in general, only because it’s messy, and I have to go outside my work area to use it. If I do use paper to mark anything off (short line distances between two points on the egg, for example), I cut off the very edge of the sticky part of used post-it notes, which works just as well as spray adhesive, but without the mess.
I’ve even used rubber bands on bantam eggs, which are small and quite thin-shelled compared to regular chicken, duck, and goose eggs. I’ve not had a rubber band breakage yet!
~MC
I’m just in the process of trying this with a goose egg. I’m about half way and so far so good (touch wood). So tempting to do both sides at once in the same colour to save search for entrance and exit points but it would make the inside of the egg awfully tricky to navigate so I’m sticking with your method and it is working. Thanks for the idea and instructions.
This is stupefying. Absolutely ingenious.
Mary, you are resourceful and tenacious when creating a new embroidery technique. Looking at something and creating a technique to accomplish the feat is a gift.
Whether it’s embroidery or equipment design we reap the benefits of your ability to see/create a concept and devise a technique or a product that will add to our enjoyment of embroidery.
I appreciate your willingness to share your talents and skills with us.
Hi Mary, just stumbled upon your site, I am doing applique and some simple stitching with a couple of classes of children and was looking for some clear guidance . . . your videos are really clear, thankyou so much and I LOVE the egg stitching … not sure if you’ve seen some methods of cross stitching where holes were punched in metal (such as spades, watering cans, etc….. I love the idea of stitching on unexpected items. Thank you for sharing your extensive knowledge, best wishes, Valerie (Ireland)
can these Embroider on Eggshells be bought from you.
Bonjour , J aimerais essayer cette technique .pouvez vous me dire le n° de l aiguille utilisée . Merci
I have done Sashiko embroidery and I do quite a bit of egg carving and painting so I have wondered if I could do the two together. Your tutorial is very clear and I will certainly use it as a basis for my attempt at merging the two hobbies. Thank you