


If you’re just popping in here on Needle ‘n Thread for the first time, we’re working our way through a hand embroidery project called “Mission Rose,” worked in silk (and eventually gold threads) on a silk ground. You can find all the articles relating to this project in the Mission Rose Index, if you’d like to follow along or catch up on the project.
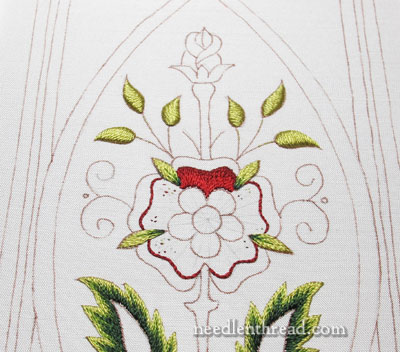
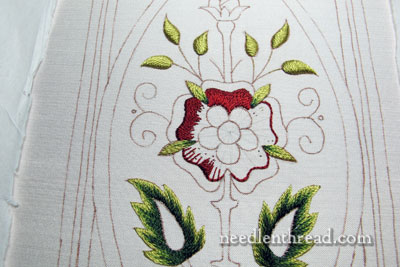
Well, after a distressing series of mishaps with the little leaves around the rose, they’re finally finished. And I’ve moved on to the rose, which is a refreshing change from greens.
Let’s look at what happened with the leaves at last, and then see some progress on the rose.
For the leaves inset around the rose, I skipped any outline underneath the stitching altogether, to keep them as flat as possible. The majority of the fill is the lightest green in long and short stitch, working the stitches relatively long down the middle of the leaf and fanning out the sides.
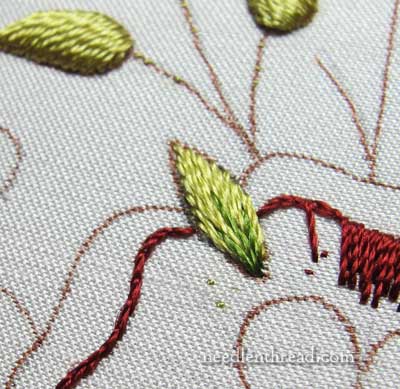
Then I worked three stitches in the medium green down towards the inside tip, and then a couple tiny dark green stitches just at the very tip.
So here we are, with the leaves finished and the rose underway.
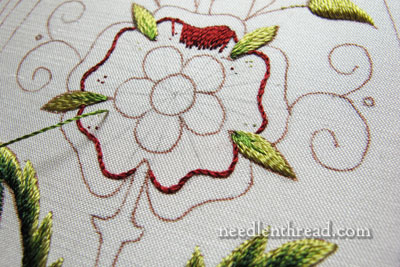
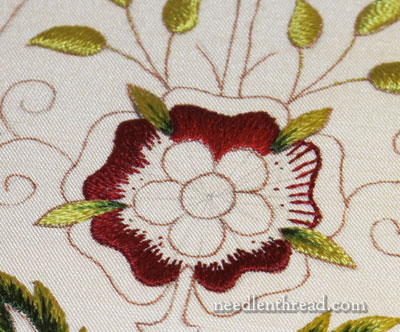
The outline around the rose petals that you see in the photo above is worked in split stitch, in Soie de Paris 4624 (the second darkest red).
Then, I started the long and short stitch over the outline, in the same red.
The inside of the petal is worked with the brighter red (945) in long and short stitch.
I liked the result pretty well and went forward. First I filled in the darker red all around.
When working the long and short stitch, it helps to stitch in occasional directional stitches. I normal stitch in the directional stitches, and then fill in between them.
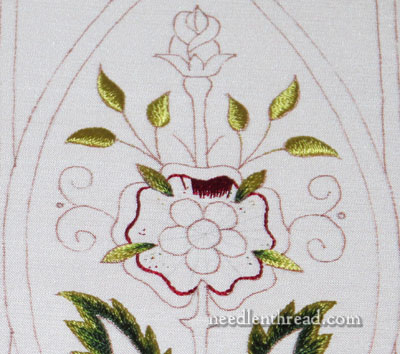
Almost there, all around the rose…
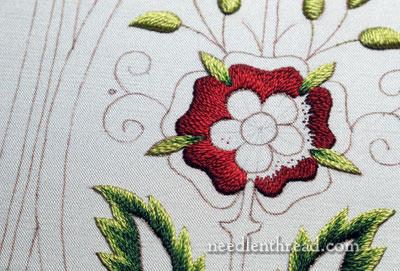
…and then the brighter red working in…
…and here’s the last shot I took until working on the inside petals.
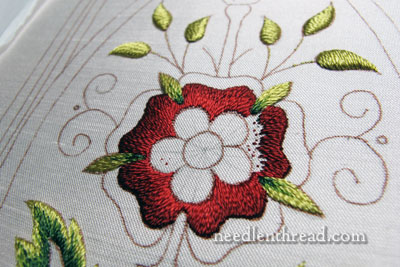
So, that’s the rose so far!
The inside petals are lighter than these. The pinks will come into play there.
If you have any questions, comments, or suggestions, feel free to have your say below!
You can find the rest of the articles relating to the Mission Rose project listed here.
Ah, that’s so much better. The very green, padded sepals did look too prominent. These will look even better when the outer parts of the petals are in place. I’m looking forward to seeing how you tackle the shading and padding on those.
beautiful as always!
I like the lighter green sepals, too – they relate better to the leaves. They actually look like they belong to the same plant!
Mary,
I can see the drawn shapes on the fabric of the tiny leaves around the rose, are you going to outline them with gold or another thread?
Oh yes!! Gold… tiny gold, just over the outlines…
Your stitchery is perfection!
This is beautiful already, can’t imagine how gorgeous it will be with the gold! Every time I read your blog, it makes me want to get out my stitching 🙂
Mary, I do have a question and I apologize if it’s a subject you’ve covered in the past. I notice that you’re working the rose from the outside in, so to speak. My brain always wants to start in the center and work outward. Is there a technical reason you’re doing that or just personal preference?
Thank you.
Hi, Kathy – Generally, in “western” embroidery (as opposed to Asian – Japanese, especially) the elements are worked from the farthest back element to the topmost element. So, with the rose, those little leaves go in first, because the petals are “on top” of them. Then the back of the petals (the round I’m working now) and then the center scalloped petals, because they are “on top” of this round, and finally, the center – which is going to be goldwork, and goldwork generally comes after silk. The final outer ring of narrow, turned over petals can be worked any time after this round I’m presently working – they sit on top of this round. This way, the layers, especially when padding or outlining is involved, sit on top of previous layers and help to give dimension to the overall piece. ~MC
G’day Mary, I’m especially enjoying this and is looking wonderful.
Am glad I gave granddaughter embroidery items for her 4th birthday. She’s just loving it. Running stitch just yet and is getting them smaller and neater with each session. At first she scoop stitched rather awkwardly, but then started stab stitching so was glad I included a hoop. Once I set that up she really got the hang of it. I thread the needle etc, but she’s very independent with the stitching, including sewing on buttons like a pro! Nice bright coloured, interesting shaped buttons which I included. Also a good quality pair of scissors that are like little shears. She loves using them. Cuts scrap fabric into smaller and smaller pieces and puts them in a jar! The fabric is a soft drill with large, bright coloured flower shapes, a bit like the outer shape of the flower in your rose. I have her running stitch inside the outline, or where ever she decides to go, and she sews buttons in the middle, or anywhere her fancy takes her too! I’m very mindful of not discouraging her from freeform. Two things stand out. The last stitching time she was singing to herself, and didn’t know it, while she stitched. “Was I” she said. The other was her saying “I’m so proud of myself for doing this knitting” !! The other grandmother is a knitter. Only about 10 – 15 mins sessions just yet with her current attention span and hope her mum will keep it up now I’m back home. One day she’ll be following your blog : )
That’s great, Kath! Sounds like she’s having a lot of fun and enjoying herself! I love it when kids sing to themselves when they’re doing something. It generally shows they are free from frustration! ~MC
HI Mary
I like the new improved small leaves much better. So two colours of red for the petals that you have done so far, correct? The stem stitch outline and outer part of the petals are in 4624 and the rest in 945. Please correct me if I am wrong. I haven’t started the flowers yet but picking out red is my least favourite of all things embroidery. 🙂 Yours is looking great so far. Thank you again for sharing this with us.
Yes, that’s correct, JT!
Fascinating. Thanks for showing us. I was especially interested in the way you put the directional stitches first in your long and short stitch. I could have used that information when I was embroidering flowers last year.
Dear Mary
The Mission Rose is looking great. I love the change to a lighter green much better and blends in really well. I miss long and short stitch as my current Guardian Angel project is all split stitch it is getting a bit boring and I keep thinking of different ideas for my next project. Can’t wait to see the progress on this.
Regards Anita Simmance
It looks fabulous! I like the new leaves.
I wanted to follow along with you and do this project too, but I’m afraid to start! I have the silk floss and suitable fabric. I’ve printed the design from your site (it looks so much smaller than from your updates!), I need to copy the design to the fabric and start, I guess and I’m nervous. Really, really, nervous! Any words of wisdom?
Hi, Valerie – Well, I’m not sure if they’re words of wisdom (I haven’t earned that status yet – my hair’s not grey!), but, for what it’s worth: just start! Every single project you do is a stepping stone, and you’re not going to cross the creek without stepping on the first stone. And really, what’s to be afraid of? Look at all the mistakes / re-do’s I’ve done on this thing, and it’s no worse for wear. Just think of it as a journey, and take the first step! You can always ask questions – I’ll help you as much as I can from a distance. And if you stay a couple steps behind me, then I’ll make all the mistakes for you in advance, I promise!
Do you have good stretcher bars or a frame to mount the piece on while you’re working? Take the set-up slowly and carefully, and then everything else will be just a matter of taking one step at a time.
Another thing – often that first part of setting up tends to loom like an unsurmountable, dark mountain ahead. If you just make yourself do the set-up part, I bet you’ll be really eager to start stitching once it’s set up!
~MC
Ah yes, very nice leaves. I like these much more but if it was up to me, I wouldn’t have known how to change them to improve them. But you always know what to do. The rose petals are so rich looking, I want to touch them.
The new green leaves look so much better. I really appreciate the way you divided the long and short stitches. Mine always look so choppy and now I have a new way to think about how to do this stitch. I’m looking forward to seeing the middle with the pinks added in.
Hi Mary –
I really enjoy following your projects and I’ve learned many tips that have improved my work and in many way made it easier. With this latest post, I’m curious why the little dots are appearing on your petals as you work them. I think they are just from anchoring your threads, but I wondered if maybe you putting in small guiding points. BTW – I love the idea of guide lines for the long and short stitch – mine will come out so much better in the future. Thanks, Laurel
Hi, Laurel – The little dots are where I start and end my threads. They’re little stab stitches. If you start on the top with a knot in your thread and then take a few little stab stitches, you can then cut the knot and the thread will be secure. It’s a great way to start and end threads securely, without having to flip your frame all the time. As long as you’re doing it in a spot that will be covered with embroidery….!
Hi Mary,
I really like the way the colors are coming together on this project. I’ve noticed in the photos several small ‘dots’ (a tiny stitch)of color. Are these just places where you’ve done a stitch while changing needle direction? Forgive my ignorance, I haven’t worked with silk thread . . .
cg
che spettacolo mary!!!!!!!!
Dear Mary,
congratulations on the solution with your inset leaves quandry. The really do look lovely now. The rose is beginning to take shape and the reds look so rich and vibrant. Can’t wait until the next post.
Do you have anything going into the needlework exhibition coming up in London later this year? I will keep an eye open in case. Maybe send you some pictures if I can.
Thank you for your inspiration,
Michael
felicidades, su labor quedo maravillosa y con el paso a paso se detallo cada puntado al detalle, gracias.