


Over the past month, some of the questions I’ve been repeatedly sorting out of ye olde inbox concern embroidery hoops and frames.
I figure that if five or six people are asking the same questions, then there are plenty of others out there who are wondering, but not asking. So today, here’s a little Hoop Talk for you!
For beginners who are just getting into embroidery, I want to emphasize that here’s nothing at all wrong with starting out with the Susan Bates plastic hoops that you can find at most craft and hobby stores. These are great for beginners, and I use them all the time when teaching kids and adults alike, because they are affordable and they do the initial job.
But after a while, you’ll probably hit a point where you want a Really Good Hoop.
I’ve already written an article about what makes an embroidery hoop good, so if you’re wondering about good hoops, you might check that out.
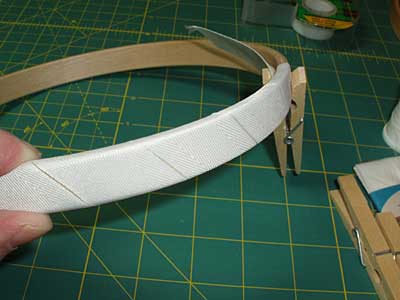
Once you have a good hoop, it is really helpful to bind at least the inner ring of the embroidery hoop. So here’s a tutorial for binding an embroidery hoop, along with a discussion on the advantages of binding a hoop.
If you want to bind both rings, here’s a tutorial for binding both rings of an embroidery hoop.
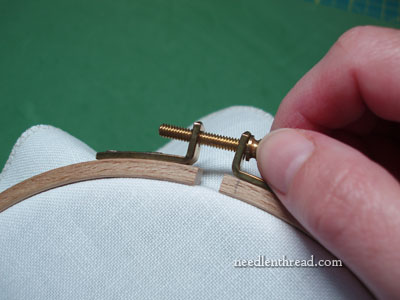
Once you’ve bound a ring, you’ll want to set up your hoop with your fabric and start stitching! So here’s a tutorial on setting up an embroidery hoop. Be sure to check out the comments below that article – there are some good tips in there from experienced stitchers.
When I first started Needle ‘n Thread back in June of 2006, I wrote an article on embroidery hoops and frames, which has since been updated, so you can find a little more reading material there about different hoops and frames and their advantages and disadvantages. It’s not exhaustive, but it covers quite a few different options and in it, I discuss the question of when to use a hoop vs. when to use a frame.
Throughout all those articles linked to above, you’ll also find recommendations for different types of frames, as well as resources on where to find good hoops and different types of good frames.
I was really excited that, of the six emails I received asking about hoops, all of them were from embroiderers who are playing with monograms! So, six different people, from scattered parts of the globe, all working on monograms…I just think that’s dandy! I’m glad I’m not the only one currently immersed in them!
Don’t forget the give-away that’s going on this week for a spot and kit for Tanja Berlin’s Pansy Needlepainting class. If you haven’t signed up yet, you have until early next Monday morning to get in on it!
Time to fly to the workroom – I have an old book to photograph for you, and some serious stitching to make headway on today. More on that later this week.
If you have any questions, input, or suggestions about hoops, frames, and the like, feel free to leave a comment below!
Good Morning Mary! As always, thanks for sharing your knowledge. Binding a hoop really improves performance & I was surprised to see hoops bound with bias-cut strips of muslin when I attended classes at RSN. In fact, they were not sewn, just tied on. Quick & simple. Hardwicke Manor hoops are worth the investment, not only because of the smooth wood & countersunk hardware rivets. Their thumb screw tightening mechanism has a screwdriver slot at the end, making it much easier to regulate the tension. Once your thumbs give out, you can still make adjustments. Usual disclaimers, just a satisfied customer.
Hello Mary
When I began to learn embroidery, years ago, my teacher said me that I MUST put the ribbon on the two rings, and be carefull to go round to the ends of the external ring and wrap them very carefully since the embroidery or (and) the material will be damaged. And when the ribbon is soiled, I have to change it.
Have a nice day.
Dear Mary
I’ve read all the related articles you have written on hoops and very helpful they are, I’ve bound my Hardewicke Manor hoop and it has helped to tighten my fabric for embroidery. I agree that Hardwicke Hoops are superior to ordinary hoops as I have experience when I tightened a hoop on my cheap hoop with my screwdriver the bracket fell off, I was not impressed still you pay the price for cheap products. Thanks for the articles on hoops and frames, I’ve just recently finished a monogram which I really enjoyed doing. I hope the photography goes well and you are able to get down to some serious stitching.
Regards Anita Simmance
Mary, I love your blog! It’s so well written, so well researched, charming and very informative!! I always look forward to it. Thank you!
Just returning to embroidery after a long absence, I only have the plastic and old metal/cork hoops. I am so glad that others asked this question because I’ve seen your hoops in photos and wondered where they came from! Thanks so much for the links to finding the info. Very helpful in my busy world. PS – I am recently smitten with monograms, especially whitework but have no clue what to put them on?
Hi Mary–I gotta say that I LOVE the Susan Bates hoops. I’ve been using them for years, and when they are used properly, I can get the fabric as tight in them as I can with a bound wooden hoop. The key is that they must be put together correctly; there’s a lip on the inner hoop that fits under the fabric when the two hoops are put together. Many people think the lip goes on the bottom, but it’s the key to getting the fabric drum tight.
I bought one of those expensive wooden hoops years ago at a seminar, but I don’t think it’s any better than the Susan Bates hoops. I think I’ve used it twice. Plus I love that the SB hoops are cheap and come in boatloads of sizes. PLUS, if they get dirty I can wash them. I can’t put my wooden hoops in the dishwasher.
One thing you forgot to mention that is you should take the embroidery out of the hoop when you are done stitching for the day, regardless of what kind of hoop you use.
Thanks for all your great needlework knowledge!
Carol S.
I agree about the Susan Bates hoops. I’ve had some handsome wooden hoops, but none can compare with the Susan Bates for price and functionality. I can get my ground fabric tight enough to play timpani solo.
Regards,
Doreen from Maine.
Hi Mary,
I look forward to your new posts ever since I found your blog last January. I really appreciate all the information you go over. I’m just beginning in embroidery. Thank you!
Two hoops on one project, that makes me smile.
I have preferred the HM wood hoop since I was introduced to them a few years ago. Especially since I have had no trouble with hoop marks. Love those rounded edges and the increased depth of the larger hoops.
I use Susan Bates hoops as well, they really can get the fabric drum tight for any kind of embroidery. But I love my wooden sit upon hoops! These are the somewhat thick wooden hoops like the ones shown in your photos, but I don’t know the brand off hand. I bought one from Wendy Schoen and the other from Tristan Brooks. The best thing about them is that they are hands free! Using two hands is so much easier and your hands don’t get tired as quickly as when using a non sit-upon hoop. Since I usually use fabric that is large and the hoop marks will be cut away, I can leave the fabric in the hoops for weeks at a time. I love your equipment articles. Well, let me amend that, I love all your articles!
Hi Mary, what is the best thing to use for crewel embroidery – its a 15 inch x 15 inch project – Appleton threads on Linen Twill. Will the hoop damage the area already embroidered when its moved around.
Thanks
Mary….each morning I look for your blog before any other mail. I was so excited yesterday to do a ‘first’ for me. I freehand embroidered zinnias with lovely french knots and used the fly stitch I learned last week. Staggering shades of russet and purple with the yellow french knots….I am SO PLEASED. This is part of a plaque I made for grandaughter, For the name, I cut a Stencil with an hot tip stencil cutter with her name and ‘God loves you’. Being that her name is unusual, this is the personal part of the gift. The flowers decorate the base and I will frame it in a wooden embroidery hoop, of which I found many for 50 cents a piece. Painted the hoop to match the stenciled printing. I am so excited about this craft, and so happy not to do ‘tea towels’…..moving along to much more creativity. Thanks Mary for the interesting, encouraging, and amazing format for this art form.
Two questions –
Can fabric (either side of embroidery fabric) with circular cut-outs substitute for binding a frame?
What do you think of the Q-snap frames?
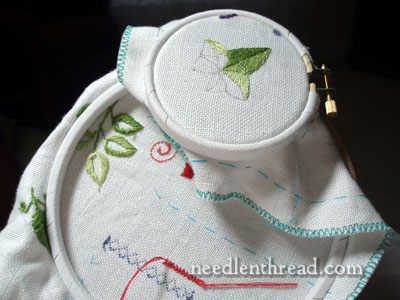
I have a really stupid question. In the first picture of this email there is a project using 2 hoops. Does one serve the immediate work surface and larger one for excess fabric.
Thanks
Hi, Pat – Oh, no – not a stupid question! The reason I have two hoops on that project is because I was going back and forth between the larger area, where I was embroidering one thing, and the smaller area, where I was demonstrating something else. So, two hoops! Normally, I wouldn’t have two hoops on the fabric at once, but there’s really no rule that says you can’t! 🙂
Dear Mary
I am looking for information on how to mount ground fabric and backing fabric in a hoop. If it is on your website, I have not been able to find it.
Will you help, please?
Sharon
Hi, Sharon –
To mount ground fabric backed with something else in a hoop, make sure both fabrics are aligned on the grain of the fabric. You can baste them together around the design area if you wish – this will hold them together – and then you mount them as you would just ground fabric. Make sure when you mount them that they are both equally taut – no buckles or wrinkles in the backing fabric. The key, though, is just to make sure they’re lined up on the grain. Once you start stitching through both, the stitches will do the work. -MC
Hello could you please help me?
Where should I put my embroidery hoop when I am embroidery ?
Inside my embroidery to the center,left or where? Is there any Right way to place
It over my working place to embroidery?
Tks for your help
Hi, Beatriz – if it fits over your whole design, center the design in it. If not, just move it around wherever you want to work on your design.
Mary would you bind the inner ring of a Hardwicke lap hoop.
Yes, I would. I have one that’s bound, so if I use the sit-on hoop stand, I always go back to using that particular hoop. You have to manipulate the cotton twill tape around the hardware where the stick and hoop join, so there might end up being a little miss or warble in the covering. I think it really helps with keeping good fabric tension.