


Playing around with shisha embroidery stitches can be somewhat addicting! This is what happens: when I’m in the middle of one method, a potential variation occurs to me, and I have to try it.
That’s how this particular variation came about. I don’t think you’ll find this one in a book – it was one of those “make it up as you go and hope it works out” approaches. That being said, there really are very few “original” stitches out there. Most stitches are made up of components of known stitches, and this one is no exception!
What I did here is combine various elements:
1. I used the foundations stitches from the original shisha stitch we looked at.
2. The first movement of the decorative part of the stitch is the same used in both the original shisha stitch and first shisha variation – it’s the buttonhole-like stitch passing around the foundation stitches.
3. From the buttonhole-like stitch that passes around the foundations, I branched into a fly stitch, overlapping each fly stitch with the one before.
4. And finally, I added a ribbed spider web wrapping that holds together the overlapping intersections.
Sound confusing? Well…. let’s work through it together!
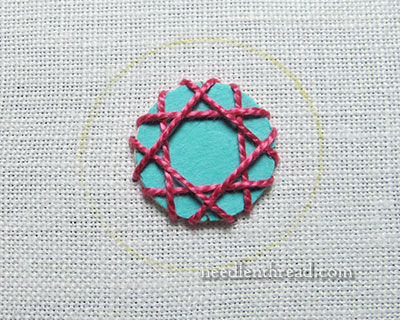
Start with the same foundation used in the original shisha stitch tutorial.
It’s important that your foundation thread and the decorative stitch thread (for the “flower” looking part of the stitch) are the same color, since small irregular gaps do occur and the foundation stitches are visible through these gaps.
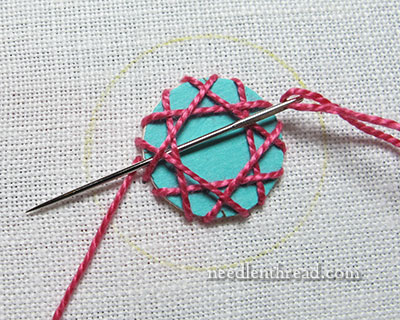
Bring your needle and thread to the front, next to the edge of the mirror, and then pass the needle underneath the foundation stitches, keeping the working thread pulled downwards towards you, so the needle passes over the working thread.
This is the same first movement illustrated in the original shisha stitch tutorial and in the tutorial for the first shisha variation.
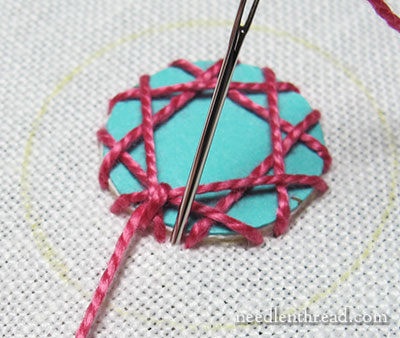
Keep ahold of the working thread so that you don’t pull it all the way through, and take the needle down into the fabric right next to the mirror’s edge, about 3/8″ – 1/4″ away from where the needle first emerged from the fabric.
This establishes the width of the open part of the first fly stitch.
Pull through, but keeping holding the working thread to leave a loop on the top of the fabric.
As long as you keep ahold of the working thread at this point, you’ll maintain tension on the foundation stitches, which is also important.
Come up inside the loop of the working thread, on your outside perimeter for the decorative stitch.
I’ve marked the outside perimeter with a yellow line, so that you can see where I’m coming up. Marking a perimeter is helpful at first, until you get used to working stitches of a consistent length.
Anchor the stitch on the outside perimeter by taking a little stitch over it, just as you would with a regular fly stitch or a chain stitch.
That completes the first stitch.
For the second stitch, bring the needle and thread to the front, next to the mirror’s edge, in the middle of the two “arms” created by the previous fly stitch.
Take the thread around the foundation stitches, with the needle coming out over the working thread as usual.
Leaving a loop of working thread on the top of the fabric for the fly stitch, take the needle down into the fabric a short distance away from the right “arm” of the previous fly stitch, about half the distance away from it.
What you want to accomplish is overlapping fly stitches of approximately the same size. If your first fly stitch was 1/4″ wide at the top (next to the mirror), and you’ve started this second fly stitch in the middle of that first one, then you have to end this second fly stitch about 1/8″ past the end of the previous fly stitch.
Bring the needle up inside the loop of the working thread to finish the fly stitch…
…and anchor the stitch.
Thus ends the second stitch.
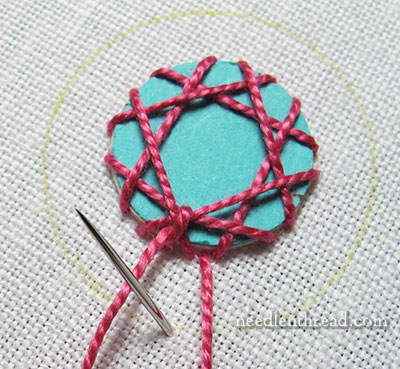
When you begin the third stitch – and all subsequent stitches are done exactly the same way – bring the needle up next to the end of the first fly stitch, which is not the one you just completed, but the one before that. And the stitch continues as before.
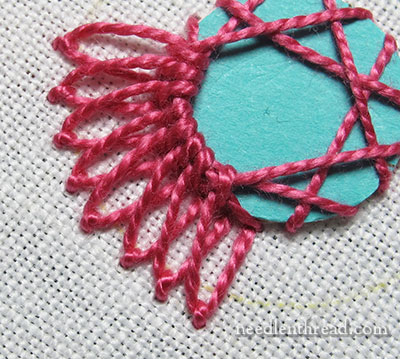
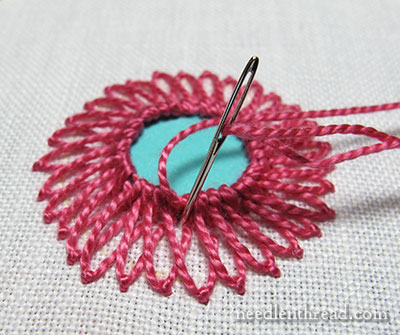
Work all the way around the mirror, overlapping the fly stitches. Don’t forget to work the “wrapping” movement around the foundation stitches before moving into the fly stitch part!
Try to fan the stitches out, so that they all keep the same angle. This takes a little doing. It gets easier after the first attempt.
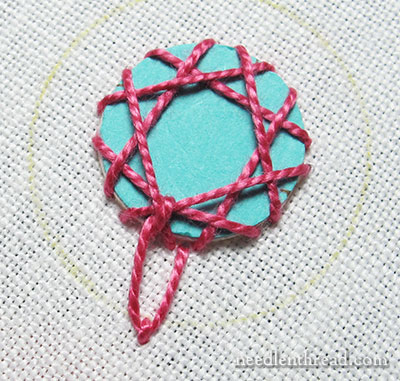
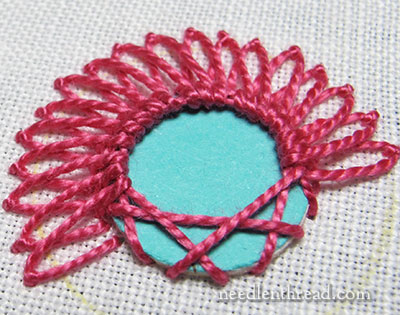
As you approach the beginning again, you’ll need to gauge where you stitches go, so that you don’t crowd too many in at the end, but also so that you don’t leave a noticeable gap.
To finish the whole circle off correctly, the right side of the last fly stitch needs to enter the fabric underneath the very first fly stitch, so angle the needle sideways to enter the fabric underneath that first stitch.
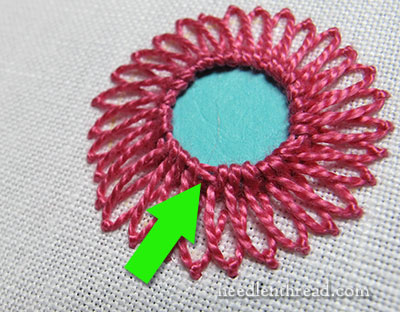
Because the stitches are widely spaced, you’ll experience a few small gaps in the wrapping on the foundation stitches on top of the mirror. These little gaps are not really noticeable if your foundation thread is the same color.
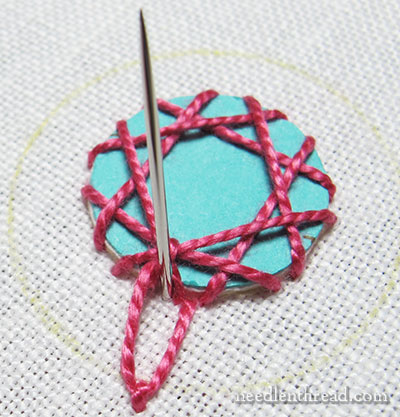
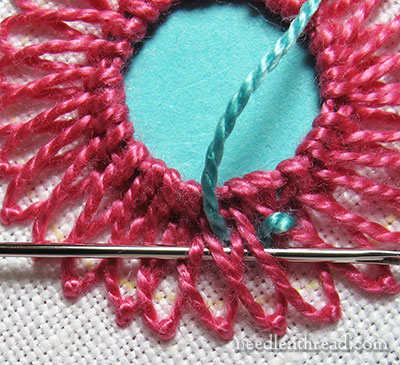
However, after taking your last fly stitch, you’ll end up with a larger than normal gap on the foundation stitches.
I’ve zoomed in on the gap, so you can see it better. It’s about the width of two stitches. So we need to cover that.
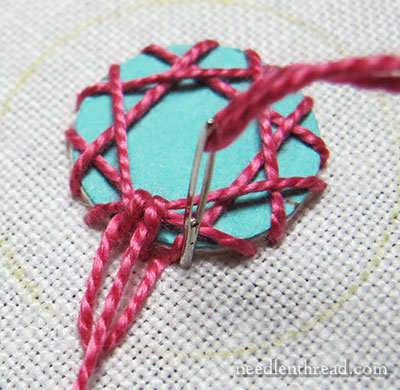
And it’s very simple to do so. Just bring your needle and thread to the front of the fabric just on the edge of the mirror, next to the gap. You’ll be inside some of the fly stitches.
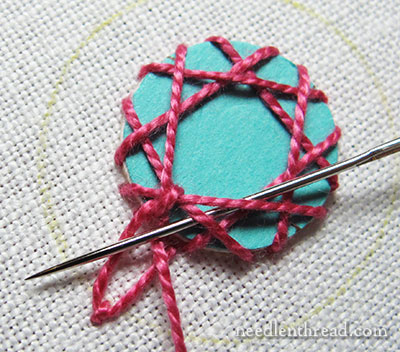
Wrap the thread around the foundation stitches as your normally would – this is the same as the first movement of all the shisha stitches we’ve seen so far – keeping the working thread below the needle and making sure you don’t snag any of the fly stitches.
Then take the needle straight back down into the fabric, to end the thread.
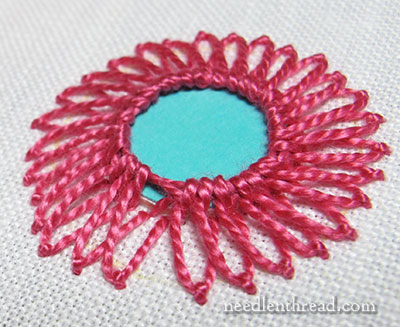
So, what you see here is that the last stitch that you take is not actually the fly stitch in this variation – it’s the wrapping stitch that goes around the foundation.
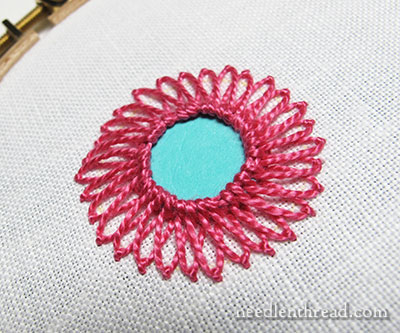
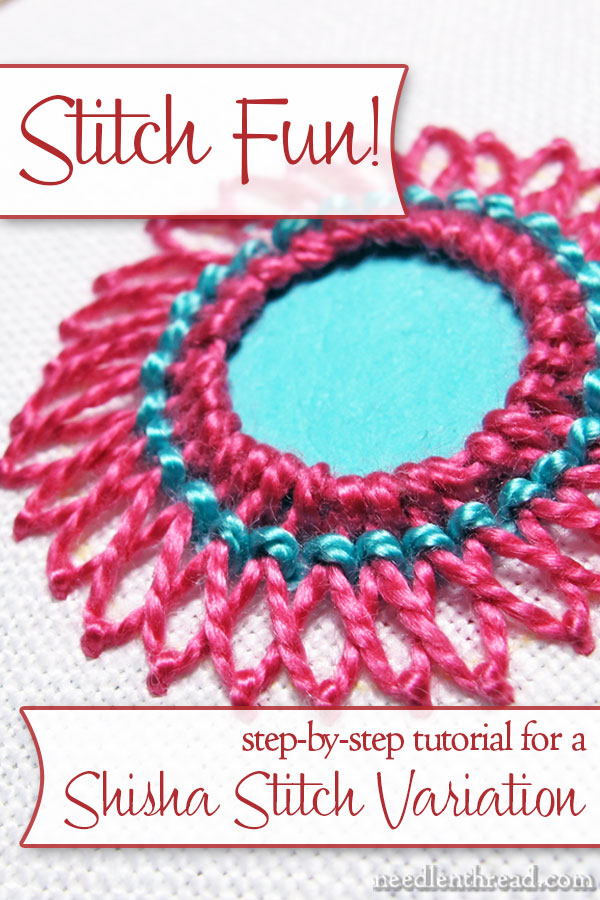
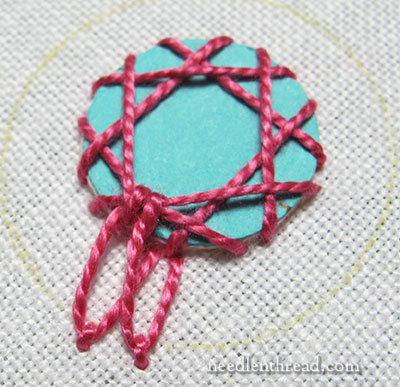
You could leave the element like this and not go any farther with it, if you wanted. It would make a nice sun burst or large flower element, as is.
But I liked the effect of a contrasting color of whipped spider web stitches around the inside, to anchor the overlapping fly stitches and to add a bit of interest. So let’s see how to do that…
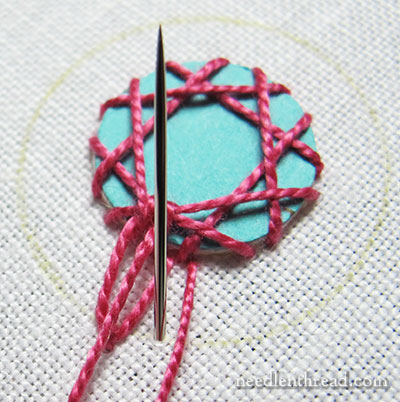
Thread a blunt tapestry needle with a contrasting color.
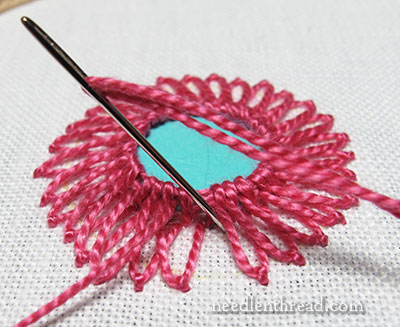
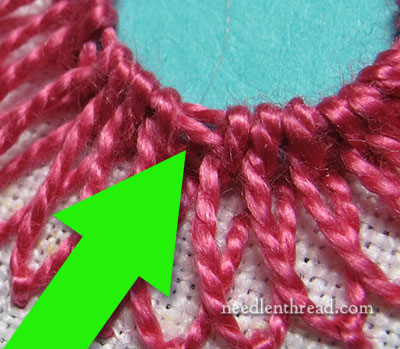
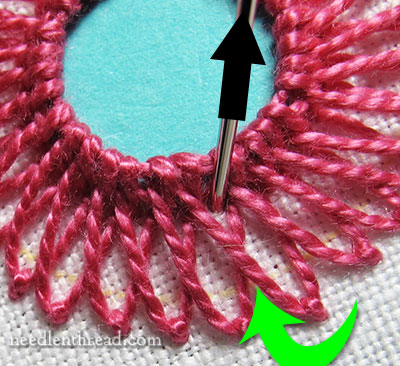
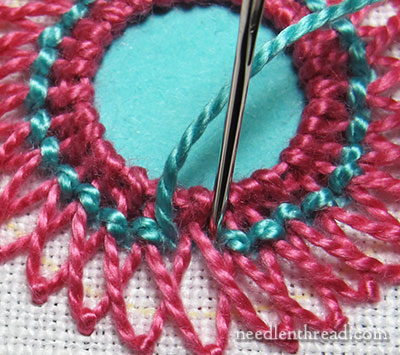
Bring the tapestry needle and thread to the front of the fabric, next to the mirror’s edge and above the “X” formed by two overlapping fly stitches. The green arrow in the photo above points to the “X”.
It’s really important to start this part of the stitch in the right place. As long as you start in the right place, the wrapping stitches will maintain the woven-overlap look. But if you start in the wrong place, the wrapping stitches will separate the fly stitches, and you’ll end up with open, regular fly stitches that don’t overlap.
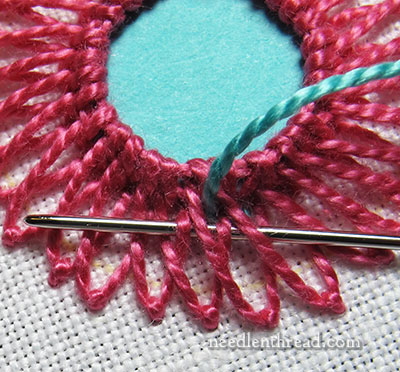
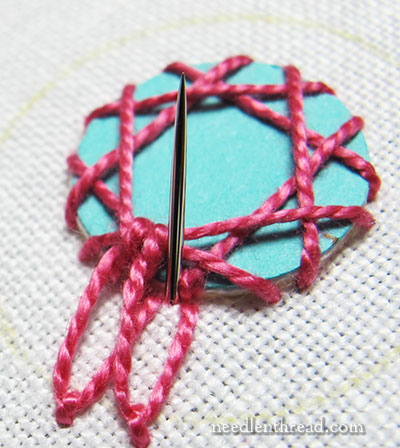
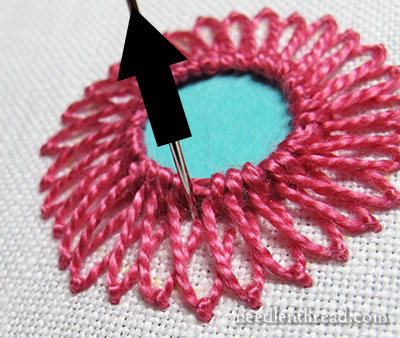
Now, once you’ve come up in the right place – above the “X” marking the overlap – take the needle back (to the right) over two threads from your starting point, and then moving forward (to the left) under four threads, so that you’re going two threads past your starting point.
It may help to watch the ribbed spider web video, if you’ve never done this type of ribbed wrapping of stitches.
Just remember that, to maintain the overlap of the fly stitches, you have to go back over two, and forward under four for each wrapping.
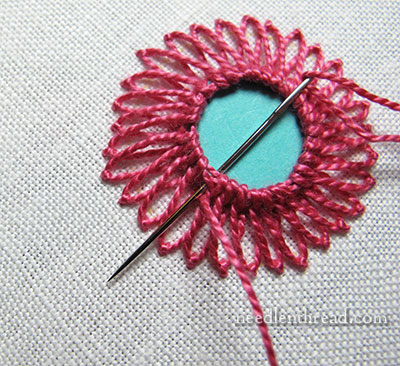
So, above, you can see that the first wrapping stitch is worked (in turquoise) and now the needle has gone back over two threads and is moving forward under four for the next wrapping stitch.
When you get to the last two threads that need to be wrapped, just take your needle down into the fabric over the last two threads.
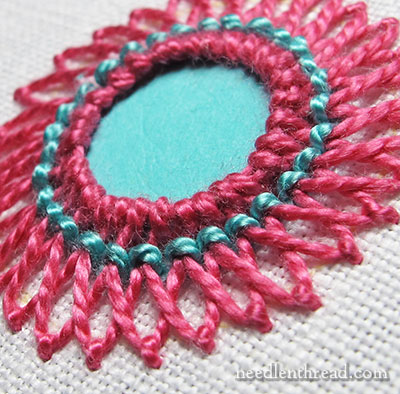
There! An overlapping-fly-stitch-ribbed-shisha!
It might seem a little complex when reading through this whole tutorial, but once you sit down and work through it, you’ll find that it’s not too difficult.
I’m still fiddling about with other variations, which I’ll share down the road. I might have to put together a whole shisha sampler at this rate!
Hope you enjoy working this one as much as I did!
Stitch Fun is a series of embroidery stitch tutorials here on Needle ‘n Thread, where we explore combinations and variations of embroidery stitches, as well as more obscure and complex stitches. If you’d like to see all the tutorials in the Stitch Fun Series, drop by the Stitch Fun Index, where they’re all listed and linked up.
Bonjour Mary,
I ordered shisha mirrors from the US last week and I am just waiting to play with them.
This last tutorial is just beautiful, I really like the look of a flower. Thanks Mary, your are really great.
France from Canada.
I cannot wait to try this.
I love it! It looks great! Thanks for posting!
This is soo pretty! Now to go get some mirrors & think up a project. Thank you
This is beautiful. I already made the first one and I will definitely make this too. thanks Mary.
That’s a cool stitch, Mary. Thanks.
I’m really enjoying this mini-series, and this variation is especially gorgeous! I love how it looks like a flower 🙂 Thanks so much for the wonderful tutorial, I can’t wait to try this! I bought some shisha mirrors after your review 😉
wow! I love your tutorials…step by step…it all gets done – 😀
Dear Mary
I’ve been away this weekend to Dorset it was lovely but missed your post on Shisha. I love this it’s beautiful and thanks so much for your detailed tutorial on this interesting stitch it looks lovely and not to complicated. I was practising Tambour the other day and using silk thread but it kept getting stuck passing through the linen perhaps silk is not the best thread to use I’m going to try some other thread next time. Anyway the Shisha looks lovely thanks for sharing this with us.
Regards Anita Simmance
Oh I love this variation so so much!!! Thank you for sharing and thank your Muse for revealing it in the first place!!
Have you ever tried this on anything non-circular? I’m putting little oval portraits on a crazy quilt and embroidering “frames” around each one, covering the edge and securing them in this way. This looks like it would work. Not super experienced (just enthusiastic). Not sure how the first step should be adapted as they are much larger than the little mirrors – about 2″ long and 1.5 ” wide.
thanks for any ideas you may have.
Wonderfulllllll………….
Super and very useful
Hi Mary,
I know thus us an older tutorial but I so appreciate your teach8 ng these shisha variations. I’m also hoping you will let us know what kind of thread you are using in this tutorial? I made my 1st one and while I love it, it doesn’t quite look like yours. I’m wondering if it’s the thread I used. I am using a DMC 6-ply. Is that what you were using as well?
Hi, Kimberly – I actually used a #5 perle cotton for this variation. I like the way perle cottons work with shisha, and since they’re twisted and non-divisible (you don’t take them apart like you do stranded cotton), they work up easily and quickly.
Amo tudo que você faz. É pura alegria, inspiração, poesia . É um dom maravilhoso.