


My first finish in 2014 will be the Mission Rose project – the End is Coming Very Soon!
The Mission Rose is a goldwork & silk embroidery project that I started in the spring of 2013 and have developed step-by-step here on Needle ‘n Thread. If you want to follow the project from beginning to end, you’ll find all the articles relating to it listed in chronological order on the Mission Rose Index page.
I hesitated writing this “in between” article – between my last update and the official finish. But there are a few little musings and tips I want to share.
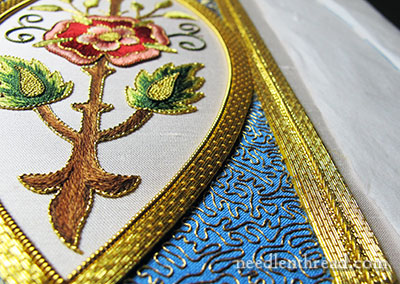
At this point, all the gold on the outer and inner goldwork frames is finished.
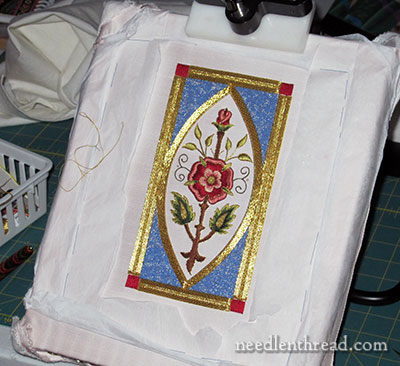
In the photo above, you can see the piece from a little farther away, giving a better perspective on size.
A few readers asked why I started from the outside of the outer frame and worked both sides towards the middle, finishing with the middle.
In most cases, it makes more sense when covering with couched passing threads to start at the middle of a section and work out, especially when working around curves or any shape you’re filling that changes in size. You’d work the center, pretty much where the longest consistent line through the shape runs, and then work out to the sides, ending the threads as you come into contact with the edge of the design. In this way, you get a solid covering of gold that is usually a lot neater, and that gradually and smoothly finishes along the edge of the shape.
I did originally begin working from the center out on the large outer frame, but after putting in two lines of gold on the first side, I picked them out and decided instead to start from the outside and work into the middle.
The main reason for this is because I found the area where the inner frame runs into the outer frame a bit tricky, and I wanted to work that area first, to make sure it was going to “work.”
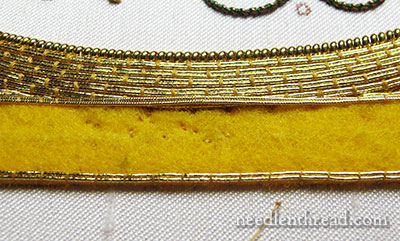
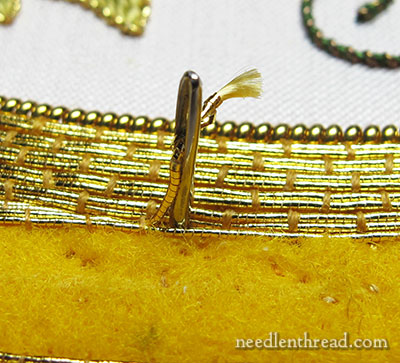
In the photo directly above, you can see where the curved inner frame is running into the straight outer frame. To tackle this are and keep my frame threads running exactly in line, I decided not to cut the passing threads when I arrived at the curved edge of the inner frame, but instead, to extend the passing thread over the curved inner frame (without couching it). Then, I picked up the couching again on the other side of the curved inner frame.
Once the whole line was couched, I went back and snipped the center of that uncouched area, and plunged the threads next to the curve of the inner frame.
In the photo above, only one thread of the pair that I was couching on the outer frame was broken by the curve of the inner frame. So I continued couching the one thread in the pair along the edge of the inner frame, leaving some extra on the other thread in the pair, so that I would have enough of a tail to plunge and finish.
It all sounds confusing, I know… and in some regards, while I was working on it, it was confusing!
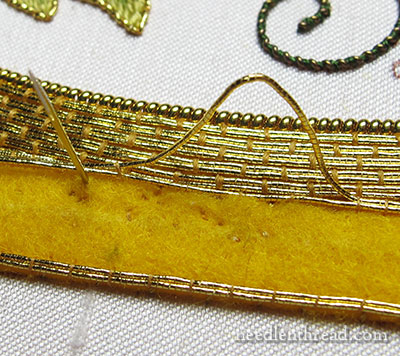
You can see here where I went back to plunge the small tails where the passing thread on the other frame crossed over the curved inner frame.
In this case, I used a needle to plunge, but in several instances, I found it easier to use a plunging lasso. You can read about how to make your own plunging lasso here, and how to use it.
When plunging in a space like this, there’s a bit of displacement that might go on with the gold threads in the surrounding area. That’s what a mellore is for. A mellore is a goldwork tool that is very useful for nudging goldwork threads back into place and smoothing them out again. You can read all about what you can do with a mellore and whether or not it’s absolutely necessary here.
Once all the goldwork in a given area is finished, I go back over the area, using the mellore to re-situate threads that may have been displaced by plunging and pulling and whatnot.
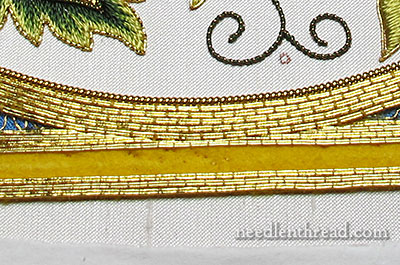
Here’s the area where the two frames meet, with the outer frame still incomplete.
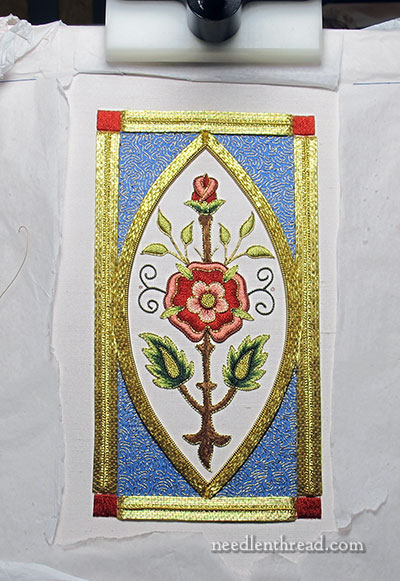
And here’s another photo (in bad lighting!) with both the frames finished.
The last steps of the project will be worked in this order:
First, I’ll outline the inner frame all around, including where it meets the outer frame.
Then, I’ll outline the outside of the outer frame.
Then, I’ll outline the inside of the outer frame, tackling the edges of the corners at the same time. This is the only tricky part left.
And finally, I’ll finish the corner treatments after all the gold is on. The corners will not be just red like you see now – there’s a little decoration going in there.
Luckily, those frame outlines are all relatively large goldwork threads that go on fairly quickly, so I’ll have a finish for you pretty soon!
I can’t wait to finish the Mission Rose. I have The Itch to move on to other projects and I need to get ‘er done! My final plan for the Mission Rose, for all those who have asked, is to frame and hang it. Believe it or not, I don’t have any of my own embroidery in my house. So I think I’ll be keeping this one for a change.
Once the Mission Rose if finished, I’ll be moving on to the project I mentioned in this article / book review, which will be geared towards beginners and beyond. I have all kinds of ideas floating around in my head for it, and I’m looking forward to working those out with you!
Fascinating! I’m looking forward to the final reveal.
Dear Mary
It looks absolutely stunning, beautiful and I don’t blame you for keeping it to yourself. That is some plunging you had to do it must have been very difficult to plunge in the middle of the goldowork. It makes sense to start from the centre and work out towards the outer frames I must remember that when I next add gold to my project. Just one question would you say it was better to use felt when using passing gold as opposed to adding gold straight onto the fabric, it’s just that when I added goldwork on one of my projects straight onto the fabric it buckled and I wondered if it was because there was no support. Thanks for sharing this it looks lovely, can’t wait to see the completed piece.
Regards Anita Simmance
Hi, Anita – you can do it either way. The felt serves two purposes – it raises the gold work, and it also eliminates being able to see any bits of the ground fabric between the gold threads. The yellow felt blends with the gold and makes the whole thing look quite solid, even if there are some tiny spaces.
But one thing I always do with gold work, unless I’m working on a very sturdy linen ground (a medium or heavy weight linen) and only doing a little bit of gold, is line the ground fabric with another fabric, usually a cotton muslin (calico) or sometimes linen, depending on the ground fabric. For example, with this project, the ground is silk dupioni, which is a relatively lightweight silk. It would not stand up well to this much gold work and silk embroidery. So I framed up a piece of linen with the silk on top of it, and worked the whole project through both layers. The linen supports the Goldwork and the silk embroidery on the silk ground and makes the whole piece sturdier.
Hope that helps!
Hi Mary
Thanks for your speedy reply Mary this is very helpful I’ll remember this in my future projects.
Thanks
Regards Anita Simmance
Mary, as usual your work is so exquisite! It is definitely ‘eye candy’ for those of us who appreciate art, skill, quality of materials, and dedication. I just get a warm tummy feeling looking at Mission Rose and knowing that the art form will be living long after we are all ‘dust to dust.’
Will this piece have a commissioned home or is it ‘just’ a project? Just curious.
Lynn
Hi, Lynn – as I mentioned above, I will probably frame it and keep it. I don’t really have any of my own embroidery in my house, so this one will most likely find a home right here. – MC
Dear Mary,
Your work is so beautiful. I read your blog everyday–sometimes twice. At the time, I am well versed in counted cross stitch and a few fancy stitches, but I have never done embroidery, per se. I am looking forward to your next project, but I have one big question–What will I need to follow along with you? Will I need to buy the book, or what supplies do I need to have?
Thank you for having such a great website and for your willingness to share all you know about embroidery and needlework with others.
Hi, Nick – thanks for your comment! So glad you enjoy Needle ‘n Thread!
For the next project, you’ll need to buy the book if you’re planning on following along and working the project, because that’s where the design is. You can always apply the concepts in the project to a different design, if you don’t want the book. That’s the nice thing about embroidery – most techniques used to embroidery in any one will translate into other designs quite easily.
Because the step-by-step projects on Needle ‘n Thread develop along with my work, I don’t generally publish a complete list of supplies before the project begins. I usually mention the fabric I’m using and the first round of threads I pick out, and then, as I make changes along the way – adding or subtracting colors or thread types and the like – I show those changes, too. If you’re keen to create the same exact project, then it usually works out a little better to wait until the project is well underway before purchasing or ordering supplies. But if you are comfortable with “messing around” with me through the project, then you can always start off with the basics and then add and subtract along the way. Or you can substitute your own threads and so forth – you don’t have to work the project the same way I do it. And that’s part of the fun of the whole adventure, I think – seeing what other people do!
Hope that helps!
It’s an absolutely gorgeous piece and I’ve enjoyed following it’s progress. It’s totally beyond my skill set, but I marvel at all the thought that went into it’s creation. I’m surprised you don’t have any of your work in your house. I’d be interested in seeing how you label it as your creation, and how you frame it to protect it for generations to come.
G’day Mary,
This is awesome, as in awe-inspiring. Good on you, and beaut you’re planning to keep it. Look forward to seeing what you decide for the framing.
Cheers, Kath.
Hi Mary, Thanks for the update. I confess that when you first added the vermicelli on the blue corners, I wasn’t convinced. But now that the frames are (mostly) finished, I can see why you wanted to do it. And it’s all just so pretty. I can’t wait to see the final product.
It is lovely, just lovely!
Mrs. Corbet,
I just can’t wait to see the final thing! It’s so beautiful and shiny. But it’s goldwork, so of course it’s shiny! I like shiny :).
We started school again today.
Hi Mary,
This really has come together well. Are you planning to do anything with the dots near the tendrils?
Alex
Hi,Alex – yes, those will be covered when I do the corners….
That is amazing work! I also went back and read your article on the plunging lasso — I’ve been using a similar technique for tucking threads under in counted cross stitch. MUCH nicer not having to thread a needle, especially now that I’m using bifocals. 🙂
Looking gorgeous. Very interesting to read what you did and the meeting of the borders!
I have to say I was not a fan of the blue to begin with. Now that it is nearing the end I can say that the blue does look quite lovely now. It’s a stunning piece of work all around and I have enjoyed the process and your detailed explanation of it all!
Hi Mary, Your Mission Rose project looks wonderful – way beyond my skill level at this stage but certainly something for me to aim towards over the next few years. You mention that you will frame this project and I was just wondering if you frame your own work or send it off to a framer? I have a number of finished projects that need to be framed or “used” in some way and want to attempt to framing them myself. Tricky or ‘do-able’? Thanks again for your fabulous site and blog. Best wishes for 2014. Ros
For once, you will be pleased to know, I am totally gob-smacked. Speechless with admiration.
Once again Mary, your work delights the soul and uplifts the heart….wish i could do only half as well. although i do not claim to be anywhere near your skill or knowledge level i can appreciate good artwork when i see it…lol.
i also understand how you do not have much of your work in your own home. i’ve been doing stitching, knitting, crocheting, stained glass, and many other crafts for many many years (starting in my teens) and have very little of it in my home as i usually end up giving my work away and never see it again. Mission Rose is definitely one you should keep. It turned out gorgeous, of course!
I don’t know if you remember the etui I made for my dear friend using the tudor rose design. My friend passed away in November at age 96. Do you have any kind of suggestion as to how i would ask for the etui back from her family?
Hi, Sharyn – you might tell them you’d like to have it as a memento, to remember her by…?
Oh My gosh that looks amazing so far! I can’t wait to see the finished project! Thank to you I am getting in on the hand embroidery. I have found this project amazing and I would like to start something similar here soon. Thank you for the tips and tricks!
It is looking really wonderful, Mary! I can see that you are stealing your own thunder a little with the interim post, but I am glad to read about your solution with the borders. It is a very good idea to carry the thread across to keep it straight!
If you are only displaying one project at home, this is a good one to choose!
Just beautiful, Mary. What a gorgeous piece. Thank you for sharing the journey–it’s been both fun and inspirational to watch it develop over time. Definitely a project worth keeping for yourself!