


To all who offered sound advice on my stitching dilemma mentioned yesterday, many thanks!
I spent yesterday afternoon and early evening fiddling, and this is what I did. Not 100% sure of part of it, but let’s chat it up, anyway! And then I’ll show you what’s next in this grand adventure.
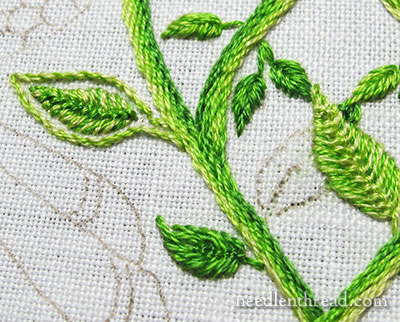
Here’s the background leaf, removed. I didn’t remove the tip, because it’s fine. It’s just some straight stitches in the dark green.
At this point, I hadn’t picked out the outline around the leaf on the side, but I did shortly after I took this photo.
Strangely enough, I was so engrossed in The Fix, that after this photo, I forgot to take any other photos along the way. When I unloaded my camera last night, I surprised myself with one photo, which is really weird, since I usually take 100 or more photos in two or three hours of stitching.
To remedy the situation, I made my way out to the work room in the wee hours to snap some “finish” shots. And that was no mean feat! I was in my PJs, the wind was howling something fierce, and the temperature – which was a balmy 70 earlier in the day – had dropped some 35 degrees. Bechilled, fingers blue, I made my way through the night to my abandoned cave where I do most of my work, flooded the place with lights, and took photos.
I just hope the neighbors weren’t peering through the windows…
But, back to The Fix!
I think the lower leaf looks better. It’s worked in fishbone stitch, with two strands of the medium-dark green.
The outlines, I worked in one strand of floss using a medium-dark green, in a tiny stem stitch. I like them better, but I’m still not sure I like them.
They are outlines. And outlines are supposed to be visible. And I like the outlines on the different leafy elements in the design. My plan at this point is to leave them and see how they look in context, when more of the design is finished. They’re no big deal to snip out and re-stitch.
When cropping a photo or taking a close-up so you can see the detail of the stitched elements, we lose the whole context of the piece. These leaves, for example, look relatively large, but in the scheme of the piece, this area is not large and the leaves are small – the largest being no longer than half an inch.
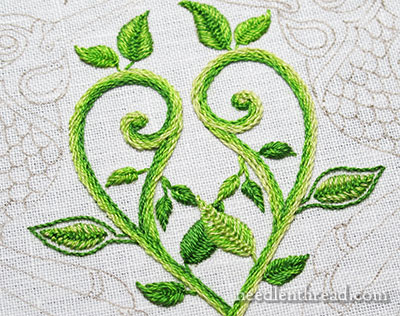
Speaking of large leaves, this is what we’re going to chat about next:

The Large Leaves at the base of the design.
This was the plan I had planned not to plan. I really hadn’t planned on using long & short stitch shading on this version of the project. But (there’s always a but) the fact is, I did. And I’ll tell you why and give you some detailed stitching tips when next we visit the project.
In the meantime, if you’re following along with this version of the Secret Garden project, and if long & short stitch shading intimidates you, I’ll offer some alternatives that can work, too. But I strongly encourage you to give long & short stitch shading a try.
It is a much more forgiving technique than people initially realize. And it does tend to add a certain Wow Factor to surface embroidery projects. It’s definitely a technique worth learning. To that end, I have a series of long & short stitch shading lessons here on Needle ‘n Thread, and you’re welcome to take a look at those to glean some tips for this type of shading.
If you’d like to follow along with the Secret Garden Hummingbirds project, which features a design from “Secret Garden: an Inky Treasure Hunt & Coloring Book” by Johanna Basford, you can find all the articles relating to this project arranged in chronological order in the Secret Garden Project Index. Among the articles, you’ll find plenty of tips and techniques that will help you with your own embroidery projects.
Hi Mary!
Love the big leaves!
I wouldn’t dwell too much on the outline of the leaves. I’m sure once you complete the green parts and move onto other colors it will cease bothering you. I know I often get fixated on something that I barely notice in the finished product!
Looking forward to more hummingbird posts!
Wow Mary! You are amazing! Fancy getting up in the night and going into the cold like that for us. What dedication!
I must say the leaves look better now you have re-done them. I wouldn’t be able to leave anything that I wasn’t happy with. I find my eye is naturally drawn to it and it annoys me more and more, so it is worth fixing it.
The lower leaves look sensational! I love them!
Thanks for your incredible commitment. You are a treasure. I hope you don’t get sick from sneaking out into the night.
I love the looks of the large leaves. I haven’t tried long and short stitch shading yet, but looking at how your leaves look, it makes me really want to master the technique.
The small leaf looks good. I thought it looked fine before, but the changes you did make it look better.
Mrs. Corbet,
Awwww, you went out in the cold and night just for us? You shouldn’t have ;). . .
Okay, now that you fixed the “wonky” leaf I must say that it does look better. I didn’t think it was All That Bad before, but now it’s just right.
Sarah =)
The Large Leaves look awesome!
I just started yesterday with my first try ever at long and short stitch shading. I was surprised at how good it looked for a first try. And I loved doing it.
I am very new to embroidery and found your blog packed with info, thank you so much for that, I love it. It helps me so much.
And I love your Secret Garden project, as soon as I feel a bit more experienced I will start my own version(I love the one with the owls in it).
The little leave looks much better and the outlines too. It is so nice you share everything with us.
I love those owls! I especially love the big one – can you imagine him with some truly vibrant colors instead of tans and browns? That whole book is a treasure trove of fantasy patterns which is a lovely break for me from whitework.
Good morning Mrs. Corebet. I have to say I’m completely amazed at how you so neatly managed to pick out the offending portions. I still make a bloody mess when I have to do it. I think the leaf looks absolutely fantastic! But I think I liked the outlines better in the lighter color for now. I know it’s still out of context with the entire whole, but right now they look more important than the leaves themselves. I find that jarring personally. Still, I’m absolutely certain that when all is said and done, the secret garden will be enchanting!
Now for the larger leaves, I assumed that eventually the larger spaces would be filled with at least some long and short stitch, (something I have NEVER done in my life) but I didn’t think that particular element was a group of leaves! :0
I thought it was a lotus flower. Feeling rather dumb at the moment.
It could be a flower! Just depends on how you interpret it. I have this vision of LOTS of springy green on mine, so that’s how I worked it. But you can definitely go flowery on that element. There are a couple other larger lead clusters on the design that would suit for flowery interpretations as well.
Or I could just be watching too much Bollywood and seeing Lotus motifs everywhere again! LOL It is gorgeous though. Did you stem stitch the darkest veins or is that just how the long and short stitch works?
Stem stitch, in dark brown….
Oh, thank you. Stem stitch is my very favorite stitch at the moment, thanks to your lovely videos. For once I don’t have a cursed lefty issue. Thank you for all your hard work.
I think the ‘outlined leaves’ look odd. What is the point of outlines around leaves. In the original ‘coloring book’ they were meant to be two different colors or patterns.
In my project, I would make different stitches in the outline, or maybe I would just make a bigger leaf.
Hi, Sally! In the original coloring book, are you sure they were meant to be other colors or patterns? Who’s to say what they are absolutely intended to be, since it’s a coloring book, after all, and people will interpret and color different ways. And it’s the same thing with the embroidered version. I see the outlines around the leaf as outlines, with white space between the outline and the leaf. For me, this keeps the leaf area from being thicker, but still adds a little visual interest around those leaf areas that are outlined.
Beautiful work. The lower leaf looks much better, as do the outlined leaves.
I wonder if the outlines look a bit stark right now because they are surrounded by a lot of white fabric. Once the hummingbirds are done I think the dark outlines will look good.
Hi, Linda – that’s the way I’m thinking about it, too, so I’ll hold off on them for now, to see how they look in context.
Dear Mary
Fancy coming out in the middle of the night to take photos for us in the freezing cold you are so kind and generous to us.The leaves look lovely, I didn’t really think there was anything wrong with them, but the fishbone stitch and the medium thread is a definite improvement. I love the large leaves in long and short stitch so beautiful, it really enhances the project. Thanks so much for the updated photos and all your efforts to share your updated needlework with us, Thanks.
Regards Anita Simmance
I very much like the fix on the overlapping leaves in the center. But the outline stitch is now in a blue-green (at least that is what it appears to be in the photos) and all of the surrounding leaves are in yellow green shades. I think I would like it better if you used a single strand of the darker yellow green that you used to stitch the leaves. I also love the big leaves in the short and long stitch.
Hi, Margaret – it’s actually the same shade used on the medium-dark leaves. Could be the lighting, could be that it’s lined up next to that light-light green….
All these lovely greens are a welcome sight! Hitting the tail end of a long hard winter, seeing your progress on this piece gives me “warm, fuzzy happy” feelings. Thanks for sharing with us!
Marie,
What a perfect work !!. I am jealous,I don’t work very well , nevertheless I love embroidery and I thing it is not very easy.The long and short stitch with me to resemble at the little cobblestone…Thank you Marie you are passionate.
I love the redo the leaf! It looks great! I am going to try it on the project I am currently working on.
I love the shading on the large leaves and I am going to get brave and try it on the same project. I am so glad that I came upon your site. I have learned so much from the video tutorials and the projects you do. Thank-you!
Mary, you might want to reconsider using the dark green outline It looks to me as if it is attached as a separate component rather than being part of a whole. The lighter green, while not as defined an edge, looks as though it comes from the stem and is all of a piece…..
Perhaps start with the lighter green and get darker toward the tip? Actually, in nature, it would get lighter toward the tip.
Aloha Mary,
Not sure about the darker outline. Will reserve opinion till the areas around it are stitched. Other colors will have an effect on total look.
Regards,
ji
Love the big leaves, and the other leaves do look better. I’m thinking that the unsettling thing with the small outlined leaves is that the leaf itself seems to be floating in the air; the only connection between it and the vine is the outline. I don’t see an easy way to fix this though.
Mary, I’d just like to thank you for your generosity in sharing your knowledge and love of embroidery. I’m not doing the Secret Garden project but I’m following it online as I am learning so much just looking at what you are doing and why. I’ve always made a mess when I’ve tried long-and-short stitch so thank you so much for your excellent tutorials, now downloaded. The sampler will have to wait for some WI(s)Ps to finish, but if I can become halfway competent in this technique/skill there will be no stopping me.
I think the outlines look great, but the little leaves are just floating inside them. Should the leaves have stems going to the vine, or to the outline stem if there’s not enough room to go all the way to the vine? It may not be noticeable in the long run, since they are so small, but it shows in the close ups.
I might wait to make a decision on the outlining of the smaller leaves until I’d done it on the larger leaves. It may make more sense then. My first thought was to use one strand for the outlining, which you have done. I’m wondering if darker and even thinner would work. Kudos to you for your tenacity in getting it “just right.” You’re a better woman than I!
I’ve never tried long and short stitch but I want to. It does intimidate me. Any pointers for beginners