


Well, I’ve experienced the first I-Must-Pick-This-Out Moment on the Secret Garden embroidery project.
I’m pretty sure there will be other similar moments, so I’m not fretting over it. There’s no point in fretting over unstitching, because it is bound to happen now and then. If you look at it as part of the process, it’s not as detrimental to your overall stitching morale!
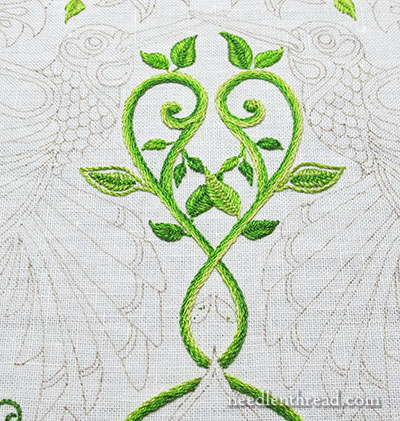
Here’s the central vine part, with all the leaves embroidered except those two little ones on the inside of the vines at the base.
This is quite a conglomeration of leaves and necessarily, there’s a lot of green here. The leaves are stitched, as previously explained, in fishbone stitch, fly stitch, and closed cretan stitch.
You can see that two of the outside leaves on the sides have an outline around them, which happens quite a few times in this whole design.
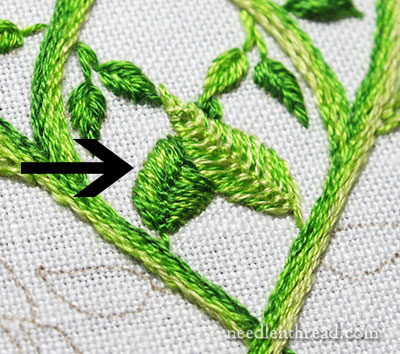
First of all, this leaf in the back has to come out. It is entirely too wonky. I’m not sure how it ended up so wonky – it didn’t look that bad when first stitched (or so I thought!).
When working overlapping elements in this design, I’m embroidering the farthest back element first, and the closest (to the viewer) element last. This helps keep the overlapping elements forward, as they should be.
On this one, I stitched the darker background leaf first, in fly stitch, and then the lighter foreground leaf next, in closed cretan stitch.
Besides that bizarre spine down the background leaf (it took a sharp turn towards Albuquerque at the base of the leaf), the stitches near the overlapping leaf have become displaced. They’re downright scrunched.
So, that’s going to come out. The question is, do I take both leaves out and re-stitch (probably the best approach, to get it absolutely right), or do I just pick out the darker background leaf and make the best of it?
Well, I’m going to do the latter – I’ll pick out the background leaf and work it with the foreground leaf still intact.
Go ahead. Call me a sloth.
Prudent Me is telling Lazy Me that I could be tripling my work here by not taking out the foreground leaf, too.
But Lazy Me is totally winning. (It’s called Leaf Glut.)
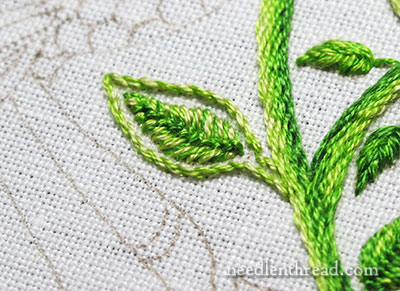
And then, there are these little guys.
Not quite sure about that outline. It seems too heavy. Or too light.
Or too heavy.
It needs reconsidering, in any case.
I don’t want to solidify the areas where there are outlines around leaves, filling in the outlines, because that will draw the whole leaf out to the outline, and I think the outlined leaves would end up looking really thick and chunky. I want the outlines to be outlines.
I’m just not sure what outlines I want them to be. Any thoughts?
I have two ideas I’m going to try, and I’ll let you know the results once I try them. And of course, if you can come up with a Grand Scheme and Solution, I’ll try that, too!
Another point: at first, I didn’t want to go with darker outlines here, because the darker outline would completely separate the leaf on the lighter edge of the vine. But the lighter outlines, in the whole scheme of the area (see the first photo above) almost seem washed out and lost.
So, besides changing the stitch, I believe it is necessary to change the shades of green involved, too.
These minor difficulties I will tackle today. And once I’ve sorted them out, all the small leaves on the vines will be finished.
And then… The Big Leaves. I have a plan for those. It was the one plan I was planning not to plan, but more on that, later.
You know that once the leaves are finished, and then the flowers, the birds are next? And then the project will be finished!
It all sounds so quick and simple, doesn’t it?!
Questions? Comments? Input? Suggestions? Critiques? Observations? Proposals? Opinions? Reactions? Sentiments? I’m all ears! Have your say below!
If you’d like to follow along with the Secret Garden Hummingbirds project, which features a design from “Secret Garden: an Inky Treasure Hunt & Coloring Book” by Johanna Basford, you can find all the articles relating to this project arranged in chronological order in the Secret Garden Project Index. Among the articles, you’ll find plenty of tips and techniques that will help you with your own embroidery projects.
Re. the outline, maybe a backstitch in a single thread, very thin and flat on the fabric? So the leaf can be a contrast against it in both size and thickness.
Hi Mary,
I was wondering. On the two large leaves in the center. What if you simplified the background leaf with a less textured stitch? Say a simple satin stitch instead of the fly stitch. Then it would not compete with the top leaf and be smoother. What are your thoughts?
Barbara La Belle
I don’t see the wonkiness of the darker middle leaf! It layers nicely.
What if you blended some of the middle greens into the light green on the outlines? I really don’t see the problem with the lower leaf.
Hi Mary,
I would remove both leaves and then start again. To me, quicker in the long run that to try to work the ‘under edge’ whilst the top leaf is insitu. I would also do the two outlines of the other leaves in a single thread so it’s there but doesn’t compete.
My husband always says I have no patience, but when it comes to ‘unstitching’ I have masses of patience. In the long run there is much more satisfaction. That’s me anyway!!! 🙂
I have to admit after reading and then looking I do see the “wonkiness”. I can see why you are going to rework it. My first thought on the outlines was to blend a darker color in with the one on the darker side to subtly change it but then after reading Thomas’ comment I am wondering about the thickness, they might look nicer thinner? Good luck Mary. I’m enjoying this journey.
How about trying a split stitch outline with a single thread in a mid-green shade, or the stem stitch with the single thread in the mid-green tone. A finer stitch would add some contrast to the heavier stems. I love watching the progress and look forward to watching the flowers unfold.
Mrs. Corbet,
I think I have to agree about the outline – just a little too thick and a hair too light. I’m not sure what I think of the poblem with the “wonky” leaf, though. But anyway, you’re making progress!
I don’t know what is wrong with my stem stitch. I do it exactly the way that you do in your tutorial (and play with it on my own) and it just doesn’t look right. It doesn’t have the Right ropey look. And it’s one of the easier stitches,too! Do you have any idea of what might be wrong? If you do I’m extremely thankful for your answer!
It reached 60 degrees yesterday. Which is good, except for the muddy mess that all the melting snow makes!
Sarah 🙂
I like the idea of a delicate back stitch, or something less textured, but I feel like you could play with this idea of an outline so that it is not so much about the leaves, but a design element– like a checkered line that’s not green– something not trying to look like it’s growing. There’s quite a few of these sort of flourishes in. The design and it might be nice to treat them differently. My first thought, what if the outline sort of disappeared or got super thin in places — like a sketched line? that might be an interesting contrast to the overall design. I think it may be hard to solve this problem before you start filling in the birds, but I always think that and then you come up with something perfect!
I disagree with you on one point, Mary – that little stem didn’t take a turn to Albuquerque, it turns toward Florida, for a little fun in the sun! Seriously though, what I did was get two color “families” of green. I am sure there is a real word for it, but I have some grassy greens and some olive-y greens. They don’t clash, and I figured I’d need a lot of greens for this project.
To back up your decision to just remove the background leaf–in Japanese embroidery one always stitches the foreground elements first, then the background elements are completed. I also like Barbara’s comment about making the background leaf less textured.
I would try a thinner and darker outline for the outlined leaves. Maybe one strand of floss.
Here’s what I would do. Pick out and re stitch the dark background leaf. Pick out the two outlined leaves and re stitch them to match the overlapping leaf — for continuity if nothing else. As they are now it’s a third type of leaf, and since they fill an important space that needs to balance bird and vines, I would not introduce open space in those leaves. Your eye will eventually travel from birds to vines and I wouldn’t want my viewers eye to stop on those 2 leaves and try to figure out, even for a moment, why they’re so different. You will have plenty of visual textures once those birds fall in place. Don’t you hate it when you have to make these choices? Good luck!
“it took a sharp turn towards Albuquerque”
LOL!!! Bugs Bunny!!
🙂 didn’t know if anyone would get that!
On the leaves with the outline, what is you extended the spine of the leaf down to the vine? That would give some contrast to the. Outline and vine without having to re-do the whole thing.
Thanks for sharing all your contemplations with us. It’s a great learning experience.
Cheers,
Jacquelyn
Dear Mary
At first I couldn’t see what the problem was but reading on I realise the dilemma. Perhaps if you embroidered the darker leaf using the same lighter coloured green thread and the same closed cretan stitch as the lighter leaf it might pan out better. I don’t know what advice to give about the outer leaves but I’m sure your will develop a way so the outlines do not look quite so thick. Lovely stitching by the way, thanks for sharing your needlework dilemmas with us and how to solve them.
Regards Anita Simmance
The outlines look fine because they sprout from the lighter colored stem so they should remain light.
It is the inner leaves that need to change their color.
As for the over-under set, they need to both be re-worked and may I suggest that the underleaf have a more pronounced heel and that the stitching run in a perpendicular direction, perhaps in simple satin?
I don’t like those overlapping leaves because they make the space seem crowded. I would omit them and put another set of the outer (unstitched) leaves in their place. I also think the outlined leaves look unnatural and would do them in the closed Cretan stitch just like the inner leaf I want to eliminate. This is like having 20/20 hindsight for me, but I can already hear the objections.
Mary, When I looked at the orig pen drawing for Secret Garden, I envisioned that the outline around the leaf was going to be the outside edge of the leaf. If you did a decorative edge stitch around the fly stitched leaf – maybe something that runs in an opposite thread direction than the fly stitch and maybe in a lighter shade of green, do you think that would look alright? Then make the stem thin, rather than ‘hollow’. And, the leaf would be just a bit larger. Just a thought.
I am in awe of your amazing work here! It’s really going to be a gorgeous piece, but I admit it, I’m slightly confused. I don’t see how it’s possible to pick out the back leaf without picking out the front… Maybe I just stitch elements like that wrong because they end up connecting to each other on the back side…
I might have been taught from a young age, but I’m still in stitching kindergarten.
As for the outlines, they look absolutely exquisite to me, so I can’t imaging putting myself through the torture of picking it out if I were you, Mrs. Corbet. Still, I’m not you, and it is your piece. It should make you happy, first, last, and always.
Heaven knows I’ve picked out entire sections of my work over my Grammy’s and mother’s strenuous objections.
Mary, I just could not let this pass. Maybe a few days in Albuquerque would be the needed medicine to make this particular leaf (and its maker) quit taking sharp turns.
Love to you,
Jane
I agree with Judith in CT about the outer leaves.
The overlapping leaves were drawn with an outline and you stitched them to the whole diagram. Perhaps you could do the same with the outer leaves. I like the darker overlapped leaf. It looks like it is shadow.
I am enjoying this project, haven’t started yet, am waiting for the silk version. I have fabric enough to do both, perhaps the floss version would give me some practice before the silk one.
I must get started. Alice
The work so far is gorgeous! I had to struggle to see the problem with the overlapping leaves. I’d take the two outlined leaves out and re-do them in a slightly darker thread combo. The “vein” seems to stand out too much. I think I’d be tempted to try the outline with one thread in the needle, just to see if that helps. I know it will be beautiful however you resolve the issues.
Mary
For me, the lack of first sheet rebounded, I embroider everything including what lies behind, so I have the feeling of a gentle breeze in my reasons … So I surbrode and I care not not take the fabric just wool. Maybe not easy with cotton …
Do you think a medium green in another stitch (for instance, back stitch or split stitch) would work? I saw the outline as something entirely different but I like your take on it.
The green leaf you say is wonky I think is OK maybe you can change a bit the end where you connect with the stem but other than that is OK. Nature is not perfect and that is way is beautiful . As for the outlines on the other leaves I would probably use only one strand of thread . You do great work and I have to say I actually learn a huge amount from your site . Thanks
I would remove both leaves if I could make sure that the threads can be secured. It would look better. Sometimes I can’t remove stitches because I don’t have enough thread to secure.
Yes, I think that’s it, the inner leaf need to be changed, color-wise (darker). I forgot to mention the satin stitch on that underleaf. I think that would be better too, simple, less detail as you go back. Maybe a 2-toned front leaf? Perhaps it is, but I can’t see for sure, if so, perhaps a bit more defined change? That might be where you could bring a bit more darkness? I still think a thinner outline, altho once the birds are in it may need the thicker line. Can you leave that until you see how the birds change it?
Hmmm…about those leaf outlines – I see what you mean about too heavy/chunky and too light conflict… So, two things come to mind. Leave them to the end – and most radical, consider making them in a color that has nothing to do with green leaves – a choice to be made after all the rest is colored in – and then played about with using color photocopies of the almost finished piece and colored pens or pencils.
Hi Mary
What about the outline done in split or back stitch in 1 strand of darker green so that it is almost like a halo? would that work?
Joyce
Morning Mary
I agree with what you are saying about the outline leaves…but…(isn’t there always a ‘but’??) When you go back and look at the design..I am wondering if you should leave making a decision until you see how it works once you have completed the birds breast? Maybe it needs to be paler to avoid overpowering the bird???
Why not try going to one strand for the leaf outline
Lotsa green happening
I don’t find, looking at the picture, that the outline is washed-out. I think the thing that caught my eye was it doesn’t look like one leaf. Let me see if I can explain; I think if the inner part of the leaf had a “stem” coming down between the two outlines to connect to the vine it would look OK. As it is it looks like the inner part of the leaf is floating.
My advice isn’t on how to stitch it. You have way more experience in this than I. All I can offer is this: You know something is off, but not exactly what…so turn your piece upside down and look at it that way, or hold it up to a mirror and look at it’s reflection. Those little bits are enough to trick the eye and allow you to “see” a bit more objectively. I do this when I paint all the time. Fellow students looked at me funny for flipping my canvas upside down, but it really helped me with objectively looking at the piece. Maybe this can help in this instance too.
For the outlines.. I’m not sure if it’s too complicated for this 101 version… But a Hungarian braided chain stitch in a darker pair of greens may look really pretty?
I envision the outline leaves with a border of satin stitch or perhaps rows of stem stitch or chain stitch and the middle of the leaf with the veins stitched in wide apart fly stitches to give more of a lighter, open look. Saying this though I am a novice embroiderer.
Jude, that is so different from what I had planned to do on mine, but you have changed my mind completely!! I am picturing what you described, and I am really agreeing with you. I am working mine more as abstract, or fanciful, than realistic. Thank you for your idea!
In my landscape embroideries, I use paler colours for the distant objects, darker colours for the foreground objects. So, I would exchange the colours of the two leaves, making the one in back lighter, the one in front darker. Distance also makes objects farther away finer, while objects closer to the viewer chunkier. Just my thoughts…maybe they will help…
Hi Mary,
My first thought is why are these little leaves outlined when nothing else is? I think they are meant to move the viewer’s eye outward from the central motif toward the (Humming?)birds.
It might work to start with more plies toward the base of the leaves and reduce the thickness of the thread as you work toward the tip. You would still have an outline which directs the eye, but it would be much less prominent.
I’ll be interested to see how you treat this.
MJ
If it was my project, I think I would be inclined to remove those two leaves altogether, and then extend an intertwined vine in the space instead. I like the outline on the other leaves.
Beautiful stitching, though. Good luck!
Doris
I love my embroidering but am finding it harder to see the small stitches, even with new glasses. I need something to go over the top of my glasses to magnify. Any suggestions?
Thank you for your inspiring site
Hi Mary,
Find a web site very interesting. It’s mastered.com, they have tambour embroidery courses online,but you have free acces to one hour course with an instructor from Hand & lock. They’re also offering a course on advanced goldwork embroidery. The complete courses are expensive, but the free hour worth the look.
Just begin the Secret garden project…
Maggy
Hi Mary, I love it when you – The Expert – ask us what you should do. It makes us feel so good, as if we could tell you anything you don’t already know, lol.
OK, well I’m game. Firstly, I know and you know and I know you know that you should unpick both leaves and start again – ’nuff said.
On the subject of the outlines: I think a finer stitch, maybe with just one strand of floss, would probably be better. Perhaps split stitch or back stitch but maybe with one strand the stem stitch would be OK.
Hope all this helps you decide to do whatever you have already decided to do .
When I looked at the first picture, the leaf on the left (bottom picture) seemed out of place. I think it needs a darker outline. It needs to match the center of the inside leaf. The one on the right looks OK from this distance.
As for the overlapping leaves, I remember having the same problem many years ago. I know in some crafts (stamping, rug hooking) it’s better to do the top leaf first, then you don’t have to do the part of the bottom leaf that is underneath. It was always hard to make the center of the leaf follow straight across a blank space. I think that’s why the edge of the lower leaf cuts (or curls) in where the top one crosses.
3/14/14. On CBS this am did I see Gail King with a print dress with the Humming Birds fron the secret garden project?
Following your comments, you are teaching me how to critique my own work! Until now, I could just tell something wasn’t right (I don’t mean an incorrect stitch), but didn’t even know how to think it through. Thank you.
I also have masses of patience for unstitching. The work in my stretcher bars is sometimes done four times before I get it right. That’s ’cause I’m always pushing the envelope.
Again, thank you.
Hi Mary; you have stated often that linen is the best material to embroider on. I know an interesting website called Deutsche Optik. While most of the things sold there are for military buffs and some of it is disturbing, they have bed sheets of linen 62 by 56 inches.
I believe there are 5 in a pack and the sheets goes for $15.00 each. You might want to check this out.