


I’m having So Much Fun embroidering the leaves on the Secret Garden project!!
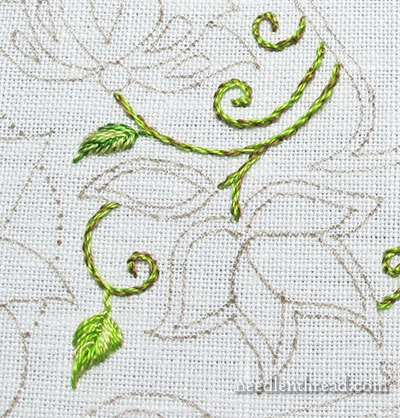
The small and medium-small leaves work up really quickly if you’re using fishbone stitch and fly stitch, which we talked about the other day.
And with hopes of spring springing eternal, the green is a mood lifter right now, too. Winter’s loosening up its hold here in Kansas – the sun is shining, the temperature is creeping upwards, almost all the snow is gone, the birds are singing cheerily of a morning. And stitching green leaves makes me ever-hopeful that spring is just around the corner.
Today, we’ll look at a full shot of all the vines finished and a good amount of the small leaves finished, and we’ll discuss some more tips for working the small and medium sized leaves on the project.
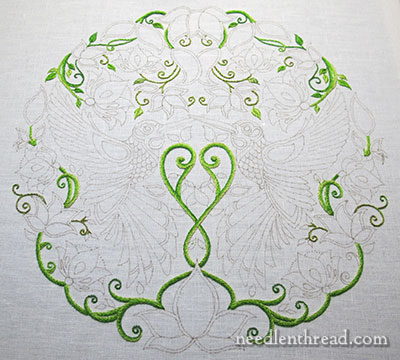
This is what the piece looks like stepping back from it, with all the vines embroidered and all the small leaves in the top half (above the hummingbirds) embroidered as well.
It looks sparse, doesn’t it? I don’t think it’s going to look vibrant and really full until those large leaves start going in! But we’re getting there, we’re getting there…
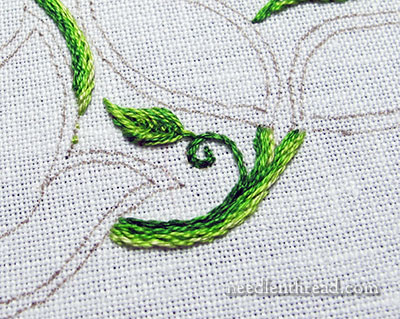
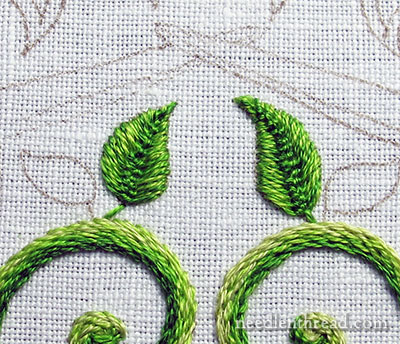
When stitching the leaves (the one above is a fly stitch leaf, started with a twisted chain stitch), it makes a big difference having two shades of green in the needle.
Notice that the leaf looks a little shaded. But I didn’t shade it – that’s just the way the two shades of green worked themselves out as I stitched.
That’s a very easy way to add “shading” to a leaf. It’s almost cheating!
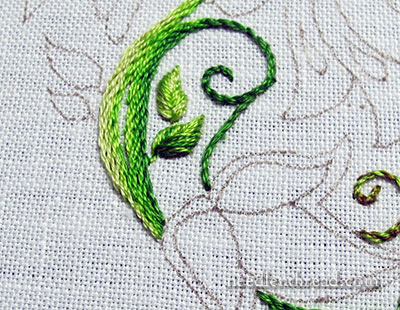
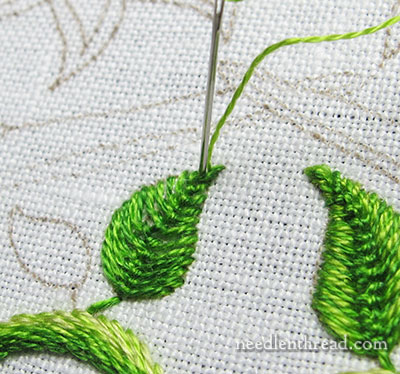
Here are another two leaves worked with two shades of green in the needle, this time in fishbone stitch.
For the lower leaf, I skipped a shade of green in the line-up of the greens. So I used 905 (medium-dark) and 907 (medium-light) and skipped 906.
For the upper leaf, I used 907 and 472, the two lightest shades of green.
The moral of the story: you can skip around with your greens, using different combinations, to add a little variety to the leaves.
On these leaves which branch off the brown-and-green twiggy vines, I used predominantly lighter greens, because the darkest shades in the selection of greens looked too blue next to the brown and light green vines.
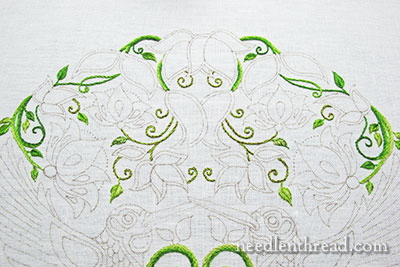
This is the top half of the design, with all the small leaves finished.
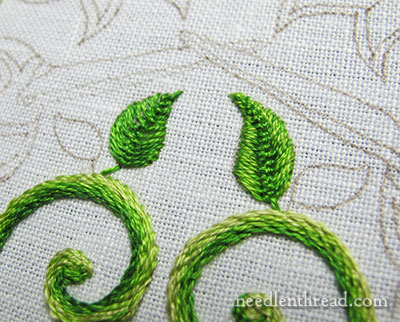
Here you can see the two larger leaves just below the hummingbirds’ beaks. They’re not “large” leaves – I’d classify them as medium-small, compared to the rest of the project.
These are worked in closed cretan stitch. Initially, I worked them with two threads in the needle (906 – the medium shade of green – and 905, the next darker shade).
The leaf on the left is the initial result of the closed cretan stitch with those two shades. And it’s ok, but… I really wanted something a little thicker. The larger the leaf, the less coverage and fill you get with two strands of floss.
So, to thicken the leaf up and lighten it up a little bit, I took the 907 (the medium-light green) in one strand is a size 10 crewel needle, and I worked light green straight stitches between the cretan stitches, working from the edge to the middle.
This really filled out the leaf (you can see the finished one on the right) and brightened it up quite a bit.
Here they both are, “enhanced” with the lighter green.
The light green is worked only just up to the braided center area created by the cretan stitch – it doesn’t go into that area. This way, the braid stays intact, creating the vein down the center of the leaf, but the edges get filled out quite a bit.
I plan to use this enhancement method on many of the medium leaves, but not necessarily with the cretan stitch only. There are other stitches that work well to fill leaves and make a broad center vein, so I’ll test out some other stitches along the way, too.
So, at this point, I have all the vines finished, the small leaves on the top half finished, and a few small leaves and medium-small leaves on the lower half finished.
My next milestone will be finishing all the small and medium-small leaves on the whole piece. Then, I’ll do one of two things: I’ll either give the green a rest for a bit and move on to the flowers before tackling the large leaves, or I’ll just tackle the large leaves.
Filling Larger Spaces
Keep is mind, as the leaves get larger, we have to think of other ways to fill them. Fishbone stitch, satin stitch, cretan stitch – these won’t really work on the large leaves on this piece, because the stitches would be too long.
Another thing to keep in mind as the leaves get larger (and we have to use different techniques to fill them): the embroidery will slow down quite a bit. While it’s fairly easy to stitch five little fishbones leaves in twenty minutes, it’ll take twenty minutes (or significantly longer, depending on the technique) just to fill one large leaf.
Working at Your Own Pace
If you’re following along with the Secret Garden project or some variation thereof, don’t let me rush you! Work at your own pace. That’s what the Project Index is for. You can go back to it and read the articles again as your project develops.
On the other hand, if you’re way ahead of me, don’t rush me! I’ve gotten a few emails asking what to do on the flowers. If you’re finished with the leaves, or you just want to stitch the flowers, feel free to stitch them however you want to stitch them. I can’t instruct individuals via email, and then write the same information again on the blog. Don’t feel like you have to wait for me, though – you are most welcome to move ahead and interpret your version of the project however you wish!
Sharing Photos
I’ve had a couple requests about setting up a place to share photos for this project. I’m working on some options and will let you know when I have something set up.
Questions, comments, suggestions? Feel free to have your say below!
If you’d like to follow along with the Secret Garden Hummingbirds project, which features a design from “Secret Garden: an Inky Treasure Hunt & Coloring Book” by Johanna Basford, you can find all the articles relating to this project arranged in chronological order in the Secret Garden Project Index. Among the articles, you’ll find plenty of tips and techniques that will help you with your own embroidery projects.
Very nice! I like it!
Dear Mary
My your really coming along on this project the leaves are beautiful and so many different techniques and different coloured green threads wonderful. The Cretan stitched leaves are very attractive and so is the fishbone stitched leaves and the overall photo of the stitched pieces of the project is just lovely. I can’t wait to see the flowers embroidered this will be a wonderful contest to the leaves. Thanks for sharing your update on the Secret Garden with us, have a great weekend.
Regards Anita Simmance
Mary, I want to start off by saying thank you for your detailed notes on this project. It has inspired me, a new person to embroidery, to start this project. Thanks again for your hard work and I am looking forward to getting started on this project myself. – Heidi
Love the progress shots Mary. Thank you for sharing. This is also giving me ideas for my current project. I’m having problems getting the needlepainting come out the way I want, so I’m going to try twisting two different color threads together and see how that looks.
Mrs. Corbet,
Thanks so much for all the wonderful tips – very helpful.
Still snow on the ground here. And still cold. If I remember right it’s supposed to get up into the 40s sometime soon. It has probably changed by now, though, either for better or for worse. I hope it’s better, because I’m awfully tired of winter.
Sarah 🙂
Hi Mary,
I have not finished my vines yet but think I will start a few leaves just to have a change of pace! Looking at your picture of the whole piece you have a couple of small vine curls on the bottom right still to do – unless you have done those since posting the picture.
Thanks for the detailed instructions, looking forward to your choice of colours for the flowers and birds. Spring starting to arrive here too after all the rain so need to get the stitching done before the gardening calls 🙂
Cheers,
Liz
Mary,
What wonderful work as always.
I so wanted to stitch along with you. Unfortunately when you started this project I had just decided I needed a sewing/craft room. So I’m in the process of cleaning out a bedroom that had “somehow” turned into a storage/catch-all room for three years…I couldn’t even see the floor when I started! The junk we think we have to keep!
You’re daily updates make me long to be stitching instead of cleaning. Can you possibly imagine?! The only thing that’s kept me on task is the thought of how organized everything will be….at least for a little while. LOL
I was hoping I’d be able to catch up when I finished (which better be this weekend) but now I have 4 quilts to do by June. Luckily your posts are so detailed and wonderful that someday I’ll be able to go back and stitch…but for now it’s off to clean I go to the sound of 18″ of snow dripping and sliding off my roof. At least it’s melting and not accumulating!
This is such a lovely idea! It is simple but produces such a beautiful effect. Thank you.
This is really looking nice. I like the use you have made of the different stitches for the leaves. I know that you have a lot more work to do but, the negative spaces on the top photo make quite an impact on the eye. Once again, thanks for sharing all of the information on your thought processes.
This could not have come at a better time! I started a Stitcher’s Blessing and I wanted something more than a backstitch. I am ready to try some different things to pep up the leaves and flowers. I am thinking the stitches and the coloring of the threads mixed is just what I need to add to my project. Thanks for sharing! I know I sure appreciate it.
Hello Mary,
What can I say? this is just beautiful. I do not realize the same project, I drew myself as for points, the colors, I draw heavily on your work and do everything “to the letter” your blog is magical …
Gmorning Mary!
For the sharing of photos, do you think you could get the forums working? Itd be great to be able to discuss and share… then again it the forums might be to cumbersome. Anyways, however you do it Im excited! The advice you gave me on puckering for long and short stitch really panned out and now my piece is so pretty!! I hope to show you the photos of before and after your advice so you can see the huge impact youve made! Im constantly petting it in awe as i embroider it lol. And even though its not done, and its my first long and short piece ever, Ive recieved a ton of compliments! All thanks to you!!
I hope you have a sunny cheerful day,
Veronica
G’day there Mary,
I’ve been interestingly following along with this project but not often getting past just the email versions lately so haven’t been commenting on how intriguing it all is. It’s beautiful, the difference of browning off the greens for the twiggy stems etc. It’s noticeable in these photos of how good it looks. It has all come to life quickly, I mean the embroidery has taken on it’s own personality so early in the workings of it. You must be enjoying it, breathing life into it stitch by stitch.
My order from Lorraine at Colour Complements came through quickly and I’m thrilled with it all, some tubular ribbon and some sparkly threads for my underwater UFO. I puzzled over 3 small skeins grouped together, a #12 & 8 DMC and a rayon, until I noticed a ‘thank you’ tag on them. What a lovely and useful gesture, some yummy freebies. I’m fired up to get the underwater UFO firing on all cylinders (or whatever other-world UFOs have, underwater or otherwise). Just what I needed.
Cheers, Kath
I love it already. I enjoy seeing the close ups of your fine stitching but also enjoy seeing the whole layout. It gives me a better feel for how all those tiny stitches look from a bit of distance and the whole flow of the design. Gorgeous.
Hi Mary
I have a possibly rather silly question! When you cross over vines with stem stitch do you leave the gap in the underneath vine then come through this gap with the vine crossing over the top? I tried going over and it seems to thick. Thank you for all your advice.
Jude
Hi, Jude – yes, I left a gap in the lower vine. You can do it either way, but if you don’t like the thickness of crossing over, best to leave a gap….
Hi Mary,
What a beautiful work you are undertaking! I love the design and the colours. Will keep following your progress!
Kind regards,
Loes
Hello Mary, I do not know if I am correct or not but you are using DMC floche, on the vines correct? I can not find find color 904. Could you help please!
Thank you,
Sandra
Hi, Sandra – I’m using regular DMC six-stranded floss for the whole piece, actually, not floche. You should be able to find it in the regular floss. Hope that helps! -MC
I really appreciate your detailed photos and notes on this project. I’ve never been to any hand embroidery class and so other than a few words on embroidery from my mom when I was a child, I’ve only ever had books to teach me and none of them have taken the time to detail the stem stitch like you have or the leaves. Thank you so much.
3AM and I keep telling myself to go to bed, but I keep reading the next page and then the next! I’m hooked.