


Some stitchers following along with the Secret Garden project have written to ask for tips on how to simplify the embroidery on their versions of the project, especially with regards to long & short stitch fillings.
At times like this, I wish I were an octopus… or a double-octopus (a sedecipus?). With 16 hands, I could embroider all the possibilities for every follow-along project on Needle ‘n Thread. Just imagine! And that way, I could answer so many questions visually, which would be easier all around.
But, since I only have two hands, we’ll have to settle for a few general tips. You can apply these to any surface embroidery project, not just the Secret Garden project.
To that end, here are some suggestions and thoughts on simplifying embroidery projects to make them more accessible to your own particular levels and likes.
So, you don’t want to tackle long & short stitch for the leaves, but you do want them filled and shaded?
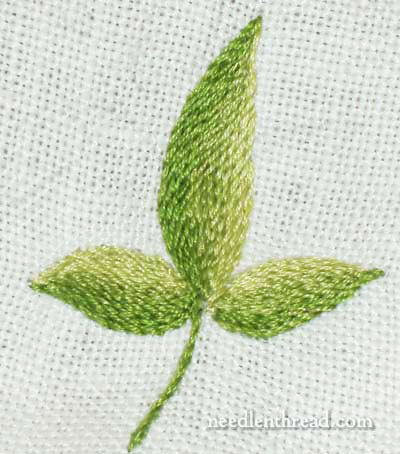
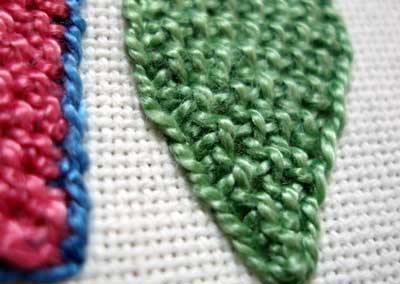
You can try shading with stem stitch. Following the same concept that we worked through embroidering the vines on the Secret Garden, apply the concept to the leaves. The leaf above is shaded with stem stitch in the same way, using two strands of floss in the needle.
You can find further explanation of how the leaf above was shaded in this article on color control in embroidery for beginners.
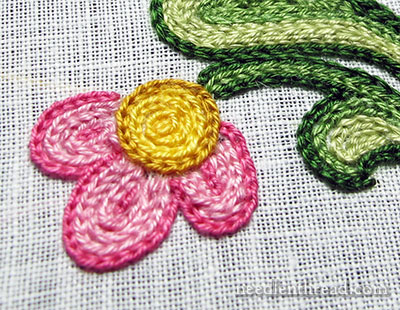
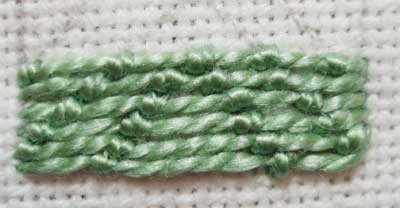
Another option – use chain stitch as a filling.
Although this example is technically tambour embroidery, the concept is precisely the same. Tambour embroidery is chain stitch, and you can accomplish the same type of filling with chain stitch and a regular needle.
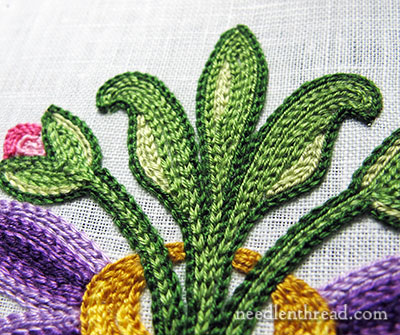
Chain stitch makes a nice filling! And by manipulating the placement of your greens on the leaves, you can create subtle shading, or very bold color changes – or somewhere in between.
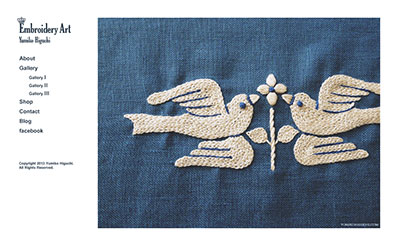
If you want to see some examples of very effective chain stitch filling, visit the website of Yumiko Higuchi, Embroidery Artist. In this gallery of embroidery art especially, scroll through the photos. You’ll see how the simple chain stitch can be used for beautiful filling.
The piece above was just a trial. It’s not on the actual Secret Garden project – it’s on a little scrap of fabric I keep on hand to test ideas. Never fear to test ideas! Keeping a doodle cloth on hand is a good way to do that.
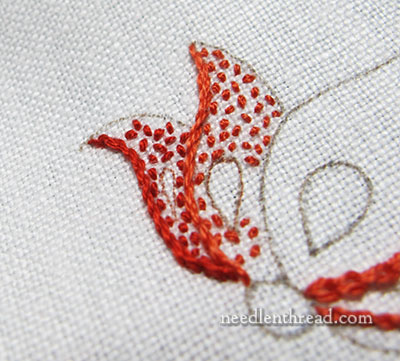
This filling technique is the simple, simple seed stitch. (Excuse the old video in that link! One of these days, I’m going to update that one!)
Seed stitch is a tiny straight stitch. Sometimes, it might be two tiny straight stitches right next to, and parallel to, each other.
By grouping seed stitches closer together and spacing them farther apart, you can achieve a sense of shading. You can also change the shade of your thread as you fill an area with seed stitch.
Seed stitched areas need some kind of outline, and a bold line using any kind of line stitch works well.
With seed stitch, it’s easy to impart a sense of colored filling, without any real technical difficulty as far as the stitch is concerned.
You can see more examples of seed stitch used as a filling for larger areas in this article about a Sunbonnet Sue Quilt Square that I embroidered eons ago for a fundraising quilt.
Certain types of self-couching stitches – like Bokhara couching and Romanian couching – could also be used to fill the larger leaves. With Bokhara couching, you can create a pattern of veins on the leaves with the couching stitches.
The difficulty with Bokhara and Romanian couching is that they are very “linear” looking fillings, and shading can be problematic. If you don’t want the large leaves shaded, though, they’re both good options for filling larger spaces with solid color.
You could go for a much more textured filling with something like detached buttonhole filling. You could work it as a solid filling, or you could space the buttonhole stitches and end up with a lighter, lacier filling.
In this much older article on the uses of buttonhole stitch, you’ll see a section on buttonhole shading. That’s also an option for filling, using a familiar and easy-to-master stitch.
Both options – detached buttonhole or buttonhole shading – will yield a good bit of texture. You can shade with both by changing out your threads. The shading will be linear, following the stitch direction, but it can work.
Normally, neither of those stitches work so well when stitching on top of them, though, so if you wanted to work veins down your leaves, these probably aren’t the best option.
Not an Exhaustive List – Explore!
This is not an exhaustive list of filling stitches that could be used – it’s just a few examples. A good stitch dictionary will give you a good springboard for exploring other options. If you don’t have a good stitch dictionary to use as a reference, consider investing in one. There are many reviews for stitch dictionaries on my Needlework Books page.
Experimenting & Expending Effort
With embroidery, I think that more (and better) learning happens when we experiment and try things ourselves.
It’s the whole motivation-effort-ease-learning relationship. It goes like this:
With the right motivation – for example: “I really want to learn this well so I can master this technique and move on to this more difficult technique that I’m just dying to do” – we expend more personal effort to learn.
Luckily, because it’s something we’re highly motivated to do and it’s something we like doing, expending the effort seems easier to us. “I don’t mind trying this and picking it out if it doesn’t work, because I know it’s going to make me a better embroiderer. I tried it. I don’t like it. I picked it out. That was no big deal.”
And finally, because we expend all that effort, we learn better, and what we learn sticks with us longer.
Fortunately, we’re talking about embroidery here and not calculus. This is not a dry, abstract subject. The tactile, creative, pleasurable nature of embroidery carries us through the “tough” spots more easily. And because we can see results right away with embroidery, it’s easier to keep the levels of motivation high. And that helps us learn more!
In any case, I hope these examples give you some alternate ideas for your Secret Garden project, if you have an aversion to long & short stitch. But, again, just like the learning scenario above, if you’re motivated enough to learn the long & short stitch, with a little trial and error and effort, absolute beginners can learn it.
Another thing: Don’t be intimidated by techniques just because you see them done by professional embroiderers, trained embroiderers, and so forth. There’s no law, written or unwritten, that says you have to reach a certain “level” before you attempt long & short stitch.
Which brings me to a Typical (and True) Teacherism: all the above being said, no one else can learn it for you. If you want to learn it, eventually you have to do it. That’s the only way you’ll learn.
Questions? Comments? Suggestions? Input? Are you stitching the Secret Garden project and using different stitches for your leaves? If so, what stitches? Any ideas or tips you want to share for filling areas larger elements without using long and short stitch? Have your say below!
If you’d like to follow along with the Secret Garden Embroidery Project, you can find all the information pertaining to this project, including resources, materials, and stitching tips, in the Secret Garden Project Index.
Good morning, Mrs. Corbet, thanks for the FABULOUS post today. I’m determined to learn long-and-short stitch thanks to your encouragement. I’m under no delusions that mine will be pretty for quite some time, but you’re so right… you can’t learn unless you do! Now, if only I could make that work for my detached chain stitch… (sigh) no matter how many times I do it, it’s still terrible!
Practice, practice, practice! You can do it, Kristina! With any stitch, it’s just a matter of taking it slowly, working through it and figuring out the movement of the stitch, and then finally repeating the movement until it’s easy for you. Then concentrate on making it look better while you practice. Persevere!
After nearly 22 yrs of perseverance I’m just sick of it. no matter what I do the loop always, always closes on me. Of course, I’m in good company, my grammy tired for over sixty and never got that stitch right. Who says heredity doesn’t count?
Thank you for this excellent tutorial about shading. There are always options, no matter what medium of expression. – Sharon
Good morning!!
Another option for filling: chain stitch with whipped edges and double chain stitch (whipping the touching edges of rows as one). Using different shades you could make some neat veins and shadding 3ffects. Mary has some articles on it somewhere, Im actually using it on a different embroidery project i have going! Its a medallionesque design where im trying different stitchs in corresponding colors on each layer! Ahh. Now i want to buy all the stitch encyclopedias mary recommended and try each one. <3 all the beautifull stitches in the world!!!! I want them all!!!! Well except cross stitch.
Also have you checked out the embroidery designers webpage for game of thrones???! Its fantastic. Made me oo and ahh for awhile. http://Www.michelecarragherembroidery.com
Cheers!
Great newsletter today Mary. Loved the part about trying new things. You are so right about never knowing how if you don’t at least try it. You inspire me to improve and I thank you for that.
Find myself wanting to become better, and slowing down to be more precise in my stitching.
What a brilliant post! The alternatives you suggested are great technical tips, and your views on learning are even better.
Mary:
Today’s article is great. Can I add a little something on it? I learned just plain line embroidery about age 6-8 with my Mom. Life got in the way and I rediscovered this around age 80-82. I was introduced to Trish Burr then and purchased her book, “Long and Short Stitch Embroidery” (LSSE). Not only is it a learning book but she provides patterns to be copied. Anyone in the world can learn to do (LSSE) with her delightful book. I have done the most simple one in her book and have now tackled a more difficult one. This book is only $19.95 ($25.95 Can) or maybe one can find it in their library. LADIES, GO FOR IT! Trish also has a sample pansy kit that one can purchase from her as a learning project. It is small but adorable. Thanks for letting me commend you for today’s article and adding my 2-cents worth. I have a friend who thought that I painted my very first pansy from Trish. Mary, I love, love, love your writing and am a avid fan of yours. Thanks for your site.
Dear Mary
Yes it’s so true practice, practice I first learnt the long & short stitch from your sampler I embroidered all the elements and felt I could tackle an embroidery project using the long and short stitch after practising on the sampler and it’s not so daunting now. I have completed many projects now and feel quite confident using L&S stitch. I have also followed your How-to videos on all different stitches and this has helped me be confident in all different areas of needlework and not to be afraid of trying new ways of needlework. Thanks for the tips on different filling stitches very helpful.
Regards Anita Simmance
I agree – you only learn by doing. Oddly, I have found both satin stitch and long and short stitch relatively easy, but only by doing a lot of it. And, not perfectly yet. But I have discovered that looking at one of your videos on a particular stitch gives me confidence, and i set aside a piece of fabric in a medium-sized hoop marked with pencil lines, to practice a new stitch. It sits beside my chair in the sitting room and I pick it up in idle moments to do another line or two, hopefully getting better as I go. Your instructional videos are fantastically good and accessible. Thank you for them, in addition to all the other information and support you give us ‘beginners’ – we’re ALL beginners when it comes to a new stitch!
Thank you so much for your March 31st post. I am at the beginner “plus” stage and kept feeling like I wasn’t learning fast enough. After reading your thoughts , I feel as though if I just keep trying, I am bound to hone my skills.
Mary,
Once again, THANKS for you inspiring and informative articles which not only encourage us to dig in and try something new, but also give plenty of resource references for help. We appreciate your excellent advice to: TRY… PRACTICE….. DO!! And what fun we are having!!
Gratefully,
Molly
Thank you for taking your time to respond to all these questions. You have the patience of a saint to deal with all this. You always give such wonderful suggestions and advice that people always want more.
I find the information that you share so willingly with us is more than we would every get from a local class. I appreciate your sharing of your vast knowledge. I look forward to the next posting.
I really enjoy that you also review books that we could use for reference. I have purchased quite a few of them.
🙂 Thanks, Quiltnut! I’m glad you enjoy Needle ‘n Thread!
Mary, I’m so happy to see you mention Yumiko Higuchi – I am totally obsessed with her beautiful website (and yours). I keep wanting to buy one of her books on the Japanese Amazon but I have no idea what I’m buying and how much it is, really! Thanks for another interesting and informative post.
Mary, you’re my angel today. I’m one who is really NOT ready to do long and short stitch on a project this complex. I do a lot of different stitches in my crazy quilt blocks , and I’ve learned so many new stitches from you.
In time, I’m going back to your tutorial with the different shapes to practice. But I’m not there yet. I’ve taken out the little bit of lss that I did. I feel very encouraged to continue on with the Hummingbird Project. Thanks again.
One more thing Mary. I’m the one whose fabric is too loose in the hoop. I wrapped the bottom one, but it’s still too loose. I’m a little disappointed with this hoop I ordered. A really good one. Yesterday I wrapped part of the top hoop, but of course you can’t meet the two ends together. I managed to make it stay, but it doesn’t look good. Anyone else ever wrapped the top hoop ? Just curious.
Did you wrap with bias or gauze/scrim? I have found plain old roll gauze to have better grip on many ground fabrics (and working in medicine for decades always seem to have it around). I’ve wrapped both top and bottom hoops mostly to avoid bruising silk grounds. A few stitches at the end of the wrap keeps it neat.
I have plenty of stitch references but what’s really getting me interested in trying new stitches is working through Sharon Boggon’s Take a Stitch Tuesday . I’m using up my ORTs on fabric scraps to compile my own stitch glossary – working a small sample of a stitch is the best way to get a feel for its possibilities. (Calculus is fun, by the way.)
I would point out that with some things, if everybody needs to do it, everybody does it! Somehow. When everyone wore handknitted socks, everyone knitted them! With the first cars, you needed special clothes and it was a Big Deal. Now almost everyone drives — not well, but almost everyone. I got in the ground floor of word processing in 1972. My resume was full of all the systems I knew. And now what? The bosses input their “dictation” and let the secretary finalize it. Everyone inputs! . . . Thanks for sending us to Japan today, Mary! I just sent for my linen and tossed into the order a hoop and the tambour hook! I may be using it before I expected to. And one of the bead embroidery books has arrived! Marvelous! I’ve been doing beadwork for years and never saw some of those ideas. Emote emote emote! What a wonderful little world we live in thanks to Internet!
Thank you so much for all you give all us that are enjoying learning. One project I am looking for is an old fashion looking ABC sampler. I do not know how to cross stitch and would like the sampler in embroidery stitches. I hope somebody knows of a pattern. thank you
hola Mary me gustaria comentar tus puntadas ,pero no hay traductor
solo te envio las gracias por tan lindas tecnicas
un abrazo
lidas
French knots!!!
Just a thank you today for sharing the Kumiko Higuchi link. The photos were so inspiring. Nothing like great visuals to stir your creative juices. I used chain stitch on some pillow slips (years ago) to do a Penn Dutch motif. Worked up quickly and took machine washing and drying well. My favorite filler, tho time consuming, is French knots. Looks great on denim. Thanks again for your posts! Judith
Well said, Mary, you are absolutely totally utterly and 100% right. You must do to learn.
For Kristina who is having trouble with her detached chain loop closing up: try not to pull the straight stitch part of the stitch too tight, and while you are pulling that thread through, hold the loop slightly open with your other hand. For years I couldn’t get a French knot to work. They always just went right through the fabric and nothing happened, until the penny finally dropped one day and I realised that I needed to take the thread back down a little way off from where it came up to form the knot!
May I also recommend Sharon Boggon’s on-line stitch dictionary at http://www.pintangle.com. I am sure Mary has it on her list, but as an embroiderer who is not in her league, I would like to add a plug for Sharon – her instructions are clear and straightforward with lots of photographs. She is also a very helpful person, like Mary.
Thank you so much for the advice.
Mary, I am just getting ready to start the Secret Grden project. This may seem a silly question– but what do you use to rip out? Is there a better way to do it? Love your website and look forward to your daily newsletter! Thanks.