


The other day, I gave you a little sneak peek at the flowers on the Secret Garden project, and today, as promised, we’ll chat about colors and stitches.
Before getting into the general details about the stitches I’m using, let’s cover color choices.
If you’re following along with the project, remember that you’re absolutely free to make your own color choices! I’m only using two color families on the flowers. There are eight flowers total, and I’m alternating between the two color families around the design. I’m using the same yellows for both flower colors.
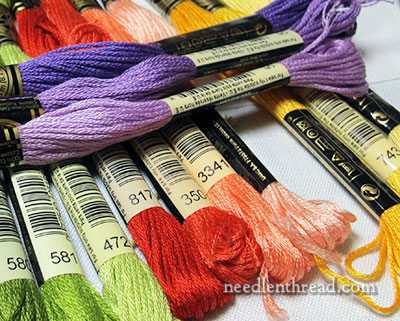
Corals to red: (light to dark) DMC colors 967, 3341, 351, 350, 817
Purples: (light to dark) DMC colors 554, 553, 552, 550
Yellows: (light to dark) DMC colors 744, 743, 742
The Secret Garden hummingbirds design (by Johanna Basford, and found in her book, which I reviewed a while ago) is a highly stylized design. The flowers, leaves, and birds that Johanna drew do not exactly replicate flowers, leaves, or birds that you will find existing in nature. Still, when we look at them on the drawing, we know they are flowers, leaves, and birds. That’s the nature of stylized design.
Because the design itself is stylized, I don’t feel compelled to make everything (or anything) in it look absolutely real, according to how it would be seen in nature.
So, for those who mentioned after Saturday’s article that the flowers look weird because you haven’t see flowers like that in your garden, welcome to the world of embroidery! I would hazard a bet that the majority of flowers that have ever been embroidered over the whole span of time in which embroidery has been practiced have not looked identical to anything you’d find growing in your garden. This is, after all, embroidery, and not photography.
So we see here the difference between realistic design and stylized design.
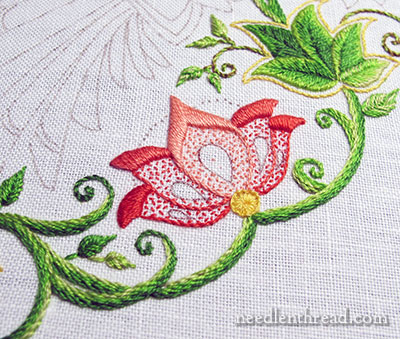
To further enhance the stylized design, I added “caps” to the tips of the petals in the flowers, so that I could add some solid satin stitch filling at the tops of all the petals. I chose seed stitch for the rest of the filling in the petals, to give a little sprinkling of color with a little bit of texture (to contrast with the satin stitch), and to avoid a solid filling. I outlined the petals with stem stitch.
The petals are worked from light to dark, from the center out. The red (817) is used to fill the middle teardrop shapes.
In the original design, there is a line of circles arching behind the petals. These, I switched to elongated French knots in two colors of yellow. 743 & 742, alternating the length so that the line of knots is a little jagged.
Elongated French knots (or pistil stitch), is simply a French knot with a longer space between where you emerged to begin the stitch and where you go down into the fabric to end the stitch. If you can work a French knot, you can work an elongated French knot.
If you have trouble with the elongated French knot, you can always work a series of long straight stitches and then go back and tip the straight stitches with French knots.
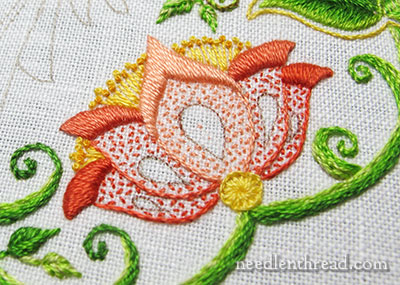
The base of the flower is a buttonhole wheel worked in yellow (743). After stitching the buttonhole wheel, I went back and filled between the spokes with straight stitches in a lighter yellow (744).
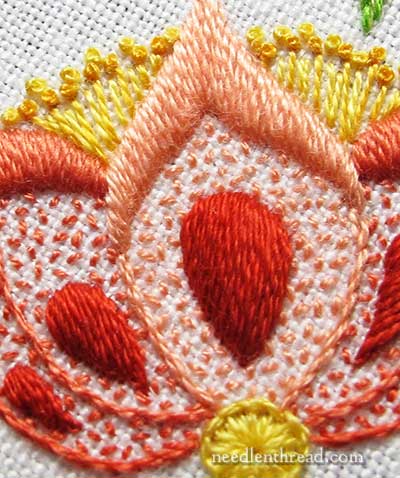
The centers of the flowers are worked in padded satin stitch, in the darkest red (817).
The links on all the stitch names above take you to various video tutorials for those embroidery stitches. The satin stitch and seed stitch videos are downright ancient (from the era when video first began to appear online), and need to be re-done. You may not be able to view them on mobile devices, but you should be able to view them on your computer. In any case, they’re on The To-Do List – you know, that ever-growing, never-ending List that we all have?
So that’s an overview of the stitches and colors used on the flowers in the Secret Garden project. Next time, we’ll look at some detailed stitching tips for the flowers, including some helpful tips for satin stitch and some fiddling about with the order of stitching.
If you have any questions or comments, feel free to leave a comment below!
If you’d like to follow along with the Secret Garden Hummingbirds project, you can find all the articles relating to this project arranged in chronological order in the Secret Garden Project Index.
Dear Mary
I am relatively new to your daily e-mail and am enjoying it thouroughly.
The Secret Garden is spectacular.
I am struggling with needlepainting and old eyes – an oxymoron?
Thank you for including us in your daily stitching.
Sharon Gray
Good Morning, Mrs. Corbet! As I expected, I’m not too keen on the sparseness of the Seed Stitch. This has NOTHING to do with your amazing creativity and skills, I just have a pathological aversion to white space unless something is supposed to be outlined like a sketch.
I’m terrible at French Knots! I do them completely incorrectly because of my Cerebral Palsy, but I really want to try these elongated ones.
Thank you, thank you, thank you, for thrilling us with your brilliance!
You do the most incredible work. I am so glad that I found your blog. Thank you so much for your incredible videos. I have purchased several embroidery designs and am itching to start!
Thanks for the daily highlight, Mary – I always look forward to your offering of the day, and especially this project. I haven’t started with it yeat, but I have since bought the book, even have the enlarged picture ready to be copied on my fabric – still not sure what I will do it on, but mostly, I want to give you a head-start so I can go and work with all the daily dosages neatly stacked one after the other:-)
Oh, and off-course, I need some time lined up too – I hate stealing a little bit of time here and there, so I don’t want to start unless I have a few days available for non-stop embroidery – so, it’s my holiday project:-)
I love the leaves, and I am mad about the flowers – needles to say, those birds are CALLING!
Thanks again!
Mary, you are truly an artist. I have been following “Secret Garden” everyday and can’t wait to see where you go! I bought the Secret Garden with the intention of doing my own project, but can’t seem to get started on it – no way it will look like yours. (:
Thanks.
Karen
I’ve been following your progress on the Secret Garden. I even bought the book right after you explained your plan. This is really, really beautiful. Your work is amazing and you are very inspiring! Thank you for sharing it!
Hi Mary, I’m the quiet one, always in the background (wall flower )I do tend to read lots of postings from many blogs but do not comment !
I have come to realise that I should consciously make much more effort…so here I am !
Your creativity is amazing…The secret garden is awesome, adoring the colour choices and the perfection that you put into your stitching !
Thank you Mary for your inspiration
Hugs
Chris Richards
xx
Hi, Chris! Thanks for popping in! 🙂
Piękne,aż pachną świeżością.
Pozdrawiam
Anna
absolutely lovely!!
Mary, I’m stating the obvious here, but your work is perfection, and I love the colors you chose for this project. Thank you so much for taking the time to share. I’m looking forward to hearing your tips on padded satin stitch : ).
Dear Mary
I have been stitching along with you and don’t have all the green leaves finished but I do love the project and your daily emails. Would you be able to show us an idea for a more solid filling of the flowers please? They look too sparse for such heavy and beautiful tops. I’m not excited about that filling you chose and don’t want to give up just because I can’t think of an alternative.
Many thanks. I look so forward to your daily emails.
Robin
Hi, Robin – Long & Short stitch looks great. You don’t have to shade it – just use the stitch to fill the petals. Of course, you can shade it if you want to…. You also don’t have to put the satin stitch caps on the petals. That was just my own touch, because I like satin stitch and seed stitch next to each other, for textural contrast. ~MC
I was starting to feel very stupid for not being all-too-wild about the sparseness of the Seed Stitch, but I do understand the need for texture. I can’t stop thinking of using all the shades to fill in the petals in the short little stitches. That way you have the texture, but no icky white.
You can actually fill completely with seed stitch if you want. Just pack ’em in!
Yes, the more I think about it, the more I could see that working. I do hope that I haven’t come across as overly-critical. You’re work is such an inspiration, and your generosity knows no bounds. I’ve always been bothered by white.
That’s ok, Kristina – different people have different tastes, so it’s no big deal. I’m partial to seed stitch, personally. But other people might not like it, and that is quite ok.
Another point about seed stitch and the photos is that the photos are quite close up, so you are seeing a lot of white. From farther away, the filling just looks like a lighter color, although, yes, there are still spaces between the seed stitch. It’s just not as noticeable when you’re seeing it from far away.
Well I’m looking forward to more pictures.
Hello Mary Corbet,
I love receiving your daily log. It is an inspiration and valuable source of information. Would you please tell me how you chose to pad the beautiful dark red satin stitched flowers from May 5.
Thank you.
Hi, Joan – I’ll be writing about the actual stitching tips for the satin stitch and so forth in a couple days, so look for that article a little later this week! ~MC
Mary,
I love your stylized flowers. The elongated French Knots remind me of the speckles that I see on the inside of the lilies I received for Easter, even though the flowers look more like double tulips.
My daughter-in-law graduates this week with her PhD in crop geneticist and your flowers reminded me of how one small change in genetic coding creates a whole new species. Thanks for your continued sharing. Debbie
I save all your emails in a folder. You have so many lovely things I want to try just waiting for the time I can get in there and read them all and do some of them. Just lovely~
Mary, your attention to detail is always amazing. Such lovely results.
Dear Mary, I’m following your daily blogs though I gave up during the ling and short stitch shading . I’m saving the mail to keep your instructions and ideas . So I’m learning. Some day I’ll be ready for a big project . I just have yo learn to shade with the LS stitch.
Hi Mary,
I am working along with you on this project and absolutely love it. That being said, I really don’t care for the seed stitch, somehow looks unfinished and not rich (does that make sense). Any suggestions for an alternative way of working that particular part of the flower. You are amazing and this is in no away a criticism, just my personal dislike of seed stitches. Perhaps I could use the padded satin stitch for the entire flower, what do you think?
Jenny
Hi, Jenny – padded satin stitch probably wouldn’t work for the larger petals, because they’re too large – the stitches would have to be too long. You also wouldn’t get much of a contrast with the teardrop in the middle. If you do something flat on that teardrop shape, you’d end up having a dent in the middle of each petal. You could always do long and short stitch, you could also do a chain stitch or split stitch filling, following the shape of the petals, etc.
Hi Mary, Your stitching never ceases to amaze me – it looks so ‘perfect’. I’m still trying desperately to keep each of my individual stitches neat and tidy. I have to say I really like the seed stitch you’ve added to the ‘body’ of the flower. I wouldn’t have thought to use it but I can see how it breaks up the solid patches of colour. I’ve tried seed stitch a number of times on various projects and, while the stitch is easy enough on a technical level, mine never quite seem to have the random quality. Oh well… I suppose it’s more practise, practise, practise..
I love your color choices it’s the one thing I have trouble with. I would think “stylized” would be easier than trying to do it for real and it’s much cuter too.
What a lovely project. I really enjoy the installments with all the detail. I wish I could do half as good as you do with the needlework. It makes me try that much harder.
I love all the wonderful colors that you are using…..
I am not stitching along with this as I am phobic about birds and couldn’t see myself actually embroidering them. I have been following the posts so far though with great interest.
As far as the stylised flowers go: I have always subscribed to the idea that as artists we are entitled to represent species that are yet to be discovered: whether flora or fauna is irrelevant.
The project is coming along so beautifully! I can’t wait to start mine! I have my book, my surface fabric, more DMC floss than I could ever need… What’s stopping me? I’m still working on a project that I promised I’d make my sister 2 years ago, and intended to give her for xmas this year, but didn’t start till January… And am about 1/2 way done with… Although tempting to start the secret garden before finishing the owl for my sister, I am holding off.. Better to finish one project before starting another! I’ve saved all the posts about the secret garden with its own tag, so I will be able to pull them up when I can finally start! Thanks so much for doing this project!
I am a s rd minor senior citizen(lol) and have never tried this type of embroidery..where do I start? It is I gorgeous.
Hi, Sue! If you start here at the index and go through the articles, you’ll find tips and links to stitch tutorials, etc., that will get you started. Here’s the index link: https://needlenthread.wpengine.com/2014/01/secret-garden-hummingbirds-project-index.html
Mary, I’m a recent newcomer to your site. I thought I was detail oriented, but you have me beat and it is wonderful!!! Your work and instructions are amazing. I definitely want to do this project and have everything except my background fabric. I’m thinking a wonderful batik (I’m a quilter) would be so lovely, but not sure what color would work. Know it would have to be super pale. Do you have a recommendation? I really love your fabric, but it is so out of my budget.
Also, will this information be included in the index for this project?
Thanks so much, Cheryl
Hmmmm. Not sure, Cheryl! I’m not too familiar with what’s available in batik. Maybe something in pale pale blues? To resemble a sky?
Mary,
I wondered about blue. Not sure I’ve seen anything really pale though. Had also thought about a super pale gray. Almost like a pearlized color. Does that make sense? I’m going to start looking. How would I go about posting a picture of WIP on this project when I get to that point?
Thanks, cheryl
Hi, Cheryl – I’m still working on a sharing area for photos… I’ll let everyone know when it is available…
Mary, This is truly lovely! I am making notes as we go along so that I will have them when I do mine. I have the book and all the materials, but have a few other things to do before I can start.
Hi Mary, your emails are a real treat for me, I look forward to reading them each and every morning. I escape into Needleland!!!Thank you so much for this pleasant, consuming diversion!!!
Especially like the secret garden.
Hi, Mary. I am so in love with this Secret Garden project! I gave the book to a friend of mine and her husband commented that his mother, who no longer can embroider, might be interested in coloring in the book and even looking at your work as you progress.
I sent them the latest (I think) email (https://needlenthread.wpengine.com/2014/05/secret-garden-flowers-thread-colors-stitch-details.html#commentform) but the index to the Secret Garden Project doesn’t link to this article. Could you please update the index when you get a chance? Thanks so much!
-Kerry Kresse