


When we parted on Friday, I was getting ready to launch into a “quick” embroidery project with a deadline – this embroidered book cover for a prayer book for Adele’s First Communion, which happened to be yesterday.
As usual, I underestimated the time necessary to finish the embroidery and the book cover. I don’t know why I always underestimate the time it will take to do these things, but alas, I’m a Super Underestimator, when it comes to time and stitching!
Today, I’ll take you through the embroidery for the book cover, show you the mistakes and foibles that I certainly didn’t correct, and discuss some changes that could easily be made to simplify the design. And tomorrow, I’ll show you how I finished the book cover.
I’m using this cross, grapes and wheat embroidery pattern for the cover of the book.
The ground fabric is linen cambric, which is backed with a high quality white cotton muslin (Southern Belle muslin).
I’m using these DMC threads, which I showed you on Friday. The book cover will most likely need to be washed a couple times, and I wanted threads that could easily handle a good washing.
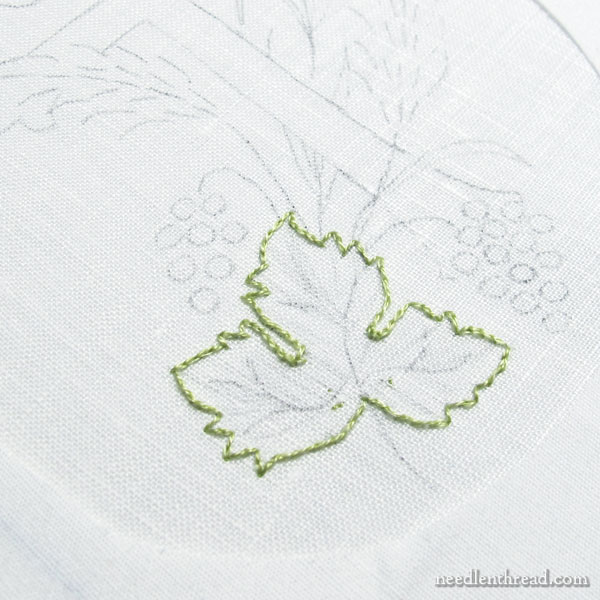
So, using one strand of DMC floss in the lightest green, I started with a split stitch line around the grape leaf, as a foundation for the long and short stitch.
When I work the long and short stitch, I generally set in long stitches that mark the direction I want the stitches to move in, and on a leaf, the direction of growth is usually the common approach. Everything on this type of leaf angles towards the growth point where the stem meets the leaf and from the center spine that grows out of that point.
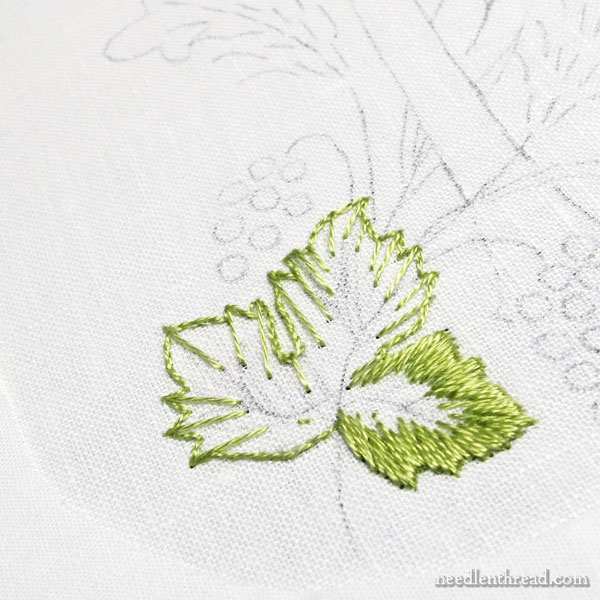
After the longer directional stitches are in, I go back and fill in between them, working longer and shorter stitches randomly.
So there’s the first layer of long and short stitch. There were a few places that would have benefitted from an adjustment at this point, but ….
Time, you know!
So I slogged on!
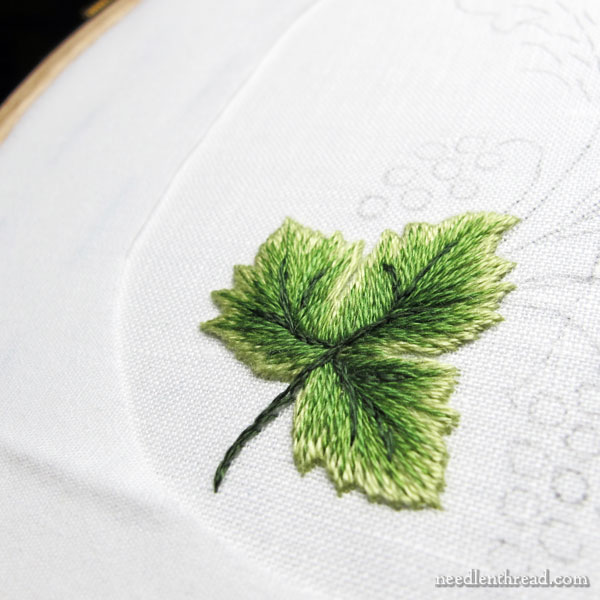
And here’s the leaf, finished. There are four shades of green in that leaf – three for the long and short stitch and a darker green for the stem and veins.
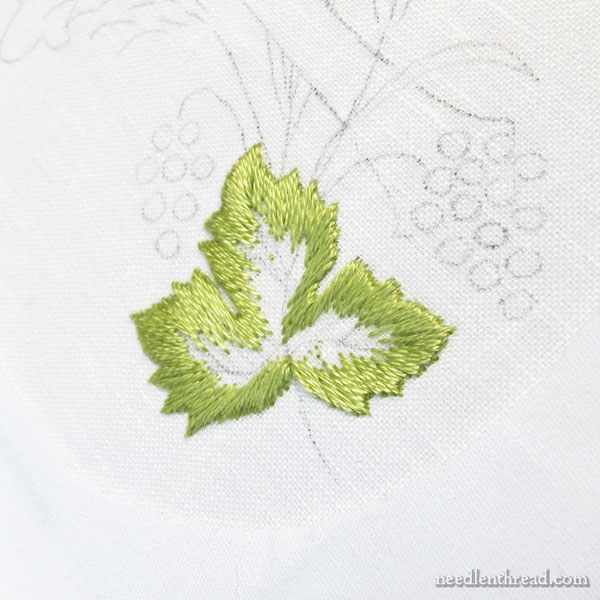
If I had been working at a more leisurely pace, I would have especially adjusted the lower left side of the leaf. I wasn’t really happy with that area, but…
Time, you know!
And so I slogged on!
Long and short stitch takes forever compared to other stitches, so if you’re in a hurry, it’s probably not the best choice for the leaf on this pattern. You could easily substitute a stem stitch filling, a chain stitch filling, or even just outline the leaf and its veins. The effect wouldn’t be the same, but it would still look nice.
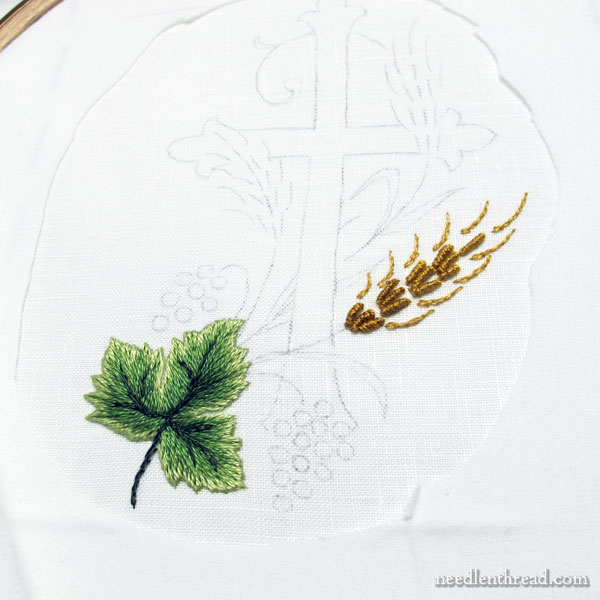
The heads of the wheat worked up pretty quickly – they’re just a series of bullion knots for the kernels with little stem stitch hairy lines for the beard.
I used two strands for the bullion knots and one strand for the stem stitch lines for the beard.
With the bullion kernels, I mixed the colors. I used one strand of a medium brownish and one strand of a yellow gold for the lower kernels on the head of wheat, and about half way up, I switched to a lighter brown and a light yellow gold in the needle.
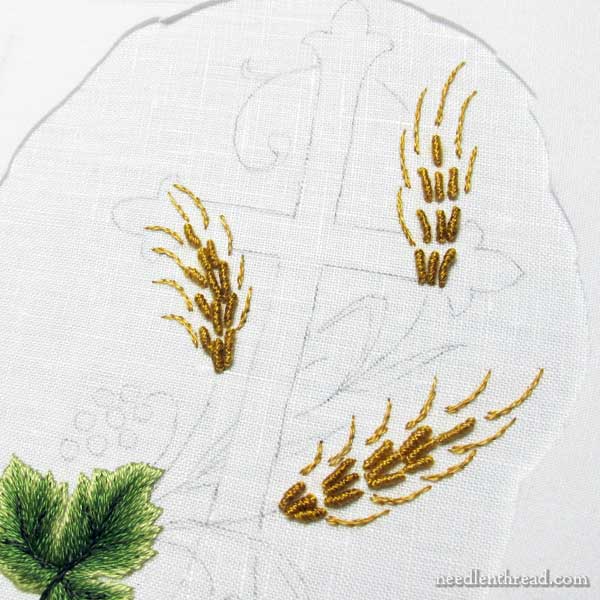
The heads of wheat look really weird, isolated and floating on the fabric…

…so I finalyl stitched in the cross, using stem stitch.
I probably should have done that first, since it’s behind the other elements, but this worked out ok.
I chose a medium corally-pink for the cross (I think it’s DMC 352), because I wanted it to be in color, but I didn’t want a dark or primary color.
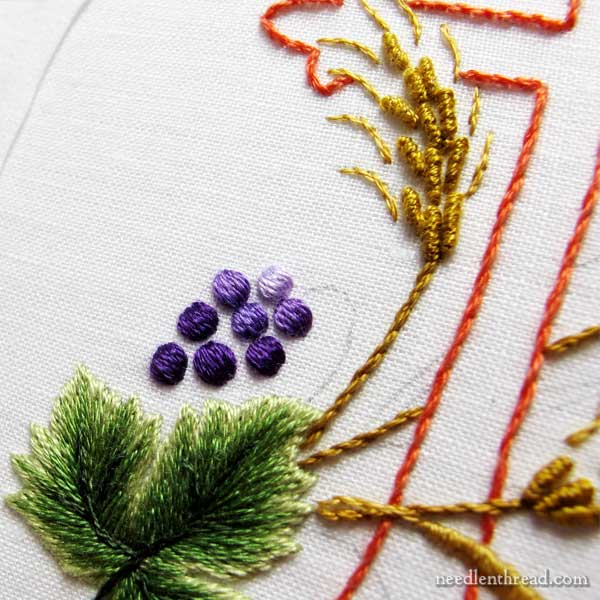
Then it was time to work the grapes.
The grapes are padded satin stitch, which, in retrospect, was probably rather silly. They’re so very small, that padding them isn’t really essential, even though I like them better padded – it gives some lift to the embroider.
If you’re trying to save time, you can skip the padding altogether. Another option for the grapes instead of satin stitch could be Rhodes stitch dots.
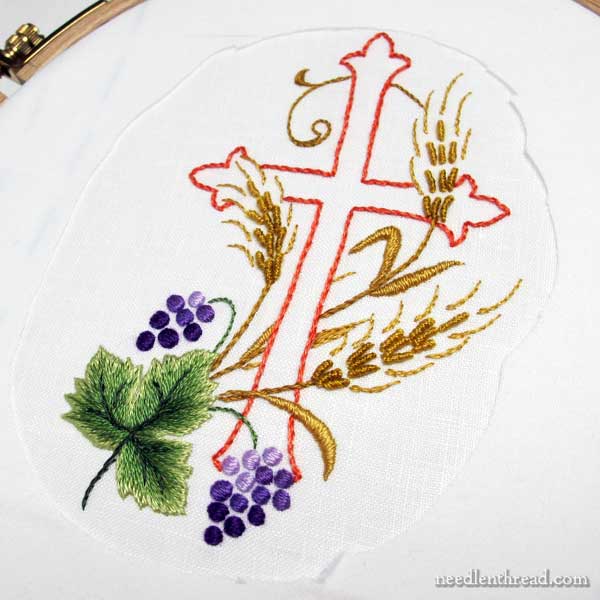
And here’s the finished embroidery.
The stems on the wheat are stem stitch in two strands of floss towards the base of the design, but working up to the swirl around the top, I used one strand of floss.
The leaves on the wheat are padded satin stitch, except for the leaf behind the cross, which is stem stitch filling, to keep it flat.
To speed up the process on that area, you could always skip the padded stitch on the wheat leaves and do them all in stem stitch filling.
The grapes on the large bunch down below ….well! A could of them ended up seriously wonky! I probably should have taken them out, but…
Time, you know!
Total stitching time: 8.5 hours.
Shortcuts for future reference: skip long and short stitch on the main leaf, don’t pad the satin stitch grapes (try Rhodes stitch for the grapes), and use stem stitch filling on the wheat leaves.
Those short cuts would shave quite a bit of time off the embroidery.
Tomorrow, I’ll show you how I finished this into a book cover, using a very quick and simple approach.
Book Cover Articles
You can find all the articles relating to making this book cover through the following links:
The cross, grapes, and wheat embroidery pattern
Setting up the project and choosing colors
The embroidery on the book cover (this article)
Finishing and assembling the book cover
Questions? Comments? Suggestions? Feel free to have your say below!
You may have finished the project that quickly, I never would have been able to! Save the more in depth project for Adele’s confirmation, when she’ll be old enough to appreciate the time and trouble it takes for such beautiful workmanship. How did the 1st communion go? Lots of excited children I bet. I hope her parents got some good photos. This book cover is so beautiful, thank you for showing us how you did it.
I think it is lovely! And I think the left leaf looks fine—don’t see anything that needs to be different. Thanks for giving the links to the different stitches.
I think this looks lovely. I’m sure your niece is delighted. Not every piece is intended for a competition. The fact that you made it and had it done for her should mean more. She will always remember that Aunt Mary made this for a very special day in her life. By the way, I am, for one, glad you made the leaf in long and short stitch. It looks more natural the way you shaded the lower left. Thank you for shareing this with all of us.
Dear Mary,
We are all glorious Super Under estimators. For all my daily planning – I would need at least 36 hours instead of 24, so I can squeeze in 5 -6 hours of sleep!
The book cover looks perfect for the occasion. The color choices are bright and vivid, I like the choice of coral for the cross – it is usually always gold/yellow or brown – it “pops up” beautifully!
Thank you for letting us know how long it tool you to finish it. In practical terms: Mary’s planned 4 hours translate into 8.5 hours in real time for her, and 12 + hours for the rest of us!
Have a nice sunny Kansas day!
Jackie
Don’t all embroiderers or crafters of any kind, for that matter, underestimate the time it takes to do something? I can always complete a project ever so much quicker in my mind than in reality!
Being nit picky, and you probably already know, but on the left arm of the cross, wouldn’t it show through the spaces in the corn?
Hi, Hazel – that doesn’t really bother me. Squint, and it’ll look better to you! 🙂
Mary, bom dia!
Estou sempre lhe acompanhando e aprendendo muito com seus emails. Sou apaixonada por bordados, e fico encantada com os seus. Sempre quis aprender fazer o bordado que você fez na folha e não consigo, por mais que eu olhe. Tem algum vídeo com passo a passo de como fazê-lo? Ficarei eternamente grata se puder ajudar-me a realizar esse desejo!
Que Deus a abençoe e que você possa, sempre, compartilhar conosco esse Dom que ele lhe deu!
Meu abraço fraterno
Elizabeth Vilarindo
Hello, Elizabeth! All the links for the stitches above will take you to the videos for those stitches. Hope that helps!
So lovely! I really appreciate how you point out the flaws and how you would do it differently. As a novice, that additional input is invaluable.
Dear Mary
I’m so glad you finished this project in time. I think it’s beautiful and I can’t see anything wrong with the leaf and I like the stems of the wheat embroidered in bullion knot stitch which look good and unusual. I like the Cross stitched in stem stitch and the grapes in raised satin stitch also look lovely actually the whole project looks so nice and perfect for a book cover. Considering the time it took I think it’s lovely and I can’t wait to see the completed cover, I hope your niece liked it and you enjoyed the day. Thanks for sharing the Bible book cover with us and for your tips and techniques on the project.
Regards Anita Simmance
My, my, that was quick. 🙂 I hope she loved it. When I did photo-album covers for a couple of family members, one for a not-so-pleasant reason, I did not stitch them on white. They would be handled too much to make that worth it. I will likely have to do another cover for a not-so-pleasant reason soon as well.
Mary, This book cover is lovely! I really like how the bullion stitch adds real “character” to the wheat! And I am glad that you used padded stitches because that continued the 3D “character” to the whole picture. I am sure that your niece was so happy that Aunt Mary made this especially for her!
So happy to know that I’m not the only one that manages to underestimate the time needed to finish something. You’d think I’d learn from experience but it never happens!
I didn’t want to say anything, but I was quite surprised by the time you expected for this embroidery.
Anyway, you have done a great job, I like it !
Nice work anyway .
Your niece will love it.
The colors are also good choice
Diane D
Dear Mary, thank you for showing the progress of the book cover. As is always the case, your stitches are exquisite, and you were imaginative in the choice of colors. My imagination would have confined me to a golden brown for the cross, but that would have been too much with the golden wheat, so the coral was a strikingly good choice.
Enjoy your blogs so much. They educate and illuminate every day. Have a small request: could you please include the outside dimensions or an object to show the size of the work? Thank you for your contributions to the day.
Hi, Pat – on this particular piece, the pattern prints at the exact size I used – it’s about 4 or 4.5″ tall. I think tomorrow’s blog post will have an outside element in it, so you can see the scale of the work on the book and cover.
Well done and on time I am impressed. I love your suggestions for speeding up the project this will be a reminder to me that I can complete a project using different stitches and save the labour intensive stitches for leisurly stitching. I love the leaf and think it is perfect. I love the bullion knot wheat.
Love the color choices and design! I wouldn’t change anything. Would you be willing to share with us the colors you used? Thanks.
Sure! I’ll try to remember to write them down and post them tomorrow!
Underestimating the actual time needed to get things done is a universal human quality. I do it every day!!
It was very helpful to see how you adjusted your choices – from fabric, to simplifying the design, and selecting stitches. I hope it was a happy day for you and your family.
We are always our own worst critics, aren’t we? I love that leaf just the way it is. And it’s never occurred to me to use the bullion stitch for wheat kernels, duh!
Of course, I’m very interested to see how you finished the piece into the bookcover.
And congratulations to your niece on her First Communion. (I still have the dress and veil I made for my daughter’s 1st Comm…seventeen years ago!)
The cover is BEAUTIFUL! And don’t worry, I won’t tell, lol!
Ah, I know! As a designer there have been instances when my grand vision of a gift, because of time, turned into a great vision that turned again into a good vision with a few I shoulda”s and a few uh oh’s that I couldn’t correct.
But the look on the recipient’s face wiped out all my misgivings.
And I’m CERTAIN that look on the face of your niece (and all who see the book) will do the same. Your place in Heaven as a wonderful aunt is assured!
Mary, that’s the sweetest thing.
Cheers, Kath
What a lucky girl Mary, she’s certainly going to have some treasures for her old age.
I think I gained as much learning from you explaining the why’s and wherefores and might offs than just a straight tutorial on ‘how to’.
You are ‘a treasure’ that I have found. 🙂
Can you actually split a single strand of dmc floss? And is there a trick to do this. I am planning to try my hand at needle painting and the first step is to outline using split stitch with single strand dmc cotton floss. Since this confused me I have put this project on the back burner. After reading today’s post I thought to ask you. I love your book cover. Your niece will love it.
Donna W.
When they instruct you to use a single strand of DMC, they mean one from the six, not one, split into the two plies that it’s made out of. The thread would shred pretty quickly if you tried to break it down into single plies. So they just mean use one strand, instead of all six how they come off the skein. Hope that helps!
Hi, Donna – Ok, I misread your question!
I suppose there’s not really a trick to split stitch with a single strand of DMC. It’s much easier to get a decent split stitch in a single strand of floss, than in multiple strands. With multiple strands, the strands themselves separate, so you end up with a much more “open” split, but with one strand, the split “hugs” the working thread and doesn’t create such an open chain look.
In any case, magnification helps. If you can’t see what you’re doing, it’s harder to split the stitch.
I think the key, though, is this: when you pull the thread through to create the forward stitch, if you’re having trouble coming up and splitting it, hold the working thread from the back (I usually do this with the little finger of the same hand I’m holding my needle in), so that you’re pulling that forward stitch down onto the fabric and keeping it in place there. You don’t have to pull it hard, but putting some tension on the thread will hold the forward stitch in place, and then it’s easier to come up into that thread right in the middle of the stitch.
It makes a tiny, fine line, but it’s just perfect for outlining under satin stitch and long and short stitch.
Sorry about the confusion in the previous reply – and thanks to Judith for pointing it out!
Very striking, good job. Glad you got it done on time. I was sending a gift to my Mom for Mother’s Day and I thought I’d whip up a matching necklace to match the top and knit swing jacket that I got for her. After all I had everything already, but since I had no real plan to follow, I spent a lot of time just designing before even executing it. Needless to say, it took up the better part of the day to complete it! So I can definitely relate to and should probably become a card carrying member of the Underestimaters Club of America! LOL
I note that you replied to the question about single strand split stitch by saying that they meant you to use a single strand of floss rather than all six strands. I think that what she was asking was, how do you split a single strand of floss to make a decent split stitch?
I was curious about as well, never having tried it.
I loved your book cover- especially the grape leaf- but then I really like almost all of your work.
Ah! I see …. Oh dear. I’ll go back up to that question and answer it there….. Thanks, Judith!
Mary, it’s lovely, and I’m sure your niece was delighted. Like so many of your other readers I particularly like the wheat, but it’s all beautiful. As for time required – if we could estimate that accurately would we ever embroider at all? or would we recoil in horror?
Hola Maria, realmente es una belleza su bordado, espero que publique una foto del libro terminado, me voy a atrever a copiar su diseño, pues mi nieto tambien se prepara para primera comunión, he aprendido mucho y estoy facinada con sus correos, gracias y bendiciones desde méxico!
I absolutely love what you did with the shades of green in the leaf!
Mary, thank you so much for sharing this beautiful piece of embroidery, I know your niece will love it and think of you each time she picks up her prayer book.
It is comforting to know that I am not the only stitcher suffering from the overestimation bug. In fact, I am sure there are a lot of us out there.
Can’t wait to see the finished cover.
You are a very loving Aunt to make the cover. It’s very pretty and surely was a special gift for your niece.
Hi Mary:
I would like your permission to stitch this prayer book cover for my personal use. And if it’s okay with you, I would like to blog my progress as well. Thank you so much – it is such a lovely design!
Hi! Sure, you’re welcome to – I’d definitely appreciate a link to needlenthread.com with credit, if possible! Enjoy the project!
Amei as dicas de como bordar lindamente.
Achei belíssimo cada um dos bordados!Queria aprender mais e mais! Obrigada!