


Notice the new title? We’re no longer going to call this series of tutorials Stitch Play – we’re going to call it Stitch Fun! Same exact idea – just a different name! Hope it doesn’t cause too much confusion!
So, it’s now time to touch up our embroidered evergreen sprigs and fly stitched holly with some bright red berries! This is a great technique for creating round red dots of any kind on your hand embroidery projects.
There are different ways you can add dots to embroidery (padded satin stitch dots are a favorite of mine), but for some reason, I find this round Rhodes stitch little ball easier to work than a padded satin stitch dot, and a lot more forgiving. And, because it isn’t padded – it’s actually self-padded, it doesn’t take as long to work up.
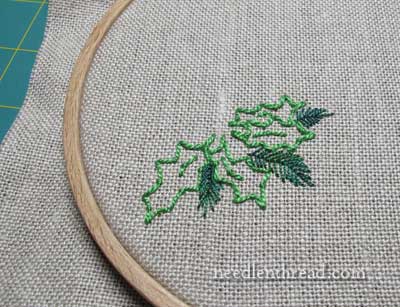
So far, this is what our free-style, embroidered Christmas greenery looks like. After we stitched the holly using fly stitch in #5 perle cotton, we added in some evergreen sprigs in fly stitch in a darker green, in #12 perle cotton.
A note on thread choice here – you really can just use anything in your stash. Because I was stitching these rather large for the demonstration, I stuck with various weights of perle cotton, but regular floss will work fine.
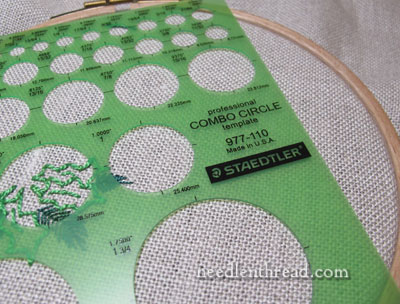
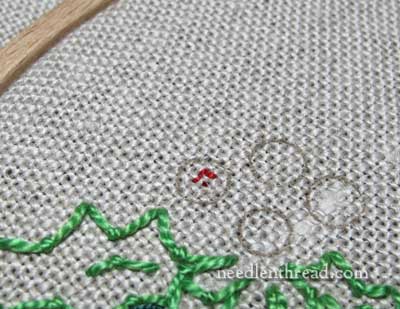
Up to this point, I’ve stitched completely “free-style” embroidery with no pattern. But when it comes to making circles, I prefer a little help. Drawing a perfect circle is difficult enough for me (ok, it’s hopelessly impossible!). Stitching one? Fuhgeddaboudit!
I use circle templates like the ones pictured above, when I want to outline a circle. These plastic templates can be found in the drafting / drawing sections of art or craft stores. For a little sheet of plastic, they might seem expensive, but they’re an indispensable tool and they’ve bailed me out of many a circular situation.
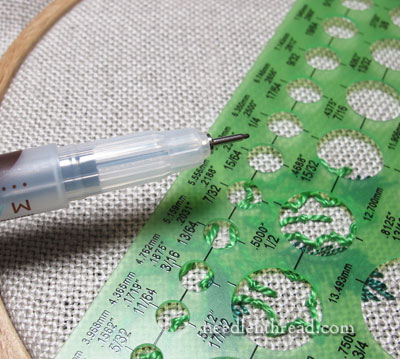
Whatever the case, though – even if you don’t have a circle template – it’s easier to embroider a really round circle if you somehow draw the circles on your fabric. I’m using a fine tipped art pen here to draw mine.
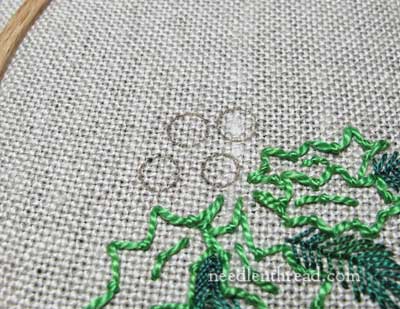
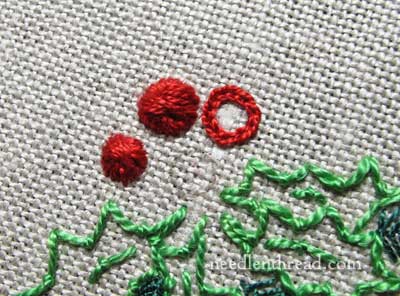
I didn’t draw all the circles the same size. Whether or not you do so is up to you, but I think berries and whatnot look a little better when they aren’t all exactly the same size.
I’m using a #8 red perle cotton here. Floche and coton a broder would work equally as well, but because they are finer threads, it would take a little longer to stitch this up. The perle cotton covers a lot faster!
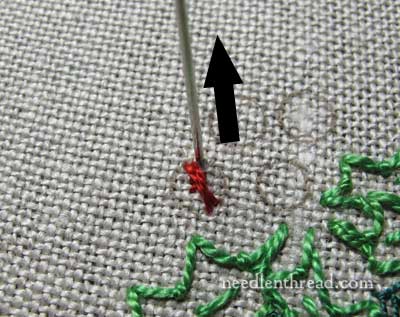
I started the thread with some tiny stab stitches in the middle of one of the circles, since they will be covered.
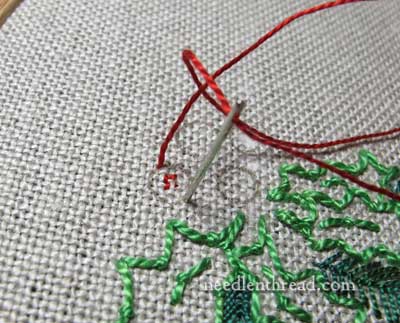
Rhodes stitch is simply a series of straight stitches crossing from one side of a shape to the other (like satin stitch), and moving around the shape until it is full. The difference between this stitch and satin stitch is that Rhodes stitch crosses over each previous stitch.
So, in the photo above, you can see I’ve come up on one side of the circle and I’m taking my needle and thread down on the other side, directly across, to cut the circle in half with the first stitch.
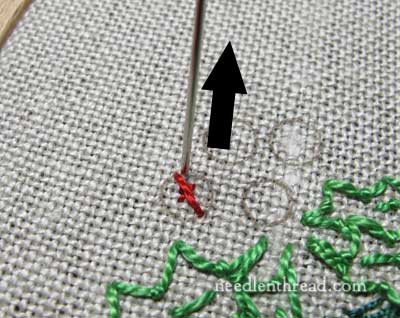
Then, I bring my needle up just to the right of where the first stitch started…
… and, crossing over the first stitch, I take the needle back down into the fabric just to the left of where the first stitch ended.
For the third stitch, I’m coming up again just to the right of where the previous stitch began, and I’ll take the needle down into the fabric just to the left of where the previous stitch ended, crossing over the previous stitch to get there.
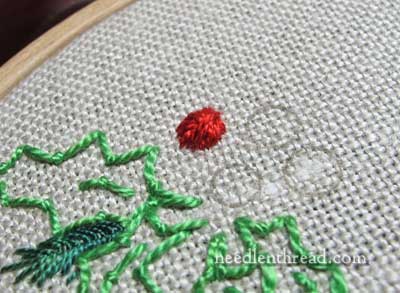
In this way, moving clockwise around the circle and crossing over each previous stitch, I worked my way around until the dot was full. With the perle cotton, it really mounds up high in the center where the stitches cross over each other.
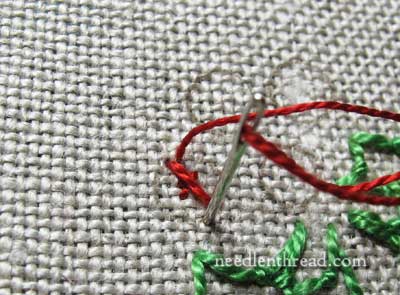
If you feel more comfortable working around an outline, you can actually back stitch the circle first, and then work the Rhodes stitch just to the outside of your backstitch outline. This might help keep your outer edge of the circle smoother. But it does add an extra step!
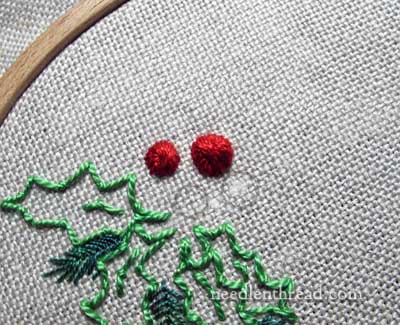
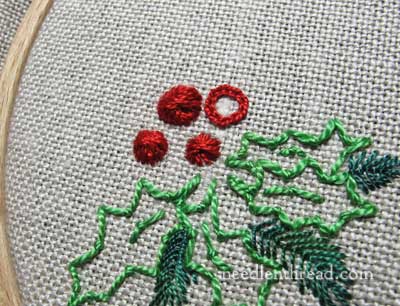
Fat little dots! This is just a great way to stitch round things.
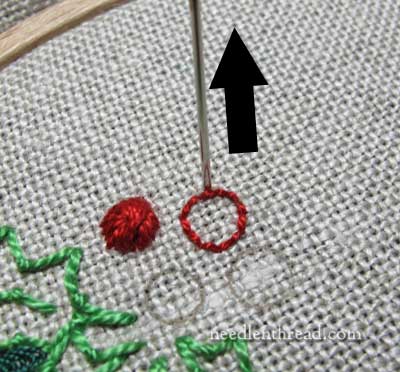
When you work your way around the dot, you’re essentially covering up each side equally. If, by chance, you find that one side fills faster than the other and you’ve got space for one more stitch on one side of your circle but not the other, go ahead and take that stitch, but instead of crossing over to the other side, tuck the stitch inside the circle, taking it underneath all the stitches and down into the fabric.
Now, all that being said, you might not be up to Rhodes stitch berries, and if that’s the case, that’s ok! You can always just use a simple chain stitch worked in a circle to outline your berries. Or a stem stitch – or whatever line stitch you’re most comfortable with.
Here’s a tutorial on working chain stitch in a circle and making a perfect, indiscernible join. And here’s a tutorial for working stem stitch in a circle and making an indiscernible join.
For the fourth berry, I made the Rhodes stitch berry less dense by working the stitches farther apart. It won’t take as long to work, and it won’t sit as high off the fabric, but it will still suffice for a nice little berry!
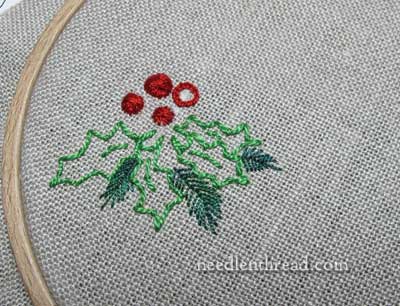
There we go – a simple way to work up some Christmas greenery with bright red berries! All told, the whole sample took me about 15 to 20 minutes, and that included stopping to snap photos along the way.
I wanted to show you this concept in use. I stitched a few little holly and evergreen sprigs using regular floss on the corner of large, nice-quality cotton flour sack towels, and I’m going to line a couple baked-goods-and-coffee gift baskets with them, folding the embroidered corner up on top. But have I gotten any Christmas baking done yet?
That’s a rhetorical question.
Stitch Fun is a series of embroidery tutorials (previously known as “Stitch Play”) here on Needle ‘n Thread that demonstrate some different and fun things you can do with individual embroidery stitches and their variations. As of today, I am officially renaming the series to Stitch Fun. Hopefully, this won’t cause any confusion for anyone. Feel free to check out the other tutorials in the Stitch Fun series!
G’day Mary, no confusion, just fun!
I never thought of Rhodes stitch. Perfect.
Thank you. Cheers, Kath.
Thanks, Kath! I really appreciate your comment – I needed a drop of cheer this morning!! ~MC
Love this, so cheery – I need a hot cup of cocoa now!
🙂 Thank you, Heather! I’m glad you like it! It’s a FUN way to play around with stitches – and without a pattern (except for those blasted circles, which I can’t draw free hand to save my life!) Enjoy your cocoa!
Cocoa sounds good right now! Snowing and windy in Kansas…. just got the electricity back, and it looks like it’ll be an inside winter day!
Hi Mary,
The Stitch Fun today is just great – those red berries are so pretty in Rhodes Stitch and I never would have thought of using it. Thank you for spreading your special brand of embroidery Christmas cheer! And never mind about the baked goods – your embroidered towels will look so pretty you could just fill your basket with “store bought” cookies and the giftees will be just as happy to eat them!
-Sharon in France
Thank you, Sharon! Yes, I think you could be right about the baked goods! Actually, I’m going into the kitchen as we speak! Perfect day for some baking – snowy and cold! Merry Christmas! – MC
Gosh, that was fun! Something cheerful to read, three mornings in a row. Thanks, Mary.
It will be a good day for baking, eh? The big storm that’s hitting Kansas is just now arriving in central Illinois. Time to turn on the Christmas lights and fill the house with the smells of sugar, vanilla, and cinnamon.
Thanks, Georgia! I’m glad you enjoyed it. Stay in and stay warm! We’ve already got sunshine peeking through in this corner of KS – and the new coat of snow is lovely, but the wind is still pretty bitter! Enjoy the day! ~MC
Thank you for sharing that, Mary. I first published it as the “Criss-Cross Satin Stitch” in Take A Stitch, my book of Brazilian embroidery techniques back in 1978. As you said, it’s a variation of the Rhodes Stitch. When I taught it (and also published it on several of my Brazilian embroidery designs), I had stitchers work around the circle like a clock, so that from 3-9pm, your stitch would be perpendicular to the 12-6pm stitch. It’s also important to outline circle motifs to get that nice, even edge. This is a beautiful stitch when worked with EdMar’s 100% rayon floss weight Cire. I’ll post a link to this page when I publish it on my blog.
I also have an interesting stitch technique for making holly leaves with a raised center ridge.
This was a delightful find this morning.I often stitch eyes on teddy bears and this Rhodes stitch will help me make my eyes more rounded and not have a flat spot. A cold windy day is great to play house and up to get everything ready in time for the kids to get home tomorrow. One teddy bear for that new grandbaby to go! Merry Christmas!
Debbie
Hi Mary,
Ohhhhhhhh – I love the “fat dots”. AND I love the new title. I think I have said before that I only know a few of the easy stitches – and I work small –
because I just love to have fun with thread and color and cute small designs. If it’s not fun – it really isn’t a leisure pasttime to me. I have enough of work. That’s just me. Of course, I do appreciate the wonderful work that you and other advanced embroiderers do!! Welcome Stitch Fun!! And I welcome each and every one of your newsletters in my inbox.
Thank you Mary and you, too, Rosalie for introducing me to this circular stitch. I haven’t been satisfied with my ‘dots’ and will be practicing this evening. We have a blizzard warning and I’m looking forward to some indoor time…..if only the electric doesn’t go again.
Hi Jane
If you are concerned about the electricity going, when you next pass a camping store, go in and by a head lamp/torch. They usually come attached to a band. Pop that on your head and come rain … sorry power cut or not, you can carry on stitching.
Happy stitching Ilana
Oh this is a wonderful stitch and great for eyes on little kids dolls, etc. I usually use a satin stitch but these dots maybe more effective and as 3D dots, or flower centers. Thanks so much.
Dear Mary
Thanks for this article the evergreen and holly look lovely love the Rhodes stitch. I love your your present of baked goodies and coffee lined with the sack towels sounds wonderful so festive.
Regards Anita Simmance
Rhodes stitch for small circles – *almost* like a self-padding satin stitch. I think they look even more berry-y(?) than satin stitched ones would. I also never would, or at least not for a veeeery long time, have thought to use the fly stitch for the holly outline. Thanks for the ideas!
Hi Mary, You really made my day today. firstly I saw your Hungarian braided stitch and you pictured your reference books. Except for 2 I have exactly the same books. So I know that I am headed in the right direction.
Then joy of joys you show exactly how to embroider berries. I am just working on grapes and I have already backstitched them. So now all I need to do is Rhodes stitch.
I have a fabulous week ahead because we have a large needlecraft fair in London, so I can search for the 2 books I dont have. Also have made a note of various items you use, and will try and find them there. In London we only have one decent embroidery shop. The others are far out. So the twice yearly fairs are a life saver.
Many many thanks Mary, have a great week
Ilana Z Toledano (London UK)