


When I first saw Hazel Blomkamp’s Late Harvest, an embroidery project in her book Crewel Intentions (which I’ve reviewed here, if you want to see what’s inside it), I thought Wow! That would be the Perfect Fall Embroidery Project!
And then I ended up starting it at the end of winter this year.
Originally, I set up the project as a “carrot” – something I can work on solely for the fun of it, as a reward when I finish other things I need to do, or just when I want something to stitch for relaxation.
The last time I had a chance to work on it was in the hot throes of summer, during mid-July in Kansas. Not exactly the Vision of Stitching Bliss that I first pictured for this project, which I imagined indulging in on crisp autumn days.
This weekend, even though the temperature peaked around 90 (thanks a lot, Kansas), I took it out and worked on it a bit. Today, I’ll share some progress, make some comparisons, and share a happy discovery with you.
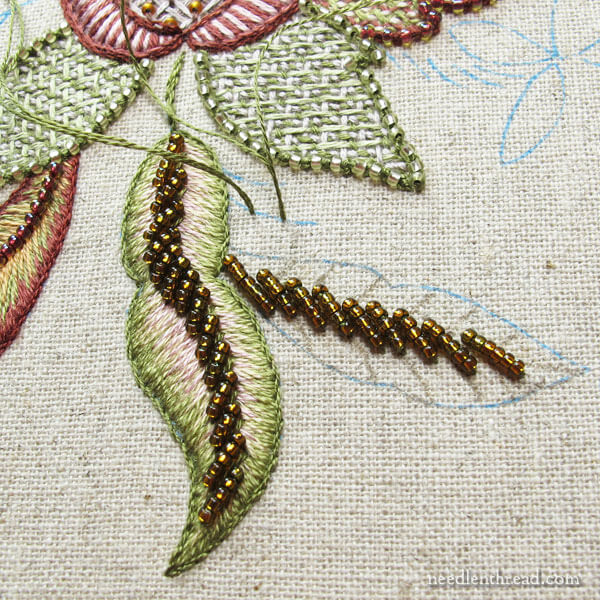
When we last visited this project, you might remember that I didn’t follow the instructions very well. The element in question at that time was the large leaf on the left in the photo above.
To summarize: I hadn’t read the instructions through first, and I assumed that the leaf was stitched in long & short stitch from the outside in (which is the direction I would normally stitch a leaf in long and short stitch) and then the beads were attached down the middle of the leaf.
In fact, in the instructions, it’s just the opposite: work the beaded spine of the leaf first, then work the long and short stitch filling from the inside next to the beads out to the edge of the leaf.
I was determined to follow the directions on the second leaf.
So, the first thing I did was work the spine with the beads.
Because I had the design lines to follow on this leaf (they were covered on the previous leaf), the spine came out much more even, and it was a lot easier to stitch the beads in place.
The spine on the left leaf is kind of wonky – but in the scheme of the whole piece, I’m not worried that it will look too bad. If it does, at the end, I might re-do it. But for now, I’m leaving it.
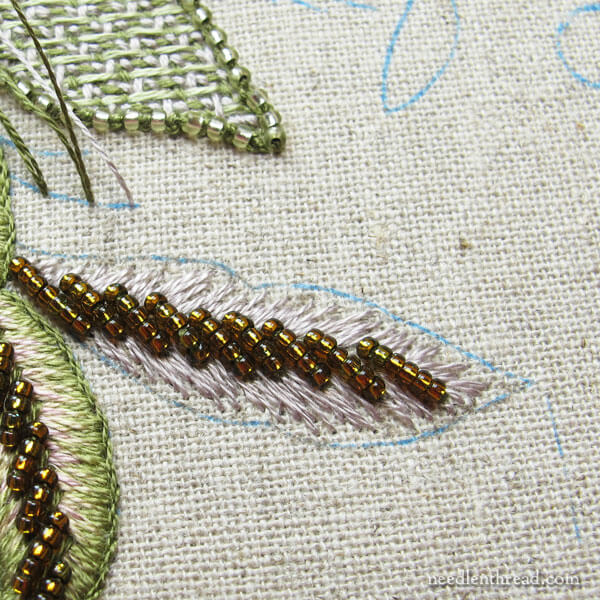
I began the long and short stitch next to the beads, and working out towards the outer edge of the leaf.
It felt Really Weird to work in this direction. It was like trying to stitch while looking in a mirror at the work surface.
I knew that three layers of colors had to fit in this space, too, so I was a little concerned that either the last layer would look stunted or the middle layer would totally disappear.
But, I forged on! I wanted to see if there was a major difference in the outcome…
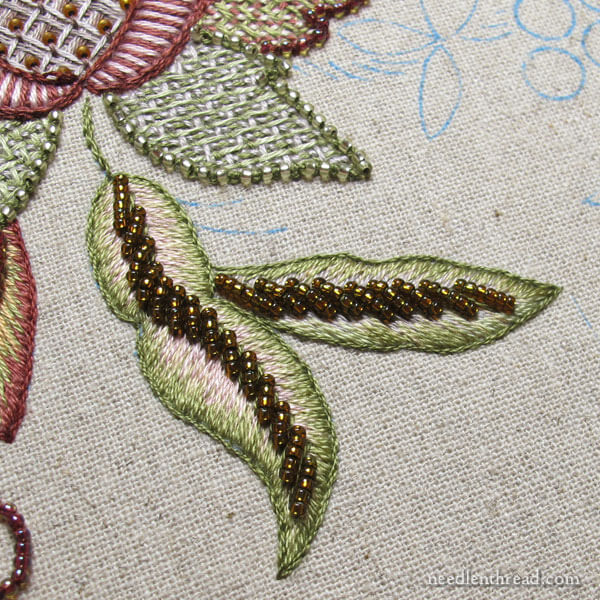
Eventually, the second leaf was finished.
Each leaf is outlined with a stem stitch in a slightly darker shade of green. While this contributes to the crisp edge on the design, it also serves to clean up the edge, which is definitely a little messier when you’re stitching from inside the design to the outside edge.
On the first leaf (on the left), I split stitched around the leaf and then worked the long and short stitch over that split stitch line, and the edge came out quite sharp and clean, with a little lift to it.
On the second leaf (on the right), the edge is quite flat, and the ends of the stitches on the design line were slightly feathery looking.
The stem stitch outline was the leveler, and I think both leaves came out fine, as far as the long and short stitch goes. The second leaf (the right leaf) has a much better looking beaded spine. But the left leaf shows much more of the middle shading and color change on the leaf.
So, something learned! Either way has its advantages and they both work.
There’s a third leaf to work that’s just like these two, and I’ll work it according to Hazel’s instructions. It’s much easier to get that beaded spine right, when you can see the design lines.
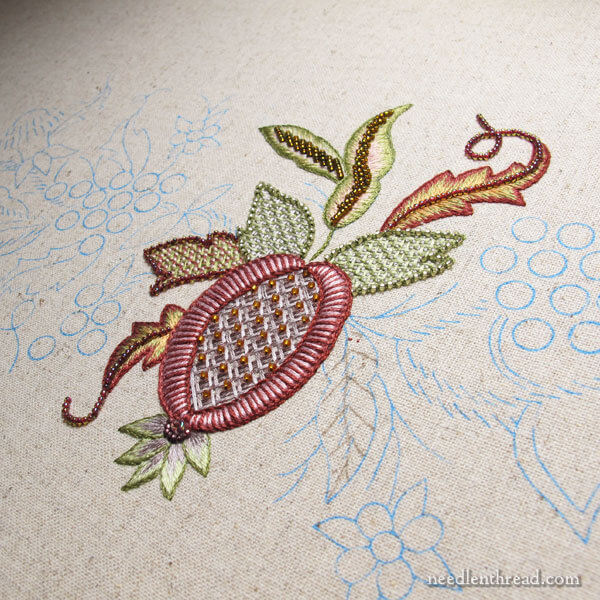
This is the very-little-progress that I’ve made on the whole project at this point.
Incidentally, the pomegranate in the center is elongated and not symmetrical. That’s the way it is in the design. It’s not meant to be round and perfectly balanced. The majority of the pomegranate, except for the lower tip (maybe the lower one-third) is covered with stumpwork leaves, so you don’t see most of it – just really the lower tip and some of the center.
I set this project up on stretcher bar frames. It’s a very wide project, but not deep.
I’m using my Needlework System 4 table stand to hold the frame while I stitch. The frame is tilted downwards at an angle, just over the edge of my work table.
So, when I’m facing the frame and working, it’s hanging downwards in front of me, and because of the width of the frame, it covers quite a bit of my work table.
If I need to get anything on the table, I have to reach underneath the frame or around it to fetch.
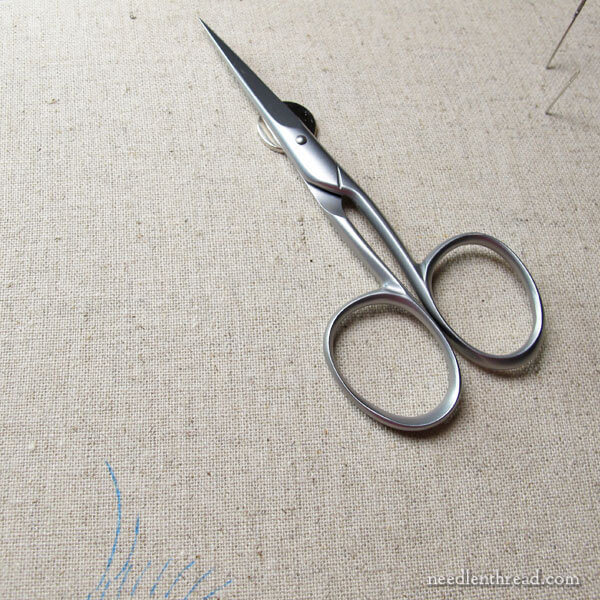
So, to remedy that, I use really strong tiny magnets to hold my scissors on the front of my fabric, since I reach for them often.
What I didn’t like was having to reach underneath the frame to pick up my little bead tray that I made using a gift card tin and a tacky bead mat.
Happily, the configuration of the tin and the tacky bead mat ended up being the perfect solution for this particular project, because…

…a couple very strong little magnets hold the bead tin in place on the front of the fabric, too.
So, the magnets hold the tin (with gusto – they’re very strong), and the tacky mat holds the beads, even though the whole frame is hanging at least a 45-degree angle. It’s very convenient!
I love it when things work out like that!
So, that’s my progress on Late Harvest. It isn’t much, but a little progress is always better than no progress at all.
I’m definitely planning to spend more time on this project during the cooler fall days (hopefully coming soon). It’s funny how just that little bit of stitching this weekend has sparked my obsession with it again. It’s such a fun kit!
You can find the kit for Late Harvest available at Hazel Blomkamp embroidery, if you’re interested in stitching it, too. Keep in mind that the currency is in South African Rand, and the kit ships from South Africa.
The kit doesn’t come with instructions – the instructions can be found in Crewel Intentions.
Mary,
Happy Thanksgiving from Canada. It is also a gorgeous weekend here and a gift to those who are fortunate enough to own a cottage by a lake.
Your frame set up with a 45* slant away from you fascinated me. I cannot quite picture it and wonder if you could add a photograph of it on your next posting of this project. I read Hazels instructions to stitch from the centre out and wondered how it would work. Obviously, very well.
My health is continuing to improve. The family were wonderful. Have started to stitch again though not to write. That will happen when the urge occurs.
All the best, Ann B.
Dear Mary
It’s good to see that you have started more stitching on the Late Harvest project just the right time for the cooler autumn days. The leaves with the beads are beautiful as is your stitching. I’m glad you were able to get some stitching done this weekend and I love the idea of how you use the magnets great concept it keeps everything together. Thanks for sharing the Late Harvest update with us and for the links to the project and I look forward to your progress on this project.
Regards Anita Simmance
A little progress here and there is better than no progress at all!
(And it looks very nice; stop fretting over the first leaf.)
Thank you, Mary, for taking the time to show a WIP! I personally think the beads look fine on both leaves. And I can’t see much difference in the L&S stitches that can’t be attributed to the different angles of the stitches relative to the camera and light source. But I would think it’s easier to stitch down by the beads, rather than trying to come up by them?
Holly
Yes, you’re right. I switched about half way through, to going down by the beads. But it’s easier to set the angle, if you’re coming up by them and heading outwards, but you do end up having to scooch around the beads as you bring the needle up…. so, anyway, on about half of it, I went down by the beads, and the other half, I came up by the beads. Either way worked!
Both of the leaves are beautiful, but I think I prefer the first one. I would definitely find it more natural to work the leaves as you did on the first one. As I said though, they are both fabulous and nobody but you will notice how they’re worked.
I think it’s a shame that the gorgeous pomegranate will be partially obscured – it’s lush! (unless I’ve misunderstood – in which case, ignore me).
I love those strong magnets, I have one on my seat frame and park my needles on it, out of the way.
Hi, Cheryl – no, you’re right – it will be mostly obscured, in a way. There are stumpwork leaves that float above the whole upper part and upper outside edges. The pomegranate, though, peeks out enough that you see it, and it looks pretty neat in the design. I can’t wait to get to that part! Yes, I find so many uses for strong magnets….as long as I don’t get them close to my camera, all is well!
Hi Mary
I’m so glad you have started “late harvest” from Hazel’s book. I purchased this book as soon as it arrived from the publishers and sourced all the materials for doing this beautiful piece of work. Then I became scared of starting as I had never worked the weave stitch before. Now I can follow you as you work each piece. This has given me confidence in doing it myself. Thank you.
I would love to do this one myself sometime; I have the book, but other stuff is pending. (Plus I need to learn to do stumpwork!) I love seeing your updates!
I like the lift on the edge of leaf 1. Would you get the best of both methods by placing the spine beads first, then working the long and short from the outside in, again going over a split-stitch border?
That’s exactly what I was going to suggest. Do the segments in her order, but stitch in the way you are used to doing your stitching.
Mary, I love my System 4 table top frame ( I also have the floor model as well).
When at home I solved the “reaching under) by get a little rolling cart from JoAnn’s and placing the essentials – threads, beads, etc. on
Top . It even has drawers for storing stuff. I also got the 4′ ten drawer rolling carts and am in love with them ( Joanne’s – look for sale and then use coupons. I got the price down to $35.) one has just tools and hoops, another threads and the third is fabric and small projects TBD ( bookmarks, pin cushions, necklaces etc)
I can roll them into any room I am working or just line them up against the wall.
Darcy
This is a “keeper” article–so many good tips! Your “Late Harvest” project looks lovely.
Laws have changed since I was in healthcare but, pharmacies used to get pill counting trays from drug reps….they make great bead trays!
I’m curious about how you get to the back of a wide project on stretcher bars with the System 4. Since you are working at an angle, don’t the bars hit the table when you rotate the piece? Or are you using the extender, and if so, does that give you enough clearance?
Hi, Cindy – you’re right, it is difficult to turn the wide frame. I bring all my ending threads to the front, in any area that’ll be stitched later, and I only flip the frame once, when I’m ready to end off all my threads. So I flip it by actually turning the frame over and not turning the neck of the stand, but only after I’ve finished stitching in an area and need to end all my threads.
Divide South African Rand prices by 13.33, preferably before keeling over! Sheesh, worse than lire or yen! . . . In the second leaf, it looked to me like you just laid the beads on flat. I am more of a beader than embroiderer. In drooling on Native American work, I notice they have a gift for letting the beads hump up a bit in such a situation, giving depth. And similar practice in Oriental and European beadwork. At any rate, both your leaves are lovely. Thank you for taking us to this beautiful place.
Fantastic thinking with the whole magnet/gift card box/sticky mat/bead keeper! That could come in handy in other types of projects, too… Hmm…
This is just beautiful, Mary. I do admit, I think I actually like the first leaf better just a bit, but really, you are right, once the entire piece is finished, they will just become part of the whole and no one will ever notice any difference I am sure. I am looking forward to watching you work on this. I must admit, I’ve missed a “for fun” type piece since you finished the hummingbirds. Now that I think of it, how did you frame them? Or what did you end up doing with them? Did you post and I either missed or forgot? Would love to see them completely done up.
Hi Carol – We’ll be happy to have you in Arkansas! There’s a good EGA chapter in Little Rock — please join us if you’re moving to the central part of the state. Jane
Thank you Jane for the invite. Unfortunately I will be an “almost from MO” person. We are about 2 miles (if that far) from the MO border. And you know those beautiful Ark. roads, they make sure you slow down and enjoy the scenery. LOL.
Jane, I looked up the guild to see if any others were closer. No such luck, all are over an hours drive away, thru those wiggley roads. 🙁 But oh, if I had the last piece I did (it’s sold) I would join just to try and enter the mixed media exhibition! But all are sold, except one and that one is earlier than 2013 I think, maybe 2012. 🙁 I wonder if this is a one time thing. Most likely. Dog gone, I’ll miss the boat again!
Aren’t you clever with your tin and magnet! And both leaves look wonderful.
Hi Mary, this is sort of not apropos to this at all but since you raised the topic of your table stand, I thought I’d ask anyway.
What do you do to hold your pattern where you can see it? I am using a sit-upon frame for my hoop and the pattern is sort of flopping around on the couch, which is not at all convenient. Do you have a solution to this at all? I’ve tried clamping the pattern to the hoop but it takes up too much room (as well as creasing the as-yet-unused linen). I cannot think of a solution that allows the pattern to be in my eye line but at the same time, out of my way enough to allow me to work on my hoop.
Any advice would be gratefully received. Thanks.
Don’t know if you would like this idea, but how about one of those inexpensive metal music stands? Could you stand that next to your chair or in front with the design pattern there?
Sarah, I use a Loran stand with magnets to hold patterns and set it on a wooden TV tray. The Loran products are available in most hobby shops. I do a lot of counted thread work and have to have a pattern easily visible while I stitch. I use a wooden embroidery stand designed by Judy O’Dell and manufactured to her specifications. It is excellent and is much less expensive than the System 4 which is also excellent. Best, Charlotte
Thanks Carol and Charlotte.
Mary- you mention the extra strength magnets you use. .may I ask where you found them? I know I have seen them somewhere. ..but of course, when I actually WANT the darn things, I can’t find them anywhere! Thanks-Amanda
Mary, hope all is well. I am so accustomed to having your lovely column with my morning tea that this morning seems blank without it. Blessings, Charlotte
Hi, Charlotte! Yes, I was out of commission this morning, I’m afraid. Tomorrow, I’ll have a short article up and a little news…. Thanks! 🙂
Dear Mary
I hope you are well, missed you very much today. Take care thinking of you and hope you are better very soon. God Bless.
Regards Anita Simmance xxx
Hope you’re feeling better today Mary. You’ve really spoiled us. We’re accustomed to hearing from you…..lol. While reading this article, I checked out your tacky bead tray. I created a tin when you talked about the goldwork one, out of a gift card tin. I lined it with velveteen and it works great for my beads and sequins. I use a lot of sequins (you know, a seed bead and sequin on a straight pin unit) for my ornaments. I covered a piece of batting with fabric and glued it into the lid of the tin.. That way when I know I need 13 seed bead/sequin units, I make them ahead of time and stick them into the padded lid ready to grab and go with them. Several years ago I needed something to keep beads available and still in one place and didn’t know about the tacky bob so improvisation took place. It just so happened I had some Rescue Tape (double sided) in a drawer and lined the lid of a little plastic box that came with large paper clips in it. It too works well. When not in use, I just close up the little box (maybe 2 x 3 inches), the sticky tape stays sticky but doesn’t leave any residue either. I think I’m gonna get another tin and use the rescue tape in the lid, as I do a little bit of needlepoint and use a scroll frame for it and use the magnet idea. Keep those ideas coming, Mary. Don’t know what we’d do without you. Oh btw, I bought one of those bead trays you recommended and like it a lot. I keep sequins in them too, not just beads. So everything I need is in one place and it doesn’t take up much space on my bookcase, when placed vertically, which is next to my work areas.
I’m having total knee replacement on November 9th. I keep saying no more surgery! So I’ll be right there recouping with you, thinking of you often, especially if I’m clear headed enough to sew! I’m very behind, especially on my hummingbirds… so I’ll try to get everything out and ready to sew easily. Take care, Barb
I’ve had that surgery, Barb. You won’t feel like doing much for the first week or so, but as long as you make the time for your physio, you’ll soon be champing at the bit. No driving for a month, so you’re housebound, needlework will be a life save. Best of luck with your surgery. You’ll feel like a new woman once you’ve recovered.
Here’s a wish that whatever the health issue, it is resolved completely, and without complications, and of course, in your favor.You add so much goodness to the world.
in gassho
kaethejean
I couldn’t agree more with this sentiment! Well said, Kaethejean!