


Here’s the last voided monogram I’ll bother you with for a while! After this – besides sharing with you another project or two on the list – I’ll be dabbling with different, more classic approaches to monogramming and sharing some tips with you along the way.
This is a monogram that was meant to be a slightly simpler approach to the Confetti Monogram I showed you earlier – fewer threads, larger stitches, to work up faster – but part of that didn’t work out as planned.
Never fear – I’ll tell you how to adjust your approach to speed up your own voided monogram project.
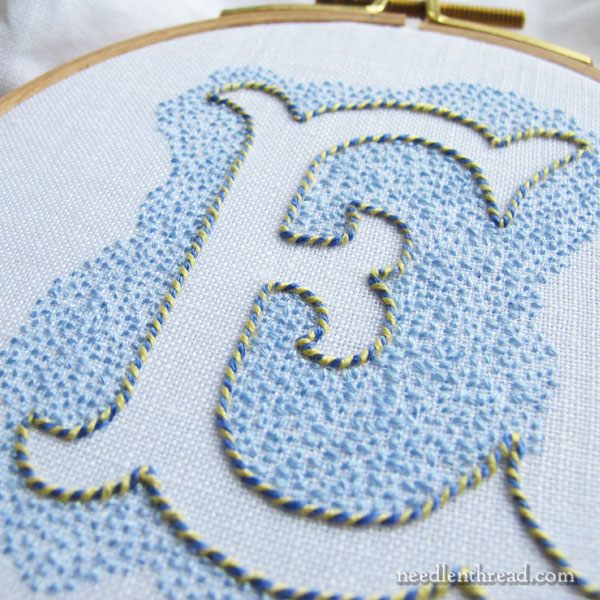
The E monogram is worked on Alba Maxima linen lined with a good quality white quilter’s cotton.
While the Confetti Monogram was stitched with floche, this one is embroidered with regular DMC cotton floss – the six-stranded stuff – in only three colors: a dark blue, a light blue, and yellow (3838, 3840, and 727, respectively).
A lot of this, I didn’t actually stitch myself. This was a project my niece was working on, and I think she did a great job for her first time at this type of stitching. But she ran out of steam! She started the seed stitches So Very Small, so it was taking forever to fill that background.
So I took over.
I didn’t get very far, either. Chortle chortle.
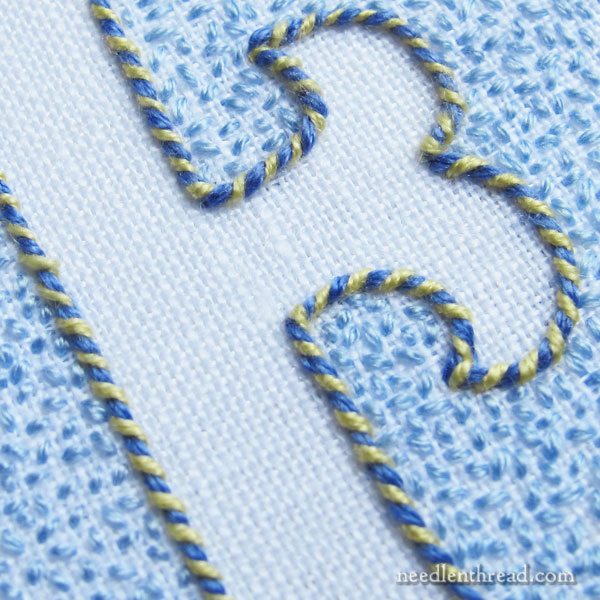
On the outline, she used three strands of floss and worked a chain stitch in dark blue, and then she whipped the chain stitch with two strands of yellow.
That worked out well – notice that all the tight corners and points are nice and sharp, as they should be.
To get this to happen, end the chain stitch line at each tip or sharp turn, and then start it up again around the corner or in the new direction, but inside the last loop of the previous line, to keep the whole line flowing smoothly.
Now, this whole monogram would have worked up pretty fast, had she chosen to make her seed stitches significantly larger. I’m not talking about using Big stitches – just bigger than the ones here! Spacing them farther apart, since they are larger stitches, would also speed up the whole process.
So, instead of seed stitches that are 1/16″ or smaller, as they are in this case, 1/8″ seed stitches spaced farther apart would have worked great and taken a lot less time.
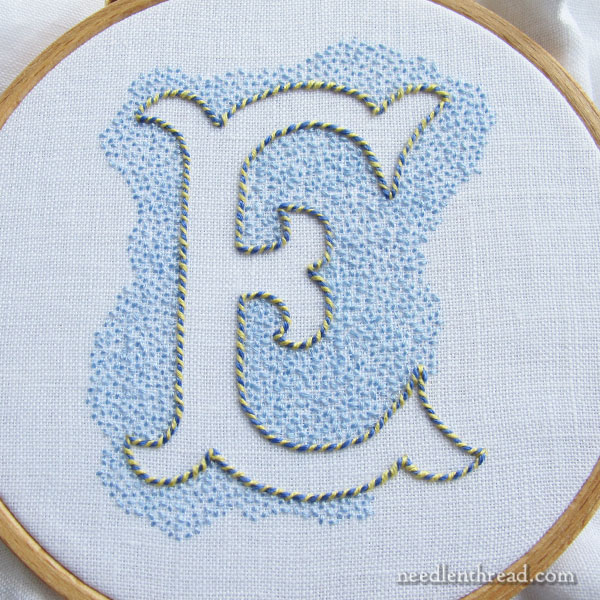
Still, the overall effect is there – the voided monogram with the stitched background to make the letter really stand out.
I like the whipped chain stitch she used for the outline, and I love the simple color combination. (I’m a sucker for blue, yellow, and white!)
Tips for a Quick Voided Monogram
So, what can we learn from this particular letter? Here are some tips that will help you work up a quick voided monogram:
1. Use a heavier thread and a bolder stitch (like chain stitch) for the outline of the letter. Whipping the stitch adds a nice dimension and color variation to the line.
2. Work the background seed stitches in one color (as opposed to the Confetti Monogram, which is worked in multiple colors).
3. Work the seed stitches larger – say, 1/8″ – and space them out uniformly. The background space will fill up much more quickly!
Other Voided Monograms and Resources
If you’d like to see the previous examples of voided monograms that we’ve discussed here on Needle ‘n Thread recently, here’s a round-up of those articles:
How to Embroider a Simple Voided Monogram – this is the Confetti Monogram, using floche and multiple colors. You’ll find instructions on setting up the project, fabric, and stitches.
Embroidering a Floral Themed Monogram – this is the beginning of the floral voided monogram, with tips on transferring, setting up the project, and choosing stitches.
A is For Almost Finished – This is progress on the floral voided A monogram, with tips on stitching different types of flowers and whatnot.
Finished Floral Voided Monogram – This article discusses finishing the edges of the background area and shows the complete floral monogram with a totally encrusted, embroidered background. There’s also a photo of the back of the hoop.
Looking for Monogram Patterns?
You can find some great alphabets that would make good voided monograms in my e-book, Favorite Monograms, which is available for immediate download – just think, you could get started today!
Coming Up…
I’m working on some stitch comparisons for you. I love examining similar stitches, dissecting them and comparing them. It’s sort of like biology, only without the formaldehyde.
I’ve also been grubbing about for some supply sources many of you have been inquiring about, so we’ll discuss supplies at some point. That’s always a dangerous discussion!
Next Monday, I’ll announce the Talliaferro give-away winner, so if you haven’t joined in on that yet, and you want a new crewel kit – do!
And a little bit about organization and project management and fun stuff like that. Oh yes, I’ve been making the September Goal List.
Enjoy the rest of your week!
My efforts at whipped chain stitch do not look nearly that good. Certainly not something I’d publish! Congratulations to your niece, it is beautiful work!
I would not say these voided monograms are a “bother” at all! So many different ideas. 😀
Dear Mary
Your Niece has embroidered the E voided monogram beautifully I love the colours she has chosen simple but effective and the chain stitched outline is perfect and blends in nicely with the other thread colours. I do like the voided monograms you can use all sorts of stitches and thread colours to embelish the letter and all sorts of ideas come to mind. I look forward to all your future posts. Thanks for sharing your Nieces voided E monogram she has done a wonderful job on the project.
Regards Anita Simmance
I am the same way about blue and yellow. My daughters name is Emily. I just want to grab that monogram, finish the stitching, and give it to her! Just beautiful.
I really like the simple color scheme. Your niece did a great job, but she does have a talented teacher!
That is sweet and lovely. I like the idea of seed stitches as fill. It actually looks like tiny knots. My first thought was of the “Forbidden Stitch” of China which I believe was micro knot stitches that caused blindness to workers employed by some emperor! (not sure if it’s a true story)!
The monogram colors are cute: blue on white linen with a touch of lemon yellow.
Mary, you are awesome! Love your magic with needle and thread.
Hi Mary,
I have been following your voided monogram projects, and they give an amazing finish to an embroidered project. I plan to use the style on a project that I’m working on. I was working on a pair of pillow cases, when I made a miss step with the fly stitch. In stead of coming up under the fly stitch loop to anchor it, I came down from the top of the stitch. And it made a nice twist. I left the miss stitch and added more of the stitch. I call it the twisted fly stitch.
I hope you can make sense out of this e-mail.
Happy stitching Louann
I’m sorry I didn’t understand this.
‘…end the chain stitch line at each tip or sharp turn, and then start it up again around the corner or in the new direction, but inside the last loop of the previous line, to keep the whole line flowing smoothly.”
can someone please explain it again?
When you come to the point or sharp corner, end the line like you normally would with a chain stitch, with the small anchoring stitch that goes over the last loop in the line. Then, when you start stitching in the new direction – on the line that meets the one you just finished right at the corner – start this new line inside the loop of the last stitch on the previous chain stitch line.
Ah, yes. Now I got it.
You meant to begin inside the last anchoring stitch.
I love you, Mary.
Hi, Natasha – no, not the anchoring stitch. It’s just a little straight stitch at the end of the line of chain stitch. You want to begin the new line inside the last loop of the previous line.
I know you said not to do the multi-color seed stitch, but I cannot resist. It is on my list!
Love this E – so nicely done.
Wow, your niece did a great job. I probably would have done the same thing like her and run out of steam. I have quite of those projects thinking it is better with smaller stitches or pieces, and I don’t seem to learn from it.