


Update: If you are interested in recreating this project yourself, you will find my downloadable PDF on Voided Monograms available here. The PDF includes the full alphabets (round and square), as well as step by step instructions for stitching your own version, tips, variations, ideas for finishing, and a stitch dictionary.
The floral voided monogram that we looked at last week in its Almost-Finished stage is now finished. The embroidery is done. I refuse to put in One More Stitch!
It’s not that I don’t want to put in more stitches, but that’s the problem with this type of embroidery adventure. It might never end. There’s always One More Place you could add One More Stitch!
At some point, you have to draw the line and declare the thing complete.
And so, I declare The Thing Complete.
(I think.)
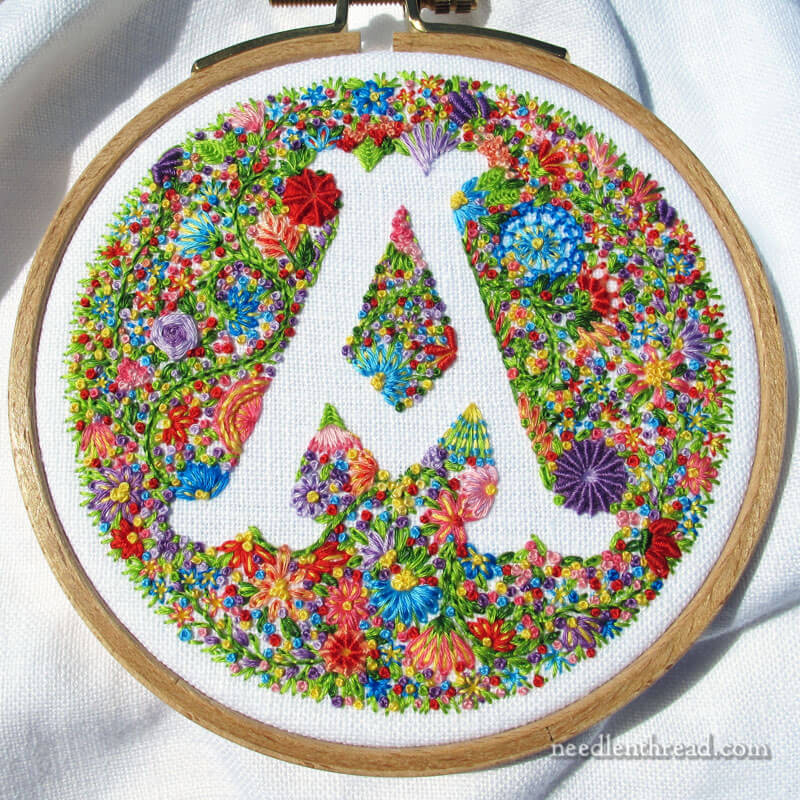
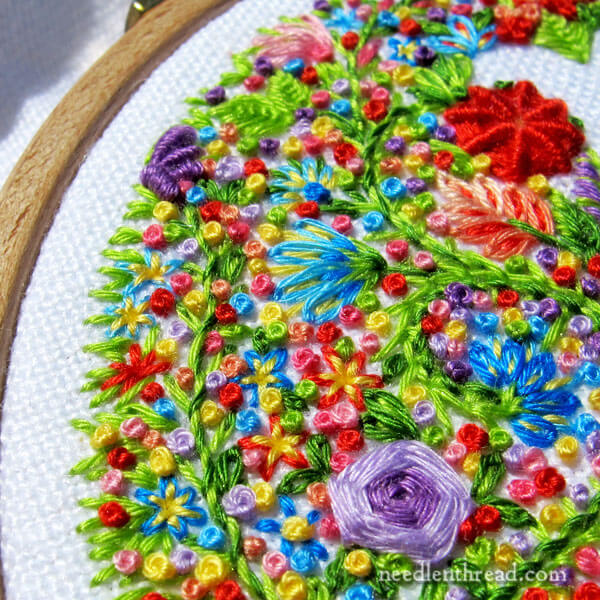
When we looked at the piece the last time, you could see by the final photo in the previous article that, although the background was pretty well filled with lots of color and lots of embroidery stitches, the edges were still a bit jagged and uneven.
My job this week was to take care of that problem – to complete the edges and give the piece a nice, smooth, balanced edge all around.
This is pretty easy to do!
Three Tips for an Easier, Frustration-Free Stitching Experience
But before we get into the edge, for those of you who want to stitch something similar, I’d like to pass on a few tips to help you embroider more comfortably, more easily and with less frustration:
1. Consider adding an “area outline” to whatever voided thing (be it a monogram or any other silhouette) you’re going to embroider. For example, with this monogram, I should have included a circle around the monogram as part of the design transfer. Situating the monogram directly in the center of the circle, it would guarantee that the whole piece came out even and that I had a defined edge to work towards.
In this case, I just used the hoop as my edge. But this can be problematic, which brings me to the next tip:
2. Use a hoop that’s at least half an inch larger than your design all around (so, at least an inch larger than the outline) – or even a whole inch all around! This will give you much more room on the back of the piece to manipulate your needle when you’re ending threads. It will also make it easier to stitch right up to the edge of your design area.
I didn’t do that on this piece – I made the four inch hoop the “outline” of my design. But as you probably know, it’s really difficult to manipulate a needle right next to the edge of your embroidery hoop on the back when you’re ending threads. (A curved needle can help you out if you get in a tight spot, though!)
3. If you’re planning on densely stitching the entire background (as I did here), don’t hesitate to go “overboard” with the larger stitched elements – more large flowers, more larger leaves, more heavy vines. You can work larger elements right next to each other, too. And they don’t have to be perfectly evenly distributed. More larger elements will save you from stitching lots of tiny elements to fill in! At the same time, though, you don’t want to leave some space for the tiny elements, because they add a lot to the whole look.
Evening Up the Edges
My method of smoothing out and evening up the edges on this voided monogram was pretty simple: it’s called Straight Stitch, the easiest stitch in the world.
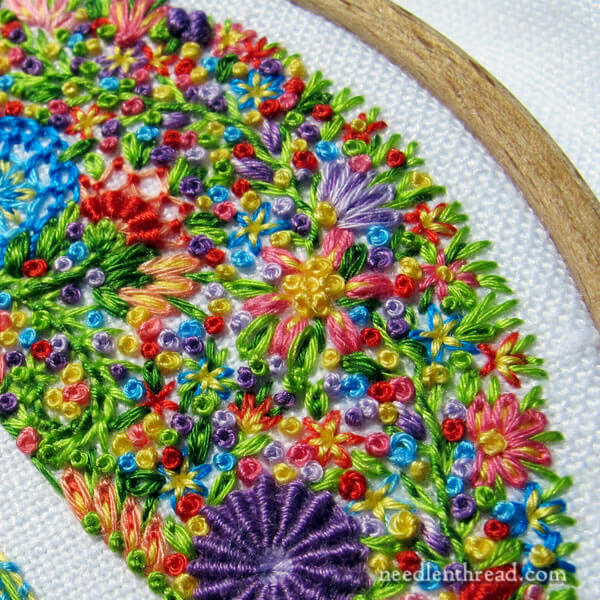
After filling in the larger leftover spaces in the background with floral elements – tiny straight stitch flowers, clusters of French knots, some small to medium-sized daisy stitch flowers – I worked my way around the very edge of the embroidery and right up to the edge of the hoop, stitching tiny random straight stitches in bright green, radiating out in different directions from whatever embroidered elements were close to the edge.
This gave the edge a somewhat hairy look, when viewing it up close.
But from even just a little farther away, it brings the design right out to a clean edge.
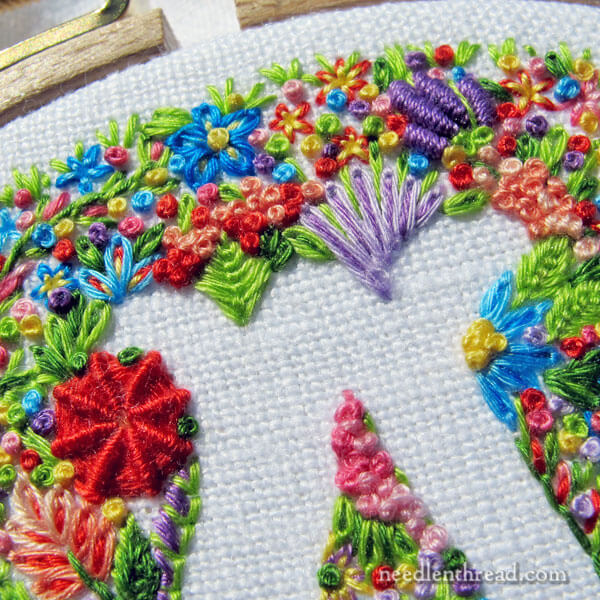
While I was working around the edge, putting in the hairy bits of green, I also worked in tiny green French knots in the design areas, wherever there were blank areas that were very noticeable.
You’ll find a lot of green scattered in this piece. I like to think of it as grass!
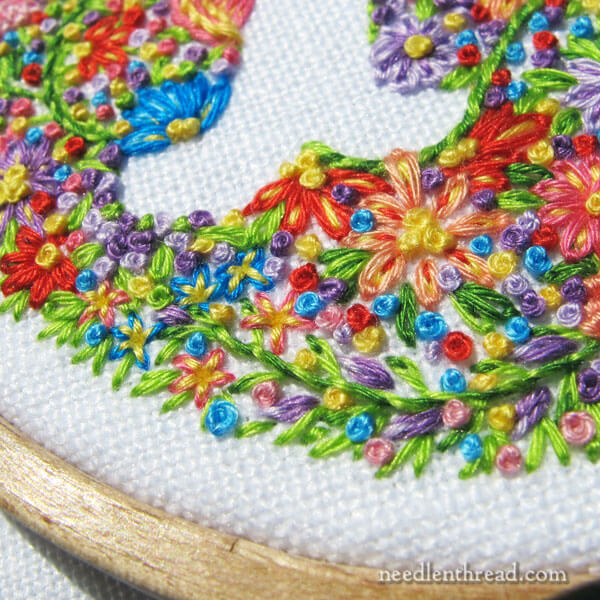
In addition to the hairy green edge, I added more knobby bits using French knots, working them over the green and among the green, to bring the color out the edge, too.
Finishing the design out to the edge, then, was pretty easy. Just straight stitches and a few extra French knots thrown in for color!
The Back of the Hoop
And now, for those of you who are morbidly curious about the back…
I remember my aunt always insisting on an absolutely perfect back, when she was showing me how to cross stitch when I was little. I really hated cross stitch at the time, and I contend it’s because I had to keep checking the back of the work, taking stitches out to make sure all the stitches on the back were perfect, too.
It sounds nice. It sounds like “expert embroidery” when the back looks as good as the front. But really, does it matter?
I say it doesn’t. I’ve seen the backs of gloriously embroidered old pieces of embroidery (like this 16th century piece, or this ecclesiastical piece), and the backs are not that impressive. And yet, these are professionally worked pieces of embroidery.
Granted, you wouldn’t want a huge knotty mess on the back, that would make the front bulge in an unseemly way.
But other than that, don’t stress over the backside of your embroidery! Over-emphasis on the back of the embroidery, in my mind, is just a recipe for discouragement.
Still, to satisfy the curiosity of the many people who wrote asking to see the back of the embroidery, I certainly don’t mind showing it to you.
And then I’m going to share a Shocking and Scandalous secret with you!
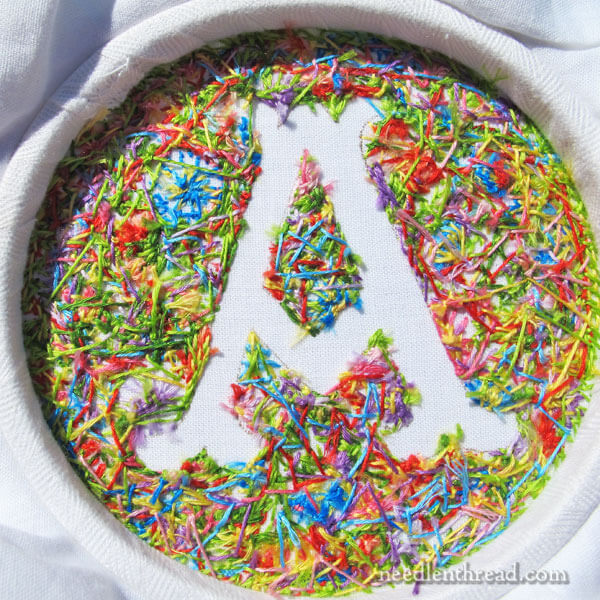
There’s the back.
It looks like a collective bunch of stitchy garbage. But that’s ok! Because no one is ever going to look at this piece – which will be in a small frame – and say, “I need to take that out of the frame and check the back. Only then will I know if it was embroidered well.”
A Shocking Secret
But here’s my shocking and scandalous secret: I even used knots in my thread.
I know! Shock, horror!
On a piece like this, a small knot on the end of the thread is going to make Absolutely No Difference At All Whatsoever on the front of the work. The front is so encrusted with stitching, that there’s no chance that a tiny bump from a tiny knot could ever be discerned on the front.
There are types of embroidery where I don’t use knots. But on stuff like this, it’s easy and quick to use a knot, and it won’t make any difference in the long run.
Pretty scandalous, eh?
And so, there you have it – the finished voided A in a floral theme!
I hope you enjoyed this mini-journey and that you try your hand at embroidering a voided monogram – or any shape you want – with this method of filling the background. It’s fun, it’s creatively satisfying, it’s colorful, it’s relaxing. It’s everything you could want an embroidery project to be.
Previous Articles on This Project
You can find the previous articles relating to this project here:
Embroidering a Voided Floral Themed Monogram – information on threads, fabric, design transfer, and first stitches.
A is for Almost Finished – information on other stitches used and filling up the piece.
If you’re looking for the monogram alphabet I used for this letter, you’ll find it in my Favorite Monograms e-book.
You know what I love best about this one? The back! Thanks for showing it to me, it made me feel much better about so many imperfect things in my life today. 🙂 Knots! Traveling bunches of thread, what a mess! Thank you so much.
I’m working on a few chain stitches to hide an unsightly slogan on a t-shirt and I was worried that it wasn’t perfect, even if it did the job. Now I think it’s fine.
Mary, I don’t usually comment, but this is just so very pretty. Thank you for sharing such good details on how to do this!
This is such an amazing piece. I’m totally in awe of your work!
Well, I am shocked, horrified! Or perhaps not… 🙂 Thank you for emphasising the relative unimportance of the back of the work (I tend to tell students that as long as it doesn’t interfere with the front, it’s fine), and for breaking the knot-taboo – some people do get put off stitching and thereby lose out on a wonderful hobby because the people who introduced them to it put such great stress on the neatness of the back and similar things.
It’s great how you encourage people to just Have A Go and enjoy it – thanks!
It’s gorgeous, Mary! I love the result. And, I confess, I often use knots, too. (but don’t tell anyone, okay?… lol )
I was one of those that had to make sure the back looked as neat as possible, but I have to say the back of this piece to looks like someone had a wonderful confetti party. Love it.
Mary, Knots and a messy back on a densely stitched piece such as this is OK in my world too. The front is what counts and it is gorgeous. If it were a hat for instance, it would add to the warmth and wind protection.
Ann B.
Mary,
Your Voided Floral Themed Monogram is Awesome! Just wonderful!
I like all the close up photographs so we can see the detail you’ve created
with this piece.
It Gives me so many ideas for a projects where I can practice my new hobby and perhaps conclude with somethingI enjoyable to look at.
I worry about balance with the piece, between the large elements and smaller partial parts. Or color balance. And value of the colors.
But then I worry.
I like your attitude and sense of humor: “shocking and scandalous secret: I even used knots in my thread. I know! Shock, horror!”
Thanks for sharing your expertise and warm personality in your blog.
Peggy
Absolutely delightful! I so appreciate your lighthearted approach to “The Back”. Yes, we want our work to look nice, but life is to short and precious to get caught up in what truly is unimportant. Enjoy your stitching, enjoy the process. ” Stitch and Be Calm” Have a blessed day Mary!
I’ve always worked with no knots but I just might change my mind. You’re right: no one ever looks at the back of the piece, and as long as it lays flat when finished, who cares about the mess or knots. Yay, you!
Hi Mary,
This little piece of embroidery just keeps getting better and better! You always have such great tips for making projects easier. I have been putting off a crewel project on velvet, but after clicking on the 16th century link, I found your tip to cover the velvet with another fabric, then embroider, then cut away the unneeded fabric! I have some leftover silk organza in my stash. Do you think that will work? Thanks for the help.
Hi, Janice – yes, it will work!
It’s absolutely beautiful, you’ve inspired me to try one myself 🙂
This piece is much more beautiful than I thought it would be! Regarding the back, Marion Scoular once said that Americans are much too concerned with their backsides. I’m pretty sure she was talking about needlework. LOL.
Just curious. About how many hours did this take?
Hi, Margo – I didn’t really track the hours. It takes quite a bit of time, considering how small it is, but it really depends on the density of the stitching…and how fast you stitch….and whether you have distractions or not! I know I worked on it off and on for about two weeks, but some days I didn’t work on it at all, some days for just an hour or less, and some days for a couple hours at a time – sometimes, while watching a movie (which slows me down considerably), and sometimes while listening to an audiobook, which speeds me up!
I absolutely love how you finished the outside edge with the green straight stitches. It looks like a little frame of grass, or maybe tiny little leaves.
Dear Mary
Back from Ravello Italy the wedding was wonderful. Anyway The voided monogram is absolutely gorgeous I love it, it makes me want to stop what I’m doing and stitch a voided monogram just like the above. ideas are coming into my head on how I could create the A voided monogram it looks such a lovely project. The back is great it makes me feel better about my embroidery because it looks just like that, you are very brave. Thanks for sharing this beautiful monogram with us, you always have great ideas.
Regards Anita Simmance
Absolutely lovely,beautiful stitching. Thanks so much for sharing the back too. Feel so much better about my messy backs now,although I have to say even the back is beautiful in a quirky kinda way.
Have you ever worked with the hoop upside-down? I often work this way, especially when doing cross stitching. I don’t have trouble making the stitches for the top when reaching down into the hoop, but then I’m not doing any “fancy” stitches. The projects I’m working now are being worked in hand. The reason I started stitching upside-down is the ability to end my threads on the back under previous stitching close to the edge.
That’s a good idea, Sharon!
Dear Mary
This is a stunning piece of work and so colourful and just ‘happy’. You are such an inspiration.
Best wishes
Ellie
I’ve found in cross stitch there’s the occasional time when you *have* to knot. French knots out in the middle of nowhere, straight stitch that covers 10+ holes at a time. Attaching beads. You just need to judge when and where to use the knot (or not :-p).
Meanwhile I think my backs tend to be quite tidy, but I’ve found the tidier the back, the easier it is to pick out mistakes. But it is impossible to have the back be *as* tidy as the front…you don’t anchor threads on the front!
Exactly the reason I feel I need to try to keep a tidy back. With kits I find I need to pick out and reuse threads where possibly – there isn’t the luxury of simply snipping threads.
Regards,
Helen Hicks
I wish you could convince the judging group for our local fair. You cannot submit pieces that have been mounted and do not show the back. Sadly this means you cannot display your work properly. If I want to submit pieces I have to unmount them or leave unframed for several months
Now I love you even more! The back is not important. It just should not interfere with the front. Amen. When I demonstrate embroidery at the museum, I get asked to turn my work all the time so people can see the back. Most are really disappointed and shocked. Some cross stitch fanatics even lecture me on the importance of the perfect back. Even when I explain that goldwork never looks the same on the back as on the front, it is lost on them :).
Ha ha!
Oh, Mary, backs, backs! As a young adult the first thing my DM would do was to grab the hem and inspect the seams and finish of anything I made to wear.
As usual you have produced a beautiful piece of embroidery Mary. I love those stitches – -reminds me so much of your alphabet you created. I want to change my name to something that starts with “A” so I can beg you for this piece!
I’ve got my voided monogram on my list of projects. Just two others in front of it. Thanks for all the tips.
I really like this, including the back. Thank you for taking the boulders of guilt off the backs of embroiderers that have had for so long about neat, no knot backs!
Mary. This is beautiful. Really really gorgeous.
Your talent is unmatched, Mary. You are one-of-a-kind, and thank you for this (again!) gorgeous posting.
Mary, Mary, Mary – I love this piece, it’s so lush and gorgeous and it just shouts to me that you had so much fun making this! And I’m delighted with your ‘back’ story!
Mary, Once again you have given us all a visual treat with your Voided Alphabet and I especially appreciate your sharing of the back of the work. After doing hardanger for years where you don’t have knots in the finished work, I am still learning how to do surface embroidery. All I have learned is from you and I so appreciate all that you share with us. I have put down working on you Stitch Sampler Alphabet to finish a wedding gift and am wondering if I should have done this differently. I am working on some pillowcases that came with the design printed on them. There are 4 hearts across the pillowcases and the outline of the hearts are not one solid background, but are anywhere from 3″ to 1/8″ sections and are very lacy looking and interspaced with french knots and detached chain stitch. I am using DMC Ecru thread for the work, 2 strands and doing the whipped backstitch for the outline stitch. I did not knot my work, instead worked my threads into the back of the whipped backstitch which means there are quite a bit of slubs at the end of each worked section. Since this is something that you will see on the inside would it have been better if I had knotted my threads off? How do you normally finished something like this?
I hope to do more of this type of work for gifts and would appreciate any guidance you can give. Thank you for your consideration of my questions. Sincerely, Louisa
Hi, Louisa – when I’m doing work like that, I usually use a waste knot to start the thread and some little anchoring stitches along the line, that will be covered by the embroidery. You can see how to do that here: https://needlenthread.wpengine.com/2008/09/starting-your-thread-anchor-stitches-on.html
It always mystifies me why people want to see the back of embroidery. Never fails when I’m at the shop working (I help out at a quilt shop occasionally) and I’m sitting there during quiet time doing some embroidery, customers will come in and look at what i’m doing then flip it over to see the back! Why?!
Love how you finished the piece with the green straight stitches and french knots around the edges. 🙂
Why look at the back? Here’s my reason:
I don’t personally care if the back looks “nice,” so long as it doesn’t hurt the front, but I do like to see how things are made. Is that a double running stitch or a backstitch? Did you fasten your thread off and start again for the dot on the “i” or did you carry the thread up to it? How did you keep that thread from showing through to the front? Ooo, that stitch looks really cool on the back; maybe I should try working it from the other side sometime…
Since I started Japanese embroidery (JE), I don’t agonize about knots and the backside any more. In JE I was taught to start the thread with a tail-less knot, so I’ve been doing that for all my embroideries, unless the thread is really thick, then I use the away-knot. As for the backside, my JE teacher mentioned that the JE craftsman in Japan don’t care about the backside – it may look like a veritable rat’s nest – they are not supposed to turn the embroidery over until it is finished!
No, I believe you’re wrong . . . I don’t think there is one spot on that embroidery where even you could add One More Stitch!
What a happy garden!
Thank you, Mary for the advice about the back of the embroidery. After cross stitching and needle pointing for over 40 years, I have never thought the back needed to look as good as the front, especially if you are going to frame the stitching. My philosophy is to keep the back clipped as neat as possible. I certainly would not take out stitches because they did not look as good as the front. Noted cross stitcher, Jane Greenhoff doesn’t believe the back has to perfect either.
I love your work and enjoy the information you share in your blog.
Cordially,
Anne Cole, designer and blogger of AC Needlework.com
That is totally gorgeous! I especially love that you used knots, I have to admit.
Thank you for this lovely journey! You were even brave enough to show us the back of the piece. I am delighted to know that the back is not as important as I once thought. It encourages me to try different things and not worry so much about people turning them over. Even a knot or 2 may hide themselves without causing a big problem. You made my day!!! Happy Stitching!
My maternal grandmother taught me to embroider when I was about 10 years of age, and she was quite the perfectionist in almost everything. It was a simple sampler to earn a Girl Scout merit badge. She didn’t place much emphasis on the back – perhaps after 70+ years she had learned you don’t have to be perfect all the time.
In my on-and-off love affair with embroidery, I always think of her when I wonder if I should rip out something substandard. Usually, I do, but it’s never because the back of the piece is less than perfect.
It’s a lovely spring/summer meadow, hurting with flowers!
This is such a happy and beautiful piece. I have not taken up embroidery seriously yet but have dabbled with beaded stitches on sewing projects and easy stitches on knitted felted pieces. I am so glad you showed us the back of your work as I have always been critical of the ‘back’ work on my simple projects thinking that all embroiderers ended up with good looking backs and what the heck is wrong with me? I won’t sweat it anymore – thanks so much!
Hi Mary, I am a beginner to moderate stitcher and I don’t think I know how to do all the flowers you did in this piece. Please consider a blog post on different kinds of flowers & leaves. (I am new to your blog so forgive me if you already have this and I haven’t stumbled upon it.)
Your website has been a huge help, I am really struggling to find info/tutorials that are not too old fashioned for my taste but also not so challenging that I lose motivation. Thanks again for the amazing blog!
Here are some bookmarks from Mary’s site:
this is probably the most comprehensive with many many links to her articles
https://needlenthread.wpengine.com/2013/10/tutorials-for-hand-embroidered-leaves.html
here are others, which may be included in the above:
https://needlenthread.wpengine.com/2013/09/stitch-fun-buttonhole-stitch-leaves.html
https://needlenthread.wpengine.com/2013/08/stitch-fun-fly-stitch-leaves.html
https://needlenthread.wpengine.com/2012/07/stitch-play-simple-cast-on-stitch-flower.html
https://needlenthread.wpengine.com/2012/04/stitch-play-inside-out-buttonhole-wheel-flowers.html
I hope this helps you continue to enjoy embroidering.
Regards,
Helen Hicks
I’ve never really considered doing a monogram before, but this beautiful piece is an inspiration! It would make a wonderful gift too! I have misjudged my space and stitched too close to the inside hoop. I learned the hard way not to do that. Needed that curved needle!
Wish I’d read your advice here before I did my last piece of embroidery – especially the advice about leaving space round the frame! Also, lovely to know you use knots for pieces like this. I do to but have always felt slightly ashamed! Inspiring work as always. Thanks
trop jolie mary..je suis de france et grâce a vous je me suis abonnée a inspiration mag et je fais beaucoup de progrès c’est la première fois que je commente mais c’est si jolie que j’ose vous demander les fils et les numéros des couleurs utilisées car c’est vraiment trop joli cet ensemble
merci bisous
This piece came out wonderful and I am standing up wave a little hurrah flag for the thready back. I have no idea why some people get so obsessed with something that will never be seen!
I LOVE this project. I want to do it now! I have so many projects to finish, but I might start it anyway and work on it when I have a bit of time, here and there. I still haven’t finished the hummingbirds! (I’m also quilting and making small things for nieces and nephews) But I love this and maybe it could be for me!
I just finished an embroidery piece and the back is so ugly and messy! But as it is turned into a purse with a lining it doesn’t matter a bit. But I also do some heirloom sewing with embroidery that really does need to look good on the back, especially with unlined baby garments. It all depends on the project.
c’est encore cindia de france mary
je suis morte de rire en lisant la traduction de mon message precedent !
car je n ai pas parle de voiture !!
désolée j espère que vous comprendrez le fond de mon message
bien a vous merveilleuse brodeuse mary
Can I have the back? I love it. Okay, so I love the front too. But the back is like string theory…it’s organic!
It’s been a fun journey, Mary! Thank you!!
Ahhh, Perfection! It looks so pretty. It doesn’t hurt either that my last name begins with an A! It really does positively glow.
Please guide me how to do comb embroidery please.
Mary, I have been following your blog for quite some time and have always been amazed with your work and attention to details. I think your latest piece is very inspiring…loving all the happy colors! I wonder what it would look like using jewel tones or traditional Christmas colors?
I’ve looked at the picture of the back again and again – it doesn’t look like a mess to me. I quite like it.
Does this mean I’ve lost my sense of perspective?
Regards,
Helen
I love the back of this piece! Almost more than the front. It would be fun to be able to display the piece so you can flip it over when the mood strikes. One day it is a gorgeous floral monogram, the next day it is a chaos confetti monogram!
Mary it must be an age/time thing for your aunt who said that the back was to be as good as the front.
I don’t particularly like cross stitch, well I hate doing it but enjoy looking at it. I too had that little saying drummed into me. So I just baulked and would not do Cross Stitch ever again. It was getting to me even with doing tapestry. So my favourite stitch for that is basket stitch appears on the back for most of the plain parts and I jump or thread over the pattern content so the back of the floral or busy part is covered. Using a lot of wool but looks good. As most of wool tapestry work is either for furniture restoration or used on furniture and wall hangings there is a lot strength in the item.
Looking at your latest A monogram I think your work on the back is neat, no floating ends it is indeed neat.
For the E, Mary all I can say is the E is ‘simply’ exquisite. Less is more. Well done you are making an old woman very happy. Hugs
I contend that the front is beautiful and the back is the beautiful mess. I love both sides. I was never taught with an emphasis on the back of the work, just economy of thread. When I discovered the focus on backs , it was a bit of a, “Whaaat?!” moment for me.
This is absolutely stunning. LOL the back…I actually think it has a beauty all its own like a Jackson Pollock!
This is beautiful. I also do not stress about the back of my work but always mindful that it does not affect the front.
I am going to try my first monogram letter for a friend (a surprise) and wanted to do it leaving negative space. I am not sure I can fill up the space with flowers. What else can I fill the space with?
How about French knots?
Love seeing this piece and keep coming back to it to study what you did.
I’ve become obsessed recently with working up a void piece. Maybe use a line butterfly or have been wanting to do some mushrooms so wondering what to use for the center for a bevy of mushrooms etc for the outer.
As I sit down to plan my voided “B” and being a beginner, I wonder if you could tell me the length of the purple ribbed flower in the lower right corner. I’m thinking half an inch.
Barb
Hi, Barb – Yes, 1/2″ sounds about right. It wouldn’t be any larger than that!