


Last week, we chatted a bit about voided monograms, and I showed you a super-simple, colorful approach to stitching one up.
To reiterate, you can apply this whole “voided” embroidery approach to any bold, clear design – it isn’t just for monograms!
I’m using monograms because I like them, and because they work up into nice little gifts to give for birthdays, Christmas, and the like. I either frame them or insert them into the top of a decorative box to make a special little gift. Occasionally, I use them for the cover of a needlebook or even a journal cover, depending on the recipient.
Today, I’ll show you the beginnings of another approach to a voided monogram. This one is a little more complex. There’s a lot more stitching variety in today’s approachand much more scope for the imagination!
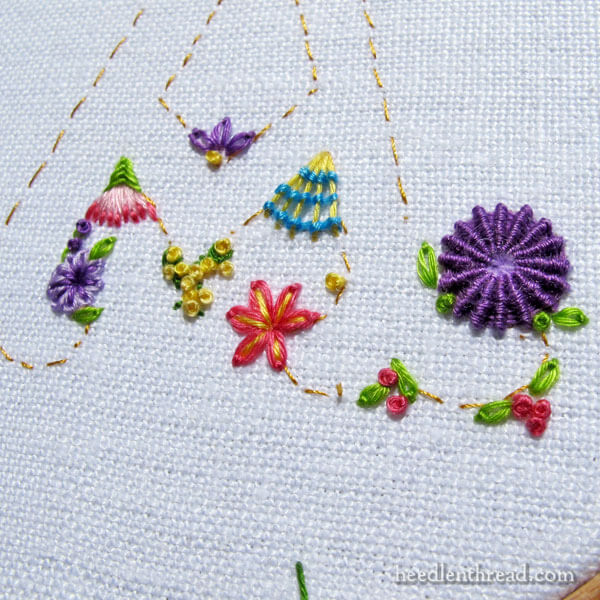
With this particular monogram, I’m filling in the background around the letter A with all kinds of floral, leafy, and vine elements.
For this project, I’m using Alba Maxima linen (available at fine needlework shops), white cotton muslin as a backing, floche for the embroidery, and, for needles, a #7 crewel needle, a #26 tapestry needle, and a #5 milliner needle.
This is free-style stitching. There’s no definite plan. But I’ll explain how I’m going about it, in case you want to try it, too.
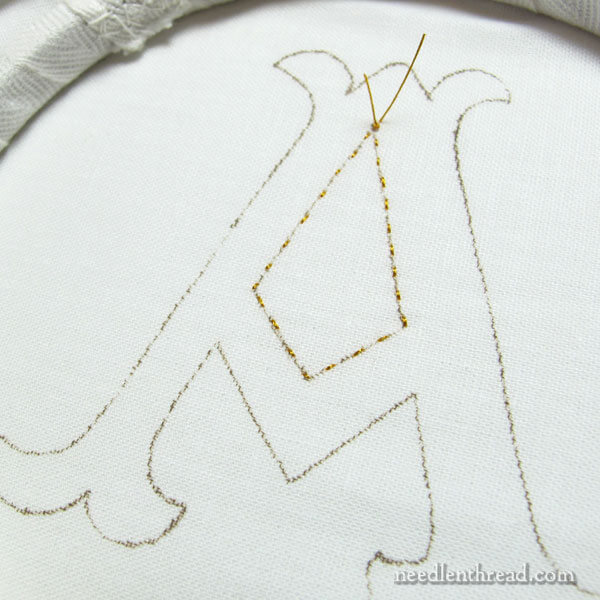
With this approach, it’s important that there’s no visible design line on the front of the fabric.
So instead of tracing the letter on the front of the fabric, I traced the letter onto the back of the backing fabric that’s behind the white linen that I’m using as a ground fabric. (We talked previously about using a backing fabric or lining behind embroidery ground fabric here.)
After tracing the letter on the back of the cotton backing fabric, I hooped up both fabrics.
In the photo above, that’s the back of my embroidery hoop, with the letter drawn onto the cotton, which is behind the linen.
Then, with a sewing thread – in this case, gold colored – I worked small running stitches very neatly along the design line.
To do this, I used the “stab” method of stitching (as opposed to the “sewing” method, which involves scooping the fabric), and made sure that my needle always entered the fabric perpendicular to it. This helps achieve an accurate running stitch on the front of the ground fabric.
I made sure that my running stitches always terminated at any corner or intersection of the design, so that I can easily see where that corner or intersection meets.

Once the running stitch outline was finished (working from the back of the hoop), this is what ended up on the front of the hoop. Exactly what I wanted, though admittedly, not absolutely perfect. It’s close enough, though!
So, now I have the design line perfectly visible on the linen. As I embroider, I’ll remove little bits of the running stitches. And in the end, there will be no chance of any design line being visible.
Time for the embroidery!
Again, we’re talking completely free-style here – whatever comes to mind as I go. The only plan I have is that I won’t cross over the design lines into the voided A area.
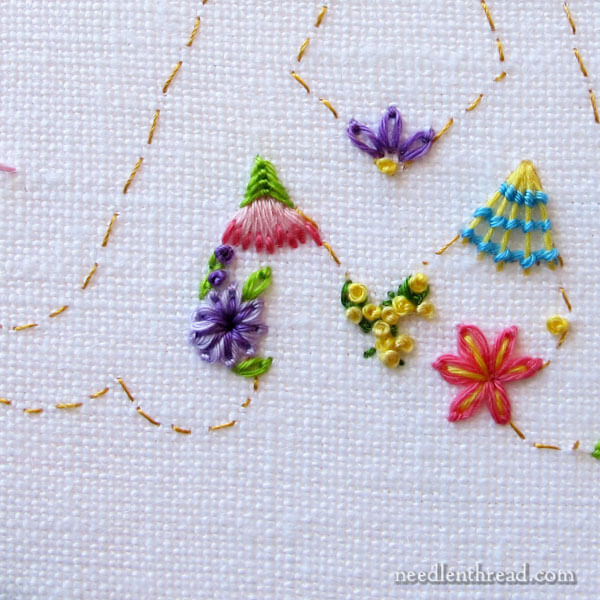
I began by embroidering in the tighter angles of the letter, concentrating on corners and points in the letter, to fill in around the A as much as possible, especially in the areas that require a little more manipulating to make things work well.
In the photo above, I’ve used a lot of daisy stitch, some fly stitch, straight stitch, split stitch, French knots, and ribbed spider web.
For colors, I selected a broad spectrum of colors from my cotton floche drawer, because it’s a great thread to work with. I made sure the colors look ok together, but I didn’t worry too much about a perfect color selection. I just picked colors I like!
The whole point of this particular letter is that it will all be a bit of a mish-mash of a colorful, floral background.
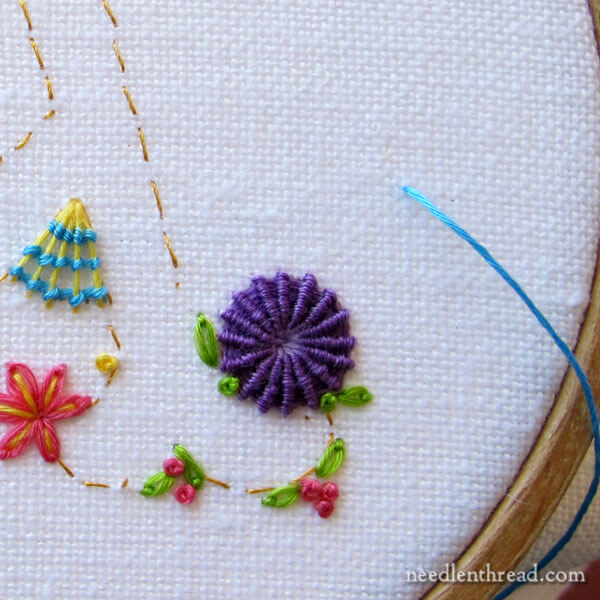
Here, you can see some more ribbed spider web (the purple flower), French knots and daisy stitches.
Notice that I situated the round purple thing so that it fits in the “scoop” of the foot on the A. It’s a good little scoop in the design for cradling a round thing.

Up in the point inside the A, I stitched a bunch of closely worked French knots accented with daisy stitches. There are a couple tiny green straight stitches in there, too, just along the design line on the right, but they’re not very clear in the photo above.
You can click on any of those photos, by the way, to see a larger version, if you want to examine them more closely.
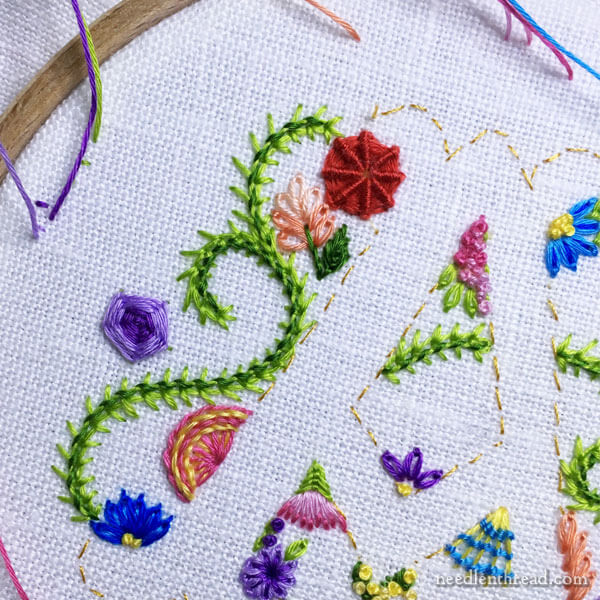
With a few elements in place, I started adding some random scrolly, vine-ish lines, using wheatear stitch in a bright green, with one side of the stitch whipped in a darker green.
If you’ve worked through any of the letters in my Stitch Sampler Alphabet, you might recognize this approach, as I used variations of it quite often in those floral letters. It’s a fun way to create a vine, and it opens up possibilities for further embellishment with little French knots and floral accents.
If you’re uncertain of your stitching path when adding vines and the like, you can always pencil them in lightly and stitch over the pencil lines. Or you can just wing it!
You’ll find a buttonhole wheel added to the left side of the letter there (in the pink and yellow). I stem-stitched over the spokes of the buttonhole wheel, using the same method as stitching a raised stem stitch.
You’ll also find a woven wheel in the two shades of purple to the left of the vine.
All of the elements are a little isolated right now, but I’ll be filling in around them with other greenery, seed stitching, French knots and the like, to create a fairly solidly embroidered piece.
This voided monogram is a terrific exercise in free-style embroidery – that is, embroidering without a set pattern, as you go. It’s a lot of fun and it can be a very exciting approach to stitching!
The monogram design I’m using belongs to the Plain Bold Letters from Favorite Monograms.
You’ll find all the stitch instructions for the various stitches I’m using available here on Needle ‘n Thread, under How-To Videos or listed in the Stitch Fun! tutorial series. I’ve linked directly to individual stitch tutorials in the article above.
More soon!
Enjoy your Monday!
Will you be going through all the alphabet letters and doing this as a stitch along?
Oh, I LOVE this, Mary! What a fun, relaxing way to embroider. I admit I’m a little jealous of A, LOL. Cannot wait to see this finished!
I love this! It seems a small enough project to commit to as well and you aren’t repeating the same sorts of stitches throughout. I think this would be great featuring our monogram to hang on the wall.
Mary, I would just like to thank you. I am a 67-year young newbie to embroidery. You are giving me the confidence to try, to explore and maybe even achieve projects I did not know how to do. You are a wonderful teacher. I am so glad I found your blog.
Mary, that is just gorgeous and a refreshing change from standard monogramming. A tip for your readers who have purchased several of your books: I was keeping 4 of your e-publications in a notebook, and I was constantly chasing pages around my studio as the punched holes gave way. I reprinted them, printing the cover pages on card. I took all four to my local FedEx Office store, where they spiral bound them all together, and added a nice transparent plastic cover to both front and back. All for $7! The pages are now nice and secure, the book can lie absolutely flat on a surface, and each book is easily located by thumbing through to find the heavier card cover pages. A nice solution for “wandering” pages!
Dear Mary
Another wonderful voided monogram embroidery I really like this one although a little more complicated than seed stitch but beautifully embroidered and a great way to enhance and individualise a letter. Will you fill up the outside monogram completely that would be great. I can’t wait to see the finished embroidered monogram. I’ve been making more dorset buttons although creating the buttons are really nice I will be glad to get into some creative embroidery such as the above monogram. Thanks so much for sharing with us the voided monograms designs they are beautiful.
Regards Anita Simmance
Oh. My. Gosh. I love, love flowers and thoroughly enjoyed using your Stitch Sampler Alphabet to make my own design to commemorate my wedding. I just love this voided monogram idea. I am going to try this – it will be third on my list of projects to do. What a great idea, and of course your colors and stitches are just so wonderful and brighten up the design. Can’t wait to see the finished product!
Te admiro!!
Tus bordados son obras de arte!
Gracias de nuevo por compartir tus conocimientos !!
Saludos desde México!
What is the size of this piece? It’s sometimes a bit hard to translate some of my favorite design ideas because of scale.
Hi, Robbie – the letters print at 2.5″ and its in a 4″ hoop.
Absolutely beautiful! You are such an inspiration.
You are brilliant, Mary. Thank you for sharing your knowledge–which inspires me with each email that lands in my inbox–with all of us. This is breathtakingly beautiful, as is everything you stitch. <3
Gosh darn it, Mary! Will you please stop with the monograms?! I can’t keep up with you!! I discovered your site shortly before your Stitch Sampler Alphabet came out. Only had about ten of them done (giving half away for gifts) when the Tulip Monograms showed up. They are so easy to complete because I’m doing them just with an outline stitch filled in with seed stitches. But then you started with the Floral Monograms – which, well, I just have to do these, too. And now the new book, Favorite Monograms. And, TODAY. Wow this is fantastic!! So, yes, please keep challenging and tempting your readers. Many, many thanks and best wishes.
What a wonderful article. Just up my alley. I love freestyle work. You’very just given me another project.
Mary, I recently started your Stitch Sampler Alphabet using Alba Maxima linen from Hedgehog Handworks,but did not line my piece and am wondering if I should have. I did not see any mention of lining mentioned in the Alphabet Sampler and am wondering if you used it. I shall appreciate any information that you would be willing to share before I continue working on this. I,too, am looking forward to seeing the finished work of your Voided Floral Theme Monogram. Thank you for all that you do for us.
Sincerely, Louisa
Hi, Louisa – no, you don’t need to line Alba Maxima for the stitch sampler alphabet letters. In fact, I didn’t line any of the fabric for those, even with the lighter weight linens. Alba Maxima is a pretty solid medium weight linen – I normally don’t even line it for heavier embroidery like Goldwork. But on this, I did want to make sure there was no chance of any threads on the back being visible on the front, and I wanted to transfer the letter this way without any design line having the possibility of showing, so that’s why I lined it. Hope that helps!
What a GORGEOUS (I don’t think my letters are big enough for the emphasis I am trying to express!!) idea! Mary, you are the best! Just the best!!
Argh! How could you do this! I have a hard enough time choosing one of the alphabets from your Favorite Monograms book, and now you come up with these lovely ideas for the one alphabet I thought I could ignore because it looked a little boring…
Hi Mary, this is just a lovely technique which I first saw done by Sharon Boggon. Her voided image was a lizard and it looked fabulous. This monogram will be incredibly pretty when it is finished.
I am guessing that you made sure the image at the back was in reverse, otherwise the running stitched one on the front would be back to front?
I also wonder whether it would work if done very small, eg the corner of a handkerchief? All in white on white linen…
Hi, Christine – yes, you can find many old handkerchiefs with voided letters, usually with seed stitch around them. There’s usually a frame around the voided area of some sort. I don’t know how tiny you could go with all the different elements here, but I don’t see why it wouldn’t work!
No, you don’t have to reverse the image, since you’re stitching the exact image with the running stitching, so the running stitch outline comes out unreversed.
I loved that idea! I would like to see it complete!
This is just so pretty! What a great way to work through your stitch how to videos :). Can’t wait to see how you progress.
Hello Mary,
Delighted to see you embroidering without lines. Free, freer and even more free stitching. As you know, I love to stitch this way. Colours and stitches choices are wonderful. Had never thought of embellishing Buttonhole Stitch like that. Am looking forward to seeing the development of the letter A.
All the best, Ann
Mary,
Thank you for this free-style project. When I joined the local chapter of the Embroidery Guild, people wanted to know what type of needlework I do, and I was ashamed to say “improvisational.” I didn’t think it was a legitimate type of needlework and neither do they. Now I know better.
Now I feel that it is OK to embroider with minimal planning and lots of improv.
Thank you!
LOVE this so much!!!
So well explained thank you x
Will post my finished piece on your Facebook page