


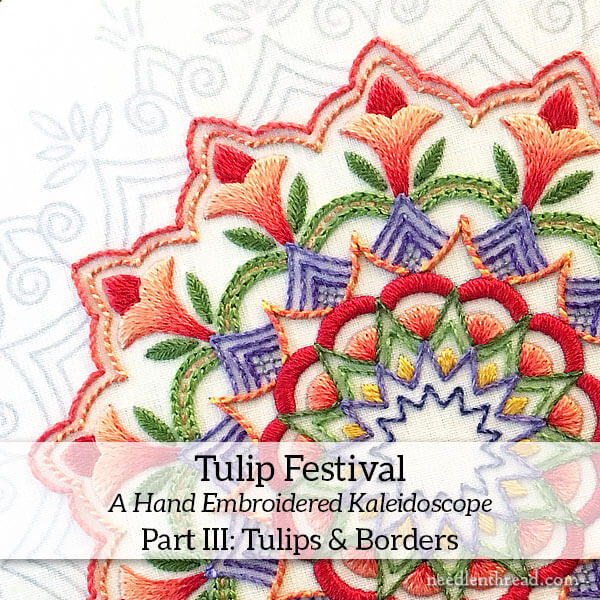
Good morning, and Happy Monday! I hope you enjoyed a pleasant weekend and had a chance to spend some time with your needle and thread! I got in zilch-o when it comes to stitching this weekend, but I did manage to prepare 12 embroidery patterns for printing. I can’t wait to show you what’s up with those!
We’ve been working our way through stitching an embroidered kaleidoscope here on Needle ‘n Thread – Tulip Festival, which we’ve visited in two parts so far. Part I of Tulip Festival covers the supplies, threads, set-up, and first seven rounds of stitches on the design. Part II covers the stitches for the the next several rounds.
Today, we’re going to cover the tulips in long & short stitch and a couple layers just beyond the tulips!
Whether you’re stitching Tulip Festival or not, I hope you’ll find some tips & techniques here that can apply to your own embroidery projects!
With the tulips in this section, there’s a certain order of stitching to follow that will give a better result and make it easier to stitch the tulips or any similar motif.
With long and short stitch shading (and many other embroidery techniques), it is a common practice in Western embroidery to start with the elements farthest back in the design. Once they’re stitched, then the next element forward is stitched “over” them. The elements might not technically overlap, but visually, they do, and it helps to keep that visual impression if you start with the back elements and work forward.
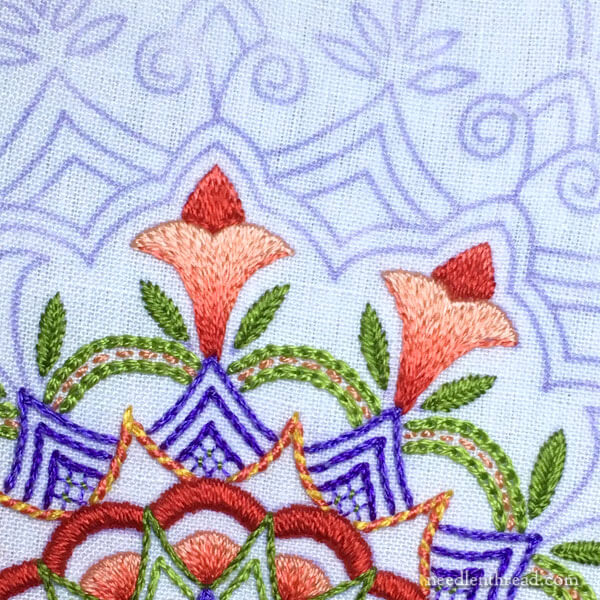
On this particular piece, then, we’ll start with the central “petal” that sits above and behind the rest of the tulip. This element is worked in three shades of the coral red Soie d’Alger – 924, 925, and 926.
Then, we’ll stitch the tulips themselves, which are worked in all the coral-reds, from light to dark – 922, 923, 924, 925, 926.
Helpful Tutorials
If you are not familiar with long and short stitch shading, all of the tutorials in this series on long and short stitch will be helpful, but especially this tutorial on shading around curves and to points and this tutorial on stitching angled elements (especially the scalloped element towards the end of the article).
Additionally, you might want to watch the long and short stitch shading video tutorials here.
The split stitch video tutorial here will help you with the initial outlining that’s worked before the long and short stitch shading is commenced.
One Strand & Split Stitch Outlines
The entire tulip element is worked with one strand of silk in the needle, using a #9 crewel needle.
On the center back petal, use one strand of 924 to work a split stitch line along the top design line of the element (don’t split stitch along the base of the element where it meets the rest of the tulip). Then, work the the long and short stitch shading primarily in two colors, 924 and 925. Then add in just a couple long and short stitches in 926 right at the base of the element, to darken it
I found it easiest to work all the center petals all around the design first, and then go on to stitching all the tulips.
You might prefer to stitch each complete tulip at one time. This is totally up to you!

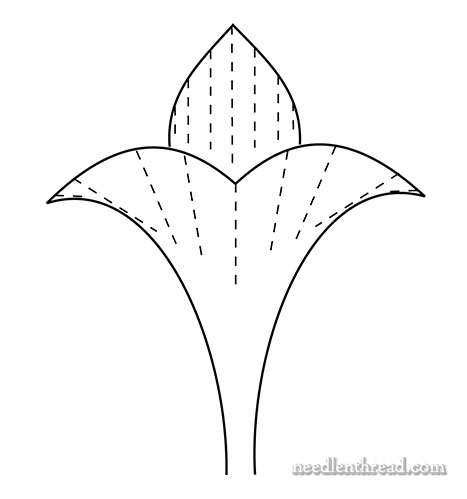
With the center dark red petal complete, split stitch along the top two petal lines of the tulip in the lightest coral, 922. Don’t split stitch around the whole tulip shape here – just across that top line.
From there, begin the long and short stitch, working the first layer of light stitches over the split stitch line, and then from light to dark down the shape, angling the stitches as necessary to fill the tulip.
Here’s a diagram that gives you an idea of the stitch direction:
Before ending the thread for the darkest shade (926) of the tulip (at the very base), turn the work over, run the thread under the backs of the stitches to the top of the tulip shape, and bring the thread to the front again at the base of the center dark petal. Split stitch right across the base of that center element in the dark red, over the long and short stitch there, to create a clear visual break.
And that’s the tulip!
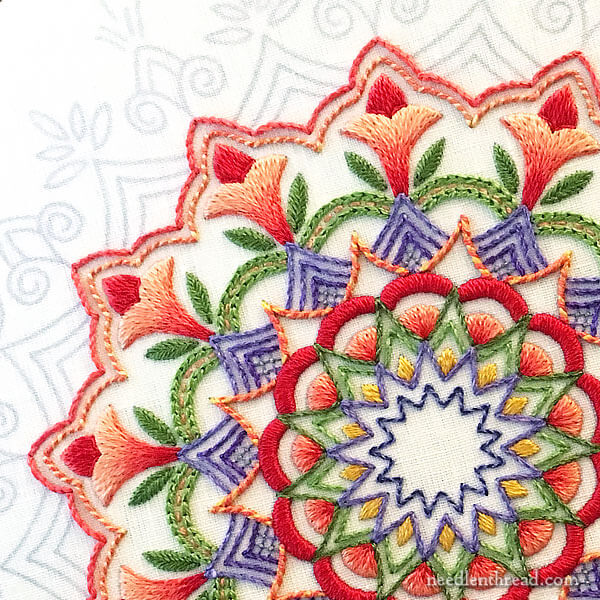
The next layer out beyond the tulips – forming a border around them – is whipped backstitch, worked in the same manner as the yellow and coral whipped backstitch in Part II. Use three strands of gold (2525) for the backstitch foundation for the first layer, and whip that layer with two strands of coral (924).
The second border beyond the tulips is stem stitch in coral 924, using three strands of Soie d’Alger. Besides the stem stitch video tutorial, this tutorial on sharp corners and scallops with stem stitch will be helpful.
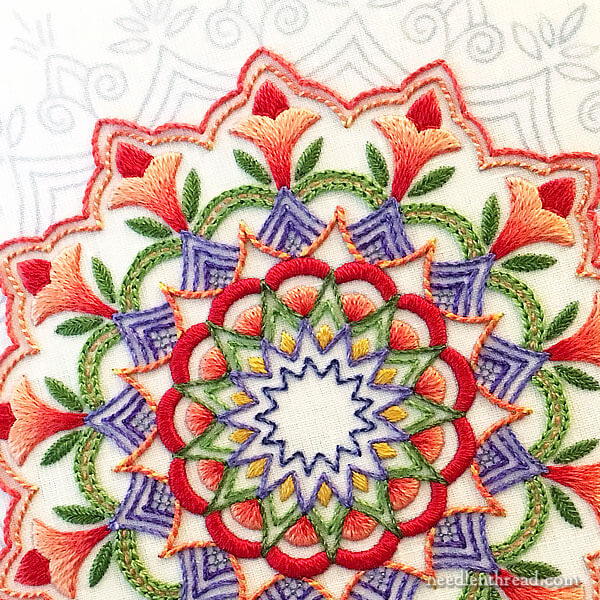
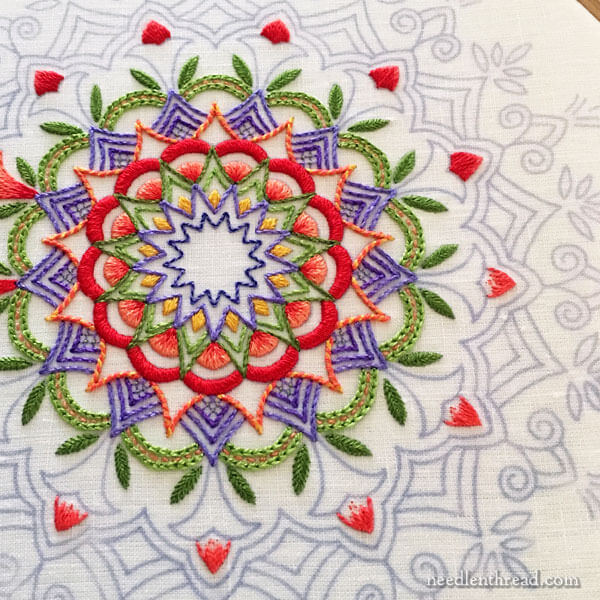
At this point, you have another excellent stopping point for a smaller version of the design.
Unfortunately, I never took a photo of the whole piece at this point! But you can get a good idea from the pictures above of how well the two outer lines beyond the tulips make a nice border.
The last installment of this short series will cover the outer rings of the kaleidoscope with the decorative elements along the outside edge.
Lesson Recaps
You can find the previous lessons in this series through the following links:
Part I – Materials, Threads, Set-Up, and first stitches
Part II – Stitching further out on the kaleidoscope
Tulip Festival Pattern
You can find the design for Tulip Festival in my pattern e-book, Favorite Kaleidoscopes. There, you’ll find a whole range of kaleidoscope patterns for embroidery, from small to large, simple to more complex. There are over 30 patterns in the e-book, ready for you to stitch into your own colorful masterpiece!
Questions?
As always, if you have any questions, comments, suggestions for alternative approaches, or whatnot, feel free to join in the conversation below!
Mary, I have several questions for you:
1. Soie d’alger did not seem to be available locally so I substituted Splendor. This is a stranded silk and I will have to experiment with the number of strands. Any suggestions?
2. The pattern looked impossibly small so I enlarged it 25%. This will take more silk, naturally, but the real problem is how to handle the hooping. Will is ruin my project to hoop it over stitching?
3. If hooping won’t work would you recommend stretcher bars or a frame?
I haven’t started yet so I could always go back to the original size and try even thought it seems very small to someone with arthritic hands. Thank you for the stitching directions, they are very clear and helpful. Best, Charlotte
Hi, Charlotte- Thanks for your questions!
1. I haven’t used Splendor in ages, so I can’t remember the make-up of the thread. I think this is something you’ll have to experiment with. But for techniques like the shading on the tulips, you’ll want to stick with one strand. The other elements, you’ll need to experiment to see what works to give you the weight you want.
2. I think when you find yourself stitching the design with the silk, it won’t seem too small in its original size! But if you already transferred, etc. then yes, you should be able to move the hoop around over your design. I don’t know how Splendor stands up to that type of hoop movement, but usually, it’s ok to move your hoop over areas of the design that have already been stitched. Just don’t leave the hoop there outside your stitching sessions. The longer the hoop is pinching the threads, the more likely they will retain an impression. You can also damp-stretch the project at the end, which will help remove hoop marks and re-invigorate the stitches. Assuming, of course, that Splendor will stand up to damp stretching (spraying with water) – it should. Usually threads that are going to run don’t run with just a misting of water. It usually happens when they are fully doused.
3. Yes, I’d probably use stretcher bars instead of a hoop – it would eliminate any worry in the long run!
If the design seems small to you, then by all means, you can stitch it enlarged! It will take significantly longer and significantly more thread, but it’ll still look great! The stitches in the design as I stitched are no smaller than they would be in any embroidery design, when worked in this weight of thread, so it’s really just the design size that seems small, but the stitches themselves are regular sized. But do what’s more comfortable for you!
Good morning Mary:
I have been following your newsletter for a short period of time now, and have gone back to many, many past issues, but I have found nothing on the use of wax for your threads. Do you use bees wax when you stitch? If so, what brand do you prefer; if not, is there a reason for this? Thank you so much for any info you might provide and thank you for the stitching calendar that I won a few days ago. I am looking forward to it’s arrival.
Hi, Mary –
There’s absolutely no reason to wax regular embroidery thread, unless you’re using it for goldwork, where the metal thread can be abrasive and beeswax serves to protect the thread. Waxing embroidery thread for regular surface embroidery will discolor the thread. I know some people say it makes thread easier to work with, but in fact, it doesn’t. I can see using “something” on rayon threads, maybe, but you’re still coating the thread with a substance that can attract dust, discolor the thread, and whatnot. Much better just to stitch with bare thread!
If you’re using embroidery thread for goldwork, then you would definitely coat it with beeswax, by running it through a block of pure beeswax about three times, and then running your fingers over the thread to work the wax in, and making sure there’s no flaky wax residue. If you’re using pure beeswax you don’t normally get a flaky residue, and the heat from your fingers works the wax in. Now, keep in mind, the waxed thread is only used in goldwork to hold down real metal threads. Free style or surface embroidery that accents the goldwork and doesn’t involve holding down any metal threads is not waxed.
The best type of beeswax is 100% natural beeswax with no additives. The disk that you find in craft stores that has a clear plastic casing and slits in it to run the thread through usually contains a mixture of paraffin as well, which is not necessary and which also leads to flaky residue. You can find small blocks of 100% natural beeswax through different sources online – there are lots of people on Etsy, for example, who carry it!
Hope that helps!
Dear Mary
Great tips and techniques and links for the L&S stitch, this is all that is required to stitch the perfect long and short stitch. There is so much going on in the kaleidoscope
design that it would be a great learning curve with so many stitches to get your needle into, especially if want to learn new techniques this would be the perfect design. Every time I see photos of the kaleidoscope design it makes want to take my needle and do it. But alas I’m in the middle of another quiet book for my other niece who is also pregnant so it will have to wait. Thanks for sharing with us all the tips and techniques on the long and short stitch and for all links on how to stitch the perfect stitch.
Regards Anita Simmance
Hi Mary,
This is a great project and I really want to join in to learn the various stitches and hone my skills. I definitely won’t be using silk thread and would prefer to use some fabric in my stash. I have some tan colored linen blend fabric I could use but really would prefer a white fabric to make the colors pop. I save my husband’s 100% cotton dress shirts and had thought about using that. What’s your opinion on this type of fabric?
Hi, Tanya – You can definitely work the design on cotton, no problem! Just make sure you tension it well in your hoop or on a frame, since cotton is more prone to puckering when stitching densely. Also, you might consider two layers – one layer for backing, to keep the fabric perfectly opaque, if that’s a concern.
The most mouth watering eye candy piece of embroidery I’ve ever seen!!! Love watching the progression … just when I think it can’t get any better you dazzle with another exquisite row! Just WOW!!! Mary, you are such a gem … and your willingness to share your gifts with us is quite special. Thank you sweet lady!!!
I’m enjoying watching your progress. Alas, work and family commitments prevent me from spending much time with my needle and thread; but I’m always looking for ideas and inspiration for later when I have more free time.
Mary Ann
Thanks for the wonderful website! I’ve learned a ton! I recently began working with silk after years with DMC and was surprised at the difference between brands, with some much more lustrous and luxurious than others. I’ve never used a laying tool before and am wondering under what circumstances you might recommend its use with silks.
Thank you for these wonderful, detailed notes working through the kaleidoscope pattern. As someone coming to embroidery after a lifetime of knitting, I’m finding this detail and all your tutorials and suggestions very helpful. My question is, in general, about starting and stopping a thread in a project like this. I’m very confused about when to stop stitching and when to carry the thread. Would you be willing to show us the back of this project? After “lurking” for some time on this and other embroidery sites, I’d like to start a serious project of my own but I’m quite unsure how to manage the work so that there is little carrying of threads. Any advice you could give would be much appreciated.
Such “eye candy”! It is absolutely beautiful!
Thanks, Laura! 🙂