


Happy Friday, folks!
If you’ve been following along with Party in Provence, an embroidered kaleidoscope that we’ve been working through step-by-step here on Needle ‘n Thread, you might find it hard to believe that we’re Almost Finished!
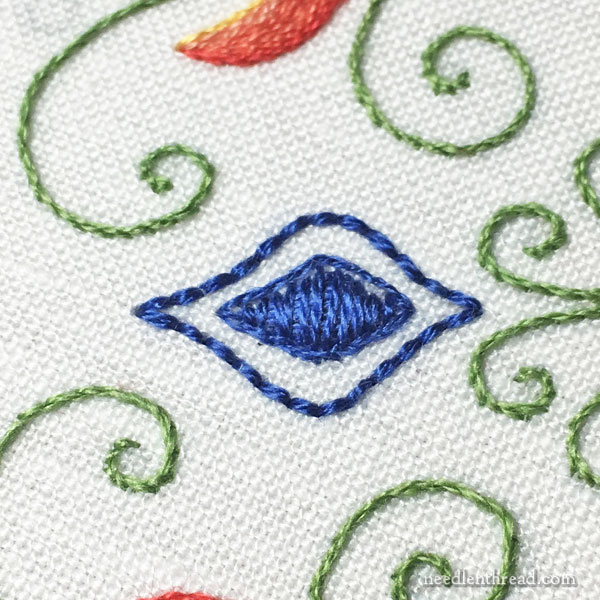
Today, we’re going to add a very little touch to the kaleidoscope – it’s the tiny medallion between each arm of the design.
Even if you’re not actually stitching Party in Provence, the tips below for the techniques used on this element can be applied to your own embroidery projects.
So…here’s the little medallion for you.

This little element, which ties the large central flower in blues together with the outer layers of the design, is worked in padded satin stitch with a small lattice accent, stem stitch, and whipped backstitch.
When you look at the element, you might be tempted to work from inside out – the satin stitch center first, the lattice element on top of that, the stem stitch outline, and then the whipped backstitch outline beyond the center.
And if I hadn’t already stitched the thing, I’d probably approach it that way, too!
But since I’ve already stitched this little element a good eight times, I’ve learned a little tip.
Stitch the whipped backstitch outline first! Why? Because the satin stitch element gets in the way while you’re whipping the backstitch.
The outer line in whipped backstitch is worked with 2 strands of 797 (blue), whipped with one strand of 351 (coral).
You can find a video tutorial for whipped backstitch here.
Satin Stitch
The satin stitch element is padded, so let’s tackle the question of padding.
(You’ll notice above that I haven’t whipped the backstitch yet. I learned the hard way.)
Begin the satin stitched element by working a split stitch line using one strand of 797, covering the line. You can find a video tutorial for split stitch here.
Once you’ve split stitched that outline, it’s time to build up the padding layers inside.
You’ll keep using one strand of 797 for all of this, through the top layer of satin stitch.
To build up the padding and finish with the satin stitch, here’s a diagram of the steps and the stitch direction you’ll follow:

Each layer of padding is worked in straight stitches, filling the shape in progressive stages, until the third layer of padding sits perpendicular to the direction of the top layer of satin stitch.
New Floss and Satin Stitch Method
When you’ve finished the padding, switch to a brand new piece of floss, even if you have floss left over.
This is very important, because you want that final layer of satin stitch to look just perfect.
When you work the satin stitch, you’ll work it just over the split stitch outline. Start with the longest central satin stitch right down the middle of the element, and then work out to one side, go back to the middle, and work out to the other side.
End the satin stitch when it just barely starts to cover the side bulges. That side satin stitch will be a lot longer than you think it should be! The whole element can be covered in about 5 stitches altogether – maybe seven, if you work them very close, but try not to crowd them.
The Lattice & Outline
The lattice over the satin stitch is worked as one large X, so that the center of the X is approximately in the center of the element.
You’ll use one strand of yellow 725 for this.
Before ending the yellow, though, switch to one strand of 351 and work a tiny cross stitch over the intersection of the lattice.
Then, go back to the yellow and work a tiny stem stitch outline all around the center satin stitched element.

And this is where we are so far!
The next installment on this project will be the last! We’ll add the beads and then you can revel in your own beautiful finished kaleidoscope!
Looking for More?
If you want to follow this project from beginning to end – to stitch along, or just to pick up some stitching and technique tips – you can find the entire project in my Hand Embroidered Kaleidoscopes project index, along with several other step-by-step kaleidoscope projects.
If you’d like to stitch your own kaleidoscopes, interpreting them in any fun way you want, you might be interested in my pattern book for embroidered kaleidoscopes, Favorite Kaleidoscopes. It’s a lot of fun!
Let me know how you’re getting on with your Party in Provence! If you have any questions, don’t hesitate to leave a comment below.
And if you have photos you’d like to share, why not stop by the Needle ‘n Thread Community on Facebook and share them there? We’d love to see your progress!
Have a terrific weekend!
That’s great, Mary, I’ve got just a couple of flames left plus two green swirls, then I can join in the medallions.
But I have a question indeed: When transferring such a repeated design, there’s generally no two elements coming out identically. (I did the transfer with carbon paper.) They all differ in size and even slightly in shape. What do you do in order to get such perfectly identical elements?
Angela from the Ore Mountains
Hi, Angela – in the instructions at the beginning, I recommended using Sublime Stitching’s fine-tipped iron on transfer pen.
I know, Mary (this pen isn’t available in Europe). But whether you use an iron-on pen or carbon paper – you have to trace by hand, and humans hands are a bit shaky by nature (and human eyes a bit imprecise), so it shouldn’t make such a big difference in the outcome, should it? Perhaps the smoothness of the fabric might be an issue, too – little molehills that sum up to a mountain in the end?
For me, I find it easier to draw / trace more accurately on paper, right over the design. Then, if I make a mistake, it’s only a piece of paper and I can start over. Plus, there’s no interference from the irregularity of the fabric. Another option that’s very accurate is prick and pounce, but it takes quite a bit more time to transfer this way. Just some ideas!
Thank you for the ideas, Mary. What you said makes sense to me, also that the smoothness of the fabric is bypassed by drawing directly on paper.
Prick and pounce is a method unknown over here, means I can’t get my hands on pounce powder, but inspired by a lady in the facebook group, I’ll go and try this method with a soft artist-grade pastel stick. This should be especially handy when tracing onto dark fabric.
By the way – only just finished the first medallion of the kaleidoscope. It looks great – the piece is gaining splendor! 🙂
It is stunning! I love how it’s coming along. All the care and perfectionism you have put into it really showcases your grand talent and skill.
Just really and especially love this happy project, Mary. I enjoy and appreciate each installment; the color and stitch choices are delightful perfection. Thanks so much.
Linda
Mary, sometimes I think you’re reading my mind. Those medallions have been tapping me on the shoulder, lately, as I’ve been mulling over the idea of using the guys all on their own.
For what, I have no idea, but I’ll find an excuse.
It’s looking great Mary!
Just wondering why you use the split stitch for the outline rather than the back stitch?
Gina
Hi, Gina – There are two reasons for split stitch instead of backstitch. One is that the split stitch builds up less thread on the back of the embroidery. The second is the physical construction of a line of backstitch (which is bumpy) compared to a line of split stitch (which is smooth). I’ve written about and illustrated this last point in this article: https://needlenthread.wpengine.com/2013/01/embroidery-tip-the-backstitch-vs-split-stitch-controversy.html Hope that helps!
Your beautiful work always brings a smile to my face! Thank you.