


Don’t you love it when a plan comes together?
Sometimes, when I’m planning embroidery projects, I don’t know if the finish I have in mind is going to work. And I had a few moments of hesitation when approaching the finish work on the needlebook from this embroidery project we chatted about on Monday.
But it came out ok, I think! Better than I expected. And that always makes me happy!
I had quite a few questions through email, comments on the blog, and social media about the beaded edge on this project, so I’ll share some tips with you below as I show you the final results.
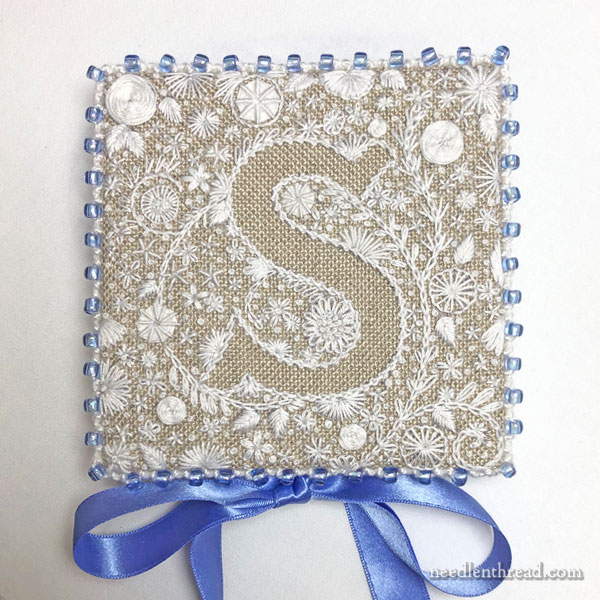
This is the finished needlebook.
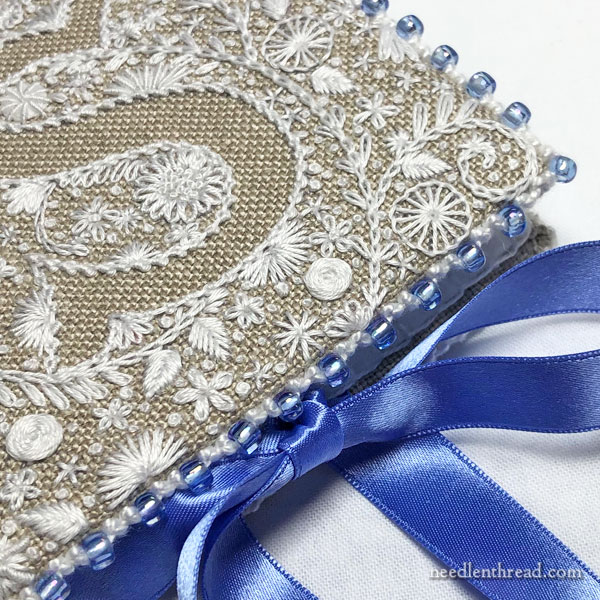
The edge on the front of the needlebook is a combination of Palestrina stitch worked on an edge and beaded Palestrina stitch.
If you want to know how to go about stitching this kind of edge, all the tutorials you’ll need to learn the technique are available on Needle ‘n Thread already.
First, you’ll want to know how to do the Palestrina stitch, and this video tutorial right here will help you learn it. Practice it on a regular piece of fabric in a hoop. Once you get the hang of the stitch, it stitches up quickly with a very comfortable rhythm. Spacing is often the greatest problem with a knotted stitch like this, but a little bit of practice and familiarity with the stitch will help you overcome any spacing difficulties.
On this edge, I worked the Palestrina stitches close together. You can space them farther apart, but the finished edge won’t be as solid. The farther apart you space them, the longer the “bridge” (the single thread between each stitch) will be.
Second, you’ll want to know how to add beads to Palestrina stitch, and you can find a photo tutorial for beaded Palestrina stitch here.
Finally, it’s a matter of stitching the Palestrina stitch along an edge, and yep! I’ve even got a photo tutorial for Palestrina stitch on an edge here. While that tutorial demonstrates the Palestrina stitch worked over the edge of two joined pieces of fabric, for my needlebook above, the same concept is applied but it’s only over the turned edge of one piece of fabric. It’s a great edging stitch!
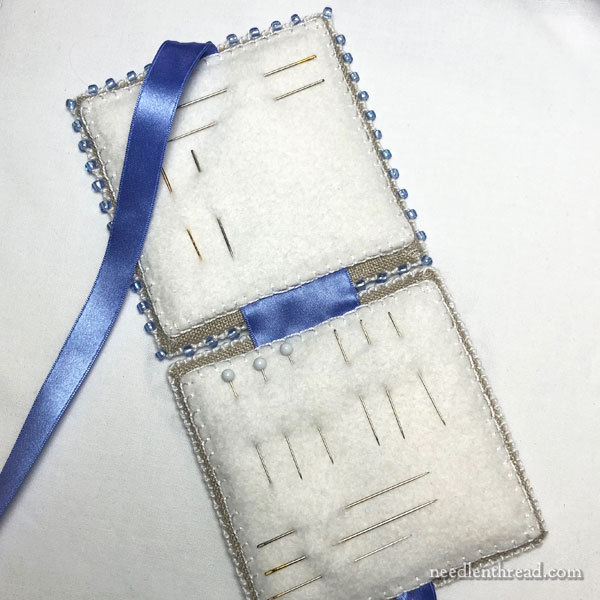
The inside of the needlebook is fairly simple, with plenty of room for a variety of needles.
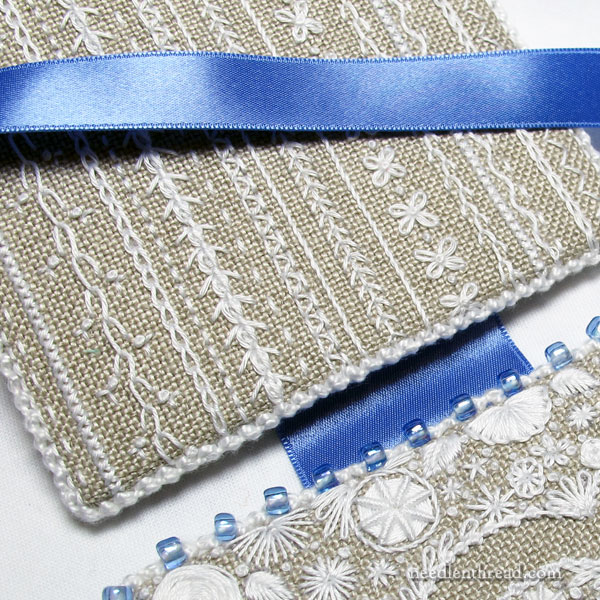
The edge on the back of the needlebook is not beaded. Two beaded edges in this format would conflict with each other, I think.
The back is a small stitch sampler of sorts.
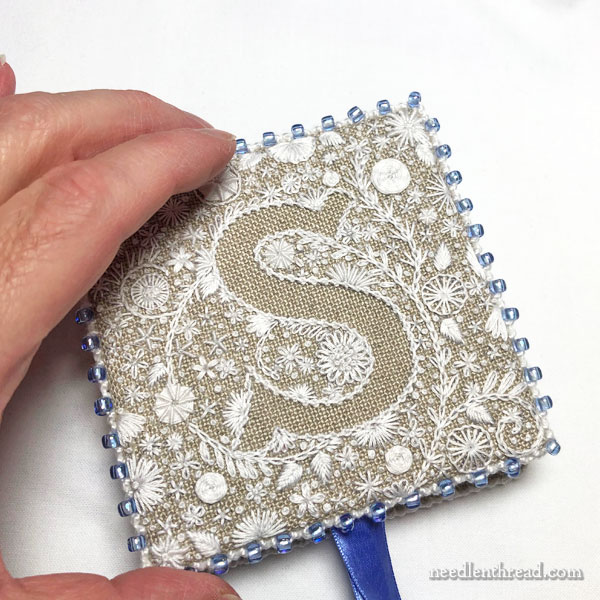
And for those asking about the size of the finished embroidery, it is 3.5″ square.
Want to Read More about This Project?
You’ll find more information about the voided monograms that I’ve been working on in the following articles. If you’re looking for tips or answers to questions that may have already been addressed, feel free to browse through these:
Some Call it Poison – Don’t Underestimate Color! This article is the beginning of one of the colored voided monograms, wherein we discuss threads and color.
Stitch Progress & Tips – This article shows progress on the colored voided monogram and shares a few tips.
From Color to Whitework: Same Design, Two Approaches – This compares the designs worked in color on white linen and in white threads on natural colored linen.
Finishing Progress: Sometimes You Have to Quit – This is where I broke off on progress before traveling. But I got back to it pretty quickly!
Whitework with a Touch of Blue – Decisions on finishing this whitework-on-natural version of the voided monogram.
Coming Soon!
The designs for my voided monograms – the whole alphabet, plus some non-monogram ideas – and the stitch and materials guide, along with finishing instructions, will all be available on Needle ‘n Thread in the nearish future. I’m working on a few extras for you, including some helpful design transfer options, which I hope will work out. Once I get the designs finished, all the models stitched, everything photographed, the instructions written, and those other options ready, I’ll let you know!
It might be a wee tiny little while yet, as there’s always that thing we call Life that tends to interfere with our best-laid plans. Oh yeah, and taxes. It’s that time of year!
If you have any questions about the project in the meantime, feel free to chime in on the comments section here!
Gorgeous and right up my alley, going past my obession with CCS and bringing in new elements! I want to do this project. It would also be a neat project for EGA meetings!!!!
This is so beautiful! I can’t wait for the voided monograms to be released! 🙂
Really love your voided embroidery needle book! It’s beautiful, and the beads are a lovely touch! I too only use tiny beads, and have a huge stash collected over the years of larger beads. Will you in a future project explain how to make one of these needle books? Although it’s easy to figure how, I would love to know how YOU stiffened, and lined the book….the exact materials used, etc.
I adore your blog and website. ❤️
Some of the details, at least, are in https://needlenthread.wpengine.com/2020/02/embroidery-project-progress-sometimes-you-have-to-quit.html.
I agree!! I’d love a tutorial on the finishing of the book itself!
Your needlebook is charming. I’m looking forward to your designs for voided monograms that are coming soon. Your finished needlebook looked to me like it would make a great special picture book: Open the cover to reveal a picture instead of needles. An embroidered oval open in the middle could frame a photo. It would make a lovely keepsake.
Unfortunately, too many people I might gift don’t sew*, but they all have loved ones.
Sandy
Hurst, Texas
*Don’t get me started on how many don’t even own an iron!
I had to laugh at the comment about irons. I also know people who don’t own an iron. I have at least 6 or 8 different irons, all important for what they do. My ironing board is never put away and my main iron sits there ready for use.
I love your idea of a picture book variation.
Hi Mary!!! What a lovely and gorgeous needlebook that you made!! I just love it!! Your instructions how to stitch Palestrina stitch is very detailed, and easy to follow, besides giving a very nice touch. Thank you so very, very much for showing us all for this beautiful and easy stitch!!!
You have created a true heirloom. It is beautiful. This is on my To Do list. Thank you.
Dear Mary, your needle book is just lovely! Looking forward to more monograms. Could I ask you to show us how to end and begin a new thread using a long line of Palestrina stitch.Much appreciated.
Thank you and God bless. Susan Coates
That came out way better than “OK.” It’s really elegant.
This is beautiful! I love the blue beaded edge. Inspiring for me!!!
Dear Mary
What a lovely, pretty finish to the monogram needlebook I love it with the blue ribbon and beads although blue is not my favourite colour it looks lovely on the needlebook contrasting with the natural linen and white thread and the lovely various embroidery stitches. I wish I could create something like this you very talented and I can’t believe it’s only 3.5 inches beautiful. I’m looking forward to the new voided monograms and alphabet ideas that will be lovely. Thank you for sharing with us the finished project on the S voided monogram and for the photos and links on the project. Very beautiful.
Regards Anita Simmance
Thank you for sharing, the needle case is stunning, love the colors.
I have a question. Do you have any suggestions on types of chairs you would recommend for stitching? I’m
looking for a chair that would be comfortable as well as supportive for back problems. I would appreciate
any recommendations.
Thanks,
Teri
Hi, Teri – I use a whole range, depending on where I’m working and the kind of stitching I’m doing. Sometimes, I use a computer chair. Sometimes, I use a backless stool (in fact, quite often). Sometimes, I use a regular kitchen chair. And sometimes I sit in a “comfy” chair (recliner – though I don’t normally recline when I’m stitching) or another comfortable living room-type chair. I’m sure there are folks who have absolute favorite ergonomic chairs that they use for stitching, but I just move around from chair to chair, depending on where I’m working and the kind of work I’m doing. Your best bet might be to go try chairs at office stores, if you’re looking for something that’s particularly supportive for the back.
I look forward to the voided monograms. My nehphew is getting married in September and I want to make a momogram something for he and his to be wife.
Oh So pretty! Thank you so much for sharing.
I absolutely LOVE it! I am going to ask my Mom to make me one for Christmas!!!!
I absolutely love your design for the needlecase. There’s something about monochromatic design that really draws me – love arran designs also. Since my name is Susan this one is particularly appealing. The blue beads are just the icing on the perfect cake.
Hello Mary,
Did you use Palestrina stitch to connect front and back of the needle case?
How can I add several fabrics between front and back? I would like to store different kinds and size of needles for my embroidery works.
Thank you for your help.
Regards,
Sophia
Oh Mary! I just love your needlebook, it’s absolutely perfect. You really are a whiz.
Trish.
Love this. As always, you have given us a lovely project with many possibilities. Always look forward to your posts. Thanks so much!!. Suzie in Idaho
Your needlebook turned out great, I love it! Thank you for all you inspirations.
Absolutely beautiful!!! Love the design and plain back. The finishing method of attaching the two sides is clever as well as the method of closing the needle book. These would make wonderfull gifts for friends or granddaughters.
Hi from Scotland – I really admire your work and look forward to seeing your embroidery creations – love your needle case – beautiful work .
Dianne
The voided embroidery needlebook looks amazing. I’d love to make few as gifts. I really enjoy and look forward to your emails.
Thankyou
This project turned out beautiful! So excited about the pending publication—I’ll be purchasing one for sure!
The needle book is lovely, I’m sure your niece will appreciate it, especially since she’s on the path to being a stitcher herself.
At tax time this gorgeous beaded palestrina edging makes a major, beautiful distraction. It will take all my determination to postpone applying your clever technique at this time. But I will be grateful to return to this posting and remember to use my decades long favorite textural stitch interspersed with whatever beads are in my supplies.
This is just lovely! What a sweet gift this would be for a friend or family member who enjoys stitching! As usual, Mary, you are inspiring me to get out my supplies and get going.
It’s a truly delightful finish Mary! I love the simplicity of the overall look, but the variety of stitches you have included in this miniature project. It looks a really interesting design to stitch technique wise. So so pretty with the beaded edge as well.
Absolutely beautiful ! I want to make one for myself, you have inspired me. Thank you.
Its all your fault I am now down another path/rabbit hole/squirrel run of color and texture and line. I fought it off as long as I could but picked up a denim jacket/shirt yesterday and washed it and am now watching your how to’s and designing and playing in my mind before I start on the project. I am mostly a quilter but do not care to wear a quilt out that often…. this is going to be a lovely journey I thinnk.
First, I really love this project! It was executed beautifully! I just want to share one darn thing — every time I notice it (on Facebook, and on your email post), that chain stitched line that comes off the bottom back of the “s” and curve up to the back of the top curve always throws me off…… for what its worth! (not much, haha!!)
Hmmmm…. do you mean the one that continues the swirl that moves up from the bottom center of the design, circling towards the top right, then it runs into the top of the S (on the right side) and emerges on the left side of the top half of the S? You mean that part – the re-emerging swirl on the top left side of the S, that continues downwards and runs into the lower left end of the S? And then it continues the swirl into the center of that lower half of the S? It’s part of a swirl that you might imagine as a 9? And you’re talking about the loop part of the 9? Oh dear, this is all as clear as mud, isn’t it? I will squint and consider the design! LOL! (If you look at the heart design, maybe the swirl plays out better in that one?)
Hi Mary! Let me “mudify” further!! You have made me look further and study it more closely than I did when I made the original comment. There was just “something”, but I didn’t analyze it. Now I have! haha! I didn’t even “see” the whole swirl thing established by the chain stitched line — and that doesn’t bother… I think it is that the “swirl” line touches the bottom back serif, so it becomes part of the letter momentarily, so I am lead off the “s”. Have we beaten this to death yet?!!
LOL! Probably! But it might come up for a final gasp of air a little later!
Mary, I am so amazed by you! I have recently signed up and I am continually going to your site to see what you have done, then two hours later I realize I have done nothing! YOU are a wealth of information and I am in total awe of what you have done! Thanks so much for inspiring all of us! Keep up the great work!
Linda
🙂 Thanks, Linda!
Mary,
this voided work is just absolutely lovely. And the openish heart makes my heart very happy today. Thank you for sharing.
Just stunning! Thank you for you ongoing inspiration!
Is the pattern for this needlebook available? I really love this design. It is so lovely.
These designs will be coming out in a variety of formats in the not-too-distant future. Thanks for asking!