


Oh golly. I really wanted to show off some serious stitching today. But in fact, I ran into one of those road blocks this weekend, and I couldn’t muster the courage to plow through it or leap over it. I came to a halt.
Brain muddle.
Let’s take a look…
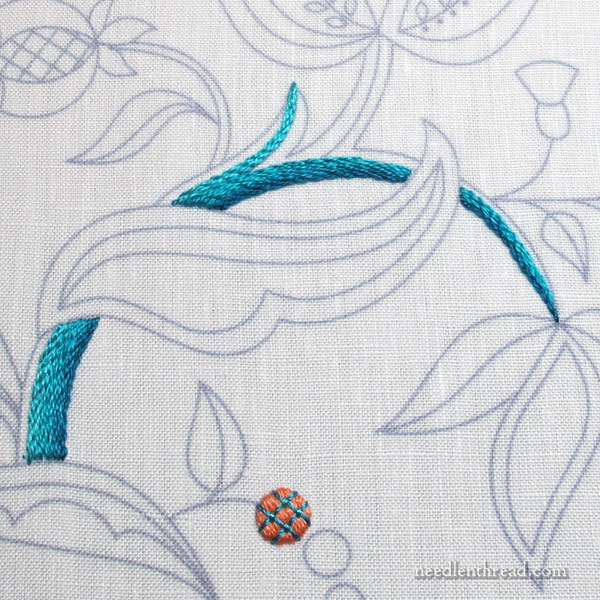
The main stem on the this very typical-looking Jacobean-esque design is … very typical-looking! It splits off in two directions, with a little stubby element towards the top flower, and the shoot-off that supports the top central flower in the design. The splits in the stem are fine. Pretty much any embroidery project that has a main stem can end up with splits in the stem, branching off to other areas of the design.
I marked out center lines on each section to cut up the stem a bit into manageable pieces that can be shaded differently (or not), depending on what the stitcher wants to do with the stem.
Shading will probably play a big part of this project, but I don’t want all the shading to be long & short stitch. Here, I’m incorporating stem stitch shading, which shows up in a heck of a lot of my projects. It’s a nice way to shade a slender, long element.
To shade with stem stitch, I usually work with three or four shades, and I blend two shades at a time in my needle between the solid colors. This way, I get a less stripy effect with the shading.
You can read more about stem stitch shading on stems here, if you’re not familiar with it.
Here, you can see the two splits in the main stem.
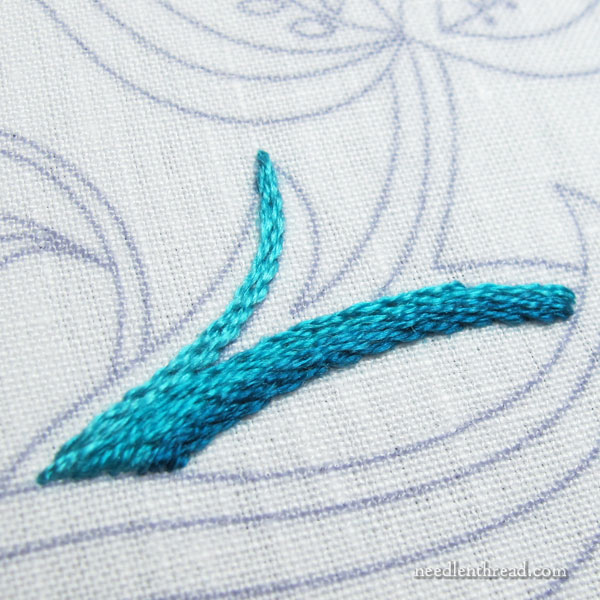
The one on the left gives the sense of a kind of stubby leafy thing. The one on the right travels up to the base of the main design element, which is a stylized floral sort of thingamabob.
This is all fine. None of it really bothers me. I know exactly where to go with it, if I’m just working a plain, shaded stem.
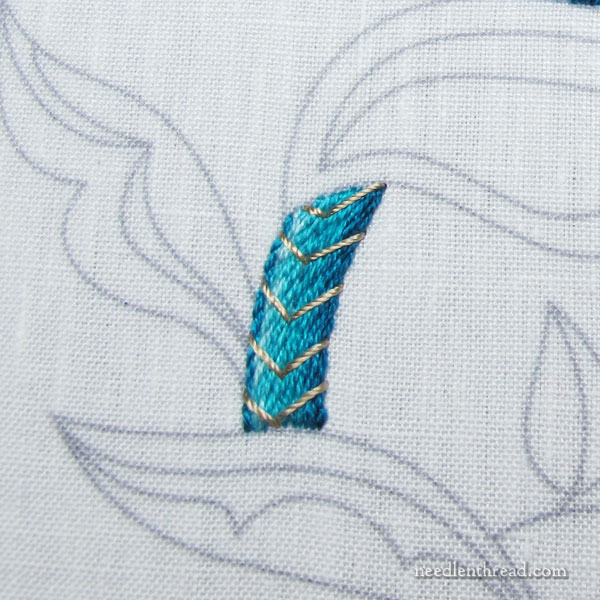
But I don’t want just a plain stem-stitch shaded stem. I want to work over the top of the shading with a contrasting line, using Silk Perlee, as you can see above.
The element naturally draws me to work these over-stitches in this V-shaped way. It makes sense. And at the base of the stem, it looks good (I think?).
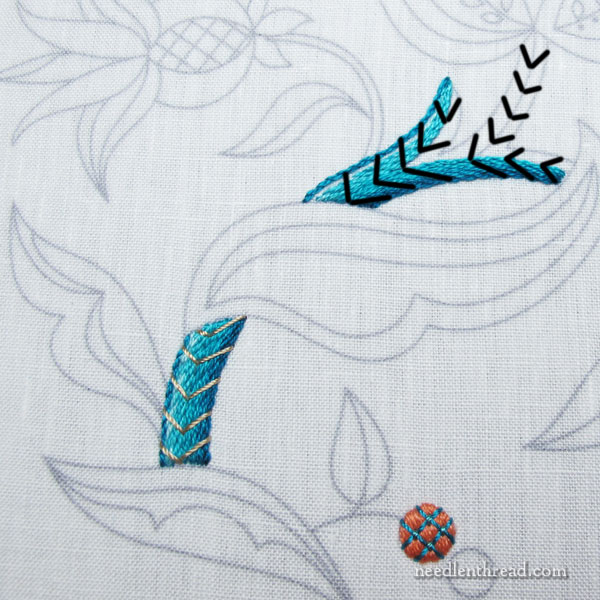
But as I work up the stem, and things start splitting off and changing directions, you can see what the problem is going to be.
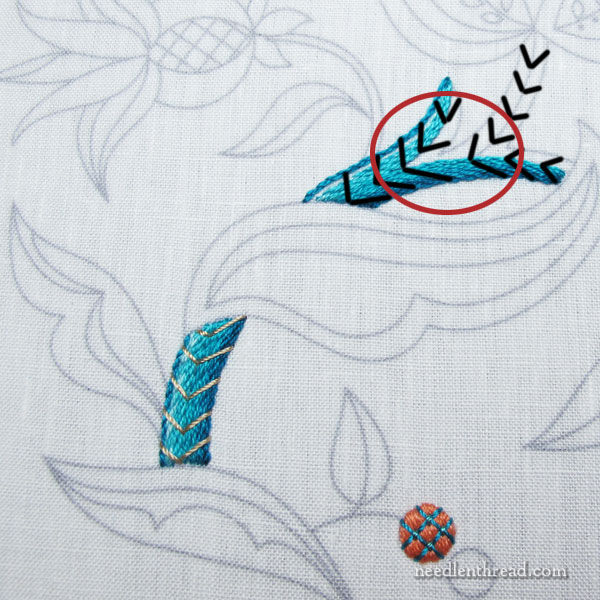
Everything in the red circled area muddles me.
I’ve worked this out on paper many times, and I still don’t have a pleasing way to manage the over-stitching without that area looking wonky and too busy.
This was my brick wall. I was really frustrated by it.
So I did what I always suggest people do when they meet with a frustrating obstacle that just won’t clear up for them.
I stepped away.
This morning, during the wee hours – I think I woke up at 3:00 am, and this was the first thing that popped into my head – an idea started to hazily develop. Of course, I couldn’t go back to sleep while it was rolling about in my head.
I tried to think of other things. Of boring things. I even tried to count sheep (which doesn’t work). But I kept coming back to the stem.
Finally, there emerged from the murk and cloud of my 3:00 AM sleepy brain, a feasible idea.
Guess what I’m going to do today? You betchya! I’ll finish the stem and try out my idea. Of course, I always have a fear that over-stitching on a shaded area can cause damage, especially if you have to pick out the overstitching.
And it’s true – it could cause damage if I were working with any other thread. But with Silk Perlee, which is naturally a bit slippy, the thread pulls right out without leaving any real evidence that it was ever there.
Oh, silk! I love you!
Next time we visit this project, hopefully I’ll be showing you the completed stem, solution and all.
Previous Articles on This Project
Just so you can see how long it takes for an idea to develop and actually work itself out (for me, anyway!), here’s a list of previous articles that have to do with this particular embroidery design:
Jacobean Whitework on Blue – The first time I started stitching this design (it’s been slightly modified since), I tried it in white threads on blue linen
Then I decided to start over with different threads and a different ground fabric
And I made a tiny bit of hesitant progress. I think at this point, I already knew I wasn’t going to like it.
The Trunk Again – and I changed my mind on the project again. I just wasn’t feeling it!
Changing the color palette, ground fabric, and threads – This is my switch to the new color palette I’m working with now. Much happier!
I’m sure there’s a lesson or two you can draw from all of this!
Have a wonderful Monday!
I just love this! The colors are amazing and the work is to die for! So glad I found your website as I delve into embroidery!
🙂 Thanks, Mary!
Work the chevrons in the opposite direction, that is, with the center point going in the direction of growth.
Hi, Karen – I tried that, but I didn’t like the look of it. It doesn’t look quite natural, because it’s actually the opposite of the direction it should go in (the center should point towards the origin of growth, which would be the base of the stem). It ends up looking like arrows on a marquee, for some reason, with the overstitching standing out very aggressively. It’s funny how just the change in direction made the stitching on the top come into focus and the background almost completely disappear. I should have taken a picture! I want the two to complement each other, with the top stitching being there, but subtle.
Oooh, lovely! I know you didn’t ask for advice but I got some anyway :). I’d like to see the split stem actually split the chevron: that is, you stitch the V’s right up to the split in the stem and then continue the left-side parallel lines on the leftmost stem, and the right-side parallel lines on the rightmost stem.
Hmm, and then what happens when the stem splits again?… I know what you mean about it looking too busy to reintroduce a full chevron on a subdivided stem.
Oh well, this is why you’re a professional embroidery expert and I’m not! 🙂 I’m sure whatever you decide on will be gorgeous, as always.
Also, I loved your computer’s autocorrect of “arrows on a marquee” to “marquis” and looked around for a photo of that, but couldn’t find one. But here is a picture of some arrows on a marquise, close enough! 🙂 (Jean-Marc Nattier’s portrait of Madame de Pompadour en Diane)
commons.wikimedia.org/wiki/File:Jean-Marc_Nattier,_Madame_de_Pompadour_en_Diane_(1746).jpg
LOL!
Hi Mary,
Love your new color pallet for this design! Looking forward to see your solution at the split in the branch. If I was playing with this one I think I would make the V couching smaller, narrower and closer together as one goes up the stems. The same as you would see in a growing plant. Have fun!
Hello, I love the colors that you chose for the Jacobean Sea Embroidery Project. Is the pattern available for download & transfer?
Thanks,
Dana
Hi, Dana – It’s not available yet. I need to finish stitching the design first and see if it works the way I want it to. I might make adjustments as I go.
Thanks for letting me know
That blue color is fabulous. May I ask the brand and shade? I want that color and everyone near it too. As a very new beginner, I have nothing on the stitching dilemma, but I’m confident you’ll figure it out.
Who am I to talk! But if you’re going with the chevrons, I’d replace the line of dark blue on the lighter side of the stem with a line of the gold; likewise on the smaller stems. As stitched at present, the eye goes to the point of the V instead of following the flow of the stem. I’d also reconsider the angle of the chevron: as stitched, the angle at the darker edge is more acute. I think I’d prefer it to meet the outer edges at the same angle rather than remain consistent in the centre.
Try splitting the Vs earlier. It appears that the really awkward part comes from the slightly too-wide Vs just below each split. If you replace each with two smaller ones almost side-by-side it gives the impression of the branch growing tight alongside the stem before curling away.
Hi Mary,
First, I love reading your work. You’ve been a huge help to me on my project.
Like you I was up in the wee hours and saw your email/post and had to agree about your dilemma; however, I saw the problem and decided to see if I could fix it . Not sure what your “ah ha” moment was but here is what I saw: Not sure if it’s a help but it’s another idea.
Thanks, Beth! I ended up doing something similar. My “ah ha” moment was a bit too bland, so I went back to the whole stem approach, and I think it worked out ok!
I like the chevron idea and have used it myself with nice results. I know by now you solved the problem and everything looks wonderful! Just for the record though ,did you try using the chevrons only on the main stem? This would require some repositioning of the chevrons before you reached the smaller side elements but I think it would work .
I look forward to seeing your solution.