


Last week, we (just barely) met the deadline for the goldwork altar cover project that’s been developing for almost a year now. You can find the backstory on this project here.
After the crunch (which was particularly crunchy!), it took a few days to get things back into working order here in the studio, and then it took a weekend to recuperate in general on all the normal aspects of life that were pretty much on hold since the last week of March.
As of today, we’re back to our normal operations – still catching up, but everything should even out again this week!
Today, I’ll show you the finish. And then later in the week – delayed, but not forgotten! – we’ll be back to our regular program, including Little Blooms.
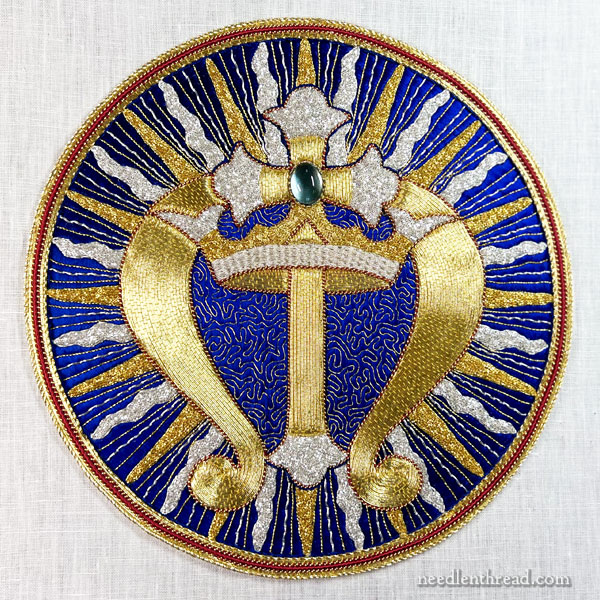
This is the finished central medallion for the altar cover. It is just a tad smaller than 8″ in diameter.
I worked the design in flat silk (the blue background), gold passing thread, a never-ending ton of gold and silver chip work using bright check purl, stretched pearl purl twisted with flat silk, gold and silver rococo, different types of gold and silver twist, and a red silk faceted gimp.
The central stone is a blue topaz cabochon set in a delicate gold bezel customized with flattened side “loops” to fix it to the ground fabric before building up the goldwork around it.
The photo above was taken while the piece was still on the frame, just after I finished it. I did not clock my hours on the medallion alone, but I estimate approximately 220 hours on the medallion from start to finish, over the almost five weeks it took to embroider it.
I learned many lessons about timing and planning for something this size. So Many Lessons! Primarily, this type of work can’t be undertaken last minute – and when it comes to hand-embroidered goods like this, especially if you are not relying on a crew of many, then anything inside a year is pretty much “last minute.” A year out seems like a long time on any project, but don’t delay because you think the deadline is in the distant future. That year goes fast.
Cutting out the embroidery is always the nerve-racking part!
Before the embroidery was removed from the slate frame, I pasted the back with rice paste – the same kind that you’d use to paste the back of, say, Japanese embroidery or similar.
The paste adds a little stiffness to the piece (but not too much stiffness) and it adds extra security to the threads on the back of the work.
I’m guessing there will be eyebrows raised at this point and some folks may say, “But you should never use paste on embroidery.” There will probably be folks who mention that conservation efforts are always more problematic when paste is used.
Just keep in mind that this embroidered piece is not a museum piece. It is not meant to last forever. It is meant for church use. It will be handled carefully, but it will be used every day – that’s what it was made for. And some day, it will have to be replaced. And that’s normal. It is being used in a climate-controlled environment, in a new church, so I think it has a good chance of lasting a while. But to think it will last in pristine shape for a long, long time is not realistic.
The pasting helps it hold up better and will add some longevity to its life.
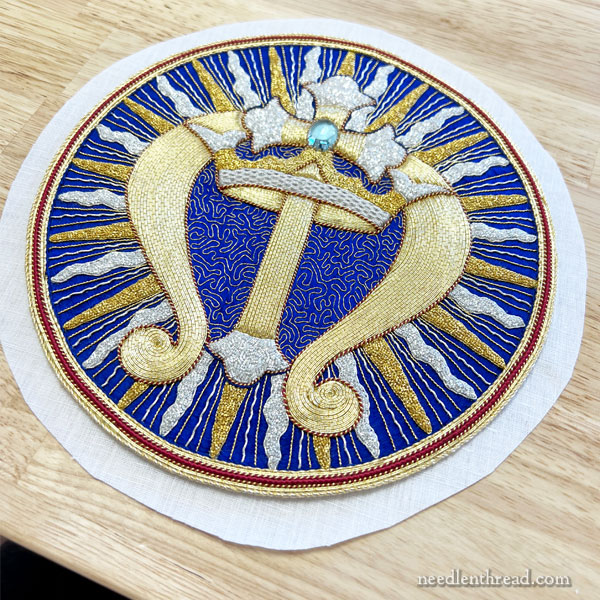
Initially, I planned on using a turned edge appliqué for the medallion, but I was not pleased with the results when I tried it.
So, before appliquéing the medallion to the velvet cloth, I trimmed the edges of the ground linen down to about 1/8″ from the stitching.
Then, I pinned the medallion in place and used gold silk thread and blue silk thread, waxed, to tack the medallion in place using invisible tiny stitches throughout the design, tucking the tacking stitches into the embroidered areas. Then, I worked around the entire design, tacking in gold silk thread underneath the gold twist on the edge.
Finally, to finish the appliqué, I added another layer of twist that was sewn onto the velvet over the 1/8″ edge of linen.
Before officially handing the cover over, we fitted it on the altar a final time to make sure that it hung as planned.
We had quite a bit of last minute adjusting to do – including re-working the cloth using a different lining approach. The entire cloth was hand-hemmed and the lining sewn in by hand, so that took time, too.

This is the cloth hung on the altar, before the altar was dressed with linens. (Normally, the altar cover covers an altar that has linens on it already.) Since the church wasn’t in use yet, we were able to come and go to fit the cloth and to make adjustments as needed.
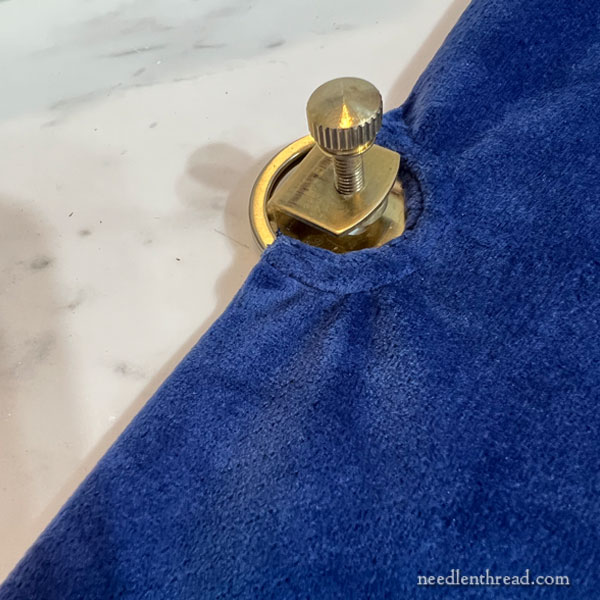
Something unique to the altar cover is this little get-up.
Most altars like this one have several inset pieces of hardware like the one pictured above fixed to the marble at intervals across the altar. The hardware features a small screw that has a broad, flat base. The hardware is used to hold the altar linens in place.
Altar covers sit on top of this screw mechanism or they sit just in front of it, leaving about 1/2″ of the linen exposed. This 1/2″ tends to get dusty pretty quickly.
Because of the weight of this altar cover, we needed some kind of solution to hold the cover in place so that it didn’t slip. Using regular cotton fabric to practice with – and a whole wide variety of types of rings and things – I figured out a solution for these inset rings that would fit over the linen hardware.
After fiddling around to make sure it would work and it didn’t look too awful, we had to “translate” it to the velvet cloth. While I was finishing up the medallion, Anna practiced on scrap velvet before sewing the rings into the altar cover.
There are six rings like this sewn into the top hem of the velvet cover, that fit over the six pieces of hardware on the 11′ 7″ wide altar. I am really pleased that these worked out, because I wasn’t sure they would! They caused me many a sleepless night while trying to figure them out!
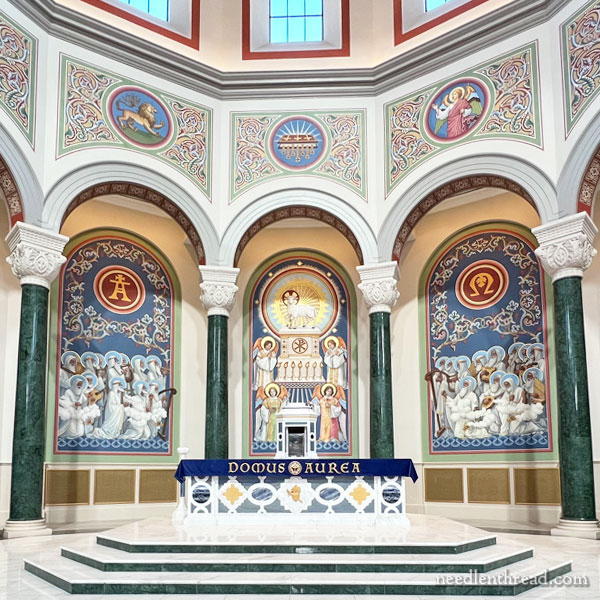
Here’s a view a little further back from the altar, still within the sanctuary of the church.
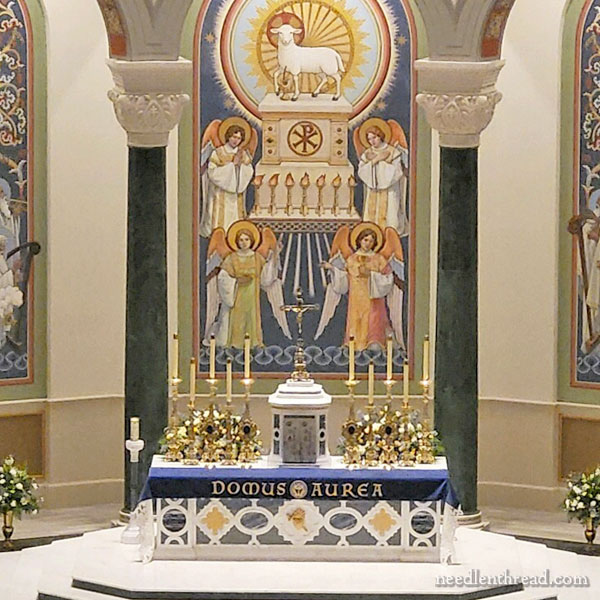
I wasn’t able to get a photo of the altar when it was all set up, but someone else sent me a picture taken with a phone and zoomed in from the choir loft. So, even though the picture is a little grainy, it will give you an idea of what the cover looks like in use every day. The letters are definitely readable!
So, that’s the end of that particular project!
And now it’s time to get back on schedule.
Coming Up
We’ll get Little Blooms under way again this week. I’m sorry we had to delay it, but hopefully, we’ll have clear sailing now!
Whew. It was a rough few weeks. It’s so good to be back to normal again!
Magnificent!!!
I have goosebumps looking at the finished altar cloth! It is spectacular beyond belief! Congratulations on completion of an incredible project!
WOW!! This is gorgeous, what an incredible feat of embroidery. You are a master artist of embroidery.
Where is this beautiful church, and what is the name of the church?
Thanks for sharing your wonderful talent with us.
Chris Handy
Hi, Chris, the church is called “The Immaculata,” located in St. Marys, KS. It was dedicated last week and it is in use daily now. I believe they still have some finishing touches to take care of on the inside, which will probably take place over time. There’s an article in the Liturgical Arts Journal about the architecture and building of the church, if you’re interested.
Mary and Anna, this piece is so beautiful. I wish I could see it in person. I’m truly in awe.
You altar project looks mazing! Wow! I am blown away! All of that time, work, and planning has paid off! I hope it is properly appreciated and well cared for over time!
Wow! Just wow!
Wow! Just gorgeous! What a phenomenal job you and Anna did. Congratulations.
That is sooo beautiful! If you don’t mind, could you share the name of the church? I am a fan of church architecture/decoration and would love to see this in person some day – the church is lovely.
Hi, Janice – the church is called “The Immaculata” and it is located in St. Marys, KS. It was dedicated last week and it is in use daily now. I believe there are still some finishing touches going on inside the church, but the construction is complete. You can read about the architecture and building of the church in this article in the Liturgical Arts Journal.
Oh Mary ! Despite your many updates showing how you and Anna worked on this project and the challenges you overcame, nothing would have really prepared your readers for the incredible beauty of the finished piece, in place, and looking just magnificent! Truly a work of art and beauty. You must be just beaming with pride and deservedly so!
The finished altar cloth is gorgeous and amazing. Thank you for the details. You answered all the questions I had except for one. You said the church wasn’t in use yet. Is it a new church or a reconstructed one? It reminds me of the a reconstructed church we visited in Dresden, Germany.
Thank you
Hi, Ellen – It’s a new construction in St. Marys, KS. It was dedicated last week, so it is in use daily now. There’s an article here about it in Liturgical Arts Journal.
The similarity in the Germanic look could be because the art in it is based on the Beuronese style, found in many churches in the Midwest, that was brought over from Germany in the 19th century by the Benedictines. So, places like Conception Abbey in Missouri, or the monastery in Clyde, Missouri, feature this style of art. It tends to look somewhat “modern” compared to many artistic styles in churches (and in the scheme of things, it is relatively modern), but it’s a stye that has its roots in 19th century Germany. The art firm that did the work inside the Immaculata is the same firm that did the conservation work on the paintings at Conception Abbey in Missouri.
Absolutely stunning, Mary!… an accomplishment to be very proud of!!
Congratulations and Woot Woot to both of you! My feelings at the end of projects is a wonderful mix of relief, delight and letting go; I don’t think I can even imagine the relief and joy and satisfaction at the end of such a complex and long project–and then to see it in place and furnished! Accolades and awe to you. Hope your deep breaths and return to “normal” go well. You might even miss it–like the loss at the end of a good book!
🙂 Linda
Mary, it is stunning! What a wonderful setting for your work. It fits in perfectly. May the Glory of God be revealed.
Mary, this piece is truly stunning. Soooo beautiful and so appropriate in the setting. I’ve loved following your progress on this. A wonderful act of generosity and devotion.
BRAVA!!!!!
So lovely! I just saw this beautiful church featured on another blog and when they shared the location I thought,”Hmmmm….. I wonder if it’s the church that Mary’s altar cover will go into?” And yes! Here it is! I have been watching you work this project with interest from the beginning! Ecclesiastical embroidery is my favorite! A job SO well done! Congratulations to you and Anna!
And I must also add that the design of the cover complements the surrounding art and architecture perfectly. Magnificent!
This turned out exquisite. And so wonderful to see it in place in its church! I can’t remember if you said where this church was (or which it was), is that something you can share?
It’s in St. Marys, KS. The church is called “The Immaculata” and it was dedicated last week. I don’t think they’re quite finished with all the finishing touches on the inside, but the construction is finished and the church is now in use daily.
There’s an article here in Liturgical Arts Journal about the architecture and building of the church.
I feel in awe when I see it all put together like this. Watching you work on the bits here and there never prepared me for the full finish. Wow! It tugs at my heart and what a blessing it will be for everyone.
What an exquisite piece of work – and so perfect for that gloriously decorated church. Congratulations on a job well done.
Darcy Walker
Mary, you’ve probably already thought of this and there’s a good reason you didn’t use it, but just in case…have you ever ironed Lightweight (or Mediumweight) Pellon Interfacing to the backside of an embroidery piece?
Back a million years ago when I did a lot of cross stitching–especially if I stitched on a shirt to be worn by kids, I always ironed lightweight Pellon to the back of the finished design. It kept the threads from coming undone through machine washing and drying and it also kept scratchy threads from irritating a child’s skin (same for adults). And one of the moms told me that even when the sweatshirt was handed down to the next sibling, it was still in great shape.
It didn’t take a lot of heat/time to anchor it down so I don’t think the heat would damage metal threads but since I’ve never sewn with metal threads, I could be mistaken.
Maybe this would work in place of rice paste?
This altar cloth is absolutely breathtaking. Whew. Thank you for sharing it with us!
Rice paste works great! I probably wouldn’t use a substitute unless I knew the embroidery was not going to be in climate control and would be subject to long term storage with only very occasional use. In that case, I’d use a paste substitute – probably something that works well for any artistic / book making / etc., application, archival, non-brittle, etc.
Iron-on interfacing is never a favorite choice for me. It can buckle and separate in certain conditions, and over time and use, especially with something that’s being folded and unfolded daily, it would tend to crease or crack or separate or simply wear off. Personally, I avoid iron-on interfacing on the back of embroidery, unless it serves a specific purpose that nothing else can fill, and even in that case, it would not be on anything that I hope would last or that would get a lot of use in movement, folding, and whatnot. It has its purposes in construction of garments and other textile things for sure, though.
Mary, can you do a post sometime about the rice paste process you used? I don’t think you’ve actually written about it. In some of your older deconstructions of ecclesiastical pieces you’ve noticed that some paste had been used on the back of the appliqués, but nothing about how to do it fresh. I’m working on a goldwork cross for a pulpit fall, and I’d love to hear more about your thoughts in the process.
Hi, Joshua – I will try to do that! I did take pictures. But essentially, it’s quite simple. I bought the rice paste in a tube, ready to use. (You can find it through Japanese embroidery supply centers and probably through “real” art supply stores, like Blick or the like.) You use a brush and brush it on the back, kind of working it into the threads gently. You can very minimally dilute with water, just by dampening your brush with water and working the paste and water together, if you need to.
Beautifully done! The whole church is particularly beautiful. The Altar cloth fits right in.
What a FANTASTIC piece of work! Just: WOW! You did it! Wonderful job to you and all your assistants!
The altar cover is beautiful. Hoping to visit the new church soon and maybe get a closeup of your handiwork.
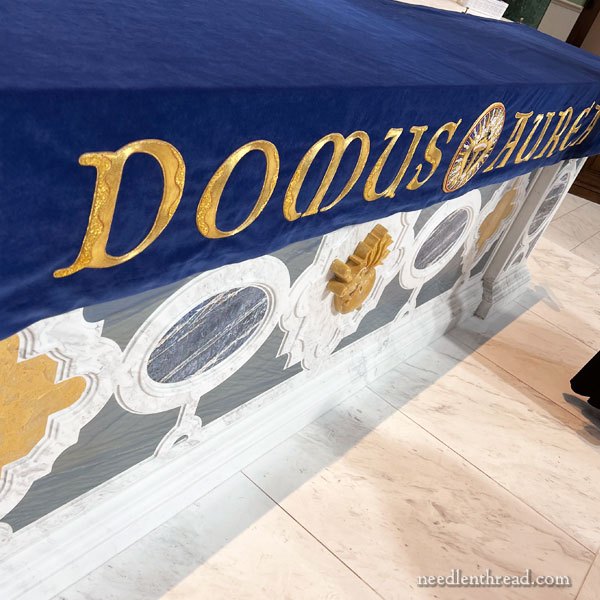
Wonderful! Good job Mary. BTW, what is the translation of “Domus Aurea?” My high school Latin was lost in the mists of time. Thanks for the info.
House of Gold – it’s a symbolic appellation for Mary used in the Litany of Loreto, because she “housed” Christ in her womb. The church is called The Immaculata and it is dedicated to Mary so that’s why they chose that text for the cloth. Well, that, and I think the fact that it is balanced, letter-wise – five letters in each word. This made it much easier to do the layout, although I wish I had fiddled a bit with the size of the lettering on “aurea.” The kerning had to be different between the two words, since the letters in “domus” take up more space.
Dear Mary,
OH MY!!!! Be still my heart. Never in all my 84 years have I ever seen anything so beautiful.
Also, what a beautiful church. I love visiting beautiful churches – all denominations.
You should be so proud to have produced such a lovely piece of art. I hope you have many, many pictures. Future generations will want to see this. They really will, I promise you.
So very beautiful.
Mary, what an amazing achievement! Your embroidery is stunning, gorgeous, masterful, brilliant – can’t think of the right superlatives!! Thank you for sharing the progress of your work and the breathtakingly beautiful result. Congratulations to you and Anna!
Wow. It’s glorious!
Mary, that is just phenomenal! I know you and Anna put a ton of work (not to mention blood, sweat, and tears) into that project, but the results are nothing short of stellar! I hope the wedding went well and that you both are now able to get some much-needed rest!
Mary, You must be not only relieved but delighted with the final result! A work of love.
Your finished project looks stunning Mary. I am in awe of your gold work! Congratulations, you must be so proud!
What a beautiful church! Your artistry in thread is such a complement to the architecture of the sacred space. It truly was a labor of love, far beyond any compensation you received.
It’s absolutely beautiful, Mary! Congratulations!
This was so interesting to watch your progress from start to finish. Bravo!!!
Amazing! Congratulations.
Absolutely breathtaking, as is the church. I marvel at your creativity, talent and sheer determination to take on such difficult tasks. Beautifully done!
Dear Mary, I have already commented on your Facebook Page but this morning I decided to open your letter on my big screen computer monitor. (28″x25.5″) Wow!!! is all I can say. All the detail that went into this piece is just beyond comprehension. I am sure you had our Lord’s Hand guiding your hand all the way. What an achievement. The church surely picked the right person to do this mammoth task. Lost of love Elza from Cape Town. xxx
Congratulations to you both on finishing on schedule and for creating such a stunningly beautiful piece. It’s simply breath-taking!
Amazing work! The piece is gorgeous. Thank you for sharing the path and the steps along the way.
Gorgeous work, Mary & Anna! I knew the deadline would be met somehow. I love the blue with the gold & silver.
As to the paste, they’ve been using it for centuries. If nothing else, wouldn’t it have the advantage of being reversible/re-doable if needed? I’m not sure we can say that about the more modern alternatives.
Gorgeous finish. It fits perfectly in the space, and I love how the center medallion came out! I’ve been following the Immaculata project for a few months now and it’s wonderful to finally see it dedicated.
As a bit of a magpie, I am wondering if you could share a bit more about the setting of the central stone — any photos of it before attachment, or challenges getting it stitched down. I was fiddling with a side-loop sort of design before you posted yours (my jeweler skills are adequate for the task of fabrication) and I’m interested in your experience.
Yes, I did take some photos, so I should be able to write about that at some point! There were challenges, but essentially, I just worked around the metal bits as best as possible.
Incredible work! You certainly are a master stitcher Mary!
Truly a masterpiece, Mary. Congratulations on sailing it in right under the wire, too. The medallion is so lovely — it is great to see echoes of projects you’ve worked on over the years in the techniques you used.
Now if only the crew who will handle the cloth going forward have enough experience of needlework to recognize its workmanship and care for it accordingly! – Kathy
When embroidering, did you have the slate frame set on trestles? I’d be keen to get some information about the right way to use the trestles. I acquired an old set in an embroidery guild sale. It looks like you just sit the frame on top and start stitching, but I feel there must be more to it than that! In particular, how do you keep the frame firmly in one place?
Yes, I did. Yes, that’s how you use them. You can raise the back of the trestles to work on a slant. The intersection of the slate frame is outside the verticals on the trestle, so that intersection is what holds the frame in place if you’re working on a slant. With goldwork, I mostly work on a flat horizontal surface, and you don’t need something to hold the frame in place. It just rests on the trestles.
Gorgeous! I’ve been a silent follower of your blog for several years now and awed by many things you create, but this takes the cake!
I totally understand where you were coming from regarding the rice paste. This is a functional embroidery which will, like all linens, eventually be retired. Still, after watching all the work that went into it, its amazing that this ISN’T something intended to last forever. For me, it is a good reminder of the transience of things.
So very beautiful, what an amazing work.
Congratulations, Mary the alter cloth looks magnificant. What a lot of work for the two of you. I hope you don’t fall into a post-project slump. It sounds like you have too much on for that to happen! Enjoy some downtime at the weekends.
No time for a slump, unfortunately! I normally don’t like a post-project slump, but I wouldn’t mind the “slow-down” that goes with one. Now I’m scrambling to catch up on everything. Ah well – such is life! 🙂
A truly astounding achievement! I’m truly in awe over the whole project and the finished masterpiece. I’m also really glad Anna works with you these days. I think she was about 12 when you started writing about her? To both of you: You Go Girls!
LOL! Yes, she was just a little kid when she started in on embroidery classes during the summer. She worked for me a few years of high school and into college, during the summer. And then she finished college and taught for a wee bit, and then – lucky me! – she came to work for me full time. She’s a gem!
Thank you for the additional information. I lived not far from St. Mary’s in Nebraska. My great-grandparents homesteaded in KS but my grandfather moved to NE. I moved to PA. My children and grandchildren are Pennsylvanian but I still feel like a midwesterner.
Ellen
Just stunning.
Beautiful work!!!!I’ve done goldwork, so know what a project this was! Congratulations on you perseverance and completion! Can I ask what kind of thread you used for your brick stitching?
I use size 100 silk, waxed heavily. The brand is YLI. It comes on spools and small cones.
Extraordinary! Congratulations on such a magnificent finish. It looks great in the space. What a lucky church!
Gorgeous work! So inspiring!