


I’ve had a lot of questions lately about framing embroidery pieces.
Now that I have a studio space with a Big Wall, I’m more inclined to frame more of my sample pieces to hang as a kind of gallery on that wall. I wrote about the wall here, if you’d like to read about it and see how it has developed since we moved into this space last autumn. There’s still quite a ways to go on it! It’s just a matter of sorting stitched samples (I have about a gazillion) and finding the right frames for them.
I like framing embroidery! And I like doing it myself, because I’ve had too many problems when taking pieces to framers who don’t quite know how to handle needlework. This frame job was disaster, for example. Considering the cost of the job, in fact, it was a huge disaster.
And it was that disaster that convinced me once and for all that it’s just better to undertake framing on my own.
So, today, some quick framing tips for you, in a nutshell, with links that you can explore further if you’re interested in framing your own embroidery pieces.
First, for a thorough overview of the framing process, read the following two articles. In them, we work step-by-step through framing a piece of embroidery, and I talk all about the tools that I used and the methods for mounting the fabric on board, and so forth.
Reframing Embroidery Part 1: Preparation
Reframing Embroidery Part 2: Materials & Methods, step-by-step
Those articles will expel any myth that framing is out of reach for mere mortals. You’ll see that the process is not difficult – it’s perfectly manageable from home.
It’s true that I use some tools that are particular to framing, but you don’t have to use these tools. Once I began framing in earnest, I realized it was worth investing in a few tools, though.
For just the basics, you’ll want cutting tools – a craft knife, a straight edge, and a self-healing mat, for cutting mounting board.
You’ll need pins! I use glass-headed pins for most of the framing work, because they’re easier on the fingers when pushing them into board. I also keep stainless steel lace pins on hand, in case I need to pin into a mat board and leave the pins in place.
You’ll need a good quality, strong sewing thread for lacing and for mitering corners occasionally.
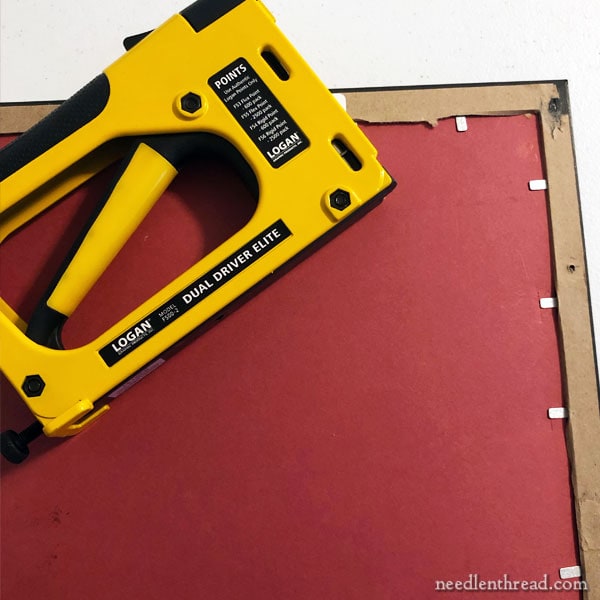
You’ll also want some backing paper and adhesive to finish the back of the frame neatly.
If you pursue framing in earnest, you can go from there and invest in specific framing tools.
One definite way to cut down on the expense of framing is to hunt down used frames. The best places I’ve found frames in good condition for practically nothing are thrift stores, Facebook marketplace, and garage sales.
Look at the frame – don’t look at what’s in it! Consider whether or not the frame will work for an embroidery piece, and if you think it will, pick it up! I’ve scored many excellent frames for less than $2, that otherwise would have cost a small fortune to have them custom made.
When you’re looking at a potential frame, check the depth of the frame and make sure that the “rabbet” – that’s the inside measurement where all the layers you intend to frame need to fit – is deep enough.
If you’re framing with glass (I normally do), you’ll want space for either a mat or a spacer (to keep the glass off your fabric), space for the glazing (the glass), space for the embroidery on a mounting board, and space for a backing board. If the embroidery can’t fit in the frame with a backing board, that’s ok. I don’t always use a backing board if the embroidery fits in snuggly enough that I know it won’t shift. I always cover the back of the frame job with brown paper that’s fixed on with adhesive along the back edge of the frame.
The Supplies Worth Paying For
While I’ve pretty much gotten past paying for custom frames (except on very special pieces), I think there are some parts of the frame that are worth paying for.
For example, it is often worth having a mat professionally cut, if you don’t have the equipment or wherewithal to cut it yourself. Plus, you have a much better range of mat options at a framing store. Give them very specific measurements – the measurement for the outside edge of the mat (where it fits in the frame) and the measurement of the “window.” Those two measurements will determine how wide your mat is, because the window will be centered inside the cut out piece of mat board.
In some cases, it may also be worth having a piece of glass cut for the frame – especially if the frame came without glass, or if you prefer to invest in museum-quality glass that cuts down on UV light penetration. Whenever I’m framing goldwork or silk or any piece that I’ve invested a lot of time into, I will normally order museum glass.
For smaller projects that weren’t time intensive and that don’t include pricey materials, I normally just go with regular glass. If the frame came with glass, I’m also set. If it didn’t, I will have a piece cut.
Sometimes, it’s worth tracking down specialty glass for a desired effect.
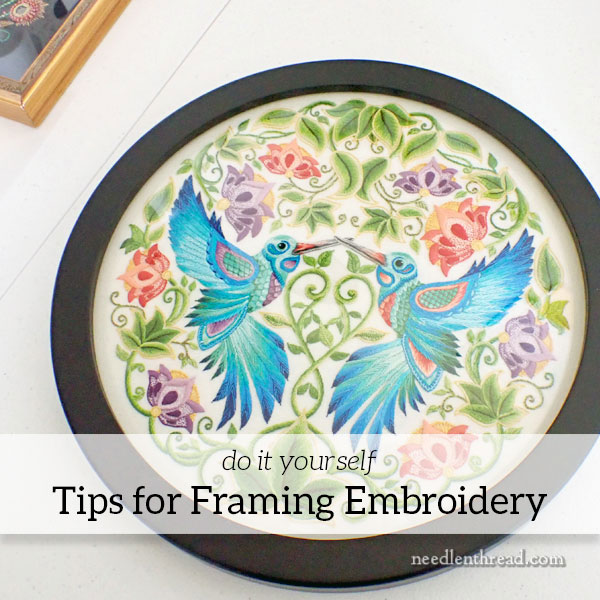
For example, on this hummingbird project, I wanted the birds mounted in a round frame with bubble glass (convex glass or domed glass) in the fame, because I thought the effect would be interesting.
More on Framing
Way back in some distant era, I wrote this article on framing a miniature embroidery piece.
And last year, the Autumn Fire stitch snippet was a framable piece, so we worked through the finishing on that together. You can check out the instructions for it here.
I hope these various and sundry tips help you in your framing endeavors!
The Goings-on at Needle ‘n Thread
Well, it seems like summer is already slipping by in a hasty blur – and it just started! We’re in full work mode in the studio! I’m tying up loose ends on my house and taking care of other outside-work life events (hopefully, all these loose ends will get tied up soon). I’ve had a lot of questions about the house – it is finished on the inside, but the outside is not, and the yard (oh my gosh) is one massive mud dump. So lots to do still! For those who have asked, yes, I will share some after photos, once the major outside work is finished.
Over the weekend, I insured that we will return to drought conditions in Kansas. I bought and installed silt socks around the sections of the yard where the mud from springs rains has been pouring onto walkways and sidewalks and into street gutters. Now that those are in place, the rain, which we need sorely, will probably cease. My apologies to the farmers.
I’m finishing up Sweet Marguerite, the next Stitch Snippet, in snatches. The first sample should be finished by the end of the week, and then we’ll be ready to talk about the kit launch! They’re almost ready!
We added floche packs to the shop last week.
Christine and Anna are preparing a whole inventory of ready-to-stitch towel sets. We’ll be adding two new ones this summer – Something Fishy and Gone Camping. I’ll share more on those with you soon.
What else are we working on? Well, right here in our little studio, we are manufacturing our very own line of a pretty little embroidery accessory! I will share that with you soon, too! I’ve sent out samples for feedback and once we work out the kinks, I will show you what we’ve been making – I’m really excited about them!
It’s a busy summer! I hope that June is off to a great start for you, too!
Thank you for this most informative article. Much appreciated, as always! Back to the most disastrous framing job: did you take it apart and stretch the wavy fabric before sending it off? How did that end? I know you had a short deadline to ship the piece.
Hi, Madeline – That’s all covered in the two articles linked to at the beginning of this article – on framing a piece of embroidery. I took it apart and then I wrote about the framing process step by step.
Sorry, Mary—seems I missed those links twice now! But oh my goodness, what a nightmare you found when you opened the back. Your framing is perfection and, from experience, I don’t think you overlaced. I’m glad you sent the links to the framer. Your tutorial is impeccable.
Many thanks for all you do from a happy Patreon member!
Hi Mary,
I remember this hummingbird project almost ten years ago already! Thank you for all you have taught us all.
A note about framing. You mentioned the “window” of the mat being centered in the frame. My framers always added a tiny bit extra on the bottom of the mat -about 1/4” or so. This is because if you center the window exactly, it will look like it is closer to the bottom edge, in other words, the width of the Matt will not really look even. It’s the same idea as when you are making a sign, the “o” (not zero) and other rounded letters will actually be taller then the other squared off letters to be optically correct.
So I finished the 3-article set on finishing/ mountine (and framing) … 4 if you consider this piece. IMO, you should cobble together an eBook on finishing embroideries. Here, take my money, please!!
So how do you finish pieces that will go into a round frame? Coz that’s gonna “wrinkle” … pleat … whatever. Square frame, round mat is one thing, but a round frame?
2nd question. I did a cross-stitch bell pull for my grandmother. It was sort of a decent-type chart type thing. Basically, I folded my cloth into a tube, and folded over the top and bottom for the hardware and called it done. Wasn’t happy then, but really not happy now. Do you have suggestions/ sources for finishing bell pulls? I was going to update it (hahahahahaha no) and refinish it. My mom said leave it as a snapshot of the family in time. (After I realized I was going to have to redo almost the entire thing to bring it up to current … I was really glad she said *don’t!*) So, I want to do a “more proper finish. Got any suggestions?
** and I really like the way you handled the frame shop way better than I would have. I don’t think “gentleness of spirit” is one of my gifts. Being an encourager, yes. Gentleness of Spirit? Not so much.
For a round frame, I start with pinning because that’s the best way to assure an accurate centering of the design on the round mounting board. Then I gather and pull the back in (using a running stitch on the fabric overhang), and then I lace through the gathers, stitching through the “pleats” that form from pulling the running stitch tight. Once that’s complete, remove the pins.
I’ve never finished a bell pull, but my inclination would be to make a “pocket” (kind of like a rod pocket for curtains, but with no overhang – just the folded “pocket” that the rod goes through) on each end of the pull, so that the hardware can slip in. Then the bottom hardware would be the “weight” that keeps the pull taut.
Please DEFINE what “GLAZING” is? Is it a clear spray over the needlework? A type of glass or acrylic in the frame? Or something else altogether?…..I just finished a 5 week (day & night) counted cross stitch/embroidery project. I have a frame, adhesive board, & back board (do NOT want a mat). I’m ready to put it together, but have been told NOT to use glass, or YES use glass. Also, told to spray clear spray over top of needlework, if NOT using glass or acrylic, to protect from dirt, smoke, pet hair, etc. The person getting this as a gift has several pets that shed, & the house is small & old, so dust, staining, & sunlight fading can be a problem. WHAT DO I DO?
Goodness! Lots of confusing information out there! If you’re not using a mat with the framing, the difficulty is that you will end up with the glass on top of your stitches, which is what you don’t want. In a case like this, you’d put spacers in the frame area (these are sold in framing supply areas in most hobby shops), to keep the glass lifted away from the surface of the embroidery and the fabric.
I would never use adhesive board in preparing something to frame. I’ve seen so many disastrous effects with embroidery mounted on adhesive board. It is common in the counted cross stitch world, but it’s not a great practice. If you ever did need to unframe the needlework to clean it, or to reframe it, etc. taking it off the adhesive board can ruin it. Also, if the adhesive board is not archival, it will discolor the fabric over time.
I have never hard of – and never would do it myself – spraying any kind of “clear spray” over the top of needlework.
I always frame my embroidery behind glass. If I am not using mat board, I use spacers of some sort, to keep the glass of the surface of the embroidery. I normally use museum glass, to cut down on UV damage. The framing with glass assists in protecting the work from environmental problems like dust, dirt, humidity, light damage, etc.
Hope that helps a bit!