This is going to be a very long article today!
When we last visited the project, we basted the turned hem in place, so that we could launch right in to the hemstitch, so if you’re at this point with me, you should have your hem turned on the back of the work and your corners mitered, and the hem basted in place.
Today we’re going to accomplish the first step of the hemstitch around the frame of Sweet Marguerite, stitching the hem in place along the way. The hemstitch that we are working will be both decorative and functional, since it is hemming the accent linen.
We can’t cover the entire hemstitch process in one article here on the website, so we’ll finish off the decorative parts of the hemstitch next week.
If you’re a member of the Needle ‘n Thread Community on Patreon, I’ll have the PDF up for you soon covering all of the hemstitch process through to the end of the project. I’ll be adding a few extra diagrams to the PDF, so that you’ll have photos and diagrams to take you through the hemstitch process. Although I’ve fallen way behind on working with video, I’ve got one video almost ready on the drawn thread / re-weaving process, so once that’s finished, I will post it over there, too. In the meantime, if you want to move ahead on the project, the instructions below will get you going on the hemstitch.
As always, please read through all the instructions carefully before you begin. In fact, it doesn’t hurt to read through them twice, so you know where you’re going as you work.
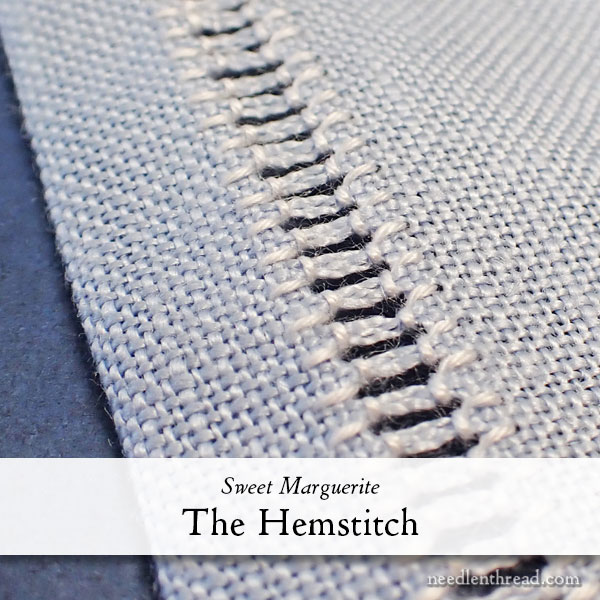
Let’s begin with a few points as an overview, with some stitching tips:
Functional vs Decorative
There are two sides to the hemstitched area on this project.
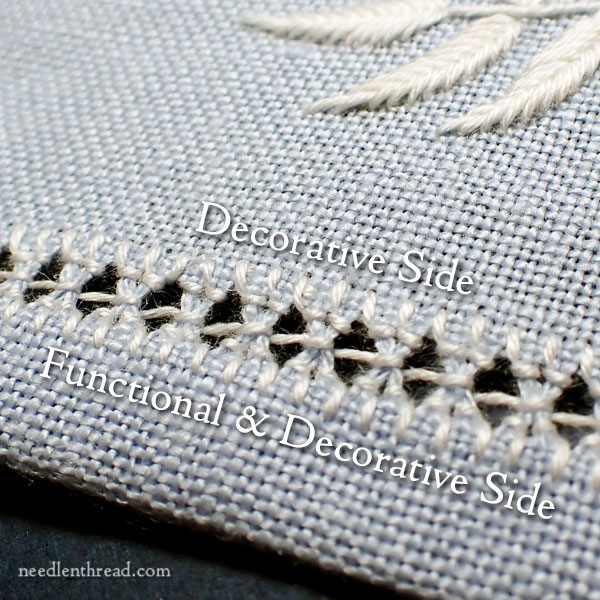
The outer edge closest to the edge of the fabric is both functional and decorative. It is functional because it catches the hem and holds it in place.
The opposite side of the drawn thread frame (the inside decorative edge of the drawn thread area) is purely decorative. It does not have any functional purpose, but it mirrors the functional side of the drawn thread work.
When working this decorative side, you must group together the same threads you grouped together with the functional side of the hemstitch.
Work from the Front
When working the hemstitch, work from the front of the fabric.
Many instructional books recommend working a functional hemstitch from the back of the fabric, but since this hemstitch is decorative as well as functional and the front is the visible side of the piece, I recommend working from the front.
Be Aware of the Back
Even though you are working on the front, you must be aware of the back, especially on the functional side of the hemstitch. Every stitch on the functional side needs to catch the hem.
The stitches on the back do not need to be as consistent as those on the front, but they do have to catch the hem in order for the embroidery project to be well-finished.
Beginning & Ending Threads
On the functional side, as often as possible, begin and end your threads inside the turned hem on the back of the fabric where they will be hidden.
On the decorative side, where possible, start and end threads on the front of the fabric with a waste knot and small tacking stitches (over one thread of fabric) that can be hidden by the hemstitch. In cases where this is not possible, run the working thread behind the stitches on the back of the work to secure it.
Counting
To work a consistent hemstitch on the front of the fabric, you’ll have to count the threads of fabric as you work. You’ll be working in threes – bundling the fabric threads in the drawn thread area into groups of three and working three threads down in the fabric from the edge of the drawn thread area. (Photos below will help clarify.)
Sometimes, as you near the corner of the hemstitched area, you may find that the fabric threads will not divide into multiples of three. Be aware of how many threads you have left, and then bundle them in a way that makes sense. The last group might be a bundle of only two threads, or it might end up being a bundle of four threads.
Long Threads
Cut your embroidery thread longer than usual so you can avoid changing threads frequently. Because the thread is passing through somewhat open areas of fabric (and therefore not undergoing as much friction), longer threads will normally hold up ok with hemstitching.
However, if you notice that your thread is looking dull, getting, fuzzy, or starting to fray, change it!
The Hemstitch on the Functional Side
Today, we’re going to look at the hemstitch on the functional side, where the hem is caught in the work.
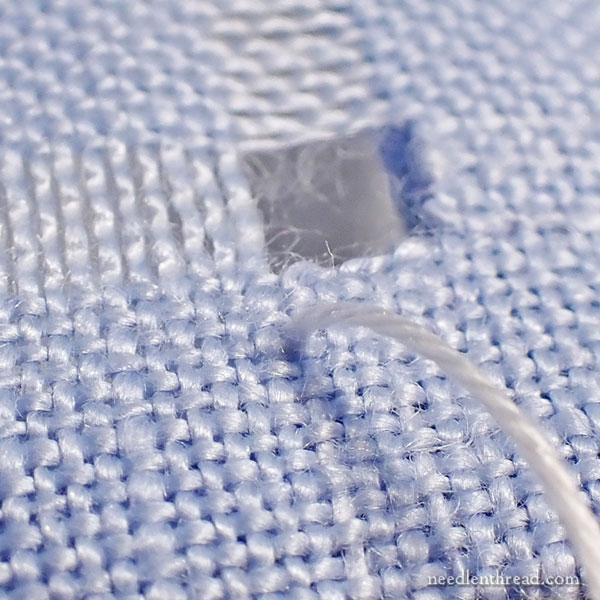
I’m starting on the right lower corner and working towards the left lower corner of the linen. If you’re left handed, you can start on the left side and work towards the right, following the same process.
With a new thread in the needle, start your thread with a knot, inside the lower right corner in the turned hem on the back, so that it will be hidden in there.
Bring the needle and thread to the front of the fabric three fabric threads down from the lower left corner of the empty square formed by the withdrawn threads, as shown above. You’re coming up in the intersection of fabric threads, where a hole natural exists because of the weave of the fabric.
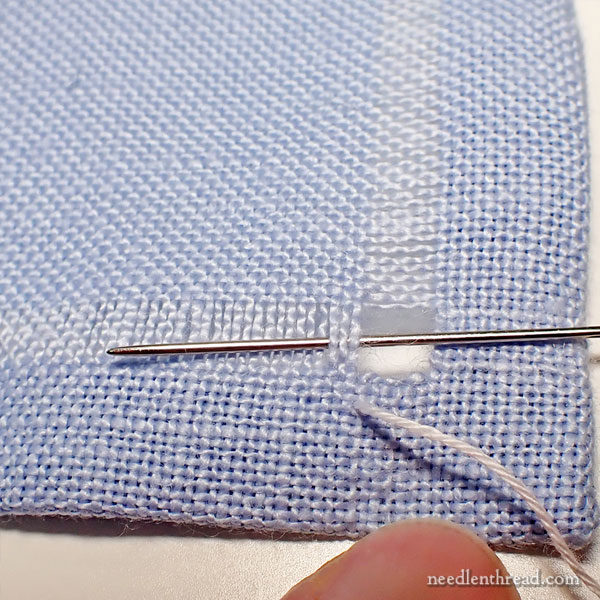
Take your needle behind thread of the remaining fabric threads in the withdrawn thread area, as shown above.
Pull the needle and thread through, so that the working thread is passing behind the vertical fabric threads and out again to the front after the third fabric thread.
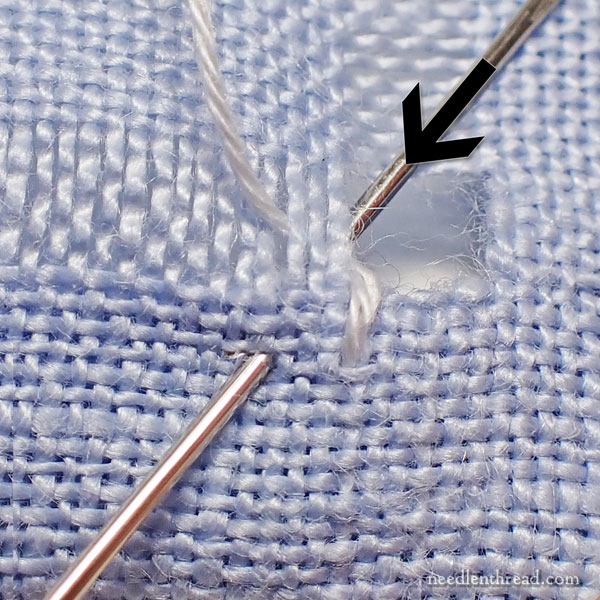
Then, take the needle to the back behind the first thread in the bundle of three and, angling it downwards, pass through the hem on the back of the work and out to the front, three fabric threads down into the fabric as shown in the photo above. (Keep reading through the instructions – I’ve repeated the three-holes-down concept below, with more explanation, if you’re unsure of how to count the fabric threads.)
Every time you pass to the front in this part of the stitch, you need to pick up a little bit of the hem on the back. You do not have to count the threads on the hem on the back of the work, but you need to come to the front three threads down into the fabric as shown above.
When you pull the stitch through, pull it firmly, so that the three vertical fabric threads in the bundle pull together.
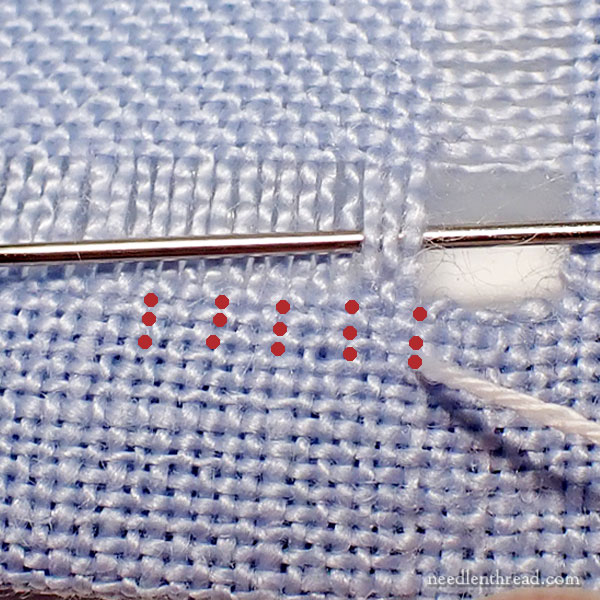
In the photo above, I’ve marked red dots to show you how to count down three threads into the fabric below the hemstitched area.
You’re always emerging on the front in the third hole (formed at the intersection of the linen threads) below where you emerged behind the vertical threads above.
Each red dot in the photo above represents an open intersection in the linen weave. You’re going to count down three of those intersections, bringing your needle up into the third one down, every time you take a stitch into the fabric below the hemstitched area.
If you have done any kind of counted thread work, this concept will be easy for you, but for some folks who have never done counted work, counting the threads in the fabric can be an unfamiliar concept. Hence, the explanation.
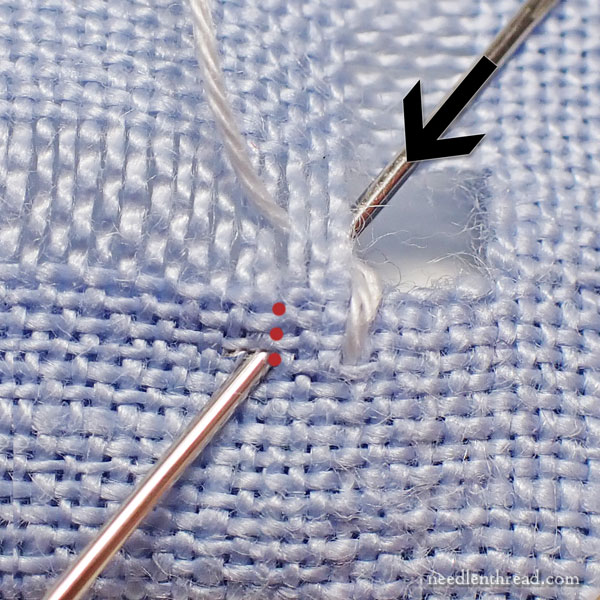
The three red dots in the photo above represent the three “intersections” or holes in the fabric. That’s where you’re bringing the needle out, at the third red dot. Make sure you’ve picked up some of the hem on the back!
Then, pull the needle and thread through to the front, pulling firmly to cinch the first bunch of vertical threads together, as mentioned above.
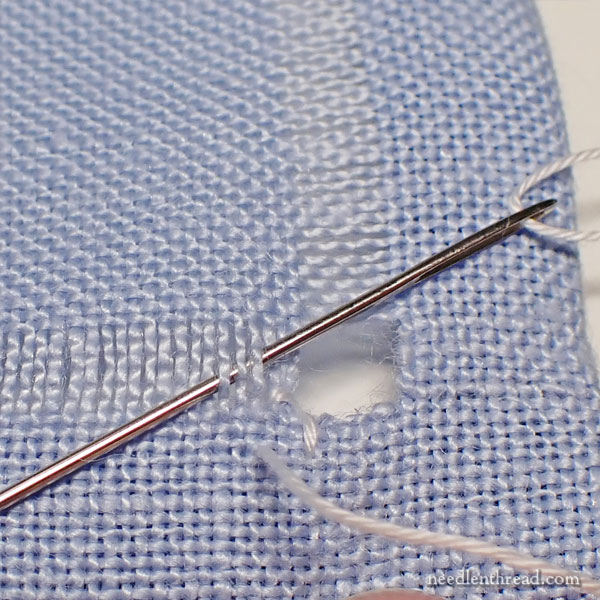
After you have emerged three threads down into the fabric and pulled through to cinch the first bundle of threads together, you’re ready to move on to the second stitch.
Pass your needle behind the next three vertical threads in the drawn thread area, as shown above, to start the second hemstitch.
With each hemstitch, you pass behind three vertical threads and out to the front, then pass back between the vertical threads at the start of the stitch, going to the back of the fabric and down into the hem, and then out to the front of the fabric three holes down below the drawn thread area, to start the next stitch.
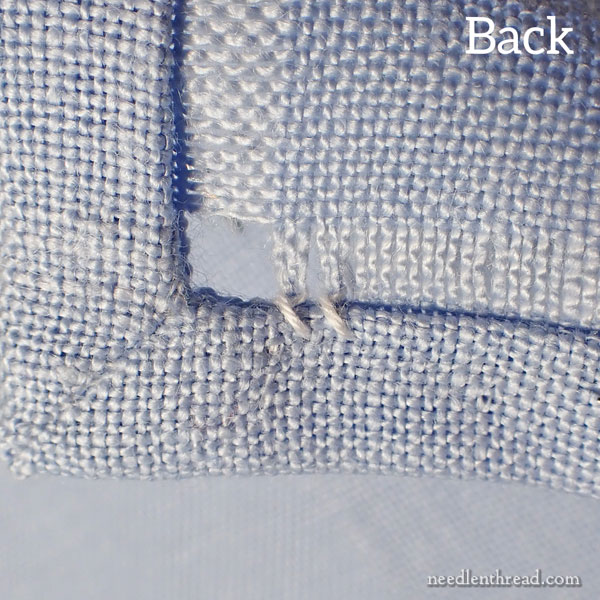
On the back of the work, your stitches will be angled and will pass through the turned edge of the hem, as shown above.
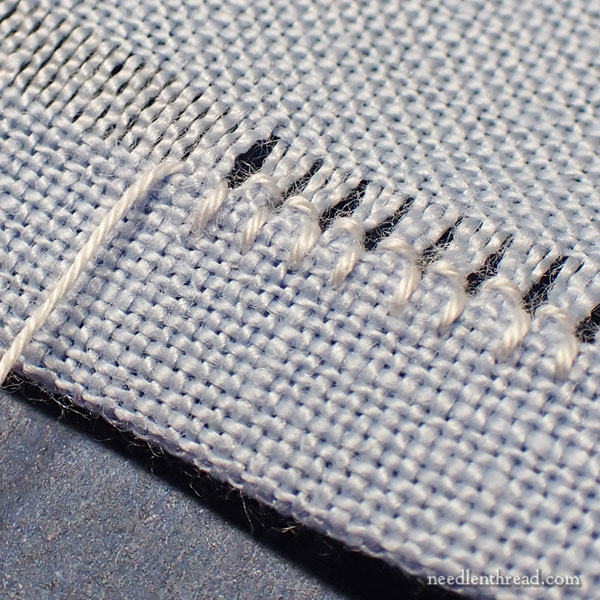
Continue the hemstitch in this manner until you reach the next corner.
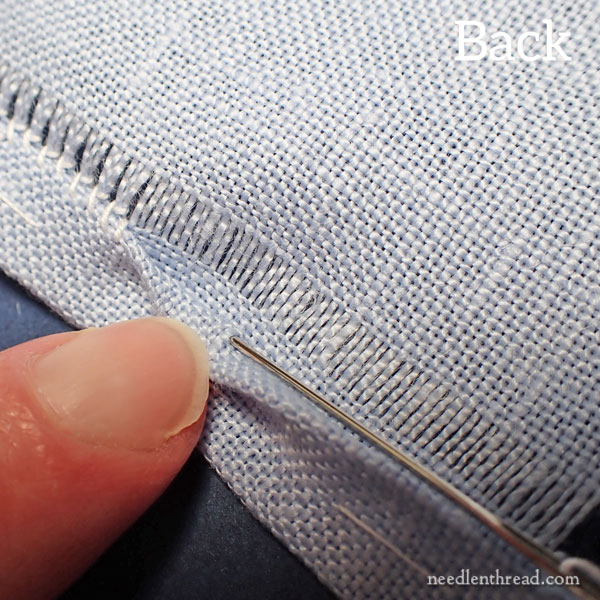
Whenever you need to end a thread and start a new one, try to do it within the turned area on the hem on the back of the work.
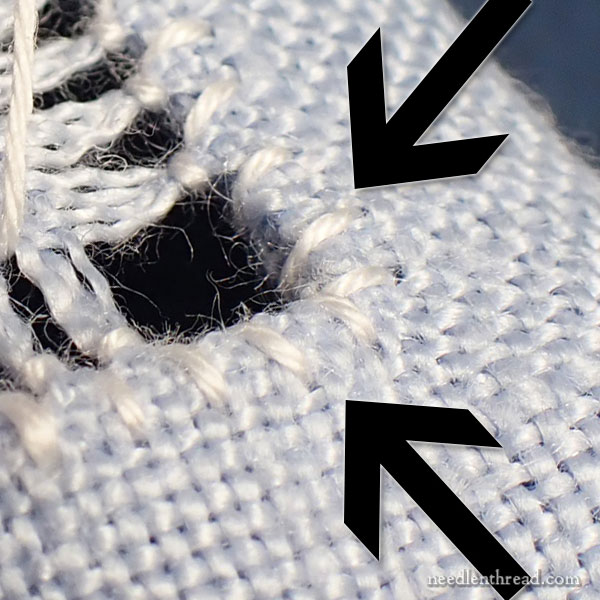
Whenever you reach a corner, work simple stitches through the fabric and hem to secure the hem to the corners of the empty squares. These stitches should also be worked by counting threes – three threads into the corner area and three threads down into the fabric – so that they maintain a consistent look with the rest of the hemstitch.
You’ll notice that you’ll end up with two stitches sewn perpendicular to each other in the outermost corner of the small empty square, as shown in the photo above.
Continue working the functional side of the hemstitch all the way around the linen square.
Next week, we will work the decorative side of the hemstitch on the inside of the square, and then we will add one more touch of embellishment on the hemstitch. We’ll be able to cover all of that in one article, so we’ll have this project finished by the end of next week!
More Info on Hemstitch, Project Index & Upcoming
I wrote this tutorial for hemstitch many years ago. You might take a look at it for some extra tutorial back-up. You’ll notice that the sides of the sides of the empty squares are finished with satin stitch instead of being re-woven as we did with this project. The rewoven approach works better when you’re working with a functional hem, so that’s why there’s a difference. But the hemstitch itself is the same process.
You can find all the articles for the Sweet Marguerite stitch-along here, in the Project Index.
Coming up, we’ll chat about what you can look forward to with the last Stitch Snippet, which will happen later this year. I’ve restructured my plans a little bit, and with the next project, we will go simple and sweet!
We’ve got some new, small designs in the works right now. I can’t wait to show those to you!
In the meantime, have a jolly weekend!


Merci , c’est très clair ! Et passionnant