


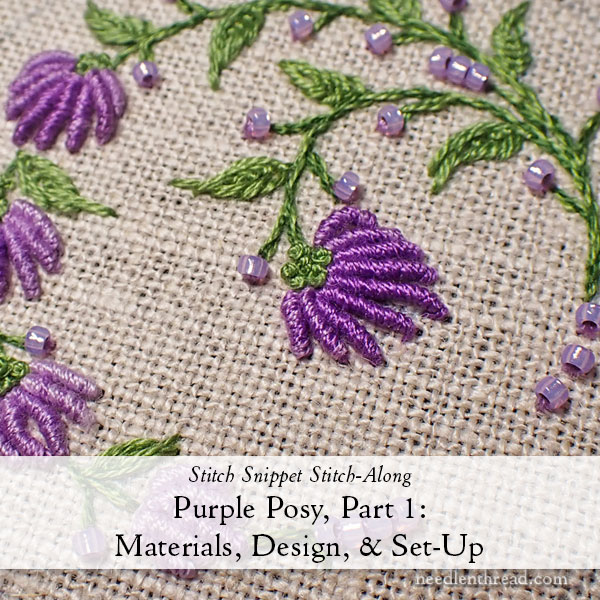
Here we go! Time to get started with Purple Posy: a Tape Measure Cozy!
In this first installment of the stitch-along, we are going to talk about materials, the design, and other preliminary information, including transferring the project. We aren’t going to cover stitching just yet, as I can’t fit everything in one blog post! Today’s information will get you started and set-up, ready to stitch.
If you have the Purple Posy kit, which is available here, you’re in great shape – you have everything you need to create the tape measure cover, except typical embroidery tools like a hoop or frame, scissors, and a few incidentals for the finishing work (like glue, pins, and sewing thread).
Materials for the Embroidery
We won’t talk about finishing materials today, because of space. We’ll just look at what you need to stitch the design as I stitched it. I’ll also briefly touch on substitutions.
Fabric: I used a 33/32 linen (not quite even weave) called Strathaven in natural. This is about a medium weight linen, as far as embroidery linen goes. It’s got a full weave, so that there’s no real need for a backing fabric, even when doing surface embroidery. You’ll need an 8″ x 12″ piece.
If you are substituting a fabric, I strongly recommend using linen, since the regularity of the weave and the ease of seeing the weave are helpful when it comes to transferring the side strip for the tape measure cover. Your fabric should have a good, smooth surface that can support the embroidery. You need to be able to stitch smooth-flowing lines, which can’t always be done on even-weave linens that have lots of space between the linen threads.
If you are using a more open weave linen, you’ll likely have to back it with a backing fabric (like a cotton muslin or batiste), so that your stitches have fabric to grip into when working the curved lines. This means you’ll need to make whatever adjustments are necessary in the finishing, to accommodate a backing fabric. Since we don’t use a backing fabric in the samples for this project, I won’t be demonstrating the finishing with a backing fabric. So it’s best to choose a fabric that has a smooth surface and full weave.
Thread: DMC stranded cotton in the following colors: 208, 209, 210, 3345, 3347
Beads: Miyuki seed beads: 11/0 dyed lilac silver lined alabaster; 15/0 dyed lilac silver lined alabaster
Needles: embroidery #7, tapestry #24, milliner #6
Tape Measure: Retractable Tailor’s Tape Measure (80″ / 2m) – the casing is 2 3/8″ in diameter and 3/4″ deep. This is included in the kit. If you do not have the kit, but you have a retractable tape measure, you need to make adjustments in the design area size to fit your own retractable tape measure. Measure the top and base of your tape measure, the height of it, and the circumference, and adjust the size of the inner ring on the design and the size of the side strip. Then, just center the floral element in your adjusted inner ring. If your tape measure is very small and can’t fit the design, you’ll need to adjust the design to fit inside the diameter of the top and base of the tape measure.
Design and Design Layout
Download and print the PDF below with the design for the top and base of the tape measure cover:
Purple Posy Design (PDF)
Make sure that your printer prints the design “Actual size” or “100%.”
The inner ring on the design is 2 3/8″ in diameter. If the page does not print actual size, or the size it prints is smaller than this size, you will need to adjust (enlarge / reduce) the printout either on your computer or on a photocopy machine. Especially if you’re working from the kit with the supplied tape measure, it is important that the design is the correct size, or the cover won’t fit your tape measure.
The side strip is not part of the design. It needs to be measured and marked on the fabric separately, as explained below.
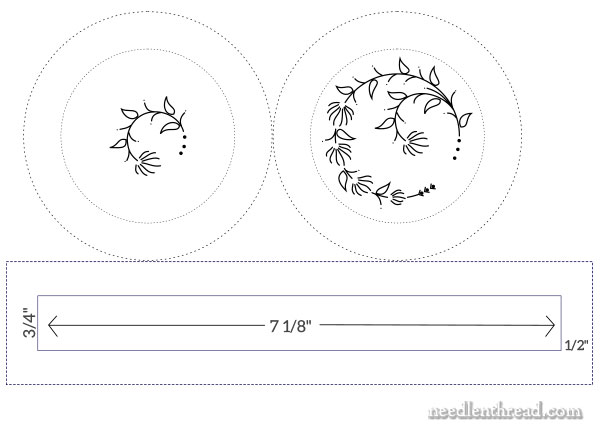
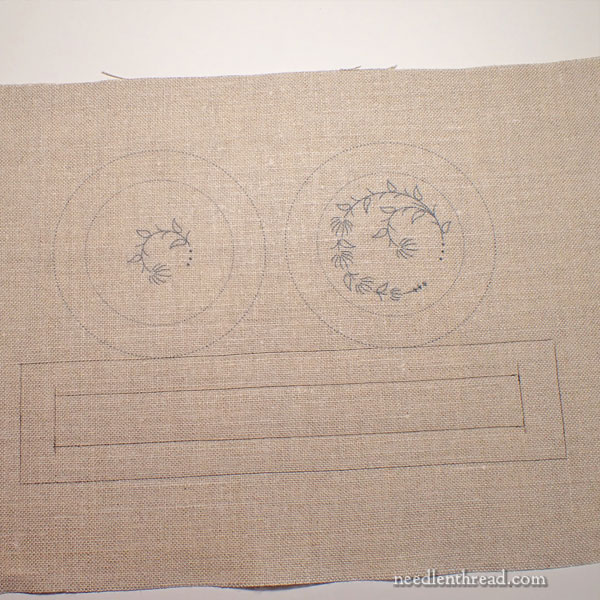
The image above represents the layout of all pieces on the fabric. Transfer the top and base in the configuration shown, and pencil in the strip as shown.
To draw the side strip, use a pencil and measure the width and height (3/4″ high x 7 1/8″ long), using the “grooves” in the weave of the linen to draw the straight line along the grain. Then, allow 1/2″ around that strip on all sides for finishing.
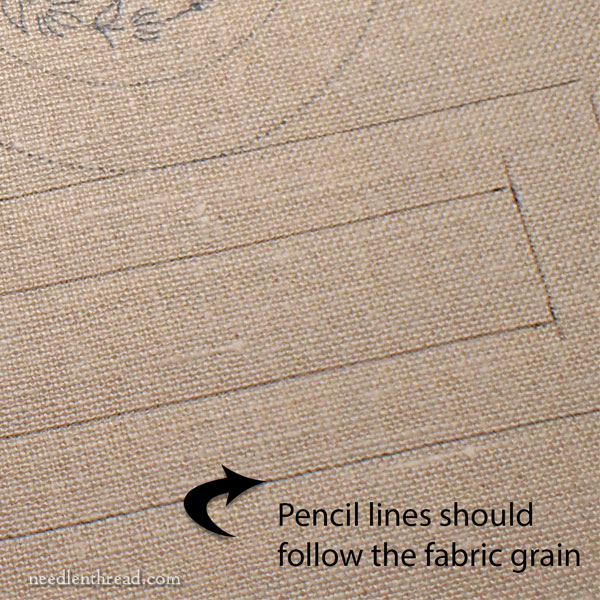
I like to use a mechanical pencil for this kind of work. Hold the pencil at a low angle to the fabric and pull it slowly along, with the pencil in the groove formed by the weave.
Transfer Methods for Top and Bottom
Use your preferred method of transfer. If you are unsure what method to use, here are some suggestions:
1. Trace: If you have a light box, you can trace the designs. Print the design page first. The design area of the circles (the inside ring) should measure 2 3/8” in diameter. (Make sure your printer setting reads “print actual size” or similar). To trace the design, you may need to darken the design lines with a fine-tipped marker so you can see the design better through the fabric. You might not have to trace every detail.
2. Prick & Pen: You can use the prick and pen method to transfer the design as well. You will need a very fine tipped micron art pen to do this. I suggest the 005 Micron pen. This method was demonstrated in a previous Stitch Snippet (Little Blooms). You can find that tutorial on Needle ‘n Thread here.
If you use this method to transfer your design, go ahead and prick the circles, too, and transfer them as small dots. You do not need to transfer every detail for the embroidery design. Because the embroidery designs are so small, it is enough to prick along the main stem, and then to either eyeball or draw in (with pencil) any additional details you might need.
3. Iron-on Transfer Pen – Sublime Stitching sells a fine-tipped iron-on transfer pen that would be helpful for transferring this design. I would not necessarily transfer every detail. Even though the pen is fine tipped, because the design is so small, it isn’t necessary to transfer every detail. Definitely transfer the stems. For the leaves, perhaps transfer just a center line that marks the length and turn of the leaf. Then, when you embroider the leaf, you’ll use that center line as a guide for the center of the stitches, but you will eyeball the outer edge of the leaf (or you can sketch it in lightly with a pencil). You can transfer the bullion knot flowers, too.
4. Tissue paper and tacking stitches: this method of transfer requires you to trace the design onto tissue paper, then place the tissue paper on your fabric and work over the design with closely spaced running stitches. Then you remove the tissue paper carefully and you stitch over the running stitches, removing them as you go if you cannot cover them completely. You can find this method of transfer demonstrated here on Needle ‘n Thread.
5. Another option is to use a water-soluble, printable product like Solvy’s Sticky Fabri-Solvy and to print the PDF on the fabri-solvy and cut out the design areas and stick them to the fabric, stitch through them, and then rinse the stabilizer away. This is not my favorite method for this type of work, especially when working with beads, but many people use this method and swear by it, so it’s up to you!
Hoop or Frame
Because this project involves beads, I prefer to use stretcher bars. I used an 8″ x 11″ set of stretcher bars to work the samples. If you are unsure what stretcher bars are or how they are used, you can read about them here.
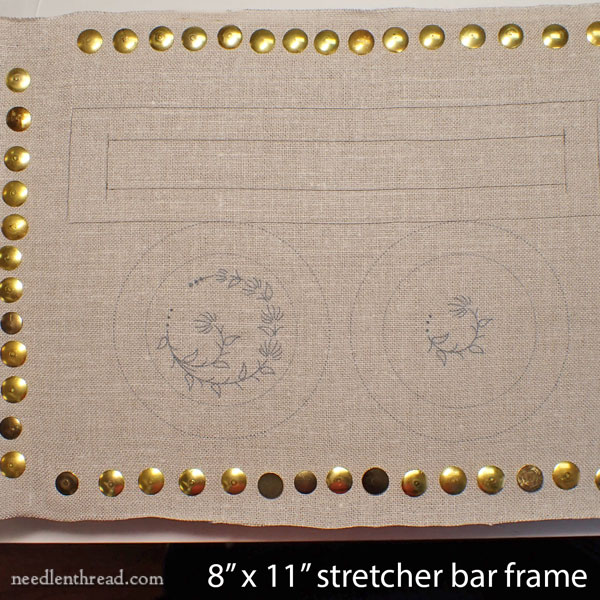
This is what the project looks like set up on stretcher bars. I pinned on the top of the bars, as you can see, because the fabric fits better that way. On the right side of the bars (not shown in the picture), the fabric is pinned to the side of the stretcher bar, because I had excess fabric on that side.
I always use Evertite stretcher bars, but there are other brands available that are less expensive. Evertites have many advantages over the others, though! And they can be reused for years and years, so they’re a good investment. You can find Evertite frames – and other stretcher bars – available through Needle in a Haystack and other stitching shops online.
If you want to use a hoop, a 4″ hoop will work fine. You will need to move the hoop as you embroider the different parts. You’ll leave the bead embroidery to the very end, and we will discuss how to handle that when we get to that point in the stitch-along.
You can also use any other type of hoop or frame that fits the fabric and that you prefer!
You’re Ready!
Once you have your design transferred and your hoop or frame set up, you’re ready to stitch!
You can find the next installment of Purple Posy here. It covers all the embroidery for the top and the base of the tape measure.
If you are a member of the Needle ‘n Thread community on Patreon, I posted a PDF for you this morning that covers all of the above, plus the embroidery of the top and base of the cover. (I can’t fit a lot more in a PDF than I can in a blog post!)
Is there a reason why the three parts need to be butted up against each other on the pattern, or can I separate them slightly when transferring? Thanks!
Thats to ensure you have enough space for framing or hooping. It’s the most efficient use of the fabric, really.