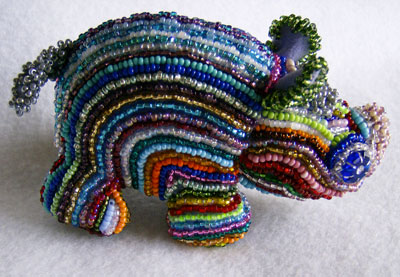
About

Mary Corbet

writer and founder


I learned to embroider when I was a kid, when everyone was really into cross stitch (remember the '80s?). Eventually, I migrated to surface embroidery, teaching myself with whatever I could get my hands on...read more

Contact Mary

Connect with Mary


Archives

2025 (78) 2024 (135) 2023 (125) 2022 (136) 2021 (130) 2020 (132) 2019 (147) 2018 (146) 2017 (169) 2016 (147) 2015 (246) 2014 (294) 2013 (294) 2012 (305) 2011 (306) 2010 (316) 2009 (367) 2008 (352) 2007 (225) 2006 (139)
 

Pounce Transfer Kit, Part 2


Amazon Books

Yesterday, we looked at making your own pounce for embroidery design transfers. Today, we’ll look at the pouncer itself.

There are many, many ways you can go about making your own pouncer for your pounce powder. You can use just a simple piece of rolled up felt, for example. It’ll work fine, and if you have scraps of felt lying about, it’ll cost you nothing.

But since I’ve got three colors of pounce powder, I like to have three different pouncers, one for each color. This is how I made mine.

Pounce Pad for Embroidery Design Transfer
Continue reading “Pounce Transfer Kit, Part 2”

Make Your Own Pounce Transfer Kit: Part I


We’ve already discussed using drawing charcoal for a dark pounce powder, for transferring embroidery designs on light fabric. Then we looked at using talc for light pounce powder, for transferring embroidery designs on dark fabric.

But there’s an in-between.

We’ll call it grey. Or, if you’re insistent on the American spelling, we’ll call it gray. Either way, it’s not black. It’s not white. It’s in between.

And this in-between color is nice, because it’s subtler on both light and dark fabrics.

If you want to be completely Pounce-Obsessed, you’ll want all three: white, charcoal, and grey.

Making Pounce for Embroidery Design Transfer
Continue reading “Make Your Own Pounce Transfer Kit: Part I”

Stop Shifting – Simple Basting


Day before yesterday, I showed you the Medallion project framed up on my new Millenium embroidery frame (which, as each day passes, I love more and more!). Yesterday, we looked at a built-in cover on the embroidery project, to protect it both during stitching sessions and outside stitching sessions. Today, I’ll show you what I did to ensure that my ground fabric (which is linen) and my lining fabric (which is muslin) don’t shift.

This is something you can do when you’re stitching through two layers of fabric. It’s not always a necessary step – on smaller projects, I rarely baste. But on larger projects that will be framed up for a while, and especially if there’s any chance that down the road I might remove it from the frame before it’s finished, it’s a good idea to do some simple basting to keep things from shifting.

Basted Layers of Fabric for Embroidery
Continue reading “Stop Shifting – Simple Basting”

The Big Needlework Cover Up


There is a real cover-up going on here. It’s perpetrated by me. And I did it on purpose.

Last time, when I started the Medallion Project, I started hastily. This time, I have started slowly and I’ve taken a little more care with the initial stages of the project. I don’t usually talk about my cover-up jobs with my embroidery projects, only because they always come after the fact: after I’ve taken photos, after I’ve done a round of stitching, after I’ve straightened everything up after a session. And frankly, I never really think about it.

When I straighten up from a stitching session, I always (always always always always – get the point?) cover my embroidery project. If it’s a large project on a frame, I lay a clean cloth over it (could be a piece of muslin, could be a clean pillow case, etc.). If it’s a small project in a frame, I’ll slip it into the bag I’m using with the project. If it’s on a hoop, I take it off the hoop and put it in my project bag. But the point is, it’s good to cover your work when you’re not working on it. Why? The reasons are somewhat obvious, I suppose – to reduce dust accumulation, to keep excess light off it, to ensure against something accidentally snagging on it – whatever. The idea is to protect it.

But it’s also a good idea to protect your work while you’re working on it.

Covering Needlework with Cloth for Protection
Continue reading “The Big Needlework Cover Up”

Millenium Embroidery Frame: Review


Have you heard of the Millenium needlework frame? Well, you know I harp a lot on slate frames and on Evertite stretcher bar frames, and I do love them both. But today, I want to show you a different type of frame.

Perhaps … the Last Frame!

It’s true. I have a new love. It’s the Millenium frame, and I’ll tell you why as I show it to you.

Update, 2016: Due to an overwhelming amount of feedback from readers, I’ve adjusted my Pros & Cons list below. Please read it carefully! I still love the frames and their stand, but please be aware that lots of people have encountered some difficulties, which I detail in the Pros & Cons below.

Millenium Needlework Frame
Continue reading “Millenium Embroidery Frame: Review”

Cleaning Vintage Crewel Work Embroidery


Last week, I was delighted to hear from a reader & fellow stitcher I hadn’t heard from for a while! She wrote and sent a picture about a clean up job that she recently undertook on some embroidery. There are two reasons I’m sharing her story and photo with you: 1. There’s some good information here about cleaning a piece of time-stained needlework; and 2. The needlework is quite vibrant and pretty! I think you’ll like it.

Cleaning Hand Embroidery
Continue reading “Cleaning Vintage Crewel Work Embroidery”